Android實現文章+評論(MVP,RxJava,Dagger2,ButterKnife)
簡介
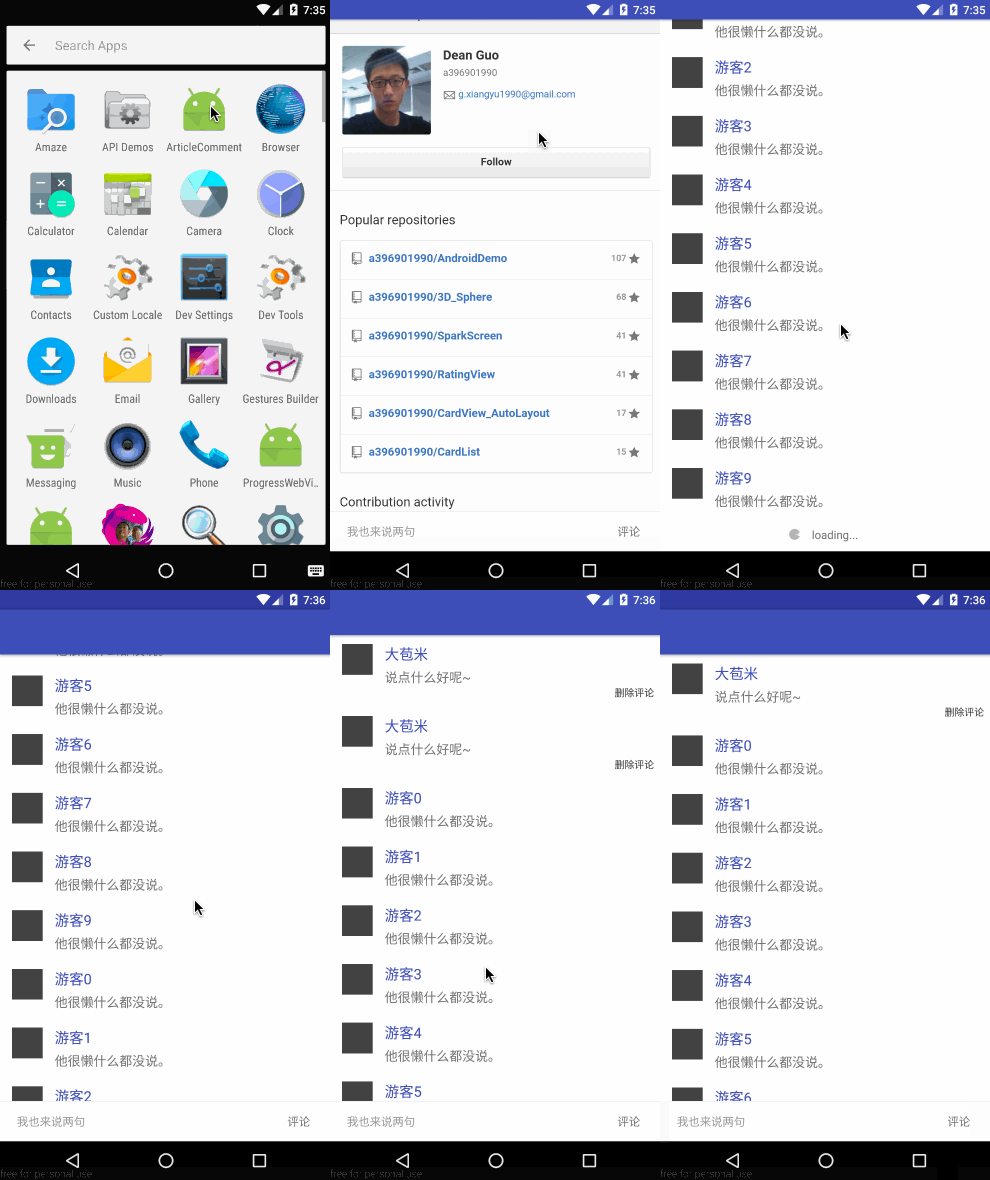
這個專案主要有兩個功能,一個載入網頁/文章,另一個用來顯示評論。並應用了MVP模式,Dagger2、RxJava、ButterKnife等開源框架。效果圖如下:

結構
首先來看一下佈局檔案:
<android.support.design.widget.CoordinatorLayout xmlns:android="http://schemas.android.com/apk/res/android"
xmlns:app="http://schemas.android.com/apk/res-auto"
xmlns:tools="http://schemas.android.com/tools" toolbar
在顯示網頁文章時是仿知乎的操作,向下滑動時隱藏toolbar和螢幕下方發表評論的檢視,向上滾動時再顯示。
toolbar的顯示隱藏是通過設定其scrollFlags屬性實現的。
enterAlways:向上滑時toolbar隱藏,向下滑動即展示。
enterAlwaysCollapsed:向上滑時toolbar隱藏,向下滑動直到NestedScrollView的底部時toolbar才展示。
exitUntilCollapsed:當你定義了一個minHeight,這個view將在滾動到達這個最小高度的時候消失。
snap:突然折斷的意思,效果同enterAlwaysCollapsed,區別為滾動時手指離開螢幕時
toolbar不會顯示一半的狀態,顯示的部分大於一半時即全漏出來,小於一半時即隱藏掉。
article_bottom_view
article_bottom_view是螢幕下方的評論條,它的隱藏顯示與toolbar同步,使用方式是通過AppBarLayout.OnOffsetChangedListener的狀態監聽與動畫實現的。
  @Override
    public void onOffsetChanged(AppBarLayout appBarLayout, int verticalOffset) {
        if (verticalOffset >= 0) {
            if (xAppBarListener != null) {
                xAppBarListener.onFingerDown();
            }
        } else {
            if (xAppBarListener != null) {
                 xAppBarListener.onFingerUp();
            }
        }
    }
content_scrolling
content_scrolling佈局如下:
<com.dean.articlecomment.ui.XNestedScrollView xmlns:android="http://schemas.android.com/apk/res/android"
    xmlns:app="http://schemas.android.com/apk/res-auto"
    xmlns:tools="http://schemas.android.com/tools"
    android:id="@+id/scrollView"
    android:layout_width="match_parent"
    android:layout_height="match_parent"
    app:layout_behavior="@string/appbar_scrolling_view_behavior"
    tools:showIn="@layout/activity_scrolling">

    <LinearLayout
        android:layout_width="match_parent"
        android:layout_height="wrap_content"
        android:orientation="vertical">

        <!--詳細-->
        <FrameLayout
            android:id="@+id/article_content_view"
            android:layout_width="match_parent"
            android:layout_height="wrap_content">
        </FrameLayout>

        <!--評論-->
        <FrameLayout
            android:id="@+id/comment_content_view"
            android:layout_width="match_parent"
            android:layout_height="wrap_content">
        </FrameLayout>
    </LinearLayout>
</com.dean.articlecomment.ui.XNestedScrollView>
NestedScrollView中巢狀兩個檢視article_content_view,comment_content_view。分別是用於顯示文章Fragment檢視和評論fragment檢視。
文章Fragment
文章Fragment中使用Webview來顯示網頁/文章。
Webview使用了騰訊的X5WebView,並在外層封裝一個載入用的進度條。
評論fragment
文章Fragment中使用了RecycleView(根據XRecyclerView改造)來顯示新增評論,並且可以進行滑動載入更多。
值得注意的是NestedScrollview中巢狀RecycleView的問題,解決方法是:
使用Android Support Library 23.2.0以上,設定
layoutManager.setAutoMeasureEnabled(true);將recyclerView的高度設定為wrap_content
設定
recyclerView.setNestedScrollingEnabled(false)避免和NestedScrolling的滑動衝突。由於禁用了recyclerView的滾動,所以在實現底部載入更多的時候需要監聽外層的NestedScrollingView
MVP
本Demo使用了MVP模式(關於MVP的文章網上很多,我這裡就不過多介紹),主要借鑑了下面3個開源專案。並作了一些改動。
大多數MVP模式裡都是View持有Presenter的引用。一個fragment對應一個頁面,一個頁面對應一個Presenter,因此如果一個功能中頁面較多時會導致邏輯複雜以及程式碼檔案的增加。
我這裡的處理是反過來使Presenter持有View的引用,即一個Activity持有一個Presenter,每個Fragment是一個View,用一個Presenter持有所有的View引用。
所有的邏輯和業務程式碼都放在Presenter中處理,Activity和Fragment只負責頁面的顯示。這樣的好處是結構簡單,邏輯比較清晰,方便在多個view中互動操作。缺點就是會導致Presenter中程式碼量過大。
程式碼如下:
public class ArticlePresenter extends RxPresenter implements ArticleContract.Presenter {

    protected final ArticleContract.ArticleView articleView;

    protected final ArticleContract.CommentView commentView;

    protected final ArticleContract.View bottomView;

    @Inject
    public ArticlePresenter(ArticleContract.ArticleView articleView, ArticleContract.CommentView commentView, ArticleContract.View bottomView) {
        this.articleView = articleView;
        this.commentView = commentView;
        this.bottomView = bottomView;
    }

    @Inject
    void setupListeners() {
        // view中注入presenter
        articleView.setPresenter(this);
        commentView.setPresenter(this);
        bottomView.setPresenter(this);
    }
}
Contract程式碼如下:
public interface ArticleContract {

    interface Presenter extends BasePresenter {
        void addComment();
        void showBottomView();
        void hideBottomView();
        void onLoadingArticle();
        void onLoadingComment();
        void onLoadingMoreComment();
        void onLoadingArticleSuccess();
        void onLoadingArticleFailed();
    }

    interface CommentView extends BaseView<Presenter> {
        void showComments(ArrayList<ArticleComment> comments);
        void showLoadMoreComments(ArrayList<ArticleComment> comments);
        void addComment(ArticleComment comment);
        void onScrollToPageEnd();
    }

    interface ArticleView extends BaseView<Presenter> {
        void showArticle(String url);
    }

    interface View extends BaseView<Presenter> {
        void showBottomView();
        void hideBottomView();
        void goToComment();
        void goToArticle();
    }
}
Rxjava/RxAndroid
Rxjava也是最近才知道。。。使用後發現是真的很牛逼。。。
於是也簡單的在這個Demo中應用了一下,載入更多評論的程式碼如下:
- 首先在IO執行緒中建立資料,這裡延遲2秒模擬網路請求。
- 然後在UI執行緒中顯示,由於懶沒寫Error的程式碼。。。
 @Override
    public void onLoadingMoreComment() {

        Subscription rxSubscription = Observable
                .create(new Observable.OnSubscribe<ArrayList<ArticleComment>>() {
                    @Override
                    public void call(Subscriber<? super ArrayList<ArticleComment>> subscriber) {
                        ArrayList<ArticleComment> comments = new ArrayList<ArticleComment>();
                        for (int i = 0; i < 5; i++) {
                            ArticleComment newComment = new ArticleComment();
                            newComment.userName = "遊客" + i;
                            newComment.commentContent = "他很懶什麼都沒說。";
                            comments.add(newComment);
                        }
                        subscriber.onNext(comments);
                    }
                })
                .delay(2, TimeUnit.SECONDS)
                .subscribeOn(Schedulers.io())
                .observeOn(AndroidSchedulers.mainThread())
                .subscribe(new Observer<ArrayList<ArticleComment>>() {
                    @Override
                    public void onCompleted() {

                    }

                    @Override
                    public void onError(Throwable e) {

                    }

                    @Override
                    public void onNext(ArrayList<ArticleComment> articleComments) {
                        if (commentView.isActive())
                            commentView.showLoadMoreComments(articleComments);
                    }
                });
        addSubscribe(rxSubscription);
    }
Rxjava簡單使用很容易,但要達到能適應各種場景就不輕鬆了,我也在摸索中。下面列出我找到相關文章:
dagger
實話實說,這個依賴注入框架真心不太明白,感覺學習成本和使用成本都有點高,demo裡也僅僅做了最簡單的應用。
butterknife
檢視注入框架,很好用!網上例子很多,使用起來也方便就不介紹了。
最後
還有一些小細節,比如新增/刪除評論,雙擊toolbar回到文章頭,點選評論按鈕跳轉到評論等等。寫這個demo的主要目的是為了練習使用MVP以及各種開源框架,如果以後有時間會陸續加入下面列表中的開源框架。
- Realm
- Retrofit
- RxCache
- RxBinding
- RxBus
