ios動畫學習(三)
阿新 • • 發佈:2019-02-11
使用Core Animation宣告動畫
CoreAnimation框架最基本的抽象類是CAAnimation類,這個類按照CAMediaTiming協議,提供了動畫執行時間、速度,及重複次數這些基本設定,同時,它也遵循了CAAction協議,可提供該動畫被圖層驅動時的響應。 CAAnimation類之下定義了一系列的類,用來定義更具體的漸變動畫類。層級如下: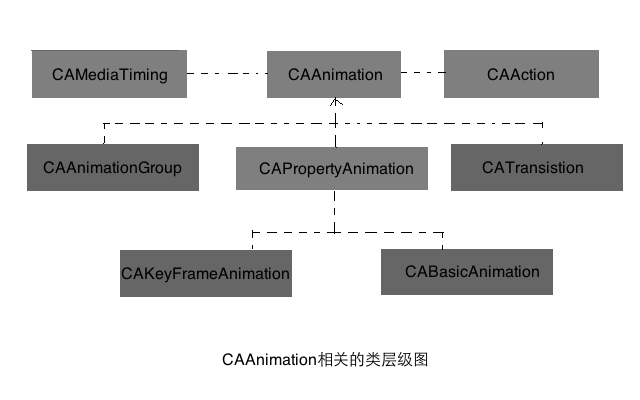
下面是CABasicAnimation類使用:
- (IBAction)down:(id)sender {
    //使用CABasicAnimation建立動畫,fromValue、toValue、byValue數值以oc物件形式存在
    CABasicAnimation * moveDown = [CABasicAnimation animationWithKeyPath:@"position.y"];
    //是檢視在動畫執行完成後,停留在最後位置
    //moveDown.removedOnCompletion = NO;
    //moveDown.fillMode = kCAFillModeForwards;

    //動畫執行完成後,自動以動畫形式原路返回
    //moveDown.autoreverses = YES;

    //動畫重複執行的次數
    //moveDown.repeatCount = 2;
    moveDown.duration = 2.0;
    moveDown.toValue = [NSNumber numberWithInt:layer.position.y+100];
    //把動畫應用到圖層上,並且給動畫加一個識別符號moveDown
    [layer addAnimation:moveDown forKey:@"moveDown"];
}

- (IBAction)up:(id)sender {
    //使用CABasicAnimation建立動畫
    //這種宣告動畫的方式改變的只有介面本身,而非物件屬性。這和設定物件屬性製作成的動畫有非常大的區別。
    CABasicAnimation * moveUp = [CABasicAnimation animationWithKeyPath:@"position.y"];
    moveUp.duration = 5.0;
    //把正數封裝成物件型別
    moveUp.toValue = [NSNumber numberWithInt:layer.position.y-100];
    //把動畫應用到圖層上,並且給動畫加一個識別符號moveUp
    [layer addAnimation:moveUp forKey:@"moveUp"];
}

- (IBAction)stopdown:(id)sender {
    //通過動畫識別符號取消動畫
    [layer removeAnimationForKey:@"moveDown"];
}

- (IBAction)stopup:(id)sender {
    //通過動畫識別符號取消動畫
    [layer removeAnimationForKey:@"moveUp"];
}

- (IBAction)dr:(id)sender {
    CABasicAnimation * downAndRight = [CABasicAnimation animationWithKeyPath:@"position"];
    downAndRight.duration = 5.0;
    //把c結構封裝成物件型別
    NSValue * endPoint = [NSValue valueWithCGPoint:CGPointMake(layer.position.x + 100, layer.position.y+100)];
    downAndRight.toValue = endPoint;
    [layer addAnimation:downAndRight forKey:@"downAndRight"];
}

- (IBAction)ul:(id)sender {
    CABasicAnimation * upAndLeft = [CABasicAnimation animationWithKeyPath:@"position"];
    upAndLeft.duration = 5.0;
    NSValue * endPoint = [NSValue valueWithCGPoint:CGPointMake(layer.position.x - 100, layer.position.y-100)];
    upAndLeft.toValue = endPoint;
    [layer addAnimation:upAndLeft forKey:@"upAndLeft"];
}

- (IBAction)stopall:(id)sender {
    //停止該圖層上所有動畫
    [layer removeAllAnimations];
}
效果如下:
CAAnimation類物件也可以設定它的委託物件,當動畫開始與結束時做自定義操作。CAAnimation的delegate屬性如下:

可以看到它與其他類的delegate屬性有些不同的是,它不需要遵循協議,只要委託物件中有如下函式即可: - (void)animationDidStart:(CAAnimation *)anim;
- (void)animationDidStop:(CAAnimation *)anim finished:(BOOL)flag;
下面介紹CAPropertyAnimation的另一個子類CAKeyframeAnimation的用法。 CAKeyframeAnimation可以指定動畫執行的路徑,能夠製作出非常“不規則”的動畫。比如沿貝塞爾曲線的動畫。
下面就來看看如何來實現貝塞爾曲線動畫。 先看標頭檔案:
//
//  PathView.h
//  LearnAnimation
//
//  Created by zg on 15/6/7.
//  Copyright (c) 2015年 zg. All rights reserved.
//

#import <UIKit/UIKit.h>

@interface PathView : UIView{
    CAShapeLayer * shapeLayer;
}

-(void)go;

@end
定義一個圓形圖層shapeLayer來執行動畫,定義一個執行方法go 再看實現檔案:
//
//  PathView.m
//  LearnAnimation
//
//  Created by zg on 15/6/7.
//  Copyright (c) 2015年 zg. All rights reserved.
//

#import "PathView.h"

@implementation PathView


// Only override drawRect: if you perform custom drawing.
// An empty implementation adversely affects performance during animation.
- (void)drawRect:(CGRect)rect {
    [self drawPath];
    [self drawCircle];
}

//定義角度轉弧度巨集
#define DEGREES_TO_RADIANS(degrees) ((M_PI * degrees)/180)
//畫路徑
-(void)drawPath{
    UIBezierPath * path = [UIBezierPath bezierPath];
    path.lineCapStyle = kCGLineCapRound;//路徑端點圓狀
    [[UIColor blackColor]setStroke];
    [[UIColor blackColor]setFill];
    [path moveToPoint:CGPointMake(0, 100)];
    [path addCurveToPoint:CGPointMake(300, 100) controlPoint1:CGPointMake(75, 25) controlPoint2:CGPointMake(225, 175)];
    [path stroke];
    path.lineWidth = 3;
    [self setNeedsDisplay];
}

//畫圓形圖層
-(void)drawCircle{
    UIBezierPath *path = [UIBezierPath bezierPath];
    [path addArcWithCenter:CGPointMake(4 , 100) radius:8 startAngle:0 endAngle:DEGREES_TO_RADIANS(360) clockwise:YES];
    [path closePath];
    shapeLayer = [CAShapeLayer layer];
    shapeLayer.path = path.CGPath;
    [self.layer addSublayer:shapeLayer];
}

//執行動畫
-(void)go{
    CAKeyframeAnimation * pathAnim = [CAKeyframeAnimation animationWithKeyPath:@"position"];
    pathAnim.duration = 5;
    //生成可變路徑
    CGMutablePathRef mutablePath = CGPathCreateMutable();
    //座標點,相對於當前圖層pathLayer自身座標系
    CGPathMoveToPoint(mutablePath, NULL, 0 , 0);
    CGPathAddCurveToPoint(mutablePath, NULL, 75, -75, 225, 75, 300, 0);
    pathAnim.path = mutablePath;
    [shapeLayer addAnimation:pathAnim forKey:nil];

}

@end
主要解釋下實現函式go: 1、因為CAKeyframeAnimation是CAPropertyAnimation的子類,所以也會有animationWithKeyPath的動畫宣告方法。 2、CAKeyframeAnimation的path屬性可以指定動畫要執行的路徑。 3、要重點說明的是CGMutablePathRef路徑的座標點是相對於執行動畫的圖層shapeLayer自身座標系來計算的。 下面看效果:
三度空間的旋轉: layer有一個屬性叫sublayerTransform,是漸變屬性。通過CABasicAnimation動畫來改變sublayerTransform屬性,即可實現圖層的三度空間旋轉。 實現如下:
- (void)viewDidLoad {
    [super viewDidLoad];
    // Do any additional setup after loading the view, typically from a nib.
    [self initSubLayer1];
    [self initSubLayer2];
    [self initSubLayer3];
    [self initPerspective];
}

-(void)initPerspective{
    //建立視點
    CATransform3D perspective = CATransform3DIdentity;
    int distance = 150;
    perspective.m34 = -1/distance;
    currentTransform = perspective;
    mContentView.layer.sublayerTransform = currentTransform;
}

-(void)initSubLayer1{
    subLayer1 = [CALayer layer];
    subLayer1.bounds = CGRectMake(0, 0, 100, 100);
    subLayer1.position = CGPointMake(140, 140);
    subLayer1.backgroundColor = [[UIColor blueColor]CGColor];
    subLayer1.cornerRadius = 10;//圓角半徑
    subLayer1.borderColor = [[UIColor blackColor]CGColor];
    subLayer1.borderWidth= 2;
    subLayer1.opacity = 0.5;
    [mContentView.layer addSublayer:subLayer1];
}

-(void)initSubLayer2{
    subLayer2 = [CALayer layer];
    subLayer2.bounds = CGRectMake(0, 0, 100, 100);
    subLayer2.position = CGPointMake(150, 150);
    subLayer2.backgroundColor = [[UIColor greenColor]CGColor];
    subLayer2.cornerRadius = 10;//圓角半徑
    subLayer2.borderColor = [[UIColor blackColor]CGColor];
    subLayer2.borderWidth= 2;
    subLayer2.opacity = 0.5;
    [mContentView.layer addSublayer:subLayer2];
}

-(void)initSubLayer3{
    subLayer3 = [CALayer layer];
    subLayer3.bounds = CGRectMake(0, 0, 100, 100);
    subLayer3.position = CGPointMake(160, 160);
    subLayer3.backgroundColor = [[UIColor redColor]CGColor];
    subLayer3.cornerRadius = 10;//圓角半徑
    subLayer3.borderColor = [[UIColor blackColor]CGColor];
    subLayer3.borderWidth= 2;
    subLayer3.opacity = 0.5;
    [mContentView.layer addSublayer:subLayer3];
}

- (IBAction)rotateZ:(id)sender {
    CABasicAnimation * rotateAnim = [CABasicAnimation animationWithKeyPath:@"sublayerTransform"];
    rotateAnim.fillMode = kCAFillModeForwards;
    rotateAnim.removedOnCompletion = NO;

    rotateAnim.duration = 3;
    CATransform3D rotateX3D = CATransform3DRotate(currentTransform, M_PI/6, 0, 0, 1);
    NSValue  * toValue = [NSValue valueWithCATransform3D:rotateX3D];
    rotateAnim.toValue = toValue;
    [mContentView.layer addAnimation:rotateAnim forKey:nil];
    currentTransform = rotateX3D;
}
當執行rotateZ函式可實現如下效果: