centos7環境配置haproxy實現mysql資料庫和redis代理伺服器
阿新 • • 發佈:2019-02-11
centos7環境配置haproxy實現mysql資料庫代理
我們通常會碰到這樣的業務場景:
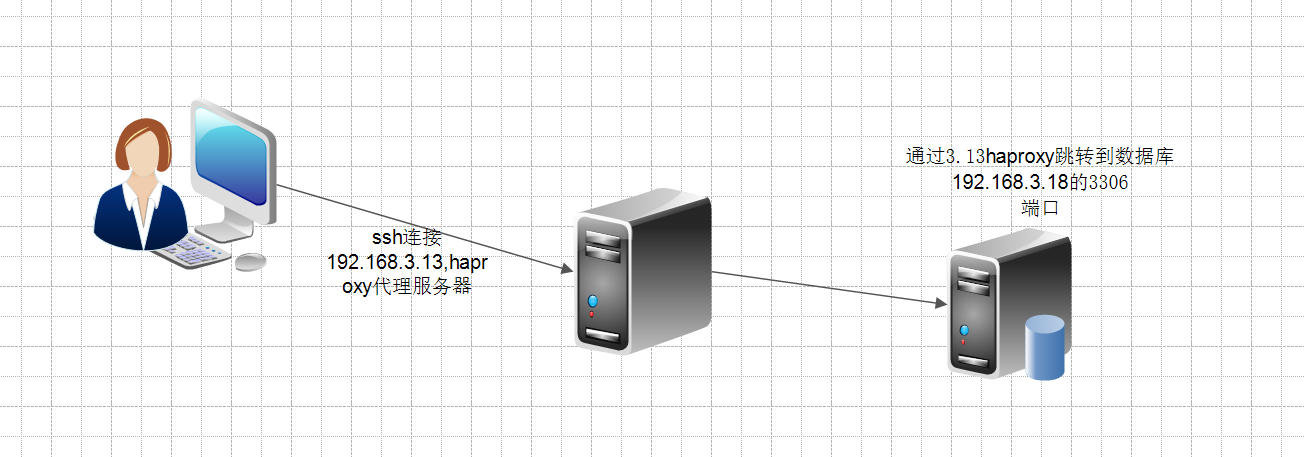
b主機和c資料庫在同一個內網,a主機不能直接訪問c資料庫,我們可以通過在b主機上搭建代理讓a訪問c資料庫,我們使用haproxy來幹這個事情
安裝haproxy
yum install -y haproxy
配置haproxy:
vim /etc/haproxy/haproxy.cfg
global
log 127.0.0.1 local2
chroot /var/lib/haproxy
pidfile /var/run/haproxy.pid
maxconn 4000
user haproxy
group haproxy
daemon
stats socket /var/lib/haproxy/stats
defaults
log global
log 127.0.0.1 local3
mode http
option tcplog
option dontlognull
retries 10
option redispatch
maxconn 2000
timeout connect 5000
timeout client 50000
timeout server 50000
listen mysql
bind 0.0.0.0:7306
mode tcp
balance roundrobin
CentOS 7上yum安裝的Haproxy,預設沒有記錄日誌。需要做一下配置才能記錄日誌。
1.建立日誌檔案/var/log/haproxy/haproxy.log
cd /var/log
mkdir haproxy
cd haproxy
touch haproxy.log
chmod a+w haproxy.log
2.開啟rsyslog的haproxy日誌記錄功能
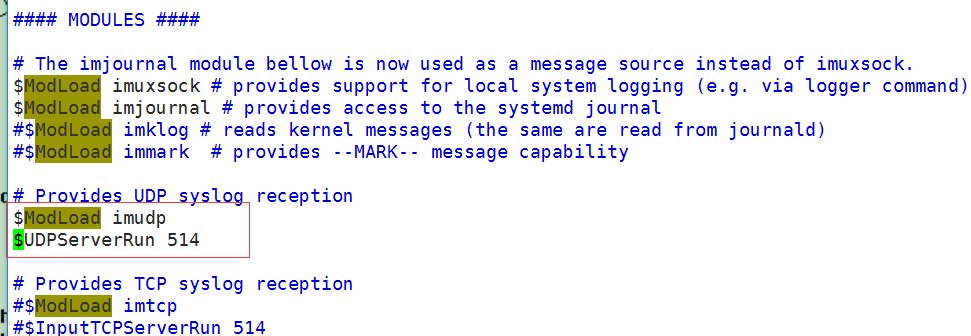
編輯vim /etc/rsyslog.conf檔案,將
$ModLoad imudp
$UDPServerRun 514
local7.* /var/log/boot.log
之後新增
# Save haproxy log
local2.* /var/log/haproxy/haproxy.log
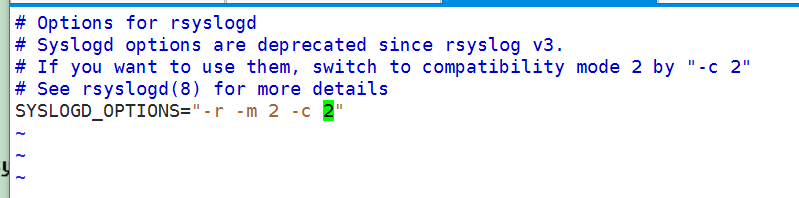
修改vim /etc/sysconfig/rsyslog 檔案,將
SYSLOGD_OPTIONS=""
改為
SYSLOGD_OPTIONS="-r -m 2 -c 2"
3.配置haproxy
修改/etc/haproxy/haproxy.cfg檔案,在global區段新增
log 127.0.0.1 local2
重啟rsyslog和haproxy服務,haproxy就能記錄日誌了。
systemctl restart rsyslog
我們通常會碰到這樣的業務場景:
b主機和c資料庫在同一個內網,a主機不能直接訪問c資料庫,我們可以通過在b主機上搭建代理讓a訪問c資料庫,我們使用haproxy來幹這個事情
安裝haproxy
yum install -y haproxy
配置haproxy:
vim /etc/haproxy/haproxy.cfg
global
log 127.0.0.1 local2
chroot /var/lib/haproxy
pidfile /var/run/haproxy.pid
maxconn 4000
user haproxy
group haproxy
daemon
stats socket /var/lib/haproxy/stats
defaults
log global
log 127.0.0.1 local3
mode http
option tcplog
option dontlognull
retries 10
option redispatch
maxconn 2000
timeout connect 5000
timeout client 50000
timeout server 50000
listen mysql
bind 0.0.0.0:7306
mode tcp
balance roundrobin
server mysql1 192.168.3.18:3306
# 還可以增加其他的代理,如9200的代理(相當於haproxy監聽多個埠)
listen es
bind 0.0.0.0:9200
mode tcp
balance roundrobin
server es01 192.168.1.2:9200
CentOS 7上yum安裝的Haproxy,預設沒有記錄日誌。需要做一下配置才能記錄日誌。
1.建立日誌檔案/var/log/haproxy/haproxy.log
cd /var/log
mkdir haproxy
cd haproxy
touch haproxy.log
chmod a+w haproxy.log
2.開啟rsyslog的haproxy日誌記錄功能
編輯vim /etc/rsyslog.conf檔案,將
$ModLoad imudp
$UDPServerRun 514
兩行前的#去掉。
local7.* /var/log/boot.log
之後新增
# Save haproxy log
local2.* /var/log/haproxy/haproxy.log
修改vim /etc/sysconfig/rsyslog 檔案,將
SYSLOGD_OPTIONS=""
改為
SYSLOGD_OPTIONS="-r -m 2 -c 2"
3.配置haproxy
修改/etc/haproxy/haproxy.cfg檔案,在global區段新增
log 127.0.0.1 local2
重啟rsyslog和haproxy服務,haproxy就能記錄日誌了。
systemctl restart rsyslog
systemctl restart haproxy
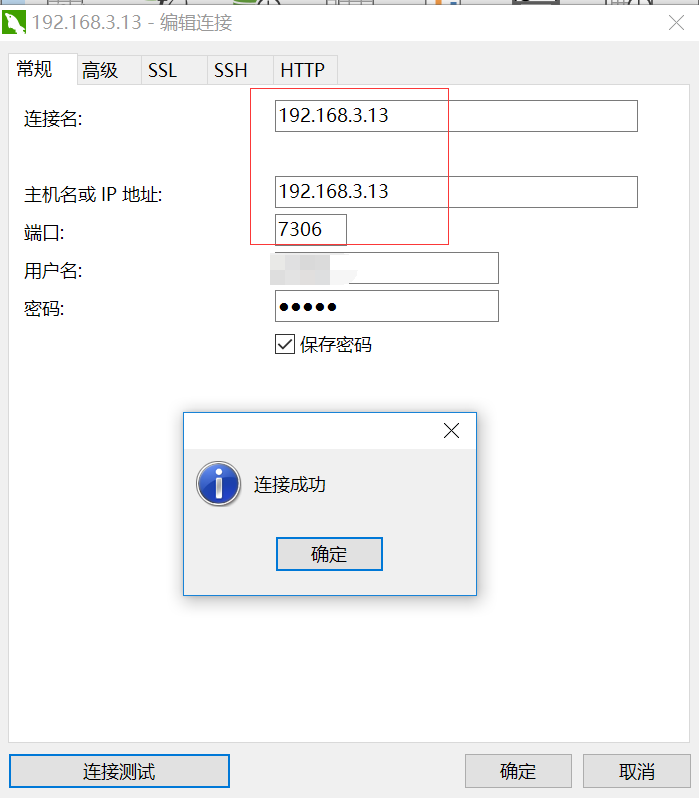
測試

報錯:
Stopping haproxy: [ OK ]
Starting haproxy: [WARNING] 313/111853 (29445) : parsing [/etc/haproxy/haproxy.cfg:17] : 'option httplog' not usable with proxy 'mysql' (needs 'mode http'). Falling back to 'option tcplog'.
將haproxy.cfg的httplog改為tcplog即可
可能報錯:com.mysql.jdbc.exceptions.jdbc4.CommunicationsException: Communications link failure
The last packet successfully received from the server was 50,158 milliseconds ago. The last packet sent successfully to the server was 50,157 milliseconds ago
引數可以適當調整:
timeout connect 500000
timeout client 500000
timeout server 500000
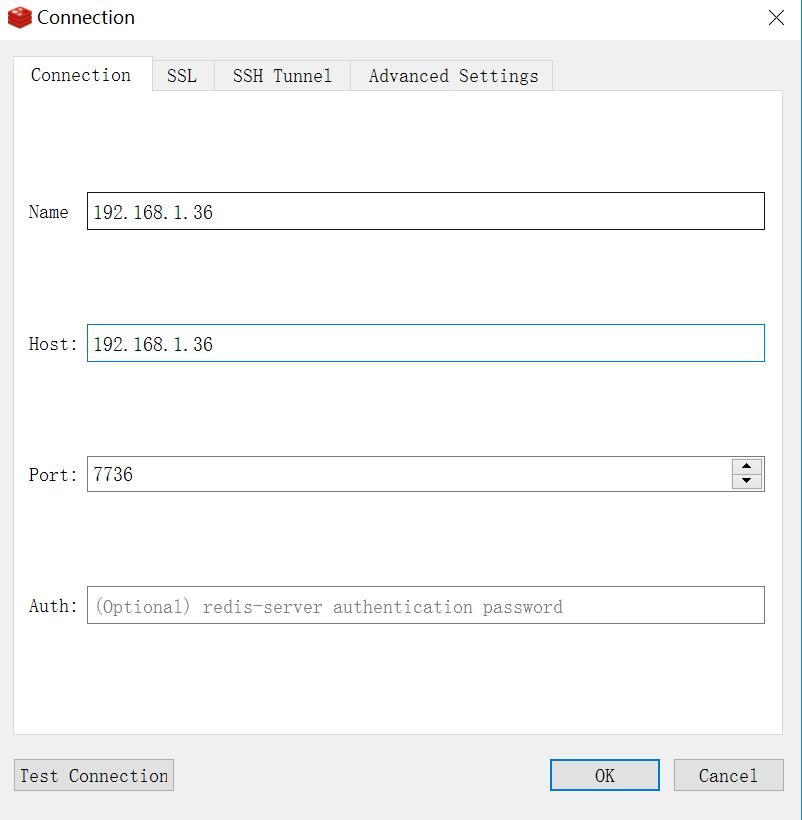
連線redis的配置,centos6.5
global
        maxconn 2
#       debug
        quiet
        user haproxy
        group haproxy
        nbproc 1
        log 127.0.0.1 local3
defaults
        timeout server  3s
        timeout connect 3s
        timeout client 60s
        timeout http-request 3s
        timeout queue 3s
frontend redis_read
        bind 0.0.0.0:7736
        default_backend cluster_redis
backend cluster_redis
        mode tcp
        option tcpka
        balance static-rr
        option httpchk
        server  redis_01        192.168.1.1:6379    weight 1
直接通過RedisDesktopManager工具連線redis即可