android-自定義View初步探索
最近開始學習自定義View,之前搞過,但是沒有系統搞,從這篇博文開始系統學習自定義View。做出一些效果圖展示給大家,同時寫一寫學些心得分享給大家。
這篇文章就是簡單的一個View檢視,如果你是大牛,請直接繞走,本篇對你來說太簡單了。如果你自認為還不行,水平還不夠,接來下請看!
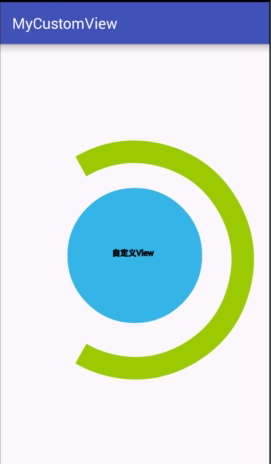
首先展示效果圖:
效果圖非常簡單,就是一個view!上面就是一個自定義view的展示!
那麼實現的思路是什麼呢?
將上面的圖分解,中間一個圓形、一個字串、外面有個弧形。首先分成這樣的三種形狀。
這麼一分解就簡單不少了。
首先圓形圖形程式碼如下:
paintCir = new Paint(); 繪製圓形圖案的程式碼片段如上所示。首先定義一個畫筆,然後對畫筆進行一些設定,最後使用畫筆在canvas畫布進行繪製。簡單吧!!
下面對上面的程式碼一步步說明:
setStyle(Paint.Style.FILL) 這個是設定畫筆是否填充繪製區域,Fill的意思就是填充,所以繪製的圓形是實心圓。那麼空心圓如何設定呢?簡單setStyle(Paint.Style.STROKE)就是。
setAntiAlias(true);//抗鋸齒 一般繪製圖形都會設定這個抗鋸齒的效果。
setAlpha(200);//設定透明度 這個要根據實際需求進行設定。要說活命的是,這個值是從0-255之間。但是我在測試的時候,感覺沒變化。設定0和設定255一樣。不知道什麼原因。
drawCircle(0, 0, rr / 2, paintCir)這個方法第一個和第二個引數是設定圓心x、y的座標,第三個引數是設定圓形的半徑,第四個引數就是畫筆。
說明完成之後呢,就要科普一下手機螢幕的座標系和角度座標系是怎麼回事兒了?
手機螢幕座標系
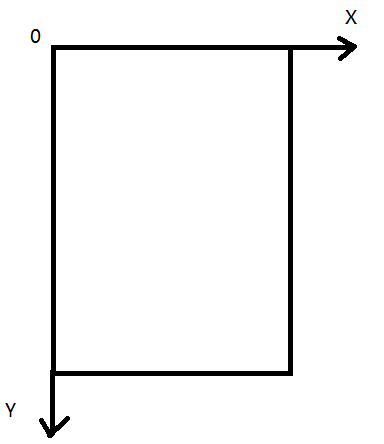
矩形區域就是手機螢幕,x、y分別代表了橫軸、數軸的正方向。這是在預設情況下,不改變座標原點的情況下的座標系。為什麼說不改變座標原點的情況呢?因為座標原點可以更改。怎麼改呢?
canvas.translate(width/2,height/2);
這句程式碼就實現座標原點的平移,也就是更改。引數分別是在x、y軸上平移的距離。
角度座標系
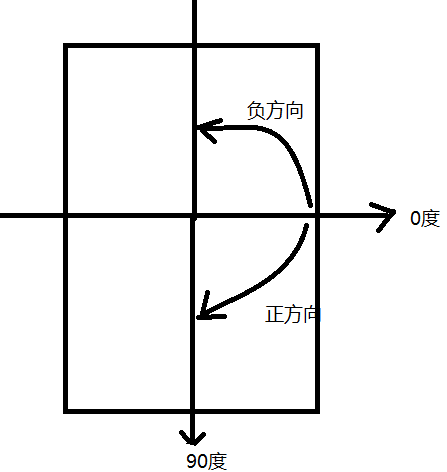
這幅圖就是手機螢幕的角度座標系,螢幕的中心不是原點,而是相對位置的原點。這麼說吧,我們繪製一個view的時候,這個view有大小,有中心,這個中心可以當做角度座標的中心原點。
明白這一點之後,對著圖,0度方向水平向右,順時針方向為正方向。逆時針方向為負方向。
這一點需要特別注意。不然後面的繪製弧形圖案的時候容易腦袋混亂和抽筋!哈哈。。。
好了基礎知識說明完成,下面就說一說如何實現博文開始展示的效果圖,首先給出自定義view的程式碼:
package com.husy.mycustomview;

import android.content.Context;
import android.graphics.Canvas;
import android.graphics.Paint;
import android.graphics.RectF;
import android.text.AndroidCharacter;
import android.util.AttributeSet;
import android.util.DisplayMetrics;
import android.util.TypedValue;
import android.view.Display;
import android.view.View;
import android.view.WindowManager;

/**
 * Created by husy on 2015/10/13.
 *
 * @link http://blog.csdn.net/u010156024
 * @description:
 */
public class MyCustomView extends View{
    private Paint paintTx;
    private Paint paintCir;
    private Paint paintArc;

    public MyCustomView(Context context, AttributeSet attrs) {
        super(context, attrs);
        init();
    }

    public MyCustomView(Context context, AttributeSet attrs, int defStyleAttr) {
        super(context, attrs, defStyleAttr);
        init();
    }

    public MyCustomView(Context context) {
        super(context);
        init();
    }
    private void init(){
        paintTx = new Paint();
        paintTx.setStyle(Paint.Style.STROKE);//設定畫筆劃線不填充
        paintTx.setAntiAlias(true);//抗鋸齒
        paintTx.setTextSize(32);//這是字型大小
        paintTx.setStrokeWidth(3);//設定畫筆寬度
        paintTx.setTextAlign(Paint.Align.CENTER);//設定字型對齊方式
        paintTx.setColor(getResources().getColor(android.R.color.black));//設定畫筆顏色

        paintCir = new Paint();
        paintCir.setStyle(Paint.Style.FILL);//畫筆填充繪製區域
        paintCir.setAntiAlias(true);//抗鋸齒
        paintCir.setAlpha(255);//設定透明度
        paintCir.setColor(getResources().getColor(android.R.color.holo_blue_light));

        paintArc = new Paint();
        paintArc.setStyle(Paint.Style.STROKE);
        paintArc.setAntiAlias(true);//抗鋸齒
        paintArc.setAlpha(127);
        paintArc.setStrokeWidth(10);//設定畫筆寬度
        paintArc.setColor(getResources().getColor(android.R.color.holo_green_light));
    }

    @Override
    protected void onMeasure(int widthMeasureSpec, int heightMeasureSpec) {
        super.onMeasure(widthMeasureSpec, heightMeasureSpec);
        int wmode = MeasureSpec.getMode(widthMeasureSpec);
        int wid = MeasureSpec.getSize(widthMeasureSpec);
        int hmode = MeasureSpec.getMode(heightMeasureSpec);
        int hei = MeasureSpec.getSize(heightMeasureSpec);
        /*
        * 此處的處理是為了當設定元件為wrap_content的時候,使用預設值大小。
        * 防止出現圖形混亂。
        */
        if (wmode==MeasureSpec.UNSPECIFIED){
            wid = 250;
        }
        if (hmode==MeasureSpec.UNSPECIFIED){
            hei = 250;
        }
    }

    @Override
    protected void onDraw(Canvas canvas) {
        super.onDraw(canvas);
        int width = getWidth();
        int height = getHeight();
        canvas.translate(width/2,height/2);
        if (width==height){

        }else{
            height =width;
        }

        //將座標系原點移到元件中心
        int rr = width/2;
        String tx = "自定義View";
        int len = tx.length();
        //繪製圓形
        canvas.drawCircle(0, 0, rr / 2, paintCir);
        //繪製圓弧
        float rcwidth = width*0.4f;

        RectF rectF = new RectF(-rcwidth,      //left
                        -(height*0.4f),    //top
                        rcwidth,                //right
                        height*0.4f);      //bottom
        canvas.drawRect(rectF,paintTx);
        canvas.drawArc(rectF, -90, 240, false, paintArc);
        //繪製文字
        canvas.drawText(tx, 0, len, - len, len/4, paintTx);
        canvas.save();
    }
}
自定義view的程式碼,其中有三個構造器,一個都不能少,少了會報錯!!切記!
然後init()是一個初始化的方法,分別 在三個構造器中呼叫進行初始化。初始化的過程中,建立了三個畫筆,分別對應文章開頭分析的三個圖案。程式碼中也寫了一些註釋,不再說明方法的意思。
然後重寫了父類的onMeasure方法,對自定義view的寬高進行了設定。在這裡需要說明view的寬高。
在ViewGroup中,給View分配的空間大小並不是確定的,有可能隨著具體的變化而變化,而這個變化的條件就是傳到specMode中決定的,specMode一共有三種可能:
MeasureSpec.EXACTLY:父檢視希望子檢視的大小應該是specSize中指定的。例如設定layout_width=match_parent ,100dp,100dip 或者layout_height=match_parent ,100dp,100dip等等這些值的情況下,specMode的值就是MeasureSpec.EXACTLY
MeasureSpec.AT_MOST:子檢視的大小最多是specSize中指定的值,也就是說不建議子檢視的大小超過specSize中給定的值。例如,設定view的屬性layout_width=wrap_content,layout_height=wrap_content 的時候,specMode的值就是MeasureSpec.AT_MOST
MeasureSpec.UNSPECIFIED:我們可以隨意指定檢視的大小。這種情況下view的大小不定,想多大就多大。自定義view的時候很實用。
有了上面的說明,我們就很容易理解程式碼中onMeasure方法的設定了。程式碼的意思是如果在沒有指定view的大小的情況下,view大小預設寬高就是250
接下來,最後就是核心onDraw方法的重寫,在onDraw方法中在畫布canvas上進行繪製圖案,並進行儲存。
由於最終的效果中有圓形、弧形,為了繪製方便,我把原點平移到了view的中心。
canvas.translate(width/2,height/2);
這句程式碼就實現了這種效果。
需要說明的是,繪製圓弧的時候需要制定一個矩形區域!指定了矩形區域以後,弧形會貼著矩形區域進行繪製。請看下面的效果圖:
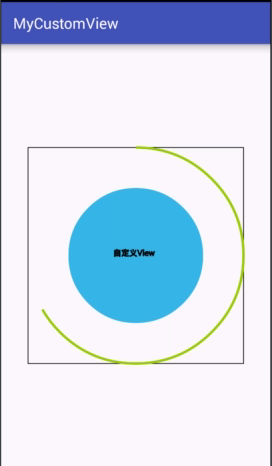
這個效果圖就把矩形區域也繪製了出來,大家可以看到弧形區域貼著矩形區域進行繪製。
同時要問問大家,能不能說出弧形區域的繪製角度???
猜到了嗎?
canvas.drawArc(rectF, -90, 240, false, paintArc);
這句程式碼就對應上面圖形的繪製角度,意思是從-90度開始,正方向繪製240度。大家好好想一想剛開始我說明的角度座標系的問題!!!
有了自定義view之後,就可以使用了,下面給出activity的程式碼;
package com.husy.mycustomview;

import android.support.v7.app.AppCompatActivity;
import android.os.Bundle;

public class MainActivity extends AppCompatActivity {

    @Override
    protected void onCreate(Bundle savedInstanceState) {
        super.onCreate(savedInstanceState);
        setContentView(R.layout.activity_main);
    }
}
是不是超級簡單!沒錯,就是這麼簡單粗暴!!!!哈哈。。。
佈局檔案:
<?xml version="1.0" encoding="utf-8"?>
<RelativeLayout
    xmlns:android="http://schemas.android.com/apk/res/android"
    xmlns:tools="http://schemas.android.com/tools"
    android:layout_width="match_parent"
    android:layout_height="match_parent"
    tools:context=".MainActivity">

    <com.husy.mycustomview.MyCustomView
        android:layout_width="wrap_content"
        android:layout_height="wrap_content"
        />
</RelativeLayout>
引用自定義view的全類名引用到xml佈局檔案中就可以了。不得不提的是,android sutdio確實不錯。自定義view可以在檢視中進行觀察,比eclipse要強!
最終的效果圖,就是上面的那幅圖。
下面把佈局檔案中改一下,如下:
<?xml version="1.0" encoding="utf-8"?>
<RelativeLayout
    xmlns:android="http://schemas.android.com/apk/res/android"
    xmlns:tools="http://schemas.android.com/tools"
    android:layout_width="match_parent"
    android:layout_height="match_parent"
    tools:context=".MainActivity">

    <com.husy.mycustomview.MyCustomView
        android:layout_width="200dp"
        android:layout_height="200dp"
        />
</RelativeLayout>
別的地方都不變,最終的效果圖如下:
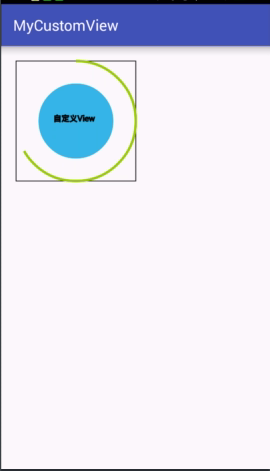
是不是還可以!!哈哈。。。
好了,這個文章算是自定義view的初步實現吧,後期會加緊這方面的學習,繪製一個酷炫的效果展示出來。
程式碼我已經通過android studio提交到github中了,地址如下:
https://github.com/longyinzaitian/MyCustomView
大家可以通過fork或者star進自己的賬號下面,通過android studio下載工程到本地,然後觀看程式碼進行學習交流。
如果不想到github,我這裡也給出下載地址,請猛戳這裡!!

