Android Ble 4.0 藍芽開發互動
產品需求:1、app通過藍芽連線到板子裝置
2、以發報文的形式與板子裝置通訊
3、當裝置接受到正確的報文指令後,會將檢測的資料返回
4、將返回的資料解析設定到介面顯示即可
板子介紹:

準備工作:
1:、與嵌入式工程師互動(將驅動這裡指串列埠,裝在電腦上)
2、將對應線路接好
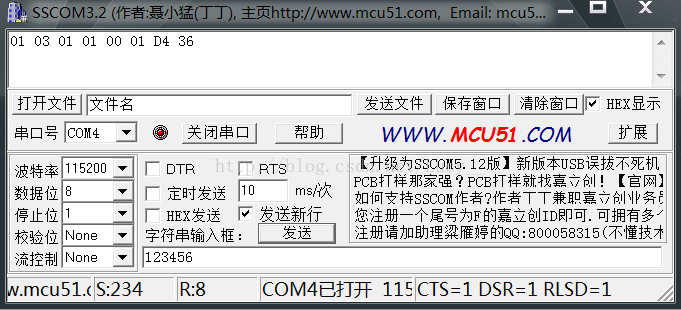
3、報文的協議文件等可先看看了解一下(這裡用的是MODBUS RTU協議)
其實也就差不多這些準備(有問題可以直接問相關嵌入式人員),廢話少說,下面就直接進行主題吧。。。
第一步:首先我們可以整理一下思路:
1、實現搜尋功能,針對藍牙周圍裝置的發現
2、對目標 裝置進行連線
3、開發期間是多與串列埠互動(可以先實現app將資料傳遞串列埠,協議先不做考慮)
4、在實現串列埠向app的資料的傳遞(協議先不做考慮)
5、實現對資料的解析(根據協議去實現解析即可),在將資料顯示即可
以上為整體的實現步驟,開發的時候在具體到細節!
第二步:防止一頭霧水,我們先來簡單複習一下BlueTooth相關的api
1:BuletoothAdapter
這個類的物件代表了本地的藍芽介面卡,相當於藍芽工作流程圖中的手機裡的藍芽介面卡,也就是說比如這個應用程式是執行在手機上,那麼手機上的藍芽介面卡就是本地藍芽介面卡。
cancelDiscovery() 根據字面意思,是取消發現,也就是說當我們正在搜尋裝置的時候呼叫這個方法將不再繼續搜尋
disable() 關閉藍芽
enable() 開啟藍芽,這個方法開啟藍芽不會彈出提示,更多的時候我們需要問下使用者是否開啟,一下這兩行程式碼同樣是開啟藍芽,不過會提示使用者:
Intemtenabler=new Intent(BluetoothAdapter.ACTION_REQUEST_ENABLE);
startActivityForResult(enabler,reCode); 同startActivity(enabler);
getAddress() 獲取本地藍芽地址
getDefaultAdapter() 獲取預設BluetoothAdapter,實際上,也只有這一種方法獲取BluetoothAdapter
getName() 獲取本地藍芽名稱
getRemoteDevice(String address) 根據藍芽地址獲取遠端藍芽裝置
getState() 獲取本地藍芽介面卡當前狀態(感覺可能除錯的時候更需要)
isDiscovering() 判斷當前是否正在查詢裝置,是返回true
isEnabled() 判斷藍芽是否開啟,已開啟返回true,否則,返回false
listenUsingRfcommWithServiceRecord(String name,UUID uuid)根據名稱,UUID建立並返回BluetoothServerSocket,這是建立BluetoothSocket伺服器端的第一步
startDiscovery() 開始搜尋,這是搜尋的第一步
2:BuletoothDevice
這個類的物件代表了遠端的藍芽裝置,相當於藍芽工作流程圖中的計算機裡的藍芽介面卡,也就是說比如這個應用程式是執行在手機上,那麼BuletoothDevice代表了你要連線的遠端的那個裝置上面的藍芽介面卡。
createRfcommSocketToServiceRecord(UUIDuuid)根據UUID建立並返回一個BluetoothSocket 這個方法也是我們獲取BluetoothDevice的目的——建立BluetoothSocket
3.BluetoothSocket,跟BluetoothServerSocket相對,是客戶端一共5個方法,不出意外,都會用到
close(), 關閉
connect() 連線
getInptuStream() 獲取輸入流
getOutputStream() 獲取輸出流
getRemoteDevice() 獲取遠端裝置,這裡指的是獲取bluetoothSocket指定連線的那個遠端藍芽裝置
第三步:實現功能
3.1:開啟藍芽,判斷手機是否支援藍芽
    BluetoothAdapter mBluetoothAdapter = BluetoothAdapter.getDefaultAdapter();
    if(mBluetoothAdapter == null){      //不支援
            return;
    }
    if(!mBluetoothAdapter.isEnabled()){ //藍芽未開啟,則開啟藍芽
                Intent enableIntent = new Intent(BluetoothAdapter.ACTION_REQUEST_ENABLE);
                startActivityForResult(enableIntent, REQUEST_ENABLE_BT);
    }
    //......
    public void onActivityResult(int requestCode, int resultCode, Intent data){
           if(requestCode == REQUEST_ENABLE_BT){
                  if(requestCode == RESULT_OK){  //藍芽開啟
                  }
           }
} if (!getPackageManager().hasSystemFeature(PackageManager.FEATURE_BLUETOOTH_LE)) { //針對裝置不支援ble,可以進行操作
Toast.makeText(this, R.string.ble_not_supported, Toast.LENGTH_SHORT).show();
finish();
}if (mBluetoothAdapter == null || !mBluetoothAdapter.isEnabled()) {
Intent enableBtIntent = new Intent(BluetoothAdapter.ACTION_REQUEST_ENABLE);
startActivityForResult(enableBtIntent, REQUEST_ENABLE_BT);
}
@Override
protected void onActivityResult(int requestCode, int resultCode, Intent data) {
switch (requestCode) {
case REQUEST_ENABLE:
if (resultCode == Activity.REQUEST_ENABLE_BT) { //藍芽啟用
} else { //藍芽沒有啟用
}
break;
}
} private void scanLeDevice(final boolean enable) {
if (enable) {
// Stops scanning after a pre-defined scan period.
mHandler.postDelayed(new Runnable() {
@Override
public void run() {
mScanning = false;
mBluetoothAdapter.stopLeScan(mLeScanCallback);
}
}, SCAN_PERIOD); //在這裡可以自己進行時間的設定,比如搜尋10秒
mScanning = true;
mBluetoothAdapter.startLeScan(mLeScanCallback); //開始搜尋
} else {
mScanning = false;
mBluetoothAdapter.stopLeScan(mLeScanCallback);//停止搜尋
}
} private BluetoothAdapter.LeScanCallback mLeScanCallback = new BluetoothAdapter.LeScanCallback() {
@Override
public void onLeScan(final BluetoothDevice device, int rssi, byte[] scanRecord) {
runOnUiThread(new Runnable() {
@Override
public void run() {
//device.getName();獲取藍芽裝置名字
//device.getAddress();獲取藍芽裝置mac地址 可以將資料使用EventBus進行需要傳遞
}
});
}
};public boolean connect(final String address) {
if (mBluetoothAdapter == null || address == null) {
Log.w(TAG,"BluetoothAdapter not initialized or unspecified address.");
return false;
}
// Previously connected device. Try to reconnect. (先前連線的裝置。 嘗試重新連線)
if (mBluetoothDeviceAddress != null&& address.equals(mBluetoothDeviceAddress)&& mBluetoothGatt != null) {
Log.d(TAG,"Trying to use an existing mBluetoothGatt for connection.");
if (mBluetoothGatt.connect()) {
mConnectionState = STATE_CONNECTING;
return true;
} else {
return false;
}
}
final BluetoothDevice device = mBluetoothAdapter.getRemoteDevice(address);
if (device == null) {
Log.w(TAG, "Device not found. Unable to connect.");
return false;
}
// We want to directly connect to the device, so we are setting the
// autoConnect
// parameter to false.
mBluetoothGatt = device.connectGatt(this, false, mGattCallback); //這裡才是真正連線
Log.d(TAG, "Trying to create a new connection.");
mBluetoothDeviceAddress = address;
mConnectionState = STATE_CONNECTING;
return true;
}private final BluetoothGattCallback mGattCallback = new BluetoothGattCallback() {
@Override //當連線上裝置或者失去連線時會回撥該函式
public void onConnectionStateChange(BluetoothGatt gatt, int status,int newState) {
if (newState == BluetoothProfile.STATE_CONNECTED) { //連線成功
mBluetoothGatt.discoverServices(); //連線成功後就去找出該裝置中的服務 private BluetoothGatt mBluetoothGatt;
} else if (newState == BluetoothProfile.STATE_DISCONNECTED) { //連線失敗
}
}
@Override //當裝置是否找到服務時,會回撥該函式
public void onServicesDiscovered(BluetoothGatt gatt, int status) {
if (status == BluetoothGatt.GATT_SUCCESS) { //找到服務了
//在這裡可以對服務進行解析,尋找到你需要的服務
} else {
Log.w(TAG, "onServicesDiscovered received: " + status);
}
}
@Override //當讀取裝置時會回撥該函式
public void onCharacteristicRead(BluetoothGatt gatt,BluetoothGattCharacteristic characteristic, int status) {
System.out.println("onCharacteristicRead");
if (status == BluetoothGatt.GATT_SUCCESS) {
//讀取到的資料存在characteristic當中,可以通過characteristic.getValue();函式取出。然後再進行解析操作。
//int charaProp = characteristic.getProperties();if ((charaProp | BluetoothGattCharacteristic.PROPERTY_NOTIFY) > 0)表示可發出通知。 判斷該Characteristic屬性
}
}
@Override //當向裝置Descriptor中寫資料時,會回撥該函式
public void onDescriptorWrite(BluetoothGatt gatt,BluetoothGattDescriptor descriptor, int status) {
System.out.println("onDescriptorWriteonDescriptorWrite = " + status + ", descriptor =" + descriptor.getUuid().toString());
}
@Override //裝置發出通知時會呼叫到該介面
public void onCharacteristicChanged(BluetoothGatt gatt,BluetoothGattCharacteristic characteristic) {
if (characteristic.getValue() != null) {
System.out.println(characteristic.getStringValue(0));
}
System.out.println("--------onCharacteristicChanged-----");
}
@Override
public void onReadRemoteRssi(BluetoothGatt gatt, int rssi, int status) {
System.out.println("rssi = " + rssi);
}
@Override //當向Characteristic寫資料時會回撥該函式
public void onCharacteristicWrite(BluetoothGatt gatt,BluetoothGattCharacteristic characteristic, int status) {
System.out.println("--------write success----- status:" + status);
};
}public List<BluetoothGattService> getSupportedGattServices() {
if (mBluetoothGatt == null)
return null;
return mBluetoothGatt.getServices(); //此處返回獲取到的服務列表
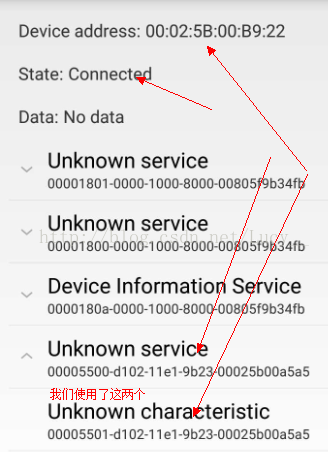
} 注意:這裡你就可以和相關的嵌入式工程師互動,使用哪些服務以及使用哪些UUID即可
private void displayGattServices(List<BluetoothGattService> gattServices) {
		if (gattServices == null)
			return;
		for (BluetoothGattService gattService : gattServices) { // 遍歷出gattServices裡面的所有服務
			List<BluetoothGattCharacteristic> gattCharacteristics = gattServices.getCharacteristics();
			for (BluetoothGattCharacteristic gattCharacteristic : gattCharacteristics) { // 遍歷每條服務裡的所有Characteristic
				if (gattCharacteristic.getUuid().toString().equalsIgnoreCase(需要通訊的UUID)) {
                                        // 有哪些UUID,每個UUID有什麼屬性及作用,一般硬體工程師都會給相應的文件。我們程式也可以讀取其屬性判斷其屬性。
					// 此處可以可根據UUID的型別對裝置進行讀操作,寫操作,設定notification等操作
					// BluetoothGattCharacteristic gattNoticCharacteristic 假設是可設定通知的Characteristic
					// BluetoothGattCharacteristic gattWriteCharacteristic 假設是可讀的Characteristic
					// BluetoothGattCharacteristic gattReadCharacteristic  假設是可寫的Characteristic
				}
			}
		}
}public void setCharacteristicNotification(BluetoothGattCharacteristic characteristic, boolean enabled) {
if (mBluetoothAdapter == null || mBluetoothGatt == null) {
Log.w(TAG, "BluetoothAdapter not initialized");
return;
}
mBluetoothGatt.setCharacteristicNotification(characteristic, enabled);
BluetoothGattDescriptor descriptor = characteristic.getDescriptor(UUID
.fromString(SampleGattAttributes.CLIENT_CHARACTERISTIC_CONFIG));
if (descriptor != null) {
System.out.println("write descriptor");
descriptor.setValue(BluetoothGattDescriptor.ENABLE_NOTIFICATION_VALUE);
mBluetoothGatt.writeDescriptor(descriptor);
}
}public void readCharacteristic(BluetoothGattCharacteristic characteristic) { //可讀的UUID
if (mBluetoothAdapter == null || mBluetoothGatt == null) {
Log.w(TAG, "BluetoothAdapter not initialized");
return;
}
mBluetoothGatt.readCharacteristic(characteristic);
}public void wirteCharacteristic(BluetoothGattCharacteristic characteristic) { //可寫的UUID
if (mBluetoothAdapter == null || mBluetoothGatt == null) {
Log.w(TAG, "BluetoothAdapter not initialized");
return;
}
mBluetoothGatt.writeCharacteristic(characteristic);
}4.3:針對讀的操作在加深一下理解:請看
 /***讀操作***/
             void   readBatrery(){
                         //如上面所說,想要和一個學生通訊,先知道他的班級(ServiceUUID)和學號(CharacUUID)
//此處的0000180f...是舉例,實際開發需要詢問硬體那邊 //此處的00002a19...是舉例,實際開發需要詢問硬體那邊 //讀取電量, 這是讀取batteryCharacteristic值的方法,讀取其他的值也是如此,只是它們的ServiceUUID 和CharacUUID不一樣 //此處的00001805...是舉例,實際開發需要詢問硬體那邊 //此處的00002a08...是舉例,實際開發需要詢問硬體那邊這樣你需要判斷是不是所有命令都成功了,因為android不太穩定,有必要來check命令是否成功,否則你會發現你明明呼叫 寫命令,但是裝置那邊不響應 } } 第四步:主要的相關的程式碼如上,具體的實現就沒有直接展示了。敬請原諒!謝謝!
本人也是第一次操作藍芽這一塊,期間看了很多的部落格,很有幫助,推薦給大家(連結),也可以自己去查資料。