極驗驗證碼的破解2-圖片還原和滑塊位置求解
阿新 • • 發佈:2019-02-14
上一章我們討論了破解極驗驗證碼的思路和步驟,這一章我將介紹如何還原兩張背景圖和求解滑塊的目標位置。
一、圖片還原
我們首先看看頁面上給了我們什麼引數:
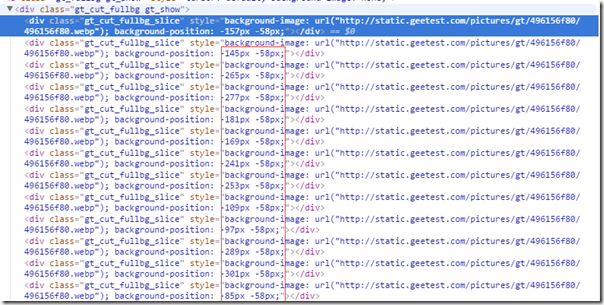
這個是完整的背景圖(fullbg)的頁面元素,可以看到他們都是來自於同一張原圖,只是擷取的位置不同。上圖紅框就是該小圖片在原圖中的位置,每一張小圖片都是10個畫素寬,58個畫素高,我們再來看看原圖:
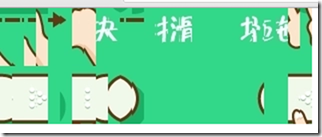
確實很亂,根本看不出什麼東西。如果我們把這個原圖下載下來,然後按照頁面上的引數擷取一個個10畫素寬,58畫素高的小圖片拼接在一起便可以得到完整的背景圖了,上程式碼:

/** * 合成指定的多張圖片到一張圖片 * *@param imgSrcList 圖片的地址列表 * @param topLeftPointList 每張小圖片的偏移量 * @param countOfLine 每行的小圖片個數 * @param cutWidth 每張小圖片擷取的寬度(畫素) * @param cutHeight 每張小圖片擷取的高度(畫素) * @param savePath 合併後圖片的儲存路徑 * @param subfix 合併後圖片的字尾 * @return 是否合併成功*/ public static boolean combineImages(List<String> imgSrcList, List<String[]> topLeftPointList, int countOfLine, int cutWidth, int cutHeight, String savePath, String subfix) { if (imgSrcList == null || savePath == null || savePath.trim().length() == 0) return false; BufferedImage lastImage= new BufferedImage(cutWidth * countOfLine, cutHeight * ((int) (Math.floor(imgSrcList.size() / countOfLine))), BufferedImage.TYPE_INT_RGB); String prevSrc = ""; BufferedImage prevImage = null; try { for (int i = 0; i < imgSrcList.size(); i++) { String src = imgSrcList.get(i); BufferedImage image; if (src.equals(prevSrc)) image = prevImage; else { if (src.trim().toLowerCase().startsWith("http")) image = ImageIO.read(new URL(src)); else image = ImageIO.read(new File(src)); prevSrc = src; prevImage = image; } if (image == null) continue; String[] topLeftPoint = topLeftPointList.get(i); int[] pixArray = image.getRGB(0 - Integer.parseInt(topLeftPoint[0].trim()), 0 - Integer.parseInt(topLeftPoint[1].trim()), cutWidth, cutHeight, null, 0, cutWidth); int startX = ((i) % countOfLine) * cutWidth; int startY = ((i) / countOfLine) * cutHeight; lastImage.setRGB(startX, startY, cutWidth, cutHeight, pixArray, 0, cutWidth); } File file = new File(savePath); return ImageIO.write(lastImage, subfix, file); } catch (Exception ex) { ex.printStackTrace(); return false; } }

帶洞的背景圖也是一樣的處理,現在看看我們還原後的兩張背景圖:
二、求解滑塊移動目標位置
有了第一步的結果,我們只需要對比兩張背景圖的畫素,從左往右掃描即可找到滑塊的目標位置了,還是看程式碼:

public static int findXDiffRectangeOfTwoImage(String imgSrc1, String imgSrc2) {
        try {
            BufferedImage image1 = ImageIO.read(new File(imgSrc1));
            BufferedImage image2 = ImageIO.read(new File(imgSrc2));
            int width1 = image1.getWidth();
            int height1 = image1.getHeight();
            int width2 = image2.getWidth();
            int height2 = image2.getHeight();

            if (width1 != width2) return -1;
            if (height1 != height2) return -1;

            int left = 0;
            /**
             * 從左至右掃描
             */
            boolean flag = false;
            for (int i = 0; i < width1; i++) {
                for (int j = 0; j < height1; j++)
                    if (isPixelNotEqual(image1, image2, i, j)) {
                        left = i;
                        flag = true;
                        break;
                    }
                if (flag) break;
            }
            return left;
        } catch (Exception ex) {
            ex.printStackTrace();
            return -1;
        }
    }

    private static boolean isPixelNotEqual(BufferedImage image1, BufferedImage image2, int i, int j) {
        int pixel1 = image1.getRGB(i, j);
        int pixel2 = image2.getRGB(i, j);

        int[] rgb1 = new int[3];
        rgb1[0] = (pixel1 & 0xff0000) >> 16;
        rgb1[1] = (pixel1 & 0xff00) >> 8;
        rgb1[2] = (pixel1 & 0xff);

        int[] rgb2 = new int[3];
        rgb2[0] = (pixel2 & 0xff0000) >> 16;
        rgb2[1] = (pixel2 & 0xff00) >> 8;
        rgb2[2] = (pixel2 & 0xff);

        for (int k = 0; k < 3; k++)
            if (Math.abs(rgb1[k] - rgb2[k]) > 50)//因為背景圖會有一些畫素差異
                return true;

        return false;
    }

值得注意的是,比較畫素的時候要設定一個容差值,可能是兩張背景圖經過多次處理存在了一定的畫素差異,也可能是有個水印。
求解出滑塊的目標位置後,我們是不是直接按照這個位移來拖動滑塊就行了呢?答案是否定的,看下圖:
可以看到在滑動之前滑塊與背景圖就已經存在一個距離了,需要做一個位移的調整,經過觀察,這個值大概是7個畫素,因此:最終滑動位移=求解出的滑塊left畫素個數-7。
下一章我將介紹如何使用模擬瀏覽器來載入和渲染頁面。


