Java web檔案上傳下載
本文主要從javaweb上傳檔案到伺服器中,並且在伺服器端進行資料檔案儲存,主要分享了檔案上傳原理、使用第三方開源工具進行上傳以及一些檔案上傳時需要注意的地方,檔案的優化處理,還有簡易分享了從我們剛才上傳進去的檔案進行下載。需要掌握基本的開發流程,底層實現原理等。
一、檔案上傳原理
- 提供form表單,method必須是post
- form表單的enctype必須是multipart/form-data
- 提供input type=”file”
Enctype屬性
告知伺服器請求正文的MIME型別。
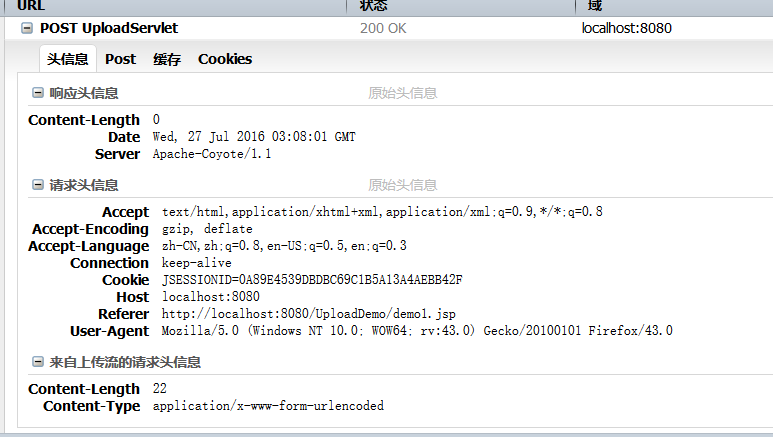
application/x-www-form-urlencoded(預設):
正文:name=aa&password=123
伺服器獲取資料:request.getParameter(“name”);
檔案上傳原理:
解析請求正文的每部分的內容。
基於html form表單上傳的資料都是以類似—————————–7da3c8e180752{0x130x10}這樣的分割符來標記一塊資料的起止。
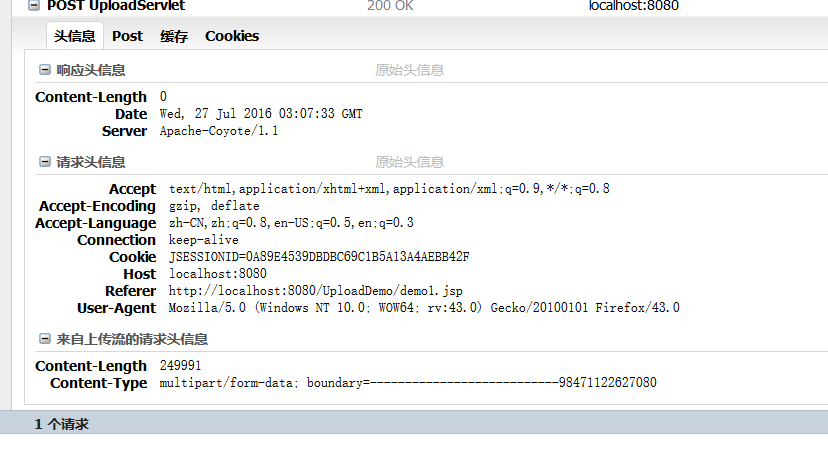
檔案上傳的Content-Type為multipart/form-data; boundary=—-WebKitFormBoundaryhQslmBE7nbTLTJzD,而普通的form表單的Content-Type為application/x-www-form-urlencoded。因此,我們可以利用HttpServletRequest的request.getHeaderNames()方法和request.getHeaders(headName)方法得到請求頭Headers中的Content-Type資料,然後根據Content-Type資料中是否包含multipart/form-data來區分請求是否為檔案上傳請求。其中boundary為檔案資料的分隔符,用於區分上傳多個檔案。
二、使用第三方工具實現檔案上傳
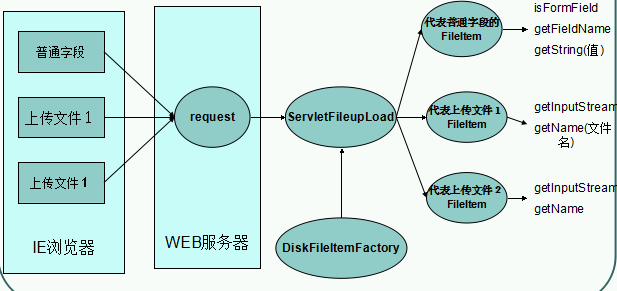
fileupload元件工作流程:
開發步驟
匯入commons-fileupload.jar、commons-io.jar包。
1、介面
我們就是需要一個form表單,為其新增enctype屬性和post方法:
<form action="${pageContext.request.contextPath}/servlet/UploadServlet2" method="post" enctype="multipart/form-data" >
姓名: <input type="text" 2、邏輯處理
我們在一個servlet中進行處理:
request.setCharacterEncoding("UTF-8");
        //判斷使用者的請求內容是不是multipart/form-data
        boolean isMultipart=ServletFileUpload.isMultipartContent(request);
        if(!isMultipart){
            throw new RuntimeException("error!");
        }
//建立DiskFileItemFactory物件
DiskFileItemFactory factory=new DiskFileItemFactory();
        //建立核心解析類ServlertFileUpload
        ServletFileUpload  sfu=new ServletFileUpload(factory);

        //解析請求物件
        List<FileItem> items=new ArrayList<FileItem>(0);

        try {
            items=sfu.parseRequest(request);
        } catch (FileUploadException e) {
            // TODO Auto-generated catch block
            e.printStackTrace();
        }
        for(FileItem item:items){
            if(item.isFormField()){
                processFormField(item);
            }else{
                processUploadField(item);
            }
        }
        response.getWriter().write("sucess!");
接下來就是分為兩種情況了,一種是對普通的表單元素進行處理,另一種是對檔案類的資料進行處理,對於第一種情況的話就比較簡單,我們直接獲取名字就可以了,基本上不用過多的處理。
private void processFormField(FileItem item) {
        String fieldName=item.getFieldName();
        String fieldValue=item.getString();
        System.out.println(fieldValue+"="+fieldName);

    }
對於第二種情況,需要我們直接對上傳檔案進行一系列的處理了,我們首先需要在伺服器上找一個存放檔案的地方,然後擷取上傳的檔名、構建輸出流、關閉流等操作。
private void processUploadField(FileItem item) {

        try {
            InputStream in=item.getInputStream();
            String filename=item.getName();

            //在伺服器上找一個存放檔案的地方
            String storeDirectoryRealPath=getServletContext().getRealPath("/WEB-INF/files");
            File storeDirectory=new File(storeDirectoryRealPath);

            if(!storeDirectory.exists()){
                storeDirectory.mkdirs();
            }

            //擷取上傳的檔名
            //filename=filename.substring(filename.lastIndexOf(File.separator)+1);

            if(filename!=null){
                filename=FilenameUtils.getName(filename);
            }

            String guidFilename=GUIDUtil.generateGUID()+"_"+filename;


            //按日期來區分儲存目錄
        //  String childDirectory=makeChileDirectory(storeDirectory);

            String childDirectory=makeChildDirectory(storeDirectory,guidFilename);

            //構建輸出流
            OutputStream  out=new FileOutputStream(new File(storeDirectory,childDirectory+File.separator+guidFilename));

            int len = -1;
            byte buf[] = new byte[1024];
            while((len=in.read(buf))!=-1){
                out.write(buf, 0, len);
            }
            in.close();
            out.close();


        } catch (IOException e) {
            e.printStackTrace();
        }
    }
三、檔案上傳優化處理
1、把儲存的檔案放在使用者無法直接訪問到的地方:例如放在:在WEB-INF/files目錄中。
String storeDirectoryRealPath=getServletContext().getRealPath("/WEB-INF/files");2、讓檔名唯一。
    String guidFilename=GUIDUtil.generateGUID()+"_"+filename;
            //構建輸出流
            OutputStream  out=new FileOutputStream(new File(storeDirectory,guidFilename));
3、避免同一個資料夾中的檔案過多。
3.1按照日期進行儲存。
    String childDirectory=makeChileDirectory(storeDirectory);

    private String makeChileDirectory(File storeDirectory) {
        Date now=new Date();
        DateFormat df=new SimpleDateFormat("yyyy-MM-dd");
        String sdate=df.format(now);
        File f=new File(storeDirectory,sdate);
        if(!f.exists()){
            f.mkdirs();
        }
        return sdate;
    }
3.2用檔名的hashCode計算需要進行儲存的目錄,二級目錄。
    private String makeChildDirectory(File storeDirectory, String guidFilename) {
        int hashCode = guidFilename.hashCode();
        int dir1 = hashCode&0xf;//  0~15
        int dir2 = (hashCode&0xf0)>>4;//0~15

        String s = dir1+File.separator+dir2;

        File f = new File(storeDirectory,s);
        if(!f.exists()){
            f.mkdirs();
        }
        return s;
    }
4、限制檔案的大小。web方式不適合上傳大的檔案。
4.1單個檔案大小:
ServletFileUpload  sfu=new ServletFileUpload(factory);
        sfu.setFileSizeMax(4*1024*1024);//限制不超過4M
4.2總檔案大小:多檔案上傳
    ServletFileUpload  sfu=new ServletFileUpload(factory);
    sfu.setSizeMax(8*1024*1024);//總檔案大小
5、限制檔案的上傳型別。
5.1通過副檔名來進行限制。
String extensionName=FilenameUtils.getExtension(filename);5.2通過檔案MIME型別來限制。
String mimeType=item.getContentType();6、空檔案上傳解決方案。
判斷檔名是否為空,當檔名為空時return。
7、臨時檔案
DiskFileItemFactory的作用是產生FileItem物件。其內部有一個快取,預設大寫拾10kb,如果上傳檔案超過10kb,則用磁碟作為快取。存放快取的目錄預設是系統的臨時目錄。
DiskFileItemFactory factory=new DiskFileItemFactory();
        //更改臨時檔案的存放目錄
        factory.setRepository(new File("D:/"));
如果是自己用IO流實現的檔案上傳,則需要在流關閉後,清理臨時檔案。
FileItem.delete();可以使用FileItem.write(File f)實現檔案上傳的儲存。
8、中文編碼
    request.setCharacterEncoding("UTF-8");

    //該編碼要和jsp頁面保持一致
    String fieldValue=item.getString("UTF-8");
9、動態js控制上傳框
   <form action="${pageContext.request.contextPath}/servlet/UploadServlet3" method="post" enctype="multipart/form-data">
        name:<input type="text" name="name"/><br/>
        <div id="d1">
            <div>
            photo:<input type="file" name="photo"/><input type="button" value="繼續上傳" onclick="addFile()"/>
            </div>
        </div>
        <input type="submit" value="上傳"/>
    </form>
    <script type="text/javascript">
        function addFile(){
            var d1 = document.getElementById("d1");
            var oldInnerHtml = d1.innerHTML;
            d1.innerHTML=oldInnerHtml+"<div>photo:<input type='file' name='photo'/><input type='button' value='刪除' onclick='deleteOne(this)'/></div>";
        }
        function deleteOne(delBtn){
            delBtn.parentNode.parentNode.removeChild(delBtn.parentNode);
        }
    </script>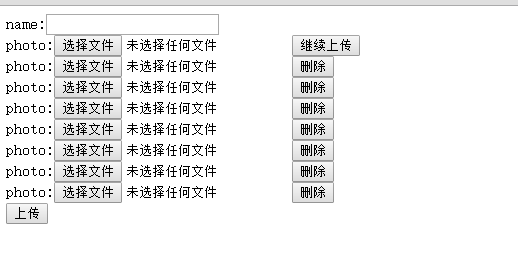
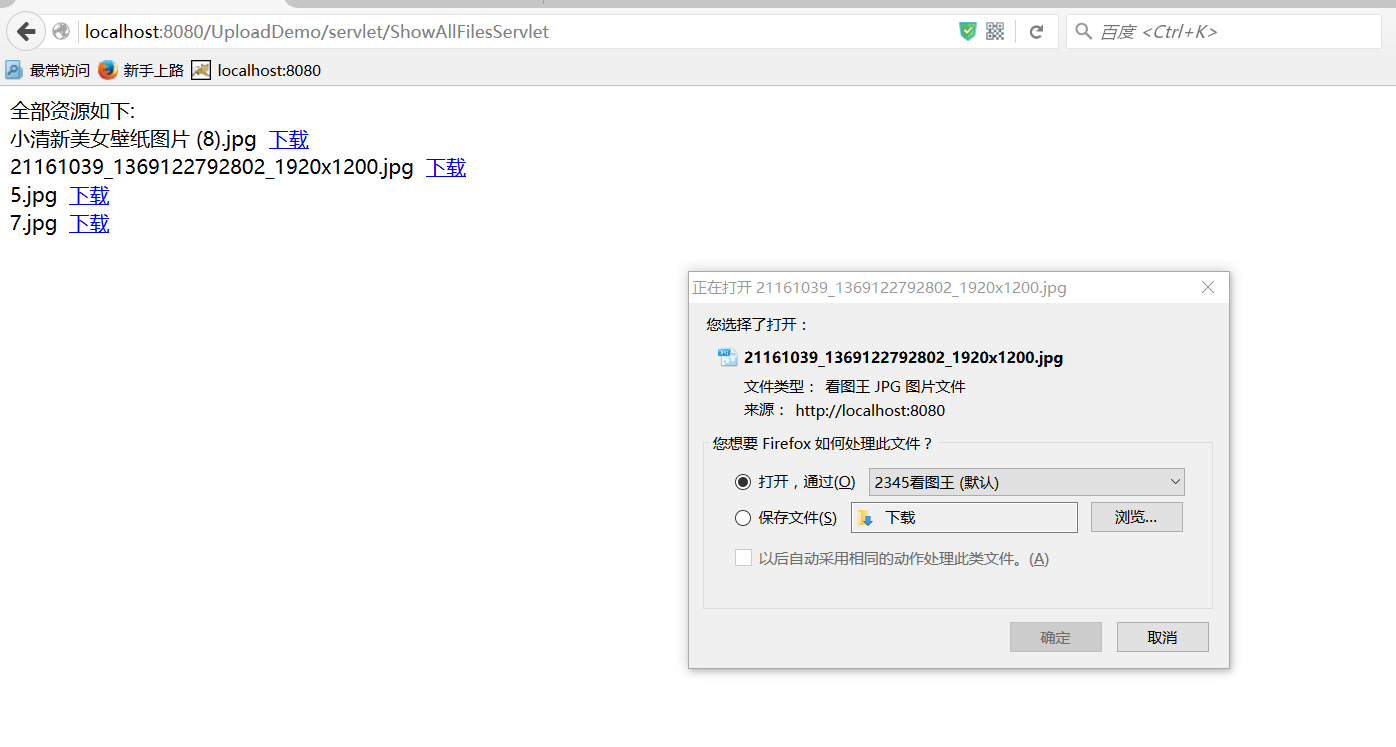
四、檔案的下載
首先我們來看一下頁面的處理:
新建一個list.jsp檔案:
全部資源如下:<br />
<c:forEach items="${map}" var="me">
<c:url value="/servlet/DownLoadServlet" var="url">
<c:param name="filename" value="${me.key}"></c:param>
</c:url>
${me.value} <a href="${url}">下載</a><br/>
</c:forEach>要記得引入jstl的核心包 。
<%@ taglib uri="http://java.sun.com/jsp/jstl/core" prefix="c"%>接下做介面顯示的servlet。
我們之前上傳的檔案是用GUID做過相應處理的,是一個拼接好的檔名,用來防止檔案同名的情況發生,這裡使用者瀏覽到的檔案當然要和上傳的時候的檔名 相同,所以這裡我們要進行擷取,把GUID拼接的字首去掉,以“_”分開。一個是在伺服器中防同名的檔名以及顯示出來的擷取後的檔名。這裡以前面說過的,防同名檔案方法2:用檔名的hashCode計算需要進行儲存的目錄,二級目錄。這裡也就需要使用hashCode找到做過檔案的路徑。
public void doGet(HttpServletRequest request, HttpServletResponse response)
            throws ServletException, IOException {
        //key:GUID檔名  value:old檔名
        Map<String, String> map = new HashMap<String, String>();
        //獲取/WEB-INF/files的真實路徑
        String rootDirectoryRealPath = getServletContext().getRealPath("/WEB-INF/files");
        //遞迴遍歷找出所有的檔案
        System.out.println(rootDirectoryRealPath);
        File rootDirectory = new File(rootDirectoryRealPath);
        treeWalk(rootDirectory,map);
        //存到請求範圍中,轉發給jsp顯示
        request.setAttribute("map", map);
        request.getRequestDispatcher("/list.jsp").forward(request, response);
    }
    //遞迴遍歷找出所有的檔案,把檔名高出來
    public void treeWalk(File file, Map<String, String> map) {
        if(file.isFile()){
            String guidFileName = file.getName();
            String oldFileName = guidFileName.substring(guidFileName.indexOf("_")+1);
            map.put(guidFileName, oldFileName);
        }else{
            //目錄
            File[] childFiles = file.listFiles();
            for(File f:childFiles){
                treeWalk(f, map);
            }
        }
    }
接下來就是下載的處理了。
public void doGet(HttpServletRequest request, HttpServletResponse response)
            throws ServletException, IOException {
        String guidFilename = request.getParameter("filename");//get方式提交的
        guidFilename = new String(guidFilename.getBytes("ISO-8859-1"),"UTF-8");
        //計算存放路徑
        File storeDirectory = new File(getServletContext().getRealPath("/WEB-INF/files"));
        String childDirectory = makeChildDirecotry(storeDirectory, guidFilename);//  13/1
        //構建輸入流
        InputStream in = new FileInputStream(new File(storeDirectory,childDirectory+File.separator+guidFilename));

        //用響應物件的輸出流輸出:下載的方式
        String oldFileName = guidFilename.substring(guidFilename.indexOf("_")+1);
        response.setHeader("Content-Disposition", "attachment;filename="+URLEncoder.encode(oldFileName,"UTF-8"));//不適用火狐
        response.setContentType("application/octet-stream");
        OutputStream out = response.getOutputStream();

        int len = -1;
        byte buf[] = new byte[1024];
        while((len=in.read(buf))!=-1){
            out.write(buf, 0, len);
        }
        in.close();


    }
    private String makeChildDirecotry(File storeDirectory, String guidFilename) {

        int hashCode = guidFilename.hashCode();
        int dir1 = hashCode&0xf;
        int dir2 = (hashCode&0xf0)>>4;

        String s = dir1+File.separator+dir2;

        File f = new File(storeDirectory,s);
        if(!f.exists()){
            f.mkdirs();
        }
        return s;
    }
通過這個網址進行訪問