
iOS多執行緒-pthread、NSThread
pthread
pthread 簡介
pthread 是一套通用的多執行緒的 API,可以在Unix / Linux / Windows/Mac OS/iOS等系統跨平臺使用,使用 C 語言編寫,需要程式設計師自己管理執行緒的生命週期,使用難度較大,我們在 iOS 開發中幾乎不使用,但是還是來可以瞭解一下的。
pthread 使用
#import "ViewController.h"
#import <pthread.h>//匯入標頭檔案
@interface ViewController ()
@end
@implementation ViewController
- (void pthread_create(&thread, NULL, test, NULL); 中各項引數含義:
- 第一個引數&thread是執行緒物件,指向執行緒識別符號的指標
- 第二個是執行緒屬性,可賦值NULL
- 第三個run表示指向函式的指標(run對應函式裡是需要在新執行緒中執行的任務)
- 第四個是執行函式的引數,可賦值NULL
pthread 相關呼叫函式
pthread_create()建立一個執行緒pthread_exit()終止當前執行緒pthread_cancel()中斷另外一個執行緒的執行pthread_join()阻塞當前的執行緒,直到另外一個執行緒執行結束pthread_attr_init()初始化執行緒的屬性pthread_attr_setdetachstate()設定脫離狀態的屬性(決定這個執行緒在終止時是否可以被結合)pthread_attr_getdetachstate()獲取脫離狀態的屬性pthread_attr_destroy()刪除執行緒的屬性pthread_kill()向執行緒傳送一個訊號
NSThread
NSThread簡介
NSThread封裝性差,最偏向於底層,主要基於thread使用,OC語言,需要程式設計師自己管理生命週期. 每一個NSThread物件代表著一個執行緒,理解NSThread更有利於理解多執行緒的含義.NSThread API
執行緒建立
有返回值初始化方法有3種:- (instancetype)init API_AVAILABLE(macos(10.5), ios(2.0), watchos(2.0), tvos(9.0)) NS_DESIGNATED_INITIALIZER;- (instancetype)initWithTarget:(id)target selector:(SEL)selector object:(nullable id)argument API_AVAILABLE(macos(10.5), ios(2.0), watchos(2.0), tvos(9.0));- (instancetype)initWithBlock:(void (^)(void))block API_AVAILABLE(macosx(10.12), ios(10.0), watchos(3.0), tvos(10.0));+ (void)detachNewThreadWithBlock:(void (^)(void))block API_AVAILABLE(macosx(10.12), ios(10.0), watchos(3.0), tvos(10.0));+ (void)detachNewThreadSelector:(SEL)selector toTarget:(id)target withObject:(nullable id)argument;執行緒操作
NSThread給執行緒提供的主要操作方法有啟動,睡眠,取消,退出.執行緒啟動
我們使用init方法將執行緒創建出來之後,執行緒並不會立即執行,只有我們手動呼叫-start方法才會啟動執行緒- (void)start API_AVAILABLE(macos(10.5), ios(2.0), watchos(2.0), tvos(9.0));執行緒睡眠
+ (void)sleepUntilDate:(NSDate *)date;//執行緒休眠(阻塞),休眠到指定日期時間+ (void)sleepForTimeInterval:(NSTimeInterval)ti;//執行緒休眠(阻塞),休眠到指定日期時長- sleepUntilDate:相當於執行一個sleep的任務。在執行過程中,即使有其他任務傳入runloop,runloop也不會立即響應,必須sleep任務完成之後,才會響應其他任務
- runUntilDate:雖然會阻塞執行緒,阻塞過程中並不妨礙新任務的執行。當有新任務的時候,會先執行接收到的新任務,新任務執行完之後,如果時間到了,再繼續執行runUntilDate:之後的程式碼
例子:
-(void)touchesBegan:(NSSet<UITouch *> *)touches withEvent:(UIEvent *)event{
    self.view.backgroundColor = [UIColor yellowColor];
    [self createWithDetach];
}

- (void)createWithDetach{
     //隱式建立
    [NSThread detachNewThreadSelector:@selector(delay:) toTarget:self withObject:@"date"];
    __weak typeof(self)weakSlef = self;
    [NSThread detachNewThreadWithBlock:^{
        NSLog(@"ssss");
        [weakSlef delay:nil];
    }];
}
- (void)delay:(id)parm{
    if ([@"date" isEqual:parm]) {
        [NSThread sleepForTimeInterval:10];//該方法後面的程式碼,10秒後執行
        NSLog(@"暫停10秒執行");
    }else{
        [NSThread sleepForTimeInterval:2];
        NSLog(@"暫停2秒執行");
    }
}
執行緒取消
- (void)cancel API_AVAILABLE(macos(10.5), ios(2.0), watchos(2.0), tvos(9.0));@property (readonly, getter=isCancelled) BOOL cancelled API_AVAILABLE(macos(10.5), ios(2.0), watchos(2.0), tvos(9.0));- 不過大家千萬不要被它的名字迷惑,呼叫
cancel方法並不會立刻取消執行緒,它僅僅是將cancelled屬性設定為YES。cancelled也僅僅是一個用於記錄狀態的屬性。執行緒取消的功能需要我們在main函式中自己實現 - 要實現取消.的功能,我們需要自己線上程的main函式中定期檢查
isCancelled狀態來判斷執行緒是否需要退出,當isCancelled為YES的時候,我們手動退出。如果我們沒有在main函式中檢查isCancelled狀態,那麼呼叫cancel將沒有任何意義.
執行緒退出
+ (void)exit;exit呼叫之後會立即終止執行緒,即使任務還沒有執行完成也會中斷。這就非常有可能導致記憶體洩露等嚴重問題,所以一般不推薦使用。- 對於有runloop的執行緒,可以使用CFRunLoopStop()結束runloop配合-cancel結束執行緒
執行緒狀態
executing是否正在執行,finished是否已經結束,cancelled是否已經取消了
@property (readonly, getter=isExecuting) BOOL executing API_AVAILABLE(macos(10.5), ios(2.0), watchos(2.0), tvos(9.0));//執行緒是否正在執行@property (readonly, getter=isFinished) BOOL finished API_AVAILABLE(macos(10.5), ios(2.0), watchos(2.0), tvos(9.0));//執行緒是否已經結束@property (readonly, getter=isCancelled) BOOL cancelled API_AVAILABLE(macos(10.5), ios(2.0), watchos(2.0), tvos(9.0));//執行緒是否已經取消主執行緒,當前執行緒,多執行緒判斷或獲取
isMainThread是否是主執行緒,mainThread獲取主執行緒,class修飾的屬性表示是一個類屬性([NSThread isMainThread])
@property (readonly) BOOL isMainThread API_AVAILABLE(macos(10.5), ios(2.0), watchos(2.0), tvos(9.0));@property (class, readonly) BOOL isMainThread API_AVAILABLE(macos(10.5), ios(2.0), watchos(2.0), tvos(9.0)); // reports whether current thread is main@property (class, readonly, strong) NSThread *mainThread API_AVAILABLE(macos(10.5), ios(2.0), watchos(2.0), tvos(9.0));currentThread獲取當前執行緒
@property (class, readonly, strong) NSThread *currentThread;isMultiThreaded是否是多執行緒
+ (BOOL)isMultiThreaded;執行緒設定(名稱,優先順序)
name執行緒名稱,主要用於debug快速定位對應出哪個執行緒出現的問題
@property (nullable, copy) NSString *name API_AVAILABLE(macos(10.5), ios(2.0), watchos(2.0), tvos(9.0));threadPriority設定和獲取執行緒優先順序,範圍0.0-1.0優先順序越高越先執行,預設是0.5,iOS8之後新增了qualityOfService列舉屬性,大家可以通過列舉值設定優先順序- 執行緒在建立後會放線上程排程池裡,當開啟執行緒時會根據設定的優先順序去優先調哪個執行緒,所以設定優先順序一點要在調
start方法開啟之前設定.
+ (double)threadPriority;+ (BOOL)setThreadPriority:(double)p;
@property double threadPriority API_AVAILABLE(macos(10.6), ios(4.0), watchos(2.0), tvos(9.0)); // To be deprecated; use qualityOfService below@property NSQualityOfService qualityOfService API_AVAILABLE(macos(10.10), ios(8.0), watchos(2.0), tvos(9.0)); // read-only after the thread is started優先順序NSQualityOfService主要有5個列舉值,優先級別從高到低排布:
typedef NS_ENUM(NSInteger, NSQualityOfService) {
    NSQualityOfServiceUserInteractive = 0x21,
    NSQualityOfServiceUserInitiated = 0x19,
    NSQualityOfServiceDefault = -1,
    NSQualityOfServiceUtility = 0x11,
    NSQualityOfServiceBackground = 0x09
} API_AVAILABLE(macos(10.10), ios(8.0), watchos(2.0), tvos(9.0));NSQualityOfServiceUserInteractive:最高優先順序,主要用於提供互動UI的操作,比如處理點選事件,繪製圖像到螢幕上NSQualityOfServiceUserInitiated:次高優先順序,主要用於執行需要立即返回的任務NSQualityOfServiceDefault:預設優先順序,當沒有設定優先順序的時候,執行緒預設優先順序NSQualityOfServiceUtility:普通優先順序,主要用於不需要立即返回的任務NSQualityOfServiceBackground:後臺優先順序,用於完全不緊急的任務
例子:
//執行緒優先順序
- (void)threadPriority{
    NSThread * t1 = [[NSThread alloc]initWithBlock:^{
        NSLog(@"%@",[NSThread currentThread]);
    }];
    t1.threadPriority = 0.3;
    t1.name = @"t1";
    NSThread * t2 = [[NSThread alloc]initWithBlock:^{
        NSLog(@"%@",[NSThread currentThread]);
    }];
    t2.threadPriority = 0.6;
    t2.name = @"t2";
    NSThread * t3 = [[NSThread alloc]initWithBlock:^{
        NSLog(@"%@",[NSThread currentThread]);
    }];
    t3.threadPriority = 0.5;
    t3.name = @"t3";

    NSThread * t4 = [[NSThread alloc]initWithBlock:^{
        NSLog(@"%@",[NSThread currentThread]);
    }];
    t4.qualityOfService = NSQualityOfServiceUserInteractive;//最高優先順序
    t4.name = @"t4";

    [t1 start];
    [t2 start];
    [t3 start];
    [t4 start];
}
結果可見:優先順序越高越先執行
執行緒通知
NSThread有三個執行緒相關的通知,
FOUNDATION_EXPORT NSNotificationName const NSWillBecomeMultiThreadedNotification;
FOUNDATION_EXPORT NSNotificationName const NSDidBecomeSingleThreadedNotification;
FOUNDATION_EXPORT NSNotificationName const NSThreadWillExitNotification;NSWillBecomeMultiThreadedNotification:由當前執行緒派生出第一個其他執行緒時傳送,一般一個執行緒只發送一次
NSDidBecomeSingleThreadedNotification:這個通知目前沒有實際意義,可以忽略
NSThreadWillExitNotification執行緒退出之前傳送這個通知
執行緒通訊
完成一些操作需要多執行緒會更加的有效,不同的執行緒做不同任務,互相有一些依賴,這就需要執行緒之間進行通訊.NSThread標頭檔案中有一個NSObject的NSThreadPerformAdditions分類,只要繼承NSObject的類都可以用裡面的方法進行通訊,共5個方法:
NSObject的分類NSThreadPerformAdditions提供了5個執行緒通訊的API
@interface NSObject (NSThreadPerformAdditions)- 去主執行緒執行
aSelector裡面的任務
- (void)performSelectorOnMainThread:(SEL)aSelector withObject:(nullable id)arg waitUntilDone:(BOOL)wait modes:(nullable NSArray<NSString *> *)array;
——————————————————————————————————————————————————————————————————————————————————
- (void)performSelectorOnMainThread:(SEL)aSelector withObject:(nullable id)arg waitUntilDone:(BOOL)wait;- 去指定執行緒執行
aSelector裡面的任務
- (void)performSelector:(SEL)aSelector onThread:(NSThread *)thr withObject:(nullable id)arg waitUntilDone:(BOOL)wait modes:(nullable NSArray<NSString *> *)array API_AVAILABLE(macos(10.5), ios(2.0), watchos(2.0), tvos(9.0));
——————————————————————————————————————————————————————————————————————————————————
- (void)performSelector:(SEL)aSelector onThread:(NSThread *)thr withObject:(nullable id)arg waitUntilDone:(BOOL)wait API_AVAILABLE(macos(10.5), ios(2.0), watchos(2.0), tvos(9.0));- 開啟一個後臺子執行緒,並執行
aSelector裡的任務.
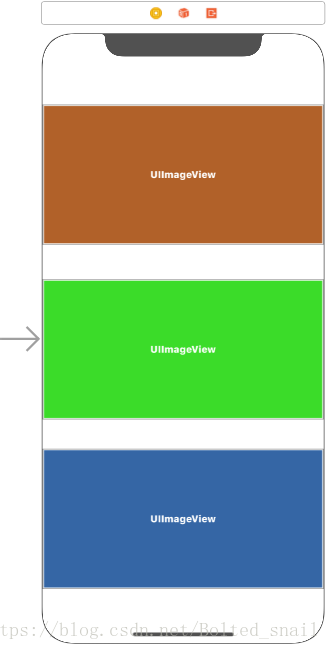
- (void)performSelectorInBackground:(SEL)aSelector withObject:(nullable id)arg API_AVAILABLE(macos(10.5), ios(2.0), watchos(2.0), tvos(9.0));wait引數表示是否阻塞,YES是阻塞的,等執行緒中的方法執行完才會去執行對應執行緒中的方法,NO就是不阻塞,直接執行對應執行緒中的方法;如果本身是主執行緒有呼叫了performSelectorOnMainThread方法,wait引數是無效的,不論是設定為YES還是NO都會立即執行.- 執行緒間通訊示例:開啟多個子執行緒去下載圖片,圖片下載完後回主執行緒重新整理UI;
Main.storyboard中新增三個UIImageView
#import "ViewController.h"
@interface ViewController ()
@property (weak, nonatomic) IBOutlet UIImageView *redImageV;
@property (weak, nonatomic) IBOutlet UIImageView *greenImageV;
@property (weak, nonatomic) IBOutlet UIImageView *blueImageV;
@end
@implementation ViewController
- (void)viewDidLoad {
    [super viewDidLoad];
    //分離新的子執行緒,該方法會自動啟動執行緒
    [NSThread detachNewThreadSelector:@selector(downLoad) toTarget:self withObject:nil];
    __weak typeof(self)weakSelf = self;
    [NSThread detachNewThreadWithBlock:^{//iOS10.0以後才能用
        [weakSelf downLoad1];
    }];
    NSThread * thread = [[NSThread alloc]initWithBlock:^{//iOS10.0以後才能用
        [weakSelf downLoad2];
    }];
    [thread start];
}
-(void)downLoad{
    //獲取圖片url
    NSURL * url = [NSURL URLWithString:@"http://pic.ibaotu.com/00/32/60/42c888piCQhw.jpg-0.jpg!ww700"];
    //根據url獲取圖片二進位制資料
    NSData * data = [NSData dataWithContentsOfURL:url];
    //轉換為圖片
    UIImage * iamge = [UIImage imageWithData:data];
    NSLog(@"%@",[NSThread currentThread]);
    //圖片獲取到後去主執行緒設定圖片重新整理ui
    [self.redImageV performSelectorOnMainThread:@selector(setImage:) withObject:iamge waitUntilDone:YES];
    NSLog(@"end1");
}
//計算程式碼執行時間方法1
-(void)downLoad1{
    //獲取圖片url
    NSURL * url = [NSURL URLWithString:@"http://58pic.ooopic.com/58pic/15/87/48/60c58PICR2A_1024.jpg"];
    NSDate * startTime = [NSDate date];
    //根據url獲取圖片二進位制資料
    NSData * data = [NSData dataWithContentsOfURL:url];
    //轉換為圖片
    UIImage * iamge = [UIImage imageWithData:data];
    NSDate * endTime = [NSDate date];
    NSLog(@"1.時間差為:%f",[endTime timeIntervalSinceDate:startTime]);
    //圖片獲取到後去主執行緒設定圖片重新整理ui
    [self performSelectorOnMainThread:@selector(showImage:) withObject:iamge waitUntilDone:YES];
    NSLog(@"end2");
}
-(void)showImage:(UIImage *)image{
    self.greenImageV.image = image;
    NSLog(@"%@",[NSThread currentThread]);
}
//計算程式碼執行時間方法2
-(void)downLoad2{
    //獲取圖片url
    NSURL * url = [NSURL URLWithString:@"https://ss1.bdstatic.com/70cFuXSh_Q1YnxGkpoWK1HF6hhy/it/u=2585485106,1388364231&fm=27&gp=0.jpg"];
    CFTimeInterval startTime = CFAbsoluteTimeGetCurrent();
    //根據url獲取圖片二進位制資料
    NSData * data = [NSData dataWithContentsOfURL:url];
    //轉換為圖片
    UIImage * iamge = [UIImage imageWithData:data];
    CFTimeInterval endTime = CFAbsoluteTimeGetCurrent();//CFTimeInterval 本為double型別
    NSLog(@"2.時間差為:%f",endTime - startTime);

    //NSLog(@"%@",[NSThread currentThread]);
    //圖片獲取到後去主執行緒設定圖片重新整理ui
    [self.blueImageV performSelectorOnMainThread:@selector(setImage:) withObject:iamge waitUntilDone:YES];
    NSLog(@"end3");
}
@end
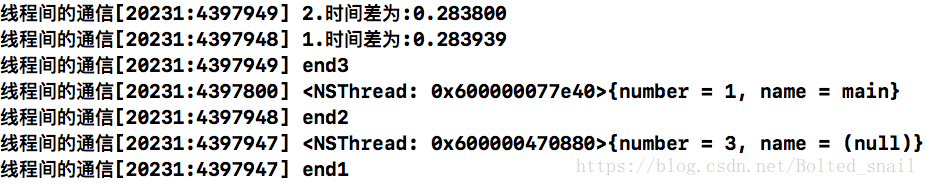
結果可見:子執行緒併發的去下載圖片,然後回到主執行緒去顯示圖片,該示例可以看出下載圖片的時間大概是0.2838秒,跟圖片大小和網路等有關。
執行緒安全
執行緒安全解決方案:可以給執行緒加鎖,在一個執行緒執行該操作的時候,不允許其他執行緒進行操作。iOS 實現執行緒加鎖有很多種方式。@synchronized、 NSLock、NSRecursiveLock、NSCondition、NSConditionLock、pthread_mutex、dispatch_semaphore、OSSpinLock、atomic(property) set/ge等等各種方式。
//synchronized同步鎖
#import "ViewController.h"
@interface ViewController ()
/** 售票員A */
@property (nonatomic, strong) NSThread *threadA;
/** 售票員B */
@property (nonatomic, strong) NSThread *threadB;
/** 售票員C */
@property (nonatomic, strong) NSThread *threadC;

@property (nonatomic, assign) NSInteger totalCount;
@end
@implementation ViewController
-(void)touchesBegan:(NSSet<UITouch *> *)touches withEvent:(UIEvent *)event{
    //設定中票數
    self.totalCount = 20;
    self.threadA = [[NSThread alloc]initWithTarget:self selector:@selector(saleTicket) object:nil];
    self.threadB = [[NSThread alloc]initWithTarget:self selector:@selector(saleTicket) object:nil];
    self.threadC = [[NSThread alloc]initWithTarget:self selector:@selector(saleTicket) object:nil];
    self.threadA.name = @"售票員A";
    self.threadB.name = @"售票員B";
    self.threadC.name = @"售票員C";
    //啟動執行緒
    [self.threadA start];
    [self.threadB start];
    [self.threadC start];
}
-(void)saleTicket{
    //鎖:必須是全域性唯一的
    //1.注意枷鎖的位置
    //2.注意枷鎖的前提條件,多執行緒共享同一塊資源
    //3.注意加鎖是需要代價的,需要耗費效能的
    //4.加鎖的結果:執行緒同步
    while (1) {
        @synchronized(self){
            if (self.totalCount > 0) {
                self.totalCount -= 1;
                //賣出去一張票
                NSLog(@"%@賣出去了一張票,還剩下%zd張票", [NSThread currentThread].name,self.totalCount);
            }else{
                NSLog(@"票賣完了");
                break;
            }
        }

    }
}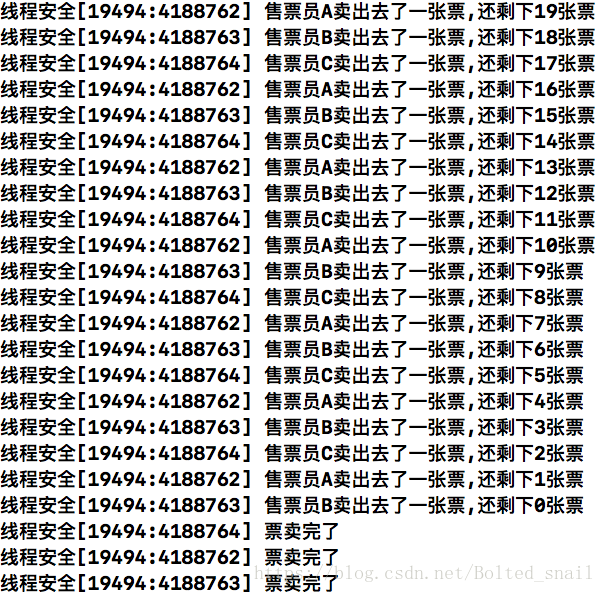
結果可見:售票資料正確,加同步鎖可以保證執行緒安全。
- synchronized 這個主要是考慮多執行緒的程式,這個指令可以將{ } 內的程式碼限制在一個執行緒執行,如果某個執行緒沒有執行完,其他的執行緒如果需要執行就得等著。
- @synchronized的作用是建立一個互斥鎖,保證此時沒有其它執行緒對self物件進行修改。這個是objective-c的一個鎖定令牌,防止self物件在同一時間內被其它執行緒訪問,起到執行緒的保護作用。 一般在公用變數的時候使用,如單例模式或者操作類的static變數中使用。
- 指令@synchronized()需要一個引數。該引數可以使任何的Objective-C物件,包括self。這個物件就是互斥訊號量。他能夠讓一個執行緒對一段程式碼進行保護,避免別的執行緒執行該段程式碼。針對程式中的不同的關鍵程式碼段,我們應該分別使用不同的訊號量。只有在應用程式程式設計執行多執行緒之前就建立好所有需要的互斥訊號量物件來避免執行緒間的競爭才是最安全的。
正確取消執行緒舉例
#import <Foundation/Foundation.h>
@interface JThread : NSThread
- (void)cancelThread;
@end

#import "JThread.h"
@implementation JThread
//結束執行緒的時候,我們可以使用CFRunLoopStop()配合-cancel來結束執行緒
-(void)cancelThread{
    [[NSThread currentThread] cancel];
    CFRunLoopStop(CFRunLoopGetCurrent());
}
@end
————————————————————————————————————————————————————————————————————
@interface ViewController ()
@property(nonatomic ,copy) JThread * customThread;
@end
@implementation ViewController
-(void)touchesBegan:(NSSet<UITouch *> *)touches withEvent:(UIEvent *)event{
    [self threadExample];
}
- (void)threadExample{
    [self.customThread start];//啟動執行緒
    [self performSelector:@selector(handleTimeConsumingOperation) onThread:self.customThread withObject:nil waitUntilDone:NO];//執行緒間通訊
}
//懶載入自定義執行緒
-(NSThread *)customThread
{
    if (!_customThread) {
        _customThread = [[JThread alloc]initWithTarget:self selector:@selector(threadTest:) object:@"建立一個新的執行緒"];//建立
        _customThread.name = @"customThread";//設定名稱
        _customThread.qualityOfService = NSQualityOfServiceDefault;//設定優先順序
    }
    return _customThread;
}
//給執行緒新增RunLoop
- (void)threadTest:(id)pram{
    NSRunLoop * runLoop = [NSRunLoop currentRunLoop];//給當前執行緒新增runLoop
    [runLoop addPort:[NSMachPort port] forMode:NSDefaultRunLoopMode];//給runLoop新增資料來源
    while (![[NSThread currentThread] isCancelled]) {//10秒後runLoop退出,執行緒退出
        [runLoop runMode:NSDefaultRunLoopMode beforeDate:[NSDate dateWithTimeIntervalSinceNow:10]];
    }
}
//處理耗時操作
- (void)handleTimeConsumingOperation{

    for (int i = 0; i < 10000; i++) {
        NSLog(@"%@:%zd",[NSThread currentThread],i);
        if (i == 500) {
            [self.customThread cancelThread];//取消執行緒
            NSLog(@"在當前執行緒中的方法取消執行緒,當前方法任然繼續執行,但後面再新增方法到取消的執行緒中執行,則不會執行了");
            [self performSelector:@selector(test) onThread:self.customThread withObject:nil waitUntilDone:NO];//因為此時執行緒取消後,再用當前取消的執行緒去執行test任務是不能執行的
            self.customThread = nil;
            break;
        }
    }
}
- (void)test{
    NSLog(@"不會再執行了");
}
@end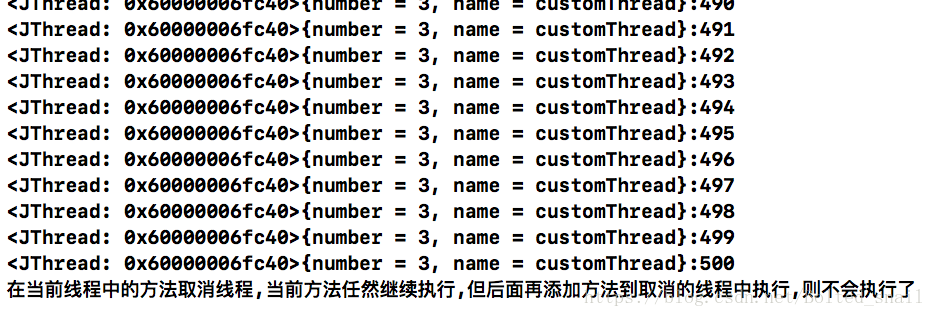
結果可見:test方法沒有呼叫,是因為執行該方法的執行緒在執行該方法之前已經取消了,所以不能往下執行任務了。