
MySQL 5.6 的MASTER – SLAVE 主從例項配置及切換 (一)
MySQL 5.6 的MASTER– SLAVE 主從例項配置及切換 (一)
1. 任務目標
近期在研究openstack中的trove,涉及到 mysql 的 主從熱備的部署和切換,
由於流程複雜,為了更好的理解,直接在Linux上部署,測試一下。
2. 參考
a)MySQL5.6 資料庫主從(Master/Slave)同步安裝與配置詳解2016/5/6
b)Windows下搭建MySQLMaster Slave 2013-08-09
3.測試環境
機器1: 10.0.0.213
機器2:10.0.0.195
需要注意是防火牆
使用的linux變種是AmazonLinux AMI
安裝
yuminstall -y mysql56-server mysql
關閉防火牆:
serviceiptables stop
這個變種版本沒有配置Selinux
檢測兩臺機器間能否ping通。
4.配置MYSQL
在Linux環境下MySQL的配置檔案的位置是在/etc/my.cnf
建立資料庫
createdatabase userdb;
4.I配置MASTER
MYSQL的root使用者的密碼初始為空,需要更改為123456,命令參考如下
[[email protected]]# mysqladmin -u root -p password 123456
Enterpassword:
Warning:Using a password on the command line interface can be insecure.
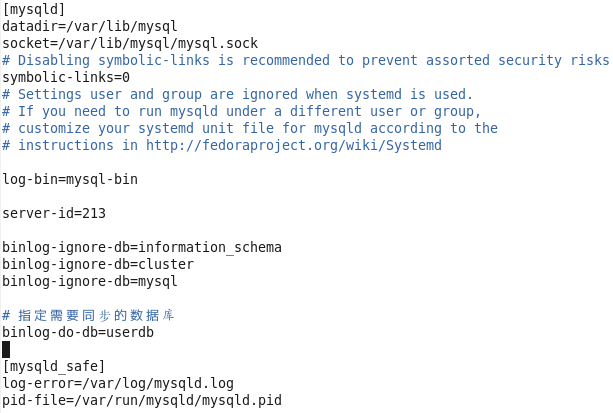
配置檔案內容如下
|
[mysqld] datadir=/var/lib/mysql socket=/var/lib/mysql/mysql.sock # Disabling symbolic-linksis recommended to prevent assorted security risks symbolic-links=0 # Settings user and groupare ignored when systemd is used. # If you need to run mysqldunder a different user or group, # customize your systemdunit file for mysqld according to the # instructions inhttp://fedoraproject.org/wiki/Systemd log-bin=mysql-bin server-id=213 binlog-ignore-db=information_schema binlog-ignore-db=cluster binlog-ignore-db=mysql # 指定需要同步的資料庫 binlog-do-db=userdb [mysqld_safe] log-error=/var/log/mysqld.log pid-file=/var/run/mysqld/mysqld.pid |
重啟服務servicemysqld restart
賦予從庫許可權帳號
mysql-u root -p123456
mysql>
mysql>GRANT FILE ON *.* TO 'root'@'10.0.0.195' IDENTIFIED BY 'mysqlpassword';
QueryOK, 0 rows affected (0.00 sec)
mysql>GRANT REPLICATION SLAVE ON *.* TO 'root'@'10.0.0.195' IDENTIFIED BY'mysql password';
QueryOK, 0 rows affected (0.00 sec)
mysql>FLUSH PRIVILEGES;
QueryOK, 0 rows affected (0.00 sec)
mysql>
重啟服務,檢視主庫資訊,參考如下:
mysql>show master status;
+------------------+----------+--------------+----------------------------------+-------------------+
|File | Position | Binlog_Do_DB | Binlog_Ignore_DB | Executed_Gtid_Set |
+------------------+----------+--------------+----------------------------------+-------------------+
|mysql-bin.000002 | 120 | userdb |information_schema,cluster,mysql | |
+------------------+----------+--------------+----------------------------------+-------------------+
1row in set (0.00 sec)
mysql>
4.II配置SLAVER
配置檔案內容
|
[mysqld] datadir=/var/lib/mysql socket=/var/lib/mysql/mysql.sock #Disabling symbolic-links is recommended to prevent assortedsecurity risks symbolic-links=0 #Settings user and group are ignored when systemd is used. # Ifyou need to run mysqld under a different user or group, #customize your systemd unit file for mysqld according to the #instructions in http://fedoraproject.org/wiki/Systemd log-bin=mysql-bin server-id=195 binlog-ignore-db=information_schema binlog-ignore-db=cluster binlog-ignore-db=mysql #指定需要同步的資料庫 replicate-do-db=userdb replicate-ignore-db=mysql log-slave-updates slave-skip-errors=all slave-net-timeout=60 [mysqld_safe] log-error=/var/log/mysqld.log pid-file=/var/run/mysqld/mysqld.pid |
重啟服務servicemysqld restart
修改對應的MASTER資訊
mysql>show slave status;
Emptyset (0.00 sec)
mysql>
mysql>stop slave; ##關閉Slave
QueryOK, 0 rows affected, 1 warning (0.00 sec)
mysql>change master tomaster_host='10.0.0.213',master_user='root',master_password='mysqlpassword',master_log_file='mysql-bin.000004',master_log_pos=120;##粗體藍色部分,對應Master輸出資訊
QueryOK, 0 rows affected, 2 warnings (0.04 sec)
mysql>start slave; ##開啟Slave
QueryOK, 0 rows affected (0.01 sec)
檢視從庫資訊,輸出參考如下
|
mysql> show slave status\G; ***************************1. row *************************** Slave_IO_State:Waiting for master to send event Master_Host:10.0.0.213 Master_User:root Master_Port:3306 Connect_Retry:60 Master_Log_File:mysql-bin.000004 Read_Master_Log_Pos:120 Relay_Log_File:mysqld-relay-bin.000002 Relay_Log_Pos:283 Relay_Master_Log_File:mysql-bin.000004 Slave_IO_Running:Yes Slave_SQL_Running:Yes Replicate_Do_DB:userdb Replicate_Ignore_DB:mysql Replicate_Do_Table: Replicate_Ignore_Table: Replicate_Wild_Do_Table: Replicate_Wild_Ignore_Table: Last_Errno:0 Last_Error: Skip_Counter:0 Exec_Master_Log_Pos:120 Relay_Log_Space:457 Until_Condition:None Until_Log_File: Until_Log_Pos:0 Master_SSL_Allowed:No Master_SSL_CA_File: Master_SSL_CA_Path: Master_SSL_Cert: Master_SSL_Cipher: Master_SSL_Key: Seconds_Behind_Master:0 Master_SSL_Verify_Server_Cert:No Last_IO_Errno:0 Last_IO_Error: Last_SQL_Errno:0 Last_SQL_Error: Replicate_Ignore_Server_Ids: Master_Server_Id:213 Master_UUID:767e164f-0932-11e7-942a-0e8f186b32da Master_Info_File:/var/lib/mysql/master.info SQL_Delay:0 SQL_Remaining_Delay:NULL Slave_SQL_Running_State:Slave has read all relay log; waiting for the slave I/O thread toupdate it Master_Retry_Count:86400 Master_Bind: Last_IO_Error_Timestamp: Last_SQL_Error_Timestamp: Master_SSL_Crl: Master_SSL_Crlpath: Retrieved_Gtid_Set: Executed_Gtid_Set: Auto_Position:0 1 row in set (0.00 sec) ERROR: No query specified mysql> |
5. 測試
5.I 寫MASTER
|
mysql> use userdb; Database changed mysql> show tables; Empty set (0.00 sec) mysql> create tabletest1( id int, name char(20) ); Query OK, 0 rows affected(0.27 sec) mysql> insert into test1( id, name ) values ( 1, 'unknown'); Query OK, 1 row affected(0.02 sec) mysql> |
5.II 讀SLAVE
|
mysql> use userdb; Reading table informationfor completion of table and column names You can turn off thisfeature to get a quicker startup with -A Database changed mysql> show tables; +------------------+ | Tables_in_userdb | +------------------+ | test1 | +------------------+ 1 row in set (0.00 sec) mysql> mysql> show columns from test1; +-------+----------+------+-----+---------+-------+ | Field | Type | Null |Key | Default | Extra | +-------+----------+------+-----+---------+-------+ | id | int(11) | YES | | NULL | | | name | char(20) | YES | | NULL | | +-------+----------+------+-----+---------+-------+ 2 rows in set (0.00 sec) mysql> select * fromtest1; Empty set (0.00 sec) mysql> select * fromtest1; +------+---------+ | id | name | +------+---------+ | 1 | unknown | +------+---------+ 1 row in set (0.00 sec) mysql> |

進一步
a) 沒有測試,如果SLAVE中沒有建立對應的資料庫userdb的情況下,能夠自動建立?
相關推薦
MySQL 5.6 的MASTER – SLAVE 主從例項配置及切換 (一)
MySQL 5.6 的MASTER– SLAVE 主從例項配置及切換 (一) 1. 任務目標 近期在研究openstack中的trove,涉及到 mysql 的 主從熱備的部署和切換, 由於流程複雜,為了更好的理解,直接在Linux上部署,測試一下。 2. 參考 a)
mysql之 mysql 5.6不停機主從搭建(一主一從基於GTID復制)
從庫 creat 不停機 event rep ply copy from end 環境說明:版本 version 5.6.25-log 主庫ip: 10.219.24.25從庫ip:10.219.24.22os 版本: centos 6.7已安裝熱備軟件:xtrabacku
MySQL 5.6容器使用自定義配置文件的權限問題
folder 圖片 OS roo title mage issues ges back 提出問題:???????? 在使用Rancher2.0.2部署一個mysql deployment時,我們會發現,如果只設置/var/lib/mysql數據目錄時,mysql容器(pod
mysql 5.6.20的安裝、配置服務、設定編碼格式
一、安裝 安裝環境 系統:Window 32 版本:Mysql 5.6.20 2、 我們開啟下載下來的mysql-5.6.20-win32.msi安裝包 3、 選擇Next 下一步:
mysql 5 6 24 winx64免安裝配置
引言 對於mysql
MySQL 5.6.21版本安裝例項
一、編譯安裝MySQL前的準備工作 1、#yum –y install gcc gcc++ ncurses-devel perl 安裝編譯原始碼所需的工具和庫 2、下載cmake原始碼包
mysql-5.6.25免安裝版配置方法
一、首先要下載mysql-5.6.25-winx64,這裡就不提供下載了 二、解壓在“D:\Mysql“,可以根據自己實際情況選擇,MySQL的全路徑即為:“D:\Mysql\mysql-5.6.25-winx64” 三、配置my.ini檔案,將下面的配置儲存成my.in
mysql 5.6免安裝版本的配置和安裝
對於mysql來說,它的my.ini配置檔案最為重要,對於伺服器版本來說,需要在mysqld(代表伺服器)下面加入這幾條必要的選項 sql_mode=NO_ENGINE_SUBSTITUTION,S
mysql之 mysql 5.6不停機主從搭建(一主一從基於日誌點複製)
環境說明: 版本 version 5.6.25-log 主庫ip: 10.219.24.25 從庫ip:10.219.24.22 os 版本: centos 6.7 已安裝熱備軟體:xtrabackup 防火牆已關 補充: 主從複製原理: http://blog.
MySQL 5.6.26免安裝版配置
首先到http://dev.mysql.com/ 上下載windows版mysql5.6免安裝zip包。然後將zip包解壓到D:\mysql-5.6.20-winx64下。 2.複製mysql下的my-default.ini, 在同目錄下建立my.ini. my.
MySQL 5.6下table_open_cache引數合理配置詳解
table_open_cache指定表快取記憶體的大小。每當MySQL訪問一個表時,如果在表緩衝區中還有空間,該表就被開啟並放入其
MySql-5.7.13-win64的安裝配置及問題解決
今天下載了mysql5.7.13 結果出現了很嚴重的啟動問題,沒有辦法解決。決定把解決歷程記錄在部落格上。 首先,下載mysql 下面傳送門:http://dev.mysql.com/downloads/mysql/ 然後在本地解壓。之後開啟cmd進入MySql-5.7.1
MySQL 5.6.35主從同步配置案例
MySQL 5.6.35主從同步配置案例MySQL 5.6主從同步配置案例分享本文環境 主庫:Redhat 6.5 x64 192.168.1.180 mysql-5.6.35 備庫:Redhat 6.5 x64 192.168.1.181 mysql-5.6.35 一、常規配置方式一1. mysql主
Mysql 5.6主從同步配置與解決方案
主庫IP:192.168.1.10 從庫IP:192.168.1.11 1、主庫配置編輯my.cnf: # 啟用二進位制日誌 log_bin = mysql-bin server-id = 111 log-bin-index=mysql-bin.index
Window環境下配置MySQL 5.6的主從復制、備份恢復
end inf content 復制 grant -h 正常的 mysql 5.6 出現 原文:Window環境下配置MySQL 5.6的主從復制、備份恢復1、環境準備 Windows 7 64位 MySQL 5.6 主庫:192.168.103.
mysql-5.6.17-win32免安裝版配置
user .exe rem rac mod 環境變量配置 登錄 setting bst mysql-5.6.17-win32免安裝版配置詳解 工具/原料 windows 2003 R2 mysql-5.6.17-win32.zip
MySQL master-slave主從復制環境搭建初試
entos lob 根據 server-id 情況 href mysql- test tab 原文:MySQL master-slave主從復制環境搭建初試 環境為centos 7.2+mysql 5.7,網上教程很多,原理也不復雜(深知自己踩的坑還不夠) 正常情
MySQL 5.6 (Win7 64位)下載、安裝與配置圖文教程
服務 建立 basedir 字長 目錄 之前 配置環境 改名 一次 一. 工具 Win7 64位操作系統 二. 步驟 第一步:下載安裝包 下載 地址:http://www.mysql.com/ 截止到目前(2016/7/24) ,官網的最新版本是5.7.13
Mysql 5.6多實例標準化安裝與配置
mysq mir -s name .gz ofo libc com fin 一. 下載並解壓wget http://mirrors.sohu.com/mysql/MySQL-5.6/mysql-5.6.36-linux-glibc2.5-x86_64.tar.gzfind
Centos6.4 + mysql-5.6.38-linux-glibc2.12-x86_64.tar 實現mysql主從復制
ide mysql-bin log_file color log-bin mysq fig isam 直接 mysql安裝方法:http://www.cnblogs.com/lin3615/p/4376224.html 用到的是兩臺服務器 主:192.168.1.1