
Postgres-xl叢集部署 + Haproxy 負載均衡
Postgres-xl 簡介
Postgres的-XL是一個基於PostgreSQL資料庫的橫向擴充套件開源SQL資料庫叢集,具有足夠的靈活性來處理不同的資料庫工作負載:
- 完全ACID,保持事務一致性
- OLTP 寫頻繁的業務
- 需要MPP並行性商業智慧/大資料分析
- 操作資料儲存
- Key-value 儲存
- GIS的地理空間
- 混合業務工作環境
- 多租戶服務提供商託管環境
- Web 2.0
如圖所示:(系統圖)
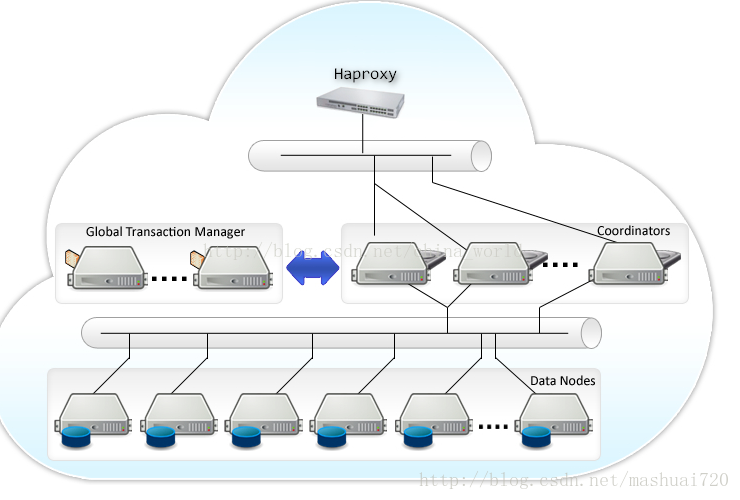
元件介紹
Global Transaction Monitor (GTM)
全域性事務管理器,確保群集範圍內的事務一致性。
GTM負責發放事務ID和快照作為其多版本併發控制的一部分。
叢集可選地配置一個備用GTM,以改進可用性。
此外,可以在協調器間配置代理GTM,可用於改善可擴充套件性,減少GTM的通訊量。GTM Standby
GTM的備節點,在pgxc,pgxl中,GTM
控制所有的全域性事務分配,如果出現問題,就會導致整個叢集不可用,
為了增加可用性,增加該備用節點。當GTM出現問題時,GTMStandby
可以升級為GTM,保證叢集正常工作。GTM-Proxy
GTM需要與所有的Coordinators通訊,為了降低壓力,
可以在每個Coordinator機器上部署一個GTM-Proxy。Coordinator
協調員管理使用者會話,並與GTM和資料節點進行互動。
協調員解析,並計劃查詢,並給語句中的每一個元件傳送下一個序列化的全域性性計劃。
為節省機器,通常此服務和資料節點部署在一起。Data Node
資料節點是資料實際儲存的地方。資料的分佈可以由
DBA來配置。為了提高可用性,可以配置資料節點的熱備以便進行故障轉移準備。
總結:
gtm是負責ACID的,保證分散式資料庫全域性事務一致性。得益於此,就算資料節點是分佈的,但是你在主節點操作增刪改查事務時,就如同只操作一個數據庫一樣簡單。
Coordinator是排程的,將操作指令傳送到各個資料節點。
datanodes是資料節點,分散式儲存資料。
安裝規劃表:

注意:PGHOME=/home/pgxl_9.5
安裝環境介紹
1).操作環境
    Window7 64位系統 電腦一臺

2).使用工具
    putty:連線伺服器
    pscp:主要用於windows向linux傳送檔案,或由linux系統向windows傳送檔案;

3).伺服器
    3臺伺服器,並各自建立有3個虛擬機器,系統版本統一為 Ubuntu(16.04.3)系統;
4).postgres-xl 版本: postgres-xl-9.5r1.4.tar.gz
安裝準備
概述:安裝準備,主要進行安裝時,一些準備工作。

1)下載方式:
    a.git方式下載:
    git clone git://git.postgresql.org/git/postgres-xl.git

    注意:請安裝git,可採用sudo apt-get install git

    b.網頁下載:
    網址為:https://sourceforge.net/projects/postgres-xl/
    下載完後將軟體包放入D盤根目錄下

    注意:這裡採用網頁方式下載,主要是因為ubuntu安裝的git,下載該軟體包比較麻煩。

2)將下載好的壓縮包傳送到規劃表中IP地址172.17.30.15 -- 172.17.30.22 共8個系統中
    a.採用Putty連線伺服器:
        (1)點選Session:
            Host Name(or IP address):輸入連線伺服器的IP,點選Open連線到伺服器
        (2)在根目錄下新建資料夾 postgres-xl_installPackage ,用以存放postgres-xl壓縮包

    b.採用pscp傳送檔案:
        (1)下載pscp工具:
            下載網址:https://www.chiark.greenend.org.uk/~sgtatham/putty/latest.html
        (2)將下載好的pscp.exe檔案放到putty.exe一樣的目錄
        (3)開始-執行-開啟cmd視窗:
            1.進入到pscp.exe目錄
            2.輸入如下命令進行傳送:
            pscp 傳送檔案 主機名@IP:傳送目錄
            如:
            pscp D:\postgres-xl-9.5r1.4.tar.gz [email protected]:./postgres-xl_installPackage
安裝Postgres-xl前配置
概述:介紹在Postgres-xl安裝前,一些配置。
注意:除了安裝負載均衡的伺服器外,都要安裝。
分為:
        1:解壓postgres-xl壓縮包
        2:建立一個使用者,使用者名稱為postgres,密碼為123456
        3:為postgres使用者設定免密登入
        4:修改/etc/hosts中內容
        5:安裝postgrex-xl相關依賴包
        6:編譯安裝postgres-xl
        7:設定postgres-xl環境變數
1 解壓postgrex-xl壓縮包
1)將資料夾postgres_installPackage 目錄下的壓縮包解壓
    a.進入壓縮包目錄cd /postgres_installPackage
    b.解壓檔案:sudo tar –zvxf  postgres-xl-9.5rl.4.tar.gz
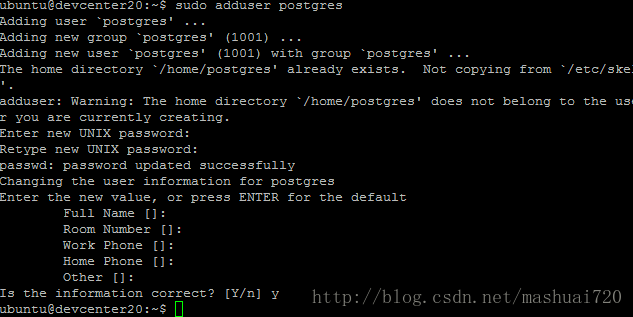
2 建立一個使用者,使用者名稱為postgres,密碼為123456
1)建立使用者,使用者名稱:posgres,密碼為:123456
    a.建立使用者:sudo adduser postgres
    b.設定使用者密碼:按提示輸入即可
    c.如下圖所示
    d.刪除使用者時,使用命令:sudo deluser 使用者名稱

 注意:建議不使用sudo useradd postgres建立,如果建立了,請輸入sudo userdel postgres刪除。

注意:除了安裝負載均衡的伺服器外,都要安裝。
如圖所示:
3 為postgres使用者設定免密登入
在ubuntu中使用者輸入:sudo usermod –a –G sudo postgres
切換使用者為postgres: 輸入如下命令sudo postgres
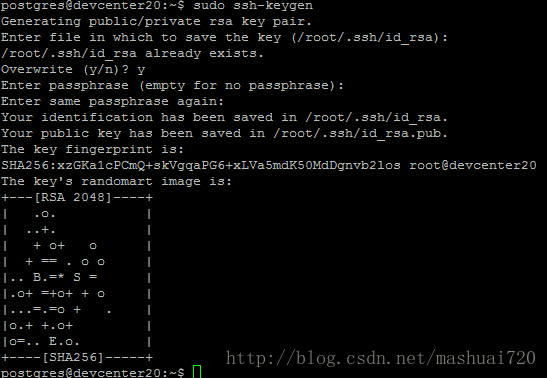
1)設定金鑰
輸入命令 sudo ssh-keygen,一直接按enter即可
注意:如果sudo ssh-keygen有錯誤,可嘗試ssh-keygen
如圖所示:
 2)金鑰傳輸(除了當前IP地址,每個IP地址都傳輸一次)
    命令:ssh-copy-id -i ~/.ssh/id_rsa.pub [email protected]

注意:!!!
    1.除了安裝負載均衡的伺服器外,都要進行金鑰傳輸。可以簡單理解:假如有三臺伺服器用來部署postgres-xl,分別A,B,C.在進行金鑰傳輸時,A的金鑰,傳輸給B,C;B的金鑰,傳輸給A,C;C的金鑰,傳送給A,B;

    2.主要修改[email protected]。將IP=172.17.30.204改為要傳輸伺服器的IP即可

    3.可以通過ifconfig 進行查詢Ip
如圖所示:配置IP:172.17.30.204 傳送到172.17.30.204(例子)

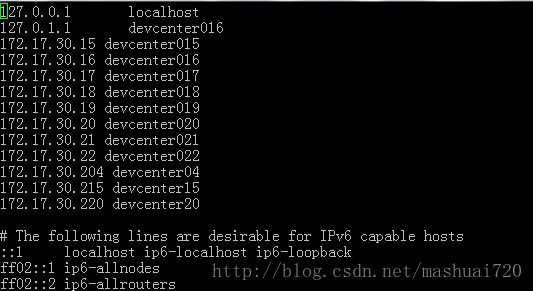
4 修改/etc/hosts中內容
概述:配置主機IP及對應的主機名
1).採用命令:sudo vi /etc/hosts
2).驗證:ping Ip eg: ping 172.17.30.204
3).如果驗證不通過,可能需要重啟:sudo reboot

注意: !!!
    1.除了安裝負載均衡的伺服器外,都要進行修改。
    2.每臺伺服器(除了安裝負載均衡的伺服器),都要新增(除了安裝負載均衡的伺服器)的所有IP和主機名

eg:如果有三臺伺服器,每臺伺服器新增
新增內容:
    172.17.30.15 devcenter015
        172.17.30.16 devcenter016
        172.17.30.17 devcenter017
        172.17.30.18 devcenter018
        172.17.30.19 devcenter019
        172.17.30.20 devcenter020
        172.17.30.21 devcenter021
        172.17.30.22 devcenter022
        172.17.30.204 devcenter04
        172.17.30.215 devcenter15
        172.17.30.220 devcenter20
如圖所示:
5 安裝postgres-xl相關依賴包
概述:安裝postgres-xl進行編譯時,所需要的依賴包

依賴包:
make 、flex、bison、openjade、docbook-dsssl
readline、zlib

ubuntu:安裝命令sudo apt-get install 安裝包名

注意:
    1.readline,zlib在ubuntu就存在了
    2.可以通過如下命令進行檢視:
        ldconfig -p | grep readline

    3.可以安裝: sudo apt-get install libreadline6-dev
6 編譯安裝postgres-xl
概述:如何安裝postgres-xl

注意:如下操作,請切換到postgres使用者下進行。採用
su postgres切換

1).編譯安裝postgres-xl

    a.在/home/postgres下建立目錄
        採用命令: sudo mkdir /home/postgres/pgxl_9.5

    b.進入到postgres-xl的解壓目錄
        eg:
            cd /postgres-xl_installPackpage/pgxlgres-xl-9.5rl.4

    c.執行如下命令:
        ./configure --prefix=/home/postgres/pgxl_9.5 --without-readline --without-zlib
    主要是將編譯好的一些檔案放在指定目錄下

    d.執行如下命令:(編譯)
        make

    e.執行安裝命令:
        sudo make install

注意:sudo make install有錯誤時,請執行make install安裝
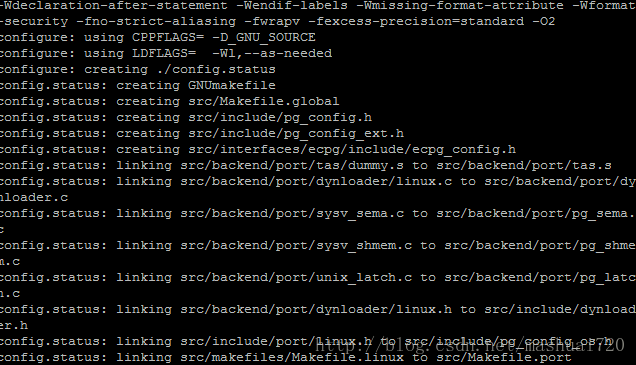
如圖所示:(./configure –prefex=/home/postgres/pgxl_9.5)
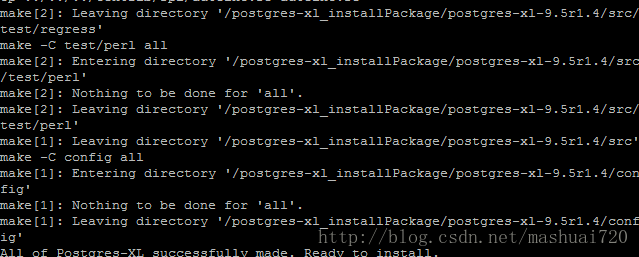
如圖所示:(make)
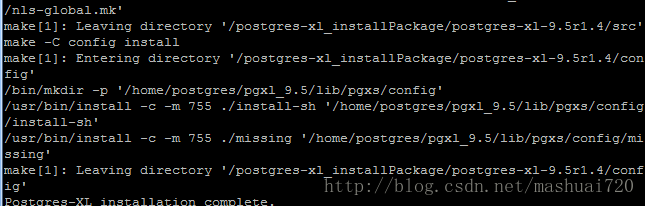
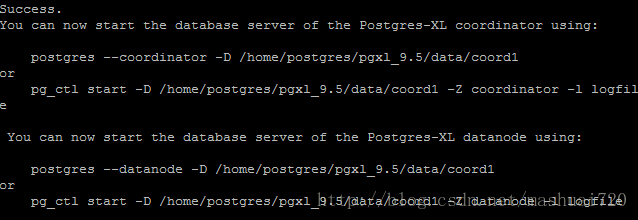
如圖所示:(sudo make install)
7 設定postgres環境變數
概述:主要將/home/postgres/.bashrc新增內容

內容如下:
#set postgres path
export PGHOME=/home/postgres/pgxl_9.5
export LD_LIBRARY_PATH=$PGHOME/lib:$LD_LIBRARY_PATH
export PATH=$PGHOME/bin:$PATH

1). 使得修改的內容生效:source /home/postgres/.bashrc

2).驗證如下:輸入echo $PGHOME 出現:/home/postgres/pgxl_9.5
初始化gtm,coordinator,datanode
概述:初始化gtm,coordinator,datanode生成相關配置檔案

    1).根據規劃表格,建立相應目錄gtm,coordinator,datanode目錄
    eg:
        在172.17.30.16的建立/home/postgres/pgxl_9.5/data,以及/home/postgres/pgxl_9.5/data/dn1和/home/postgres/pgxl_9.5/data/dn2目錄

    2).初始化gtm角色
        a.設定目錄許可權:eg:sudo chown postgres /home/postgres/pgxl_9.5/data/gtm
            b.執行命令:initgtm -Z gtm -D /home/postgres/pgxl_9.5/data/gtm

    3.初始化coordinator角色
        a.設定目錄許可權:eg:sudo chown postgres /home/postgres/pgxl_9.5/data/coord1
        b.執行命令:initdb -D /home/postgres/pgxl_9.5/data/coord1 --nodename coord1 -E UTF8 --locale=C -U postgres -W

    4.初始化datanode角色
        a.設定目錄許可權:eg:sudo chown postgres /home/postgres/pgxl_9.5/data/dn1
        b.執行命令:initdb -D /home/postgres/pgxl_9.5/data/dn1 --nodename dn1 -E UTF8 --locale=C -U postgres –W
        注意:
            nodename dn1:根據建立目錄名字修改。如/home/postgres/pgxl_9.5/data/dn3初始化時,為initdb -D /home/postgres/pgxl_9.5/data/dn3 --nodename dn3 -E UTF8 --locale=C -U postgres –W

    注意:
        1.請在安規表格中分配角色,進行相應的初始化操作。如,172.17.30.215中分配兩個datanode角色,相應目錄為/home/postgres/pgxl_9.5/data/dn1,/home/postgres/pgxl_9.5/data/dn2,所以初始化時執行initdb -D /home/postgres/pgxl_9.5/data/dn1 --nodename dn1 -E UTF8 --locale=C -U postgres –W和initdb -D /home/postgres/pgxl_9.5/data/dn2 --nodename dn2 -E UTF8 --locale=C -U postgres –W

        2.如果不執行設定目錄許可權,可能直接執行初始化命令,會出錯
如圖所示:(初始化gtm)
如圖所示:(初始化coordinator)

如圖所示:(初始化datanode)
修改postgrex-xl配置檔案
概述:根據初始化gtm,coordinator,datanode生成的配置檔案,進行相應的修改
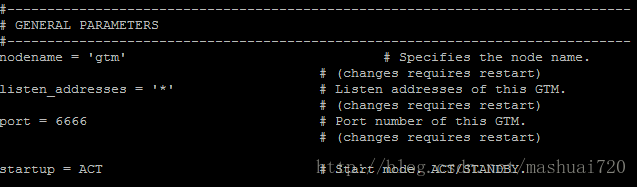
1).修改gtm生成的配置檔案:gtm.conf.檔案所在目錄為:/home/postgres/pgxl_9.5/data/gtm
修改內容為:
nodename = 'gtm'
listen_addresses = '*'
port =6666 #gtm埠
startup = ACT
注意:有的前面有‘#’,去掉#號
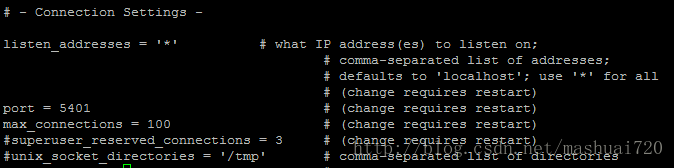
2).修改coordinator生成的配置檔案:postgresql.conf檔案。檔案所在目錄:/home/postgres/pgxl_9.5/coordinator角色目錄。eg:/home/postgres/pgxl_9.5/coord1
修改內容:
# - Connection Settings - (修改一)
listen_addresses = '*'
port = 5301 #coordinator埠設定,coord1和coord2埠都為5301
max_connections = 100
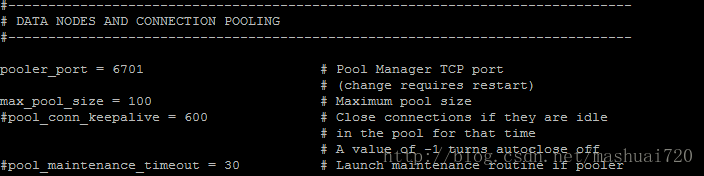
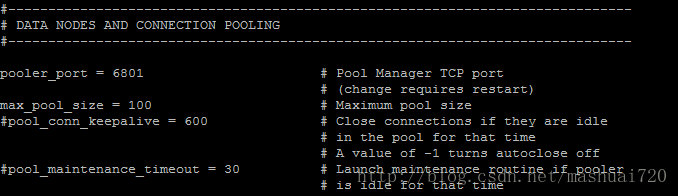
# DATA NODES AND CONNECTION POOLING (修改二)
#----------------------------------
pooler_port = 6701 #coord2這個埠也改為6701
max_pool_size = 100
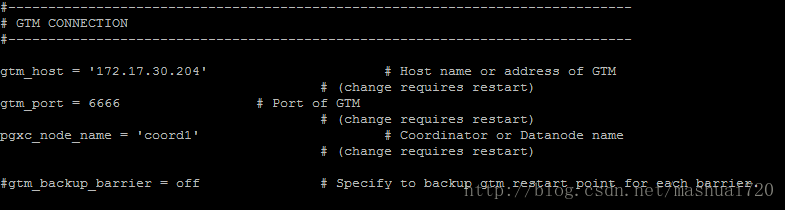
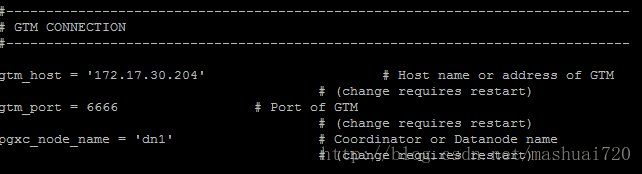
# GTM CONNECTION
#--------------------------
gtm_host = '172.17.30.16' # gtm所在的主機地址
gtm_port = 6666 #gtm配置中,gtm埠號配置為6666
注意:根據實際情況進行修改
3).修改coordinator,datanode中的pg_hba.conf檔案,檔案所在目錄:/home/postgres/pgxl_9.5/相應角色目錄。eg:/home/postgres/pgxl_9.5/coord1
修該內容:
# "local" is for Unix domain socket connections only
local all all trust
# IPv4 local connections:
host all all 0.0.0.0/0 trust
# IPv6 local connections:
host all all ::1/128 trust
4).修改datanode生成的配置檔案:postgresql.conf檔案。檔案所在目錄:/home/postgres/pgxl_9.5/datanode角色目錄。eg:/home/postgres/pgxl_9.5/coord1
修改內容:
# - Connection Settings - (修改一)
listen_addresses = '*'
port = 5401 #注意:同一臺伺服器中埠不同,但不同伺服器的埠可以相同dn2,dn3,dn4配置檔案分別改為5402、5401、5402,dn3和dn4在一臺伺服器上
max_connections = 100
# DATA NODES AND CONNECTION POOLING (修改二)
#----------------------------------
pooler_port = 6801 #dn2,dn3,dn4配置檔案都改為6801
#同一臺機器要使用不同的埠,如dn1,dn2在同一臺機器上分別是6801,6802
#dn3,dn4上埠號也是6801,6802。就是同一機器埠號不同即可。
max_pool_size = 100
# GTM CONNECTION
#--------------------------
gtm_host = '172.17.30.16' # gtm所在的主機地址
gtm_port = 6666 #gtm配置中,gtm埠號配置為6666
注意:根據實際情況進行修改
5).重啟gtm,coordinator,datanode伺服器
採用命令:sudo reboot
注意:當sudo reboot有問題時,可以採用reboot命令
如圖所示:(修改gtm)
如圖所示:(修改coordinator)
修改一:

修改二:
修改三:
如圖所示:(修改datanode)
修改一:
修改二:
修改三:
啟動postgres-xl
啟動順序:
1.啟動gtm
2.啟動全部DataNode
3.最後啟動全部coordinator
1).啟動gtm:gtm_ctl start -Z gtm -D /home/postgres/pgxl_9.5/data/gtm
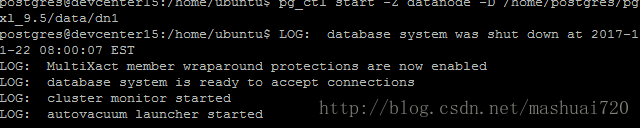
2).啟動datanode:pg_ctl start -Z datanode -D /home/postgres/pgxl_9.5/data/dn1
注意:有多少個datanode,就得啟動多少個datanode,注意修改目錄,如啟動datanode2:pg_ctl start -Z datanode -D /home/postgres/pgxl_9.5/data/dn2
3).啟動coordinator:pg_ctl start -Z coordinator -D /home/postgres/pgxl_9.5/data/coord1
注意:有多少個coordinator,就得啟動多少個coordinator,注意修改目錄,如啟動pg_ctl start -Z coordinator -D /home/postgres/pgxl_9.5/data/coord2
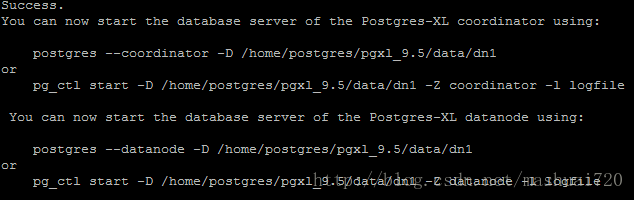
如圖所示:(啟動gtm)

如圖所示:(啟動datanode)
如圖所示: (啟動coordinator)
如圖所示:(修改coordinator,datanode中的pg_hba.conf檔案)

postgres-xl叢集部署
概述:介紹配置postgres-xl叢集,這裡的配置針對角色為coordinator和datanodede的伺服器

1).以postgres使用者進入psql:psql -p 埠號
    如:psql -p 5301

2).配置coordinator

    a.查詢節點select * from pgxc_node; 查詢存在的配置的節點

    b.更新存在的節點:alter node 節點名字 with(type=節點型別,host='對應角色Ip',
        port='對應角色Ip');
        如:如果查詢存在coord2,就更新:alter  node coord2 with (type=coordinator,host='172.17.30.18', port=5301);其中172.17.30.18
      對應的是所角色所在的伺服器IP.5301:對應角色所在伺服器的埠。
      注意:根據實際情況修改

    c.製造節點coordinator,datanode節點:alter node 節點名字 with(type=節點型別,    host='對應角色Ip',  port='對應角色Ip');
        如:create node coord1(節點名字) with (type=coordinator,host='172.17.30.18', port=5301);

    d.設定第一個資料資料節點:為第一優先
        如:
            create node dn1 with (type=datanode, host='172.17.30.19',port=5401,primary,preferred);

    e.重新載入修改的節點:select pgxc_pool_reload();

    f.查詢修改後的節點:select * from pgxc_node;

3).配置datanode節點:
      a.和coordinator配置一樣

注意:上面的配置針對角色為coordinator和datanodede的伺服器都要設定
具體修改可參考:
coord1:
    psql (PGXL 9.5r1.5, based on PG 9.5.6 (Postgres-XL 9.5r1.5))

    Type "help" for help.


    postgres=# select * from pgxc_node;

    postgres=# alter  node coord1 with (type=coordinator,host='172.17.30.17', port=5301);

    postgres=# create node coord2 with (type=coordinator,host='172.17.30.18', port=5301);


    postgres=# create node dn1 with (type=datanode, host='172.17.30.19',port=5401,primary,preferred);

    postgres=# create node dn2 with (type=datanode, host='172.17.30.20',port=5401);

    postgres=# create node dn3 with (type=datanode, host='172.17.30.21',port=5401);

    postgres=# create node dn4 with (type=datanode, host='172.17.30.22',port=5401);


    postgres=# select pgxc_pool_reload();

    postgres=# select * from pgxc_node;
coord2
        psql (PGXL 9.5r1.5, based on PG 9.5.6 (Postgres-XL 9.5r1.5))

    Type "help" for help.


    postgres=# select * from pgxc_node;

    postgres=# alter  node coord2 with (type=coordinator,host='172.17.30.18', port=5301);

    postgres=# create node coord1 with (type=coordinator,host='172.17.30.17', port=5301);


    postgres=# create node dn1 with (type=datanode, host='172.17.30.19',port=5401,primary,preferred);

    postgres=# create node dn2 with (type=datanode, host='172.17.30.20',port=5401);

    postgres=# create node dn3 with (type=datanode, host='172.17.30.21',port=5401);

    postgres=# create node dn4 with (type=datanode, host='172.17.30.22',port=5401);


    postgres=# select pgxc_pool_reload();

    postgres=# select * from pgxc_node;
dn1
        psql (PGXL 9.5r1.5, based on PG 9.5.6 (Postgres-XL 9.5r1.5))

    Type "help" for help.


    postgres=# select * from pgxc_node;

    postgres=# create  node coord2 with (type=coordinator,host='172.17.30.18', port=5301);

    postgres=# create node coord1 with (type=coordinator,host='172.17.30.17', port=5301);


    postgres=# alter node dn1 with (type=datanode, host='172.17.30.19',port=5401,primary,preferred);

    postgres=# create node dn2 with (type=datanode, host='172.17.30.20',port=5401);

    postgres=# create node dn3 with (type=datanode, host='172.17.30.21',port=5401);

    postgres=# create node dn4 with (type=datanode, host='172.17.30.22',port=5401);


    postgres=# select pgxc_pool_reload();

    postgres=# select * from pgxc_node;
dn2
        psql (PGXL 9.5r1.5, based on PG 9.5.6 (Postgres-XL 9.5r1.5))

    Type "help" for help.


    postgres=# select * from pgxc_node;

    postgres=# create  node coord2 with (type=coordinator,host='172.17.30.18', port=5301);

    postgres=# create node coord1 with (type=coordinator,host='172.17.30.17', port=5301);


    postgres=# create node dn1 with (type=datanode, host='172.17.30.19',port=5401,primary,preferred);

    postgres=# alter node dn2 with (type=datanode, host='172.17.30.20',port=5401);

    postgres=# create node dn3 with (type=datanode, host='172.17.30.21',port=5401);

    postgres=# create node dn4 with (type=datanode, host='172.17.30.22',port=5401);


    postgres=# select pgxc_pool_reload();

    postgres=# select * from pgxc_node;
dn3
        psql (PGXL 9.5r1.5, based on PG 9.5.6 (Postgres-XL 9.5r1.5))

    Type "help" for help.


    postgres=# select * from pgxc_node;

    postgres=# create  node coord2 with (type=coordinator,host='172.17.30.18', port=5301);

    postgres=# create node coord1 with (type=coordinator,host='172.17.30.17', port=5301);


    postgres=# create node dn1 with (type=datanode, host='172.17.30.19',port=5401,primary,preferred);

    postgres=# create node dn2 with (type=datanode, host='172.17.30.20',port=5401);

    postgres=# alter node dn3 with (type=datanode, host='172.17.30.21',port=5401);

    postgres=# create node dn4 with (type=datanode, host='172.17.30.22',port=5401);


    postgres=# select pgxc_pool_reload();

    postgres=# select * from pgxc_node;
dn4
        psql (PGXL 9.5r1.5, based on PG 9.5.6 (Postgres-XL 9.5r1.5))

    Type "help" for help.


    postgres=# select * from pgxc_node;

    postgres=# create  node coord2 with (type=coordinator,host='172.17.30.18', port=5301);

    postgres=# create node coord1 with (type=coordinator,host='172.17.30.17', port=5301);


    postgres=# create node dn1 with (type=datanode, host='172.17.30.19',port=5401,primary,preferred);

    postgres=# create node dn2 with (type=datanode, host='172.17.30.20',port=5401);

    postgres=# create node dn3 with (type=datanode, host='172.17.30.21',port=5401);

    postgres=# alter node dn4 with (type=datanode, host='172.17.30.22',port=5401);


    postgres=# select pgxc_pool_reload();

    postgres=# select * from pgxc_node;
測試安裝
概述:主要測試postgres-xl安裝是否成功

1).測試分佈模式的測試表並插入資料

    a.以postgres使用者進入172.17.30.17:psql -p 埠號
    如:psql -p 5301

    b.coordinator角色建立表和插入資料
    如:
        postgres=#  create table t1(id integer, name varchar(20));

        postgres=#  insert into t1 values(1,'測試1');

        postgres=#  insert into t1 values(2,'測試2');

        postgres=#  insert into t1 values(3,'測試3');

        postgres=#  insert into t1 values(4,'測試4');

    c.查詢資料是否插入成功:
        (1)datanode:有點資料節點可能查詢不到資料
        (2)coordinator:每個coordinator角色都能查詢插入的全部資料

    d.資料查詢:
        (1)這裡採用:postgres=# select * from t1;

2).測試複製模式的測試表並插入資料

    a.以postgres使用者進入172.17.30.18:psql -p 埠號
    如:psql -p 5301

    b.coordinator角色建立表和插入資料
    如:
        postgres=#  create table t2(id integer, name varchar(20))distribute by replication;;

        postgres=#  insert into t2 values(1,'測試1');

        postgres=#  insert into t2 values(2,'測試2');

        postgres=#  insert into t2 values(3,'測試3');

        postgres=#  insert into t2 values(4,'測試4');

    c.查詢資料是否插入成功:
        (1)datanode:每個datanode角色都能查到資料
        (2)coordinator:每個coordinator角色都能查詢插入的全部資料

    d.資料查詢
        可以採用:postgres=# select * from t2;注意這裡每個節點都能檢視相同資料
安裝Haproxy
概述:安裝Haproxy負載均衡。 注意:選擇單獨伺服器安裝,172.17.30.14
1).安裝Haporxy
a.安裝命令:sudo apt-get install haproxy
2).修改配置檔案haproxy.conf
a.檔案所在目錄:/etc/haproxy/haproxy.cfg
b.修改時進入檔案:
出現:
Swap file "/etc/haproxy/.haproxy.cfg.swp" already exists!
[O]pen Read-Only, (E)dit anyway, (R)ecover, (D)elete it, (Q)uit, (A)bort:
請選擇:e進入
c.修改如下內容:
global
log /dev/log local0
log /dev/log local1 notice
chroot /var/lib/haproxy
stats socket /run/haproxy/admin.sock mode 660 level admin
stats timeout 30s
maxconn 4095 #指定同步連上服務的最大連線數
user haproxy
group haproxy
daemon
# Default SSL material locations
ca-base /etc/ssl/certs
crt-base /etc/ssl/private
# Default ciphers to use on SSL-enabled listening sockets.
# For more information, see ciphers(1SSL). This list is from:
# https://hynek.me/articles/hardening-your-web-servers-ssl-ciphers/
ssl-default-bind-ciphers ECDH+AESGCM:DH+AESGCM:ECDH+AES256:DH+AES256:ECD H+AES128:DH+AES:ECDH+3DES:DH+3DES:RSA+AESGCM:RSA+AES:RSA+3DES:!aNULL:!MD5:!DSS
ssl-default-bind-options no-sslv3
defaults
log global
mode tcp #修改:mode http ---->mode tcp
option tcplog #修改:option httplog--->option tcplog
option dontlognull
timeout connect 10s #修改:連線超時時間
timeout client 60s #修改:連線客戶端超時時間
timeout server 60s #修改:連線伺服器端超時時間
#---------------------新增內容----------------------------
frontend http-in
bind *:8888 #對外提供的介面
mode tcp
default_backend psql_server
backend psql_server
balance leastconn #配置排程演演算法:最小連續線排程法
option pgsql-check user postgres
server pgsql_coord1 172.17.30.204:5301 weight 1 check inter 1s rise 2 fall 3
server pgsql_coord2 172.17.30.204:5302 weight 1 check inter 1s rise 2 fall 3
#-----------設定統計頁面配置------------
listen admin-stats
mode http
option httplog
bind 0.0.0.0:8888 #監聽埠
stats enable
stats refresh 30s #設定統計頁面自動重新整理時間
stats uri /dbs
stats realm welcome login\ Haproxy
stats auth admin:admin #設定登入統計頁面的使用者名稱:admin,密碼:admin
stats admin if TRUE
3)檢測修改檔案是否有錯
a.輸入:haproxy -f /etc/haproxy/haproxy.cfg -c
出現:
Configuration file is valid (配置有效)
b.重啟服務
sudo service haproxy restart
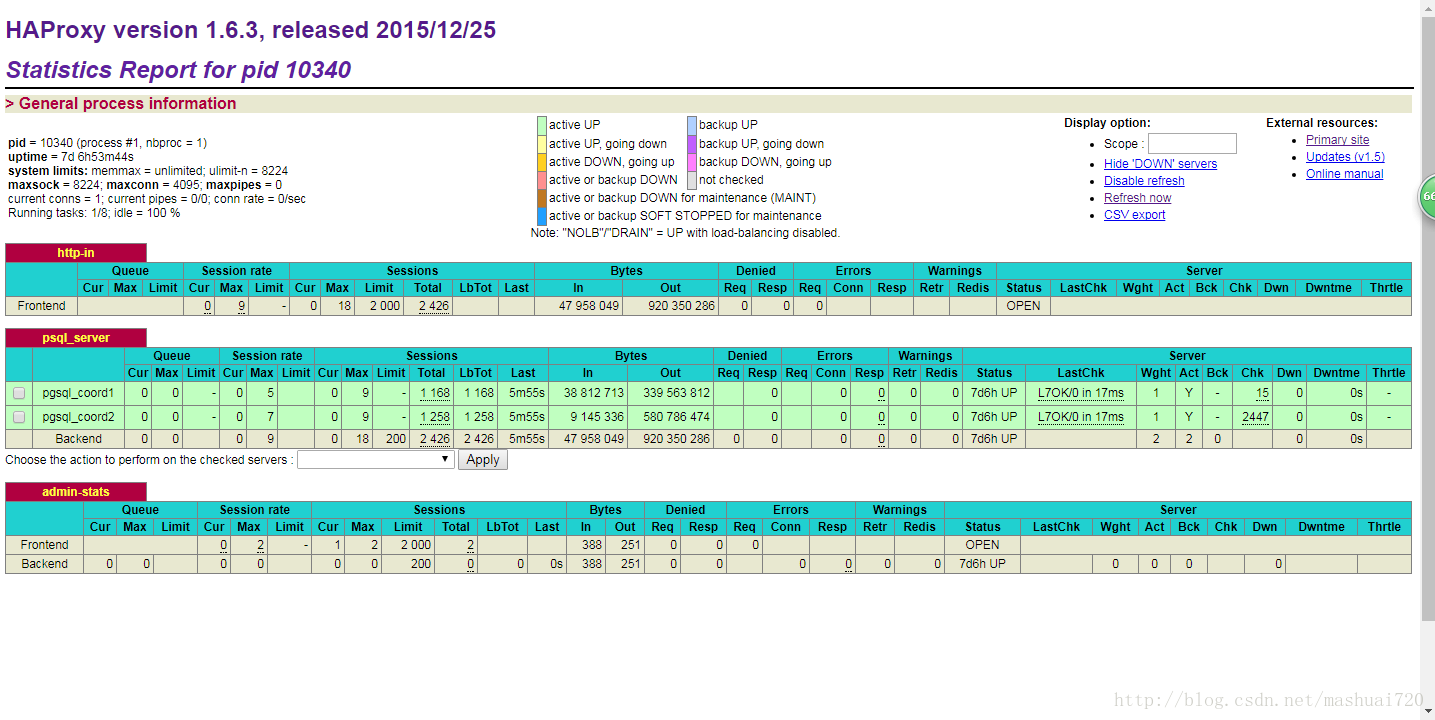
4).驗證如下:
a.在瀏覽器中輸入:http://172.17.30.13:8888/dbs
(1).彈出登入對話方塊:
使用者名稱:admin 密碼為:admin
(2).如圖所示
b.連線測試:
(1).下載postgresql客戶端sudo apt-get install postgresql-client
(2).psql -h 172.17.30.13 -p 8888 -U postgres
(3).如圖所示
5)Haproxy配置檔案解析:(伺服器,也稱伺服器)
a.glabal(全域):設定能配置用於執行Haproxy的所有伺服器。
eg:
global
log 127.0.0.1 local2
maxconn 4000
user haproxy
group haproxy
daemon
說明:
log::(記錄)所有條目到本地的syslog伺服器。這個可以是/var/log/syslog或使用者指定的地方
maxconn:指定同步連上服務的最大連線數量。
user與group能用來指定haproxy程式所屬的使用者名與群組名稱
daemon:能讓haproxy後臺執行
b.default設定:(預設)能用來配置套用frontend(前端)、backend(後端),listen(監聽)等配置專案的所有代理小結。
注意:任何配置於proxy子節(frontend,backend,或listen)的引數,都會蓋過default中引數
eg:
defaults
mode http
log global
option httplog
option dontlognull
retries 3
timeout http-request 10s
timeout queue 1m
timeout connect 10s
timeout client 1m
timeout server 1m
說明:
mode:指定了Haproxy instance所使用的通訊協定。使用http模式將來源請求連線至根基於http的真實伺服器,試用網頁伺服器的負載平衡。對於其他應用程式來說,請使用tcp模式
log:會指定日誌將條目寫入的日誌與syslog的設施。global值參照了global一節中的log引數中所指定的Harproxy instance
option httplog能記錄HTTP session的多種值,包括http請求,session狀態、連線數,來源位址,以及連線計數器等等
option dontlognull:停用了對null連線的記錄,表示Haproxy不會記錄不會記錄未傳任何資料的連線。這不建議在用在網路路上的環境中(例如網頁應用程式),因為null可能表示惡意活動
retries:指定了在無法第一次就連上時,真實伺服器會重試連線的次數
timeout:指定某個給定請求的非活動時間,單位為秒或微秒
c.frontend:設定會配置伺服器監聽來自使用者端的socket.
eg:
frontend mian
bind 192.168.0.10:80
說明:
名為main的fronend透過bind引數將Ip位址設為192.168.0.10,並監聽連線80後,user backend會指定所有來自session的連線連往app後端
d.backend:設定真實伺服器的IP地址,以及負載平衡程式的排程演演算法。
eg:
backend app
balance roundrobin
server app1 192.168.1.1:80 check
server app2 192.168.1.2:80 check
server app3 192.168.1.3:80 check inter 2s rise 4 fall 3
server app4 192.168.1.4:80 backup
說明:
後端伺服器名為app。balance會指定負載平衡程式的排程演演算法。
server 行指定了後端可以使用的伺服器。ap1到ap4時內部伺服器的名稱
位址:指定的Ip地址,Ip冒號後面的是伺服器連線埠號。check 選項標誌定期【健康檢查】的伺服器,以確保伺服器的可用性,得以傳送資料並服務session的請求。伺服器app3也配置健康檢查的間隔,是時間為2秒,app3用來決定伺服器是否健康的檢查次數(rise 4)、以及伺服器直至認定為失敗的重試次數(fall 3).
6)排程演演算法介紹:
a.leastconn:將請求分散到連線數較少的真實伺服器。當處於一個動態式且包含各種session或連線長的環境中,對管理員來說,這個排程可能會較適合其環境。這也適用包含了一組擁有不同生產力的真實伺服器的環境中,因為透過排程器管理。
結合上述配置理解:
backend psql_server
balance leastconn #配置排程演演算法:最小連續線排程法
option pgsql-check user postgres
server pgsql_coord1 172.17.30.204:5301 weight 1 check inter 1s rise 2 fall 3
server pgsql_coord2 172.17.30.204:5302 weight 1 check inter 1s rise 2 fall 3
假如:172.17.30.204:5301被連線的次數較少時,下一次,連線時,會連線172.17.30.204:5301;
總結一句話:'誰比較閒,就用誰'
b.roundrobin:將請求依序發給集區中的伺服器。使用此演算法,所有真實伺服器不管能力如何,都會被視為平等。此排程模式類似迴圈DNS(round-robin DNS)法,但更為細緻,因為這樣是以網路連線為基礎,而非以主機為基礎。Load Balancer的迴圈配置資源排程也不會因為快取DNS的查詢專案而導致不平衡。然而,在Haproxy中,因為伺服器權重的配置能輕易透過此排程器。因此各個後端的啟用中的伺服器數量會被限制為4095。
假如:上述配置為:roundrobin,時,172.17.30.204:5301和172.17.30.204:5302在被連線時,將採用迴圈呼叫的。
總結一句話:'迴圈呼叫'
c.靜態迴圈法(static-rr):一般地在一組伺服器之間迴圈性地分散各項請求。不過不允許動態式配置伺服器的權重。然而,基於伺服器權重的靜態配置,後端中不會有伺服器啟用數量上的限制。
比較: roundrobin 和 static-rr
權重:
(1)roundrobin:可以動態配置伺服器權重
(2)static-rr:不允許動態配置伺服器權重
伺服器啟用數量:
(1)roundrobin:數量上的限制,數量限制為4095.
(2)static-rr:數量上沒有限制
如圖所示:
相關推薦
Postgres-xl叢集部署 + Haproxy 負載均衡
Postgres-xl 簡介 Postgres的-XL是一個基於PostgreSQL資料庫的橫向擴充套件開源SQL資料庫叢集,具有足夠的靈活性來處理不同的資料庫工作負載: 完全ACID,保持事務一致性 OLTP 寫頻繁的業務 需要MPP並行性商業智慧/大資
RabbitMQ 單機部署 && 叢集部署 && HAProxy 負載均衡搭建
準備工作 搭建 RabbitMQ Server 單機版 RabbitMQ Server 高可用叢集相關概念 搭建 RabbitMQ Server 高可用叢集 搭建 HAProxy 負載均衡 一、準備工作(centos7.2 1511) 1.node1:172.16.25
Postgres-XL叢集部署與管理指南
Postgres-XL是一個基於PostgreSQL資料庫的橫向擴充套件開源SQL資料庫叢集,具有足夠的靈活性來處理不同的資料庫工作負載,架構如下圖所示: Web 2.0 操作資料儲存 GIS的地理空間 混合業務工作環境 OLTP 寫頻繁的業務 多租戶服務提供商託管環境 完全A
使用Mycat叢集部署及Haproxy負載均衡
目的 外界將讀寫請求發給Haproxy,Haproxy將請求分發給mycat可用節點,mycat伺服器再根據讀或寫向mysql伺服器進行資料操作。 前提 在之前mycat代理mysql讀寫分離的基礎上進行配置 haproxy 119.23.237.241 mycat_
SaltStack自動部署nginx、apache、實現haproxy負載均衡叢集
一、Saltstack 自動化運維工具 什麼是saltstack • Saltstack是基於python開發的一套C/S架構配置管理工具 • 使用SSL證書籤方的方式進行認證管理 • 底層使用ZeroMQ訊息佇列pub/sub方式通訊 – 號稱世界上最快的訊息
HAproxy負載均衡部署
null ide gas have dont 用戶組 adding net sock HAproxy負載均衡部署 1、安裝HAproxy yum -y install haproxy 2、編輯配置文件 #--------------------------------
haproxy負載均衡 rabbitmq訊息佇列叢集
1 HAProxy的特點是: HAProxy也是支援虛擬主機的。 HAProxy的優點能夠補充Nginx的一些缺點,比如支援Session的保持,Cookie的引導;同時支援通過獲取指定的url來檢測後端伺服器的狀態。 HAProxy跟LVS類似,本身就只是一款負載均衡
saltstack多節點推送實現haproxy負載均衡叢集
一.saltstack一鍵部署負載均衡叢集 實驗環境: 172.25.45.1 haproxy 172.25.45.2 http 172.25.45.3 nginx 1.安裝服務 這裡為了方便直接在master server1端安裝現在serv
HaProxy 負載均衡叢集
HAProxy是一個使用C語言編寫的自由及開放原始碼軟體,其提供高可用性、負載均衡,以及基於TCP和HTTP的應用程式代理,特別適用於那些負載特大的web站點,這些站點通常又需要會話保持或七層處理。HAProxy執行在當前的硬體上,完全可以支援數以萬計的併發連線。並且它的執行模式使得它可以很簡單安全的整合進您
解決 RabbitMQ 叢集 Channel shutdown: connection error 錯誤(HAProxy 負載均衡)
具體錯誤資訊: 2018-05-04 11:21:48.116 ERROR 60848 --- [.168.0.202:8001] o.s.a.r.c.CachingConnectionFactory : Channel shutdown: connection error 2018-05-0
haproxy負載均衡及高可用叢集
Haproxy HAProxy 提供高可用性、負載均衡以及基於 TCP 和 HTTP 應用的代理,支援虛擬主機,它是免費、快速並且可靠的一種解決方案。HAProxy 特別適用於那些負載特大的 web 站點, 這些站點通常又需要會話保持或七層處理。HAProxy 執行在當前的
HAProxy負載均衡代理
haproxy HAProxy負載均衡代理1. HAProxy概述 HAProxy 提供高可用性、負載均衡以及基於 TCP 和 HTTP 應用的代理,支持虛擬主機,它是免費、快速並且可靠的一種
LVS+keepalived 下部署RTSP負載均衡
lvs rtsp 高可用一、lvs 虛擬負載均衡服務器總體描述主要涉及軟件包:ipvsadm 和keepalived(或者heartbeat)參考下載地址:http://www.keepalived.org/software/keepalived-1.1.15.tar.gz http://ww
haproxy 負載均衡算法介紹:
haproxy 負載均衡 算法 一、Haproxy配置介紹:配置文件:/usr/local/haproxy/etc/haproxy.cfgbalance roundrobin # 負載均衡算法配置二、Haproxy負載均衡算法介紹:balance roundrobin # 輪詢,軟負載
Nginx/LVS/HAProxy負載均衡軟件的優缺點詳解
pro 做到 提交 處理 流行 pin 測試 技術分享 一是 參考鏈接:http://www.ha97.com/5646.html (總結)Nginx/LVS/HAProxy負載均衡軟件的優缺點詳解 PS:Nginx/LVS/HAProxy是目前使用最廣泛的三種負載均衡軟件
Tomcat部署+Nginx負載均衡群集
tomcat nginx Tomcat 服務器是一個免費的開放源代碼的Web 應用服務器,屬於輕量級應用服務器在中小型系統和並發訪問用戶不是很多的場合下被普遍使用,是開發和調試JSP 程序的首選。下文中java的包,簡稱為jdk通過 wget下載jdk的tar包wget jdk本地有可以直接配置,有
(總結)Nginx/LVS/HAProxy負載均衡軟件的優缺點詳解
ip_hash 不同的 應用服務 uid 目前 規則 alived 利用 edi PS:Nginx/LVS/HAProxy是目前使用最廣泛的三種負載均衡軟件,本人都在多個項目中實施過,參考了一些資料,結合自己的一些使用經驗,總結一下。 一般對負載均衡的使用是隨著網站規模的
企業實戰(4)-實現基於Haproxy負載均衡集群的電子商務網站架構
haproxy keepalived 企業實戰:逐步實現企業各種情景下的需求企業情景四:隨著公司業務的發展,公司負載均衡服務已經實現四層負載均衡,但業務的復雜程度提升,公司要求把mobile手機站點作為單獨的服務提供,不在和pc站點一起提供服務,此時需要做7層規則負載均衡,運維總監要求,能否用一種服務
HAProxy負載均衡:
均衡 emctl 關閉 mon new bin rom lan coo 配置HAProxy負載均衡(使用3臺虛擬機,1臺作為HAProxy調度器、2臺作為Real Server、物理機作為客戶端) (HAProxy調度器IP:192.168.4.50 Web服務器I
Keepalived+Haproxy負載均衡
後端服務 程序 dev round com 返回 androi 小寫 server HAProxy是一個使用C語言編寫的自由及開放源代碼軟件,其提供高可用性、負載均衡,以及基於TCP和HTTP的應用程序代理。 HAProxy特別適用於那些負載特大的web站點,這些站點通常又