
Android GreenDao使用詳解
做Android開發總難免與資料庫打交道的。但是原生的資料庫操作總是那麼的複雜且效率很低。所以決定使用第三方的資料庫操作。目前有很多的第三方的資料庫框架如Ormlite這是目前比較火的Orm資料庫框架,且這種比較符合JavaEE開發者使用習慣,註解很方便。而GreenDao則為Android大大優化,使用最小的記憶體,非常高的效能優勢。下面是網上的一個對比圖: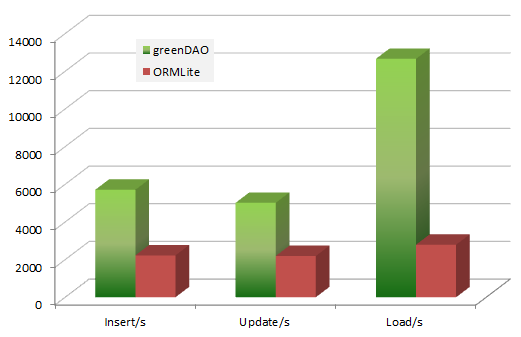
由此我們可以發現GreenDao的優勢與效率,況且目前使用的非常廣泛。所以以後決定就使用這種資料庫了。下面我將一步一步的講解如何使用這個很牛的資料庫框架。
- 首先你必須有一個生產DaoMaster,DaoMessina以及Dao和資料庫表的java檔案。所以我們建一個java工程然後在Gradle配置如下,我這裡使用的是目前最新的故使用如下的配置:
compile 'de.greenrobot:greendao-generator:2.0.0'然後我們就完成了java工程的配置。
- 然後我們寫一個Main函式用於生成我們的Java資料庫相關的類如下:
public class StudentDaoGenerator {
public static void main(String[] args) throws Exception {
//第一個為資料庫的版本號,第二個是自動生成資料庫相關檔案的包名
Schema schema = new Schema(1, "cn.zzu.wgp.cardao");
// 一旦你擁有了一個 Schema 物件後,你便可以使用它新增實體(Entities)了。 這樣我們就完成了資料的建立是不是很簡單呀,至此我們還沒有寫一行sql語句是不是很簡單呀!接下來我們到Android工程中。java工程的工作就算做完了。
- 首先Android下的Gradle配置
我們需要如下的gradle配置就可以了(注意Android和java的配置不一樣的)
compile 'de.greenrobot:greendao:2.0.0'加上這樣的配置就可以了
- 我們可以看到在Android工程中已經為我們生成了Cars,CarsDao,DaoMaste,DaoSession這四個java檔案
- Cars
public class Cars {

    private Long carId;
    /** Not-null value. */
    private String hp;
    /** Not-null value. */
    private String host;
    private int weizhang;

    public Cars() {
    }

    public Cars(Long carId) {
        this.carId = carId;
    }

    public Cars(Long carId, String hp, String host, int weizhang) {
        this.carId = carId;
        this.hp = hp;
        this.host = host;
        this.weizhang = weizhang;
    }

    public Long getCarId() {
        return carId;
    }

    public void setCarId(Long carId) {
        this.carId = carId;
    }

    /** Not-null value. */
    public String getHp() {
        return hp;
    }

    /** Not-null value; ensure this value is available before it is saved to the database. */
    public void setHp(String hp) {
        this.hp = hp;
    }

    /** Not-null value. */
    public String getHost() {
        return host;
    }

    /** Not-null value; ensure this value is available before it is saved to the database. */
    public void setHost(String host) {
        this.host = host;
    }

    public int getWeizhang() {
        return weizhang;
    }

    public void setWeizhang(int weizhang) {
        this.weizhang = weizhang;
    }

}
我們可以發現這裡面就是一堆新的get和set方法這個就是資料庫的表
你或許很好奇我們如何不寫sql語句就能建表呢,這裡其實框架已將給我們做好了。就在CarDao中
這裡面就是建立表的檔案,大家可以自己看一看我們這裡就不在詳細介紹了。下面就是兩個非常總要的類DaoMaster和DaoMession從名稱我們就可以發現他的重要性了這裡我們一般不更改這裡的程式碼我們需要寫一個類管理這兩個‘頂頭上司’。
package cn.zzu.wgp.dao;


import android.content.Context;

import cn.zzu.wgp.cardao.DaoMaster;
import cn.zzu.wgp.cardao.DaoSession;

/**
 * Created by wanggp on 2015/12/17.
 */
public class CarGreenDao {
    private static DaoMaster daoMaster;
    private static DaoSession daoSession;

    /**
     * 獲取最高的資料庫管理DaoMaster
     *
     * @param context
     * @return
     */
    public static DaoMaster getDaoMaster(Context context) {
        if (daoMaster == null) {
            DaoMaster.OpenHelper helper = new DaoMaster.DevOpenHelper(context, "car_db1", null);//第二個引數為資料庫的名稱
            daoMaster = new DaoMaster(helper.getWritableDatabase());
        }
        return daoMaster;
    }

    /**
     * 獲取daoSession例項
     *
     * @param context
     * @return
     */
    public static DaoSession getDaoSession(Context context) {
        if (daoSession == null) {
            if (daoMaster == null) {
                daoMaster = getDaoMaster(context);
            }
            daoSession = daoMaster.newSession();
        }
        return daoSession;
    }
}
接下來我們就用這個類來管理這兩個上司了。
資料庫嗎總免不了增刪改查這四個操作。所以這裡我們編寫一個介面來完成這部分工作。如下一個Dbservice
public interface CarDbService {
    /**
     * 新增一個車輛
     *
     * @param car
     * @return
     */
    public Cars insertCar(Cars car);

    /**
     * 刪除一個車輛資訊
     *
     * @param id
     */
    public void deleteCar(long id);

    /**
     * 通過id獲得一個車輛
     *
     * @param id
     * @return
     */
    public Cars getCarById(long id);

    /**
     * 通過一個模糊查詢獲得一個車輛列表
     *
     * @param value
     * @return
     */
    public List<Cars> getCarsByLike(String value);

    /**
     * 通過名稱查詢車輛資訊
     *
     * @param name
     * @return
     */
    public Cars getCarByName(String name);

    /**
     * 更新一個車輛資訊
     *
     * @param car
     */
    public Cars updateCar(Cars car);

}
接下來我們在編寫一個數據庫的操作類就是我們常用的Dao類如下:
public class CarsService implements CarDbService {
    private DaoMaster daoMaster;//這裡提醒一下這裡的DaoMa一定是我們要操作資料庫的DaoMaster如果你建了很多的表則這個很重要,我就是因為導錯包糾結很久的。DaoSession一樣的。
    private static DaoSession daoSession;
    private static CarsService service;
    private CarsDao carsDao;

    public CarsService(CarsDao carsDao) {
        this.carsDao = carsDao;
    }

    public static CarsDao getCarsDao11() {
        return daoSession.getCarsDao();
    }

    public static CarsService getService(Context context) {
        if (service == null) {//獲取CarService的方法
            daoSession = CarGreenDao.getDaoSession(context);
            service = new CarsService(daoSession.getCarsDao());
        }
        return service;
    }

    /**
     * 新增一個車輛
     *
     * @param car
     * @return
     */
    @Override
    public Cars insertCar(Cars car) {
        return carsDao.loadByRowId(carsDao.insertOrReplace(car));//通過這個語句來向資料庫中新增一個例項
    }

    /**
     * 刪除一個車輛資訊
     *
     * @param id
     */
    @Override
    public void deleteCar(long id) {

        carsDao.deleteByKey(id);//刪除操作
    }

    /**
     * 通過id獲得一個車輛
     *
     * @param id
     * @return
     */
    @Override
    public Cars getCarById(long id) {
        //通過id查詢
        return carsDao.queryBuilder().where(CarsDao.Properties.CarId.eq(id)).unique();
    }

    /**
     * 通過一個模糊查詢獲得一個車輛列表
     *
     * @param value
     * @return
     */
    @Override
    public List<Cars> getCarsByLike(String value) {
        return carsDao.queryBuilder().where(CarsDao.Properties.Hp.like("%" + value + "%")).list();
    }

    /**
     * 通過名稱查詢車輛資訊
     *
     * @param name
     * @return
     */
    @Override
    public Cars getCarByName(String name) {
        return carsDao.queryBuilder().where(CarsDao.Properties.Host.eq(name)).unique();
    }

    /**
     * 更新一個車輛資訊
     *
     * @param car
     */
    @Override
    public Cars updateCar(Cars car) {
        carsDao.update(car);
        return car;
    }

    public CarsDao getCarsDao() {
        return carsDao;
    }

    public List<Cars> getAll() {
        return carsDao.loadAll();
    }
大家可以看到我們的增刪改查是不是很簡單呀,都不用謝sql語句幾乎都是一行程式碼就搞定了。上面的查詢只是簡單的查詢,大家如果感興趣可以自己去查這些查詢條件的,以後我還會介紹這種查詢的。
- 由於GreenDao官方建議我們將DaoMaster和DaoMession放在Application中就是全域性變數。所以這裡我們要在Application中如下的寫:
public class BaseApplication extends Application {
    public IOrderHeaderService orderHeaderService;
    public CarsService carsService;

    @Override
    public void onCreate() {
        super.onCreate();
        orderHeaderService = OrderHeaderService
                .getService(getApplicationContext());
        carsService = CarsService.getService(getApplicationContext());//獲得carsService物件
    }
}
好了準備工作都已經做完了,下面就該我們的Activity上場了。這裡我們操作就很簡單了。如下:
public class CarsActivity extends Activity {
    private TitleView titleView;
    private FlatButton flatButton, search;
    private SQLiteDatabase db;
    private EditText name, cph, wzs;
    private DaoMaster daoMaster;//導包時一定注意匯入你要操作資料庫的包
    private DaoSession daoSession;//同樣注意導包
    private Cursor cursor;
    public static final String TAG = "DaoExample";
    private CarsService daoCarsService;
    private ListView listView;

    @Override
    protected void onCreate(Bundle savedInstanceState) {
        super.onCreate(savedInstanceState);
        requestWindowFeature(Window.FEATURE_NO_TITLE);
        setContentView(R.layout.cars);
        titleView = (TitleView) findViewById(R.id.studenttitle);
        flatButton = (FlatButton) findViewById(R.id.add);
        search = (FlatButton) findViewById(R.id.search);
        listView = (ListView) findViewById(R.id.listview1);
        name = (EditText) findViewById(R.id.name);
        cph = (EditText) findViewById(R.id.cph);
        wzs = (EditText) findViewById(R.id.wzs);
        titleView.setTitleText("我的專案資料庫顯示");
        daoCarsService = ((BaseApplication) getApplication()).carsService;//獲得資料操作服務,拿到這個後我們就可以進行操作了。
        List<Cars> cars = daoCarsService.getAll();//這就是查詢全部的語句就一行程式碼
        final List<HashMap<String, Object>> data = new ArrayList<HashMap<String, Object>>();
        for (Cars car : cars) {
            HashMap<String, Object> map = new HashMap<String, Object>();
            map.put("Hp", car.getHp());
            map.put("Host", car.getHost());
            map.put("wz", car.getWeizhang() + "");
            data.add(map);
        }
        Log.d("222222", daoCarsService.getCarsDao().getTablename());
        Log.d("222222", daoCarsService.getCarsDao().getAllColumns().length + "");
//        cursor = db.query(getStudentDao().getTablename(), getStudentDao().getAllColumns(), null, null, null, null, orderBy);
//        cursor = db.query("CARS", new String[]{"Hp", "Host"}, null, null, null, null, null);

//        String[] from = {"Hp", "Host", "wz"};
//        int[] to = {R.id.hp, R.id.host, R.id.wz};
        SimpleAdapter adapter = new SimpleAdapter(CarsActivity.this, data, R.layout.listviewitem, new String[]{"Hp", "Host", "wz"}, new int[]{R.id.hp, R.id.host, R.id.wz});
        listView.setAdapter(adapter);
        flatButton.setOnClickListener(new View.OnClickListener() {
            @Override
            public void onClick(View v) {
                String name1 = name.getText().toString().trim();
                String cphm = cph.getText().toString().trim();
                int wzss = Integer.parseInt(wzs.getText().toString().trim());
                Cars car1 = new Cars(null, cphm, name1, wzss);
                daoCarsService.insertCar(car1);//向資料庫中新增一個例項,也是一行程式碼
                List<Cars> cars = daoCarsService.getAll();
                final List<HashMap<String, Object>> data = new ArrayList<HashMap<String, Object>>();
                for (Cars car : cars) {
                    HashMap<String, Object> map = new HashMap<String, Object>();
                    map.put("Hp", car.getHp());
                    map.put("Host", car.getHost());
                    map.put("wz", car.getWeizhang() + "");
                    data.add(map);
                }

                SimpleAdapter adapter = new SimpleAdapter(CarsActivity.this, data, R.layout.listviewitem, new String[]{"Hp", "Host", "wz"}, new int[]{R.id.hp, R.id.host, R.id.wz});
                listView.setAdapter(adapter);
//                Log.d("------", "新增成功了!" + car.getHost() + "---" + car.getHp() + "---" + car.getWeizhang());
            }
        });
    }

}
是不是很簡單呀這樣我們就完成了資料的簡單操作,同樣你可以根據自己的需求進行相應的改變與調整。以後我可能會po上關於這方面的一些操作。上面我做了一些實驗的資料。主要用一個ListView和SimpleAdapter大家感興趣的話可以檢視如下的佈局:
listviewitem,這個基本條目的佈局
<?xml version="1.0" encoding="utf-8"?>
<LinearLayout xmlns:android="http://schemas.android.com/apk/res/android"
    android:layout_width="fill_parent"
    android:layout_height="fill_parent"
    android:orientation="horizontal" >
    <TextView
        android:id="@+id/hp"
        android:layout_width="100dp"
        android:layout_height="wrap_content"
        />
    <TextView
        android:id="@+id/host"
        android:layout_width="100dp"
        android:layout_height="wrap_content"
        />
    <TextView
        android:id="@+id/wz"
        android:layout_width="100dp"
        android:layout_height="wrap_content"
        />
</LinearLayout>
cars.xml主佈局如下:
<?xml version="1.0" encoding="utf-8"?>
<LinearLayout xmlns:android="http://schemas.android.com/apk/res/android"
    android:layout_width="fill_parent"
    android:layout_height="fill_parent"
    android:background="#fff"
    android:orientation="vertical">

    <cn.zzu.wgp.view.TitleView
        android:id="@+id/studenttitle"
        android:layout_width="match_parent"
        android:layout_height="50dp" />

    <LinearLayout
        android:id="@+id/linearLayout1"
        android:layout_width="match_parent"
        android:layout_height="wrap_content"
        android:orientation="horizontal">

        <TextView
            android:layout_width="0dp"
            android:layout_height="50dp"
            android:layout_weight="1"

            android:text="姓名" />

        <EditText
            android:id="@+id/name"
            android:layout_width="0dp"
            android:layout_height="50dp"
            android:layout_weight="4"
            android:background="@null" />
    </LinearLayout>

    <LinearLayout
        android:id="@+id/linearLayout2"
        android:layout_width="match_parent"
        android:layout_height="wrap_content"
        android:background="@null"
        android:orientation="horizontal">

        <TextView
            android:layout_width="0dp"
            android:layout_height="50dp"
            android:layout_weight="1"
            android:text="車牌號" />

        <EditText
            android:id="@+id/cph"
            android:layout_width="0dp"
            android:layout_height="50dp"
            android:layout_weight="4"
            android:background="@null" />
    </LinearLayout>

    <LinearLayout
        android:id="@+id/linearLayout3"
        android:layout_width="match_parent"
        android:layout_height="wrap_content"
        android:background="@null"
        android:orientation="horizontal">

        <TextView
            android:layout_width="0dp"
            android:layout_height="50dp"
            android:layout_weight="1"
            android:text="違章數" />

        <EditText
            android:id="@+id/wzs"
            android:layout_width="0dp"
            android:layout_height="50dp"
            android:layout_weight="4"
            android:background="@null" />
    </LinearLayout>

    <cn.zzu.wgp.view.FlatButton
        android:id="@+id/add"
        android:layout_width="match_parent"
        android:layout_height="50dp"
        android:text="增加" />

    <cn.zzu.wgp.view.FlatButton
        android:id="@+id/search"
        android:layout_width="match_parent"
        android:layout_height="50dp"
        android:text="查詢" />

    <LinearLayout
        android:layout_width="wrap_content"
        android:layout_height="wrap_content"
        android:orientation="horizontal">

        <TextView
            android:layout_width="100dp"
            android:layout_height="wrap_content"
            android:text="ID" />

        <TextView
            android:layout_width="100dp"
            android:layout_height="wrap_content"
            android:text="姓名" />

        <TextView
            android:layout_width="100dp"
            android:layout_height="wrap_content"
            android:text="違章數" />
    </LinearLayout>

    <ListView
        android:id="@+id/listview1"
        android:layout_width="fill_parent"
        android:layout_height="wrap_content"></ListView>
</LinearLayout>
這裡面有很多我自己寫的控制元件你不能自己拿來用,可供大家參考的。好了關於GreenDao這個框架就先介紹到這裡。
PS:這個框架的資料庫升級是刪除所有的表的,就是你以前的資料會全部丟失的。你們也許會好奇萬一面臨資料升級該如何辦呢。這個其實很簡單的。我將在以後的博文中會介紹如何處理的。盡請大家持續關注!