
iOS開發-------自定義回撥
阿新 • • 發佈:2019-02-15
以前一直用系統寫的類,比如UIButton,用到的時候我們只需要知道用addTarget方法來回調,產生動作,但是卻不知道回撥是如何產生的,通過學習,自己寫了一個KeyBoard的類,大體執行結果就是,點選+1,內部有一個計數器count,會+1,當count=3的時候來進行回撥,-1的時候,count - 1,=0的時候,count 制零,頁面很簡單,只需明白道理即可。
頁面如下

目標-動作回撥(Target-Action)
首先建立一個叫做KeyBoard的類,具體操作也就不提了,相信都很熟,繼承於UIView,因為我們所有的檢視類幾乎都是繼承與UIView類,建好類之後,在我們的.m檔案中新增兩個屬性,如下// // Keyboard.m // 自定義回撥 // // Created by YueWen on 15/9/22. // Copyright (c) 2015年 YueWen. All rights reserved. // #import "Keyboard.h" @interface Keyboard () { int _count;//計數器 } @property(nonatomic,weak)id target;//目標(也就是誰進行的回撥) @property(nonatomic,assign)SEL action;//執行的目標的方法 @property (nonatomic,strong)UIButton *b1; @property (nonatomic,strong)UIButton *b2; @property (nonatomic,strong)UIButton *b3; @end
接下來,用純程式碼來佈局button,但是button的建立費時費力,很不爽,所以封裝了一個建立button的簡易方法,相關功能也是可以再加的,這裡需求少,所以簡單 封裝button的建立方法如下:
-(UIButton *)loadMyButtonWithTitle:(NSString *)title Tag:(int) tag
{
    UIButton * button = [UIButton buttonWithType:UIButtonTypeSystem];//初始化button
    button.translatesAutoresizingMaskIntoConstraints = NO;//解除Autoresizing佈局
    [button setTitle:title forState:UIControlStateNormal];//設定button的文字
    button.tag = tag;//設定tag值
    [button addTarget:self action:@selector(tapButton:) forControlEvents:UIControlEventTouchUpInside];//實現按鈕的目標動作回撥
    return button;//返回例項化button的地址
}
實現手動佈局以及初始化
@implementation Keyboard


//手動程式碼例項化keyboard時用的方法
- (instancetype)initWithFrame:(CGRect)frame
{
    self = [super initWithFrame:frame];
    if (self) {

        [self otherInit];
    }
    return self;
}

//用xib或者storyboard建立的時候走這個方法
-(void)awakeFromNib
{
    [self otherInit];
}

//自己寫的建立方法
-(void)otherInit
{
    //初始化按鈕
    self.b1 = [self loadMyButtonWithTitle:@"+1" Tag:1];
    self.b2 = [self loadMyButtonWithTitle:@"-1" Tag:2];
    self.b3 = [self loadMyButtonWithTitle:@"=0" Tag:3];
    [self addSubview:self.b1];
    [self addSubview:self.b2];
    [self addSubview:self.b3];

    /**********開始佈局*********/
    //水平佈局
    NSArray * hArray = [NSLayoutConstraint constraintsWithVisualFormat:[NSString stringWithFormat:@"H:|-[_b1]-[_b2(==_b1)]-[_b3(==_b1)]-|"] options:0 metrics:nil views:NSDictionaryOfVariableBindings(_b1,_b2,_b3)];
    [self addConstraints:hArray];

    //b1垂直佈局
    NSArray * vArray1 = [NSLayoutConstraint constraintsWithVisualFormat:[NSString stringWithFormat:@"V:|-20-[_b1]"] options:0 metrics:nil views:NSDictionaryOfVariableBindings(_b1)];
    [self addConstraints:vArray1];


    //b2垂直佈局
    NSArray * vArray2 = [NSLayoutConstraint constraintsWithVisualFormat:[NSString stringWithFormat:@"V:|-20-[_b2]"] options:0 metrics:nil views:NSDictionaryOfVariableBindings(_b2)];
    [self addConstraints:vArray2];


    //b3垂直佈局
    NSArray * vArray3 = [NSLayoutConstraint constraintsWithVisualFormat:[NSString stringWithFormat:@"V:|-20-[_b3]"] options:0 metrics:nil views:NSDictionaryOfVariableBindings(_b3)];
    [self addConstraints:vArray3];


}
接下來為了方便UI設定,用了storyboard,拖一個View放到ViewController,並設定好約束之後,

不要忘記的是,給拖進去的View繫結我們寫好的keyboard類

接下來就要啟動按鈕的回調了 首先將我們的方法在.h檔案中寫好,方便外調,目標動作回撥方法如下:
//新增目標動作回撥的方法
-(void)addTarget:(id)target action:(SEL)action;-(void)addTarget:(id)target action:(SEL)action
{
self.target = target;
self.action = action;
}button的回撥放入如下
//    目標動作回撥
-(void)tapButton:(UIButton *)button
{
    if (button.tag == 1)//如果是+1按鈕被點選
    {
        _count ++;

        if (_count == 3)//如果計數器=3
        {
            //target物件執行他的action方法
            [self.target performSelector:self.action withObject:self];

            _count = 0;
        }
    }
    else if (button.tag == 2)
    {
        _count --;
    }
    else if (button.tag == 3)
    {
        _count = 0;
    }

    NSLog(@"count = %d",_count);
}
最後需要在ViewController中將view拖到Controller中,並且給keyboard新增目標動作回撥,如下
#import "ViewController.h"
#import "Keyboard.h"
@interface ViewController ()
@property (strong, nonatomic) IBOutlet Keyboard *kb;
@end
@implementation ViewController
- (void)viewDidLoad
{
[super viewDidLoad];
[self.kb addTarget:self action:@selector(myCount)];//新增目標動作回撥
}
-(void)myCount
{
NSLog(@"目標動作回調了!");
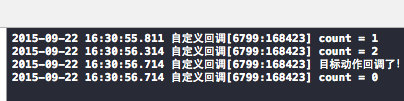
}當點選三下+1的時候,結果如下,證明keyboard進行了自己的目標動作回撥
委託回撥(Delegate)
若想進行委託回撥,那麼必然會有協議的生成,樓主比較喜歡將協議寫在.h檔案中,在原基礎上修改,並不需要修改很多,話不多講,標頭檔案以及協議如下:#import <UIKit/UIKit.h>
@protocol keyboardDelegate;
@interface Keyboard : UIView
@property(nonatomic,weak)id<keyboardDelegate>delegate;//設定代理物件屬性
@end
@protocol keyboardDelegate <NSObject>
@optional//可選的
-(void)keyboardCount:(Keyboard *)keyboard;//協議方法
@end在實現檔案中,只需要更改一下按鈕回撥方法,改正如下
//委託回撥
-(void)tapButton:(UIButton *)button
{
    if (button.tag == 1)
    {
        _count ++;

        if (_count == 3)
        {
            //首先判斷代理物件是否有協議方法,如果沒有這句話,會崩
            if ([self.delegate respondsToSelector:@selector(keyboardCount:)])
            {
                //如果有,執行該協議方法
                [self.delegate keyboardCount:self];
            }

            _count = 0;
        }
    }
    else if (button.tag == 2)
    {
        _count --;
    }
    else if (button.tag == 3)
    {
        _count = 0;
    }

    NSLog(@"count = %d",_count);
}
最後在Controller中,實現代理
#import "ViewController.h"
#import "Keyboard.h"

@interface ViewController ()<keyboardDelegate>//不要忘記履行協議

@property (strong, nonatomic) IBOutlet Keyboard *kb;

@end

@implementation ViewController

- (void)viewDidLoad
{
    [super viewDidLoad];

    self.kb.delegate = self;

}

//實現協議方法
-(void)keyboardCount:(Keyboard *)keyboard
{
    NSLog(@"我是委託回撥方法!");
}
當點選三下+1的時候,結果如下,證明keyboard進行了自己的委託回撥,委託回撥比目標動作回撥的優勢就在於,它可以傳遞引數,而目標動作回撥卻無法傳遞引數

Block(程式碼塊)回撥
程式碼塊相比於上面兩種回撥方法,顯得更簡潔,容易,首先在Keyboard.h中定義程式碼塊,如下#import <UIKit/UIKit.h>
typedef void(^KBM)(void);//定義程式碼塊,無返回值無參
-(void)setBlockB:(KBM)b;//設定程式碼塊的方法是不是標頭檔案中很乾淨呢,接下來就是實現檔案
@property(nonatomic,strong)KBM b;//通過延展給keyboard增加一個程式碼塊屬性//給程式碼塊賦值的方法
-(void)setBlockB:(KBM)b
{
self.b = b;
}接下來就是按鈕的回撥方法了,在稍作修改
//block回撥
-(void)tapButton:(UIButton *)button
{
    if (button.tag == 1)
    {
        _count ++;

        if (_count == 3)
        {
            self.b();//執行程式碼塊裡面的內容
            _count = 0;
        }
    }
    else if (button.tag == 2)
    {
        _count --;
    }
    else if (button.tag == 3)
    {
        _count = 0;
    }

    NSLog(@"count = %d",_count);
}
最後在ViewController中寫入程式碼塊b中的內容
- (void)viewDidLoad
{
    [super viewDidLoad];

    [self.kb setBlockB:^{

        NSLog(@"我是Block回撥!");

    }];

}
當點選三下+1的時候,結果如下,證明keyboard進行了自己的Block回撥
