
rabbitmq在spring中的整合
阿新 • • 發佈:2019-02-16
1.需求分析
在實際專案業務需求中,很多場景需要邏輯解耦,這時候mq是最好的選擇,rabbitmq作為一個高可用性,高擴充套件性的訊息中介軟體,很好的解決了上下游業務邏輯的解耦合;
2.rabbitmq整合實現
① rabbitmq的pom依賴
<!--rabbitmq依賴 --> <dependency> <groupId>org.springframework.amqp</groupId> <artifactId>spring-rabbit</artifactId> <version>1.3.5.RELEASE</version></dependency>
②rabbitmq連線配置
mq.host=192.168.12.137
mq.username=root
mq.password=zhangxingmq.port=5672
mq.vhost=/
③rabbitmq在spring.xml中配置
<?xml version="1.0" encoding="UTF-8"?> <beans xmlns="http://www.springframework.org/schema/beans" xmlns:xsi="http://www.w3.org/2001/XMLSchema-instance" xmlns:rabbit="http://www.springframework.org/schema/rabbit"xmlns:context="http://www.springframework.org/schema/context" xsi:schemaLocation="http://www.springframework.org/schema/beans http://www.springframework.org/schema/beans/spring-beans-3.0.xsd http://www.springframework.org/schema/context http://www.springframework.org/schema/context/spring-context-3.1.xsd http://www.springframework.org/schema/rabbithttp://www.springframework.org/schema/rabbit/spring-rabbit-1.0.xsd"> <!-- 啟用annotation功能 --> <context:annotation-config /> <!-- 載入rabbitmq連線配置 --> <bean id="propertyConfigurer" class="org.springframework.beans.factory.config.PropertyPlaceholderConfigurer"> <property name="properties" ref="configProperties" /> </bean> <bean id="configProperties" class="org.springframework.beans.factory.config.PropertiesFactoryBean"> <property name="locations"> <list> <value>classpath:rabbitmq.properties</value> </list> </property> </bean> <!--配置connection-factory,指定連線rabbit server引數 --> <rabbit:connection-factory id="connectionFactory" username="${mq.username}" password="${mq.password}" host="${mq.host}" port="${mq.port}" /> <!--定義rabbit template用於資料的接收和傳送 --> <rabbit:template id="amqpTemplate" connection-factory="connectionFactory" exchange="exchangeTest" /> <!--通過指定下面的admin資訊,當前producer中的exchange和queue會在rabbitmq伺服器上自動生成 --> <rabbit:admin connection-factory="connectionFactory" /> <!--定義queue --> <rabbit:queue name="zhangxing" durable="true" auto-delete="false" exclusive="false" /> <!-- exchange queue binging key 繫結 --> <rabbit:direct-exchange name="exchangeTest" durable="true" auto-delete="false"> <rabbit:bindings> <rabbit:binding queue="zhangxing" key="queueKey"></rabbit:binding> </rabbit:bindings> </rabbit:direct-exchange> <!-- 訊息接收者 --> <bean id="MessageProducer" class="com.amqp.producer.MessageProducer"></bean> <!-- 訊息接收者 --> <bean id="messageReceiver" class="com.amqp.consumer.MessageConsumer"></bean> <!-- queue litener 觀察 監聽模式 當有訊息到達時會通知監聽在對應的佇列上的監聽物件 --> <rabbit:listener-container connection-factory="connectionFactory"> <rabbit:listener queues="zhangxing" ref="messageReceiver" /> </rabbit:listener-container> </beans>
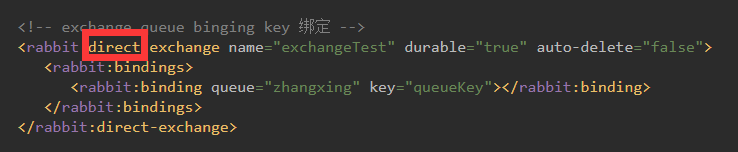
紅色方框標註的地方可以切換exchange的type,其中的key表示routingKeys

監聽訊息出發消費者回調邏輯;
④生產者
/**
 * 功能概要:訊息產生,提交到佇列中去
*/
@Component
public class MessageProducer {

   @Resource
private AmqpTemplate amqpTemplate;
   public void sendMessage(String queueKey,Object message) {

      amqpTemplate.convertAndSend(queueKey, message);
}
}
⑤消費者
/**
 * 功能概要:消費接收
*/
public class MessageConsumer implements MessageListener {


   public void onMessage(Message message) {

      /**
       * 執行具體的邏輯
*/
String receiveStr = new String(message.getBody());
System.out.println("receive message: "+receiveStr);
Map<String,Object> map = JSONObject.parseObject(receiveStr);
System.out.println("receive message: "+map.get("serviceId").toString());
}

}
3測試用例
@RunWith(SpringJUnit4ClassRunner.class)
@ContextConfiguration(locations = "classpath:application-rabbitMq.xml")
public class TestMain {

   @Autowired
MessageProducer messageProducer;
@Test
public void test(){
      /*傳送字串參考*/
JSONObject json = new JSONObject();
json.put("serviceId", "123456");
json.put("orderId","123456");
json.put("channel","zhangxing");
messageProducer.sendMessage("queueKey",json.toString());
System.out.println("OK");
}


}
測試結果

筆者的mq理解:生產者釋出訊息後,消費者監聽到後立即執行回撥方法或邏輯;
好了,我是張星,歡迎加入博主技術交流群,群號:313145288