
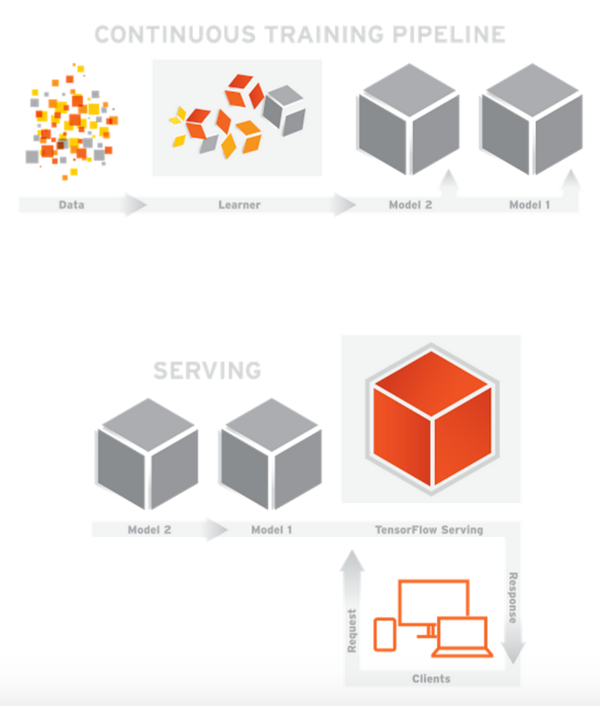
Tensorflow Serving 模型部署和服務
2016年,機器學習在 Alpha Go 與李世石的世紀之戰後變得更加炙手可熱。Google也在今年推出了 TensorFlow Serving 又加了一把火。
今天我就帶大家來用 TensorFlow Serving 部署一個簡單的 Linear Regression 模型。
以下演示執行在 Ubuntu 16.04 LTS 之上。
TensorFlow Serving 處於快速迭代期。如果本文內容與官方文件矛盾,請以官方文件為參考。
環境
TensorFlow Serving 目前依賴 Google 的開源編譯工具 Bazel。Bazel 是 Google 內部編譯工具 Blaze 的開源版本,功能與效能基本一致。具體的安裝可以參考官方文件。此外還需要安裝 gRPC (Google 又一個內部工具的開源版)。
之後請參考官方安裝指南完成。值得注意的是,最後的 bazel build 將會需要大約30分鐘時間並佔用約5-10G的空間(時間取決於機器效能)。配合使用 -c opt 能一定程度加快 build。
模型訓練
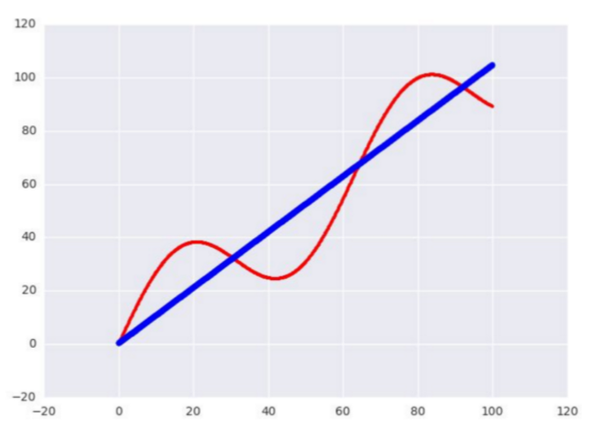
接下來我們用 TensorFlow 寫一個簡單的測試用 Linear Regression 模型。資料的話我就使用正弦函式生成 1000 個點,嘗試用一條直線去擬合。
 樣本資料生成如下:
# Generate input data

x_data = np.arange(100, step=.1)

y_data = x_data + 20 * np.sin(x_data / 10)
Reshape data
x_data = np.reshape(x_data, (n_samples, 1))
y_data = np.reshape(y_data, (n_samples, 1))
然後用一個簡單的 y = wx + b 來做一個訓練,使用 Adam 演算法。簡單調整了下引數:
sample = 1000, learning_rate = 0.01, batch_size = 100, n_steps = 500
# Placeholders for batched input

x = tf.placeholder(tf.float32, shape=(batch_size, 1))

y = tf.placeholder(tf.float32, shape=(batch_size, 1))
Do training
with tf.variable_scope('test'):
    w = tf.get_variable('weights', (1, 1), initializer=tf.random_normal_initializer())
    b = tf.get_variable('bias', (1,), initializer=tf.constant_initializer(0))

    y_pred = tf.matmul(x, w) + b
    loss = tf.reduce_sum((y - y_pred) ** 2 / n_samples)

    opt = tf.train.AdamOptimizer(learning_rate=learning_rate).minimize(loss)

    with tf.Session() as sess:
        sess.run(tf.initialize_all_variables())

        for _ in range(n_steps):
            indices = np.random.choice(n_samples, batch_size)
            x_batch = x_data[indices]
            y_batch = y_data[indices]
            _, loss_val = sess.run([opt, loss], feed_dict={x:x_batch, y:y_batch})

        print w.eval()
        print b.eval()
        print loss_val
大致把 loss 收斂在 15.8 左右。精度應該足夠了,畢竟只是一個簡單的測試用模型。
模型匯出
接下來的就是本文的重點:匯出模型。
tf.train.Saver
用於儲存和恢復Variable。它可以非常方便的儲存當前模型的變數或者倒入之前訓練好的變數。一個最簡單的運用:
saver - tf.train.Saver()
Save the variables to disk.
saver.save(sess, “/tmp/test.ckpt”)
Restore variables from disk.
saver.restore(sess, “/tmp/test.ckpt”)
tf.contrib.session_bundle.exporter.Exporter
匯出模型還需要這個 Exporter 的協助。令人尷尬的是這個 Exporter 太新了,還沒有 API 文件支援,只能參考 Github 的程式碼實現。
Exporter 的基本使用方式是
傳入 saver 構造一個例項
呼叫 init 定義模型的 graph 和 input/output
使用 export 匯出為檔案
model_exporter = exporter.Exporter(saver)
model_exporter.init(
    sess.graph.as_graph_def(),
    named_graph_signatures={
        'inputs': exporter.generic_signature({'x': x}),
        'outputs': exporter.generic_signature({'y': y_pred})})
model_exporter.export(FLAGS.work_dir,
                      tf.constant(FLAGS.export_version),sess)
大功告成!編譯!我們成功匯出了一個可以部署在 TensorFlow Serving 上的模型。它接受一個 x 值然後返回一個 y 值。匯出的資料夾以 version 命名,包含用於部署的 meta 檔案, 模型 checkpoint 檔案和序列化的模型 graph:
/tmp/test/00000001

checkpoint export-00000-of-00001 export.meta
模型部署
部署的方式非常簡單,只需要以下兩步:
$ bazel build //tensorflow_serving/model_servers:tensorflow_model_server

$

bazel-bin/tensorflow_serving/model_servers/tensorflow_model_server --port=9000 --model_name=test --model_base_path=/tmp/test/
我們看到 TensorFlow Serving 成功載入了我們剛剛匯出的 model。並且還在不斷嘗試 poll 新的 model:

客戶端
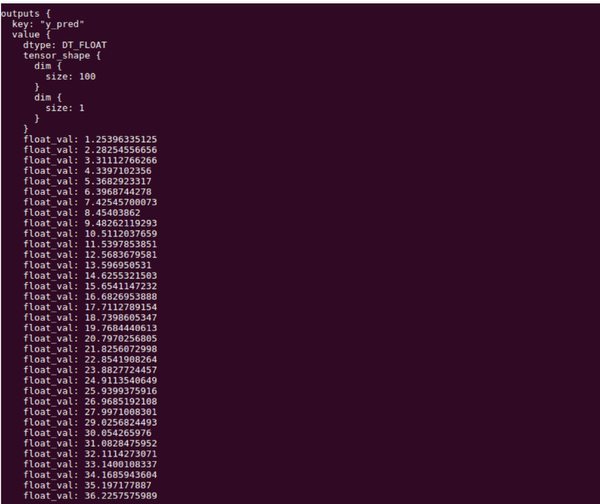
接下來我們寫一個簡單的 Client 來呼叫下我們部署好的 Model。這裡我們需要用到 TensorFlow Serving 的 Predict API 和 gRPC 的 implementations.insecure_channel 來construct 一個 request。特別要注意的是 input 的 signature 和資料必須和之前 export 的模型匹配。本例中為 名稱為 x, float32型別,大小為 [100, 1] 的 Tensor。
from grpc.beta import implementations
import numpy as np
import tensorflow as tf

from tensorflow_serving.apis import predict_pb2
from tensorflow_serving.apis import prediction_service_pb2

tf.app.flags.DEFINE_string('server', 'localhost:9000',
                           'PredictionService host:port')
FLAGS = tf.app.flags.FLAGS

n_samples = 100

host, port = FLAGS.server.split(':')
channel = implementations.insecure_channel(host, int(port))
stub = prediction_service_pb2.beta_create_PredictionService_stub(channel)
Generate test data
x_data = np.arange(n_samples, step=1, dtype=np.float32)
x_data = np.reshape(x_data, (n_samples, 1))
Send request
request = predict_pb2.PredictRequest()
request.model_spec.name = ‘test’
request.inputs[‘x’].CopyFrom(tf.contrib.util.make_tensor_proto(x_data, shape=[100, 1]))
result = stub.Predict(request, 10.0) # 10 secs timeout
別忘了配置一下 bazel 的 BUILD 檔案:
py_binary(

    name = "test_client",

    srcs = [

        "test_client.py",

    ],

    deps = [

        "//tensorflow_serving/apis:predict_proto_py_pb2",

        "//tensorflow_serving/apis:prediction_service_proto_py_pb2",

        "@org_tensorflow//tensorflow:tensorflow_py",

    ],

)
最後編譯執行,就能看到線上預測結果啦!
bazel build //tensorflow_serving/test:test_client && ./bazel-bin/tensorflow_serving/test/test_client
延伸
TensorFlow 封裝了眾多常用模型成為 Estimator,幫助使用者避免了冗長易錯的演算法實現部分。比如以上的例子就可以完全用 LinearRegressor 來替換。只需要幾行程式碼簡單地呼叫 fit() 函式就能輕鬆得到收斂的模型。唯一不足的是目前與 TensorFlow Serving 還不能 100% 相容。雖然 Google 還在全力完善 TensorFlow Serving,但是距離完善還需要一定的時間。
如果既想要使用方便快捷的的 Estimator ,又想線上部署呢?當然也是有辦法的,筆者鑽研了一下後,實現了一個用 Estimator 訓練資料,匯出模型後再部署上線的方法。最後用這個線上部署的模型實現一個線上評估房屋價值的系統。