swift:ViewController中自定義tableView簡單入門
1 建立工程:開啟xcode 選擇ios平臺下的sing view application ,選擇swift語言,建立工程
2 在ViewController裡面的新增程式碼
import UIKit
class ViewController: UIViewController,UITableViewDataSource,UITableViewDelegate{
var tableView:UITableView?
var dataArr = NSMutableArray();
override func viewDidLoad() {
super.viewDidLoad
// Do any additional setup after loading the view, typically from a nib.
self.view.backgroundColor=UIColor.blueColor()
//初始化資料來源
for i in 0...99{
dataArr.addObject("這是第\(i)行")
}
//定義表檢視
let rect:CGRect=self.view.bounds//取得self.view的大小
tableView=UITableView
tableView!.dataSource=self
tableView!.delegate=self
self.view.addSubview(tableView!)
}
//實現dataSource協議 多行
func tableView(tableView: UITableView, numberOfRowsInSection section: Int) -> Int{
return dataArr.count
}
func tableView(tableView: UITableView
let cellID="my cell is "
var cell = tableView.dequeueReusableCellWithIdentifier(cellID)
if(cell == nil){
cell = UITableViewCell(style: .Default, reuseIdentifier: cellID)
}
let s = dataArr.objectAtIndex(indexPath.row) as! String
cell!.textLabel?.text=s
return cell!
}
//實現Delegate協議 點選事件
func tableView(tableView: UITableView, didSelectRowAtIndexPath indexPath: NSIndexPath){
print("\(indexPath)行被點選了")
}
override func didReceiveMemoryWarning() {
super.didReceiveMemoryWarning()
// Dispose of any resources that can be recreated.
}
}
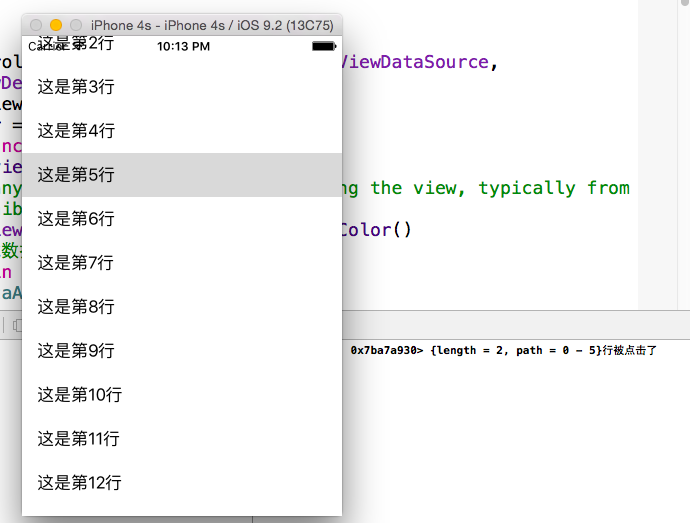
3 實驗結果