
RabbitMQ學習(三)——探索交換機(Exchange),結合SpringBoot實戰
在上一篇文章中,我們講解了RabbitMQ中的AMQP協議,對RabbitMQ中的基本概念和工作流程有了大致的瞭解,同時也知道了RabbitMQ當中的重要元件,如果你忘記了內容,可以先複習一下,再學習接下來的內容。RabbitMQ學習(二)——AMQP協議。
好了,接下來就進入本文的主要內容RabbitMQ中的交換機(Exchange)。我們已經知道了RabbitMQ中的交換機有四種類型,分為:
- Direct Exchange(直連交換機)
- Fanout Exchange(扇型交換機)
- Topic Exchange(主題交換機)
- Headers Exchange(頭交換機)
我們知道在RabbitMQ工作流程當中,當我們要使用時需要指定Exchange和Queue才能傳遞訊息,接下來我們便介紹一下各個交換機的特點,然後通過建立一個簡單的SpringBoot例子來講解各個交換機型別的用法,在開始例子前,我們先來說一說各個交換機的特點。
一、RabbitMQ中的交換機
1、直連交換機
直連型交換機(direct exchange)是根據訊息攜帶的路由鍵(routing key)將訊息投遞給對應佇列的。
直連交換機用來處理訊息的單播路由(unicast routing)(儘管它也可以處理多播路由)。
下面介紹它是如何工作的:
將一個佇列繫結到某個交換機上,同時賦予該繫結一個路由鍵(routing key)
當一個攜帶著路由鍵為R的訊息被髮送給直連交換機時,交換機會把它路由給繫結值同樣為R的佇列。同樣的一個routing key也是支援應用到多個佇列中的。
直連交換機經常用來迴圈分發任務給多個工作者(workers)。當這樣做的時候,我們需要明白一點,在AMQP 0-9-1中,訊息的負載均衡是發生在消費者(consumer)之間的,而不是佇列(queue)之間。
它的工作原理圖如下:
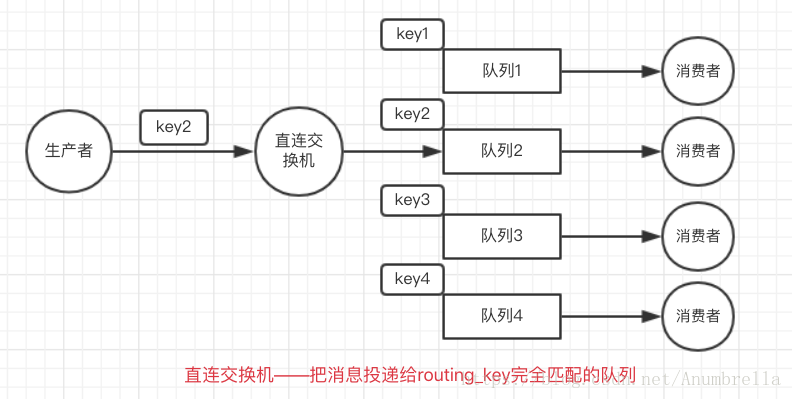
生產者傳送一個routing_key為key2的訊息,到達直連交換機後,交換機會把訊息投遞給繫結routing_key也是key2的佇列,然後再投遞給監聽該佇列的使用者。
這裡的匹配就是完全匹配,這個模式就是直連交換機。
2、扇型交換機
扇型交換機(fanout exchange)將訊息路由給繫結到它身上的所有佇列,而不理會繫結的路由鍵。
如果N個佇列繫結到某個扇型交換機上,當有訊息傳送給此扇型交換機時,
交換機會將訊息的拷貝分別傳送給這所有的N個佇列。扇型用來交換機處理訊息的廣播路由(broadcast routing)。所以扇形交換機主要做的就是廣播訊息。
因為扇型交換機投遞訊息的拷貝到所有繫結到它的佇列,所以它的應用案例都極其相似:
- 大規模多使用者線上(MMO)遊戲可以使用它來處理排行榜更新等全域性事件
- 體育新聞網站可以用它來近乎實時地將比分更新分發給移動客戶端
- 分發系統使用它來廣播各種狀態和配置更新
- 在群聊的時候,它被用來分發訊息給參與群聊的使用者。(AMQP沒有內建presence的概念,因此XMPP可能會是個更好的選擇)
它的工作原理圖如下:
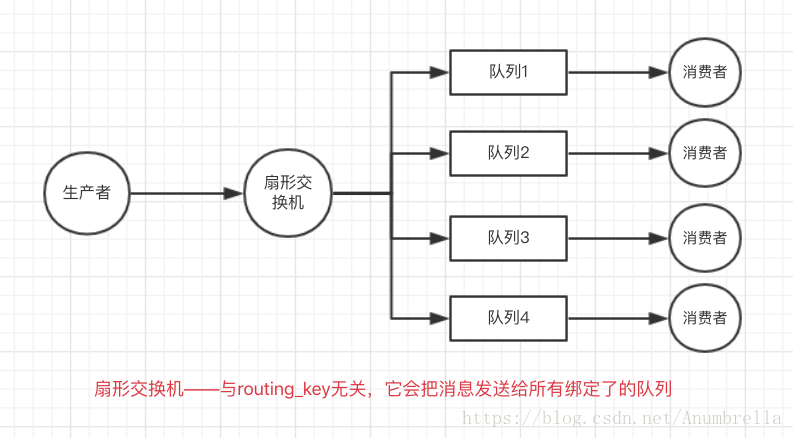
生產者傳送一個訊息給扇形交換機,扇形交換機會把訊息投遞給所有綁定了它的佇列,而這個與routing_key(路由鍵)無關,它採用廣播機制傳遞訊息。
3、主題交換機
主題交換機(topic exchange)通過對訊息的路由鍵和佇列到交換機的繫結模式之間的匹配,將訊息路由給一個或多個佇列。
主題交換機經常用來實現各種分發/訂閱模式及其變種。主題交換機通常用來實現訊息的多播路由(multicast routing)。
主題交換機非常靈活,它是通過使用帶規則的routing_key來對實現對消費分配到佇列中,可以實現一個訊息傳送給一個或多個佇列中。
主題交換機的routing_key需要有一定的規則,採用.#.…..的格式,每個部分用.分開,其中:
- *(星號):可以(只能)匹配一個單詞
- #(井號):可以匹配多個單詞(或者零個)
假設有一條訊息的routing_key為net.rabbit.kk,那麼帶有這樣binding_key(和交換機繫結的routing_key)的幾個佇列都會接收這條訊息:
1、net.*.*
2、*.*.kk
3、net.#
當然還有其他的組合,這裡只是列舉了一些。其實就和正則的匹配一樣,只要滿足就可以傳遞到該佇列中去。
主題交換機擁有非常廣泛的使用者案例。無論何時,當一個問題涉及到那些想要有針對性的選擇需要接收訊息的多消費者/多應用(multiple consumers/applications) 的時候,主題交換機都可以被列入考慮範圍。
使用案例:
- 分發有關於特定地理位置的資料,例如銷售點
- 由多個工作者(workers)完成的後臺任務,每個工作者負責處理某些特定的任務
- 股票價格更新(以及其他型別的金融資料更新)
- 涉及到分類或者標籤的新聞更新(例如,針對特定的運動專案或者隊伍)
- 雲端的不同種類服務的協調
- 分散式架構/基於系統的軟體封裝,其中每個構建者僅能處理一個特定的架構或者系統。
它的工作原理圖如下:
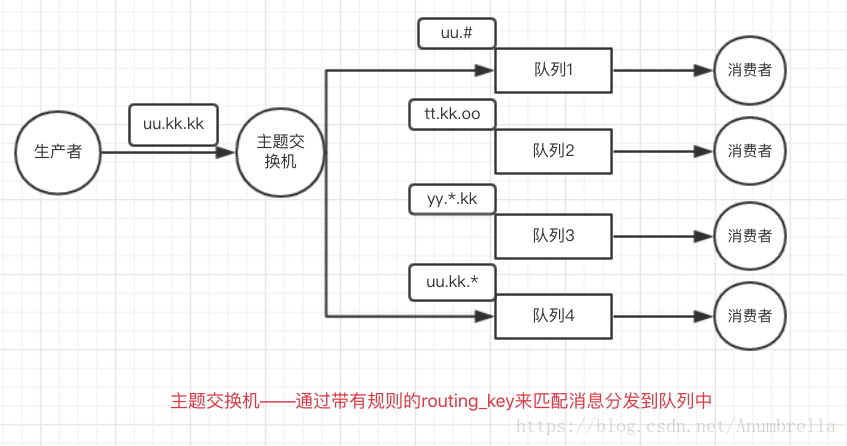
生產者傳送一個routing_key為“uu.kk.kk”的訊息,到主題連交換機後,交換機會根據routing_key的匹配規則(就是上面介紹的#、*的規則),把訊息投遞給繫結routing_key且符合規則的佇列,然後再投遞給監聽該佇列的使用者。
這裡的匹配就是正則匹配模式,這個模式就是主題交換機。
4、頭交換機
有時訊息的路由操作會涉及到多個屬性,此時使用訊息頭就比用路由鍵更容易表達,頭交換機(headers exchange)就是為此而生的。
頭交換機使用多個訊息屬性來代替路由鍵建立路由規則。通過判斷訊息頭的值能否與指定的繫結相匹配來確立路由規則。
我們可以繫結一個佇列到頭交換機上,並給他們之間的繫結使用多個用於匹配的頭(header)。
在頭交換機中需要考慮的是需要部分匹配還是全部匹配。相比較於直達交換機,頭交換機的優勢是匹配的規則不被限定為字串,頭交換機需要在佇列繫結的規則中指定訊息頭和匹配的規則。
匹配規則x-match有下列兩種型別:
- x-match = all :表示所有的鍵值對都匹配才能接受到訊息
- x-match = any :表示只要有鍵值對匹配就能接受到訊息
就是在指定訊息頭(鍵值對)時,新增”x-match”引數,當”x-match”設定為“any”時,訊息頭的任意一個值被匹配就可以滿足條件,而當”x-match”設定為“all”的時候,就需要訊息頭的所有值都匹配成功。
頭交換機可以視為直連交換機的另一種表現形式。頭交換機能夠像直連交換機一樣工作,不同之處在於頭交換機的路由規則是建立在頭屬性值之上,而不是路由鍵。路由鍵必須是一個字串,而頭屬性值則沒有這個約束,它們甚至可以是整數或者雜湊值(字典)等。
它的工作原理圖如下:
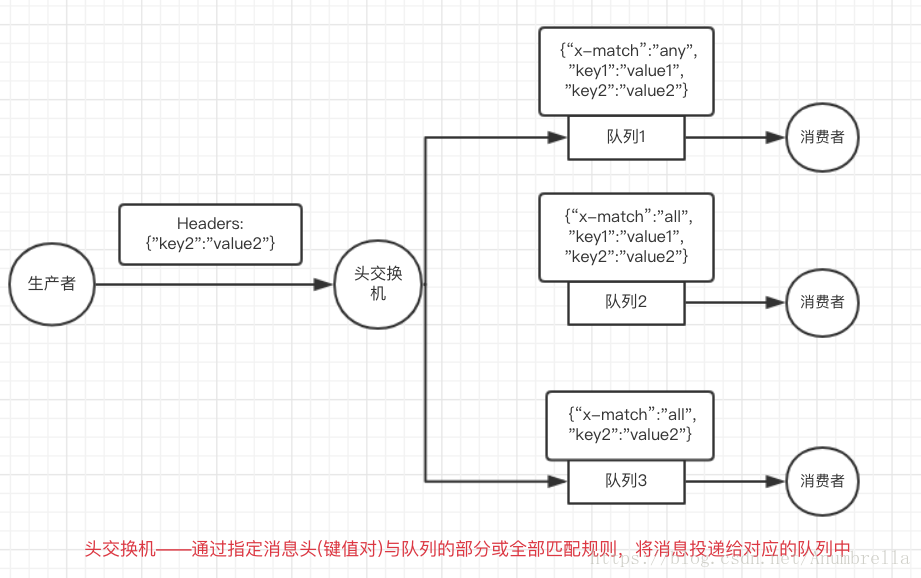
生產者傳送一個含有訊息頭為 {“key2”:“value2”} 的訊息,到頭交換機後,交換機會根據佇列繫結訊息頭中“x-match”的匹配規則(就是上面介紹的all、any的規則),把訊息投遞給滿足訊息頭匹配規則的佇列中,然後再投遞給監聽該佇列的使用者。
這裡的匹配就是訊息頭(鍵值對)模式,這個模式就是頭交換機。
到此,RabbitMQ交換機的就介紹完畢,這裡總結一下:
直達交換機:先匹配,再投遞,即在繫結時設定一個routing_key,訊息的routing_key完全匹配時,才會被交換機投遞到繫結的佇列中。
扇形交換機:與routing_key無關,把所有訊息投遞給所有繫結的佇列中。
主題交換機:繫結routing_key,在匹配routing_key時按照正則配置的規則投遞訊息到佇列中,這個也是最靈活的交換機。
頭交換機:使用多個訊息屬性來替代路由鍵建立路由規則,可以實現部分匹配或全部匹配。
注意:這裡一個routing_key可以繫結到多個佇列中,也就是說一個佇列可以繫結多個不同的routing_key,這個可以根據具體實際需求來設計。
二、RabbitMQ結合SpringBoot實戰
上面我們對RabbitMQ的佇列型別進行了大致的介紹,接下來我們便開始結合程式碼來分析:
1、新建一個Maven工程
這裡我使用Eclipse,新建一個名為rabbitmq的maven工程。這裡spring-boot使用1.4.1.RELEASE版本。在pom檔案中引入依賴包,
    <parent>
        <groupId>org.springframework.boot</groupId>
        <artifactId>spring-boot-starter-parent</artifactId>
        <version>1.4.1.RELEASE</version>
    </parent>

    <dependencies>
        <dependency>
            <groupId>org.springframework.boot</groupId>
            <artifactId>spring-boot-starter-web</artifactId>
        </dependency>

        <dependency>
            <groupId>org.springframework.boot</groupId>
            <artifactId>spring-boot-starter-test</artifactId>
            <scope>test</scope>
        </dependency>

        <dependency>
            <groupId>org.springframework.boot</groupId>
            <artifactId>spring-boot-starter-amqp</artifactId>
        </dependency>

        <dependency>
            <groupId>junit</groupId>
            <artifactId>junit</artifactId>
            <version>3.8.1</version>
            <scope>test</scope>
        </dependency>
    </dependencies>
在專案下新建resources資料夾,新建檔案application.properties,然後配置以下程式碼,詳細的意思可以檢視註釋。
# 應用名稱
spring.application.name=rabbitmq

# RabbitMQ主機地址
spring.rabbitmq.host=localhost
# RabbitMQ埠號
spring.rabbitmq.port=5672
# RabbitMQ使用者名稱
spring.rabbitmq.username=guest
# RabbitMQ密碼
spring.rabbitmq.password=guest
# 支援釋出確認
spring.rabbitmq.publisher-confirms=true
# 支援釋出返回
spring.rabbitmq.publisher-returns=true
# 虛擬主機名稱
spring.rabbitmq.virtual-host=/
# 採用手動應答
# spring.rabbitmq.listener.acknowledge-mode=manual
然後新建controller、config、sender、receiver包名,新建檔案如下所示:
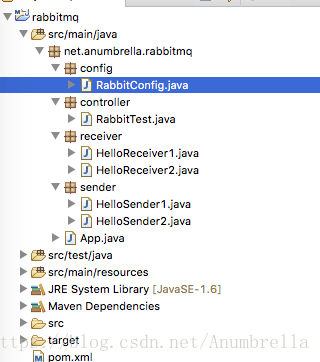
2、建立佇列、配置資訊、傳送者、消費者
這裡我們在配置檔案中新建hello、user佇列,RabbitConfig.java的程式碼如下:
package net.anumbrella.rabbitmq.config;

import org.springframework.amqp.core.Queue;
import org.springframework.amqp.rabbit.connection.CachingConnectionFactory;
import org.springframework.amqp.rabbit.connection.ConnectionFactory;
import org.springframework.amqp.rabbit.core.RabbitTemplate;
import org.springframework.beans.factory.annotation.Value;
import org.springframework.beans.factory.config.ConfigurableBeanFactory;
import org.springframework.context.annotation.Bean;
import org.springframework.context.annotation.Configuration;
import org.springframework.context.annotation.Scope;

@Configuration
public class RabbitConfig {

    @Value("${spring.rabbitmq.host}")
    private String addresses;

    @Value("${spring.rabbitmq.port}")
    private String port;

    @Value("${spring.rabbitmq.username}")
    private String username;

    @Value("${spring.rabbitmq.password}")
    private String password;

    @Value("${spring.rabbitmq.virtual-host}")
    private String virtualHost;

    @Value("${spring.rabbitmq.publisher-confirms}")
    private boolean publisherConfirms;

    /**
     * 申明hello佇列
     *
     * @return
     */
    @Bean
    public Queue helloQueue() {
        return new Queue("hello");
    }

    /**
     * 申明user佇列
     *
     * @return
     */
    @Bean
    public Queue userQueue() {
        return new Queue("user");
    }

    @Bean
    public ConnectionFactory connectionFactory() {

        CachingConnectionFactory connectionFactory = new CachingConnectionFactory();
        connectionFactory.setAddresses(addresses + ":" + port);
        connectionFactory.setUsername(username);
        connectionFactory.setPassword(password);
        connectionFactory.setVirtualHost(virtualHost);
        /** 如果要進行訊息回撥,則這裡必須要設定為true */
        connectionFactory.setPublisherConfirms(publisherConfirms);
        return connectionFactory;
    }

    /**
     * 因為要設定回撥類,所以應是prototype型別,如果是singleton型別,則回撥類為最後一次設定
     *
     * @return
     */
    @Bean
    @Scope(ConfigurableBeanFactory.SCOPE_PROTOTYPE)
    public RabbitTemplate rabbitTemplatenew() {
        RabbitTemplate template = new RabbitTemplate(connectionFactory());
        return template;
    }

}
在sender包下,新建HelloReceiver1.java,HelloReceiver2.java,程式碼如下所示:
HelloReceiver1.java:
package net.anumbrella.rabbitmq.receiver;

import java.io.IOException;

import org.springframework.amqp.core.Message;
import org.springframework.amqp.rabbit.annotation.RabbitListener;
import org.springframework.stereotype.Component;

import com.rabbitmq.client.Channel;

@Component
public class HelloReceiver1 {

    @RabbitListener(queues = "hello")
    public void process(Message message, Channel channel) throws IOException {
        System.out.println("Receiver1  : " + new String(message.getBody()));
    }

}
HelloReceiver2.java:
package net.anumbrella.rabbitmq.receiver;

import java.io.IOException;

import org.springframework.amqp.core.Message;
import org.springframework.amqp.rabbit.annotation.RabbitListener;
import org.springframework.stereotype.Component;

import com.rabbitmq.client.Channel;

@Component
public class HelloReceiver2 {

    @RabbitListener(queues = "hello")
    public void process(Message message, Channel channel) throws IOException {
        System.out.println("Receiver2 : " + new String(message.getBody()));

    }

}
這裡@RabbitListener就是監聽某個佇列,如果該佇列中有訊息時,就會發送給使用者。
同理傳送者,在sender包名下建立HelloSender1.java、HelloSender2.java,程式碼如下:
HelloSender1.java:
package net.anumbrella.rabbitmq.sender;

import java.text.SimpleDateFormat;
import java.util.Date;

import org.springframework.amqp.core.AmqpTemplate;
import org.springframework.beans.factory.annotation.Autowired;
import org.springframework.stereotype.Component;

@Component
public class HelloSender1 {

    @Autowired
    private AmqpTemplate rabbitTemplate;

    public void send(String msg) {
        SimpleDateFormat time = new SimpleDateFormat("yyyy-MM-dd HH:mm:ss");
        String sendMsg = msg + time.format(new Date()) + " hello1 ";
        System.out.println("Sender1 : " + sendMsg);
        this.rabbitTemplate.convertAndSend("hello", sendMsg);
    }

}
HelloSender2.java:
package net.anumbrella.rabbitmq.sender;

import java.text.SimpleDateFormat;
import java.util.Date;

import org.springframework.amqp.core.AmqpTemplate;
import org.springframework.beans.factory.annotation.Autowired;
import org.springframework.stereotype.Component;

@Component
public class HelloSender2 {

    @Autowired
    private AmqpTemplate rabbitTemplate;

    public void send(String msg) {
        SimpleDateFormat time=new SimpleDateFormat("yyyy-MM-dd HH:mm:ss");
        String sendMsg = msg + time.format(new Date()) + " hello2 ";
        System.out.println("Sender2 : " + sendMsg);
        this.rabbitTemplate.convertAndSend("hello", sendMsg);
    }

}
注意:這裡我們把訊息的傳送者和訊息的消費者寫在了一個程式當中了,在實際的情況中可能會在不同的程式當中。
3、新增控制層通過Restful介面模擬訊息傳送
接下來我們在controller包下,新建RabbitTest.java,通過Restful介面來模擬觸發訊息的傳送。
RabbitTest.java:
package net.anumbrella.rabbitmq.controller;

import org.springframework.beans.factory.annotation.Autowired;
import org.springframework.web.bind.annotation.GetMapping;
import org.springframework.web.bind.annotation.RequestMapping;
import org.springframework.web.bind.annotation.RestController;

import net.anumbrella.rabbitmq.sender.HelloSender1;
import net.anumbrella.rabbitmq.sender.HelloSender2;

@RestController
@RequestMapping("/rabbit")
public class RabbitTest {

    @Autowired
    private HelloSender1 helloSender1;

    @Autowired
    private HelloSender2 helloSender2;

    /**
     * 單生產者-單消費者
     */
    @GetMapping("/hello")
    public void hello() {
        helloSender1.send("hello1");
    }

    /**
     * 單生產者-多消費者
     */
    @GetMapping("/oneToMany")
    public void oneToMany() {
        for (int i = 0; i < 4; i++) {
            helloSender1.send("第[" + (i + 1) + "]個 ---------> ");
        }
    }

    /**
     * 多生產者-多消費者
     */
    @GetMapping("/manyToMany")
    public void manyToMany() {
        for (int i = 0; i < 4; i++) {
            helloSender1.send("第[" + (i + 1) + "]個 ---------> ");
            helloSender2.send("第[" + (i + 1) + "]個 ---------> ");
        }

    }

}
這裡我們主要模擬了三種情況:
- 單生產者-單消費者
- 單生產者-多消費者
- 多生產者-多消費者
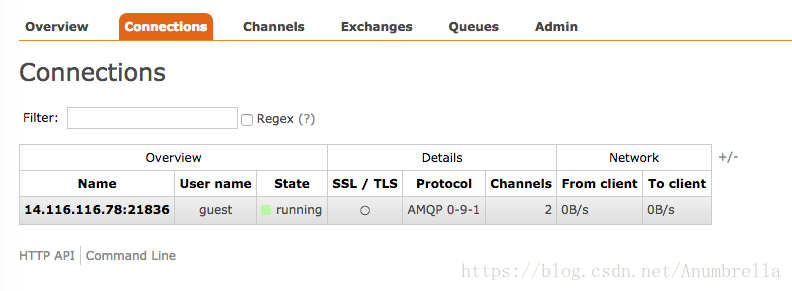
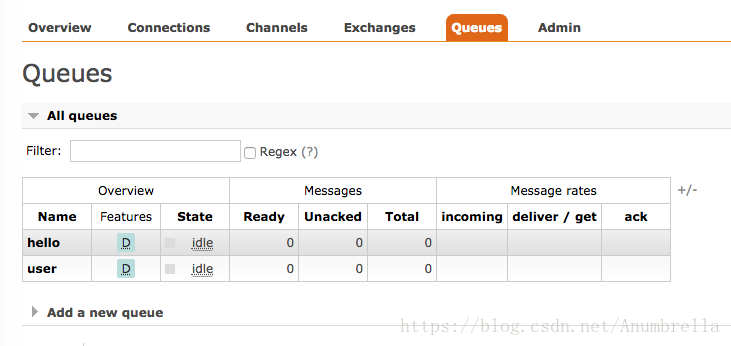
當我們執行起程式後,我們可以在RabbitMQ服務端管理介面檢視到新建的連線和新生成的佇列:
然後我們在瀏覽器裡訪問hello、oneToMany、manyToMany可以分別得到以下訊息:
可以看到使用者傳送了訊息並且收到了訊息,這裡一個使用者傳送並且一個消費者收到了。
Sender1 : hello1 2018-05-12 16:56:35 hello1
Receiver1  : hello1 2018-05-12 16:56:35 hello1
這裡我們一個使用者傳送訊息,並且多個消費者收到了訊息。
Sender1 : 第[1]個 ---------> 2018-05-12 17:05:48 hello1
Sender1 : 第[2]個 ---------> 2018-05-12 17:05:49 hello1
Sender1 : 第[3]個 ---------> 2018-05-12 17:05:49 hello1
Sender1 : 第[4]個 ---------> 2018-05-12 17:05:49 hello1
Receiver1  : 第[1]個 ---------> 2018-05-12 17:05:48 hello1
Receiver2 : 第[2]個 ---------> 2018-05-12 17:05:49 hello1
Receiver2 : 第[3]個 ---------> 2018-05-12 17:05:49 hello1
Receiver1  : 第[4]個 ---------> 2018-05-12 17:05:49 hello1
現在這裡是多個使用者傳送訊息,並且多個使用者收到了訊息。
Sender1 : 第[1]個 ---------> 2018-05-12 17:06:21 hello1
Sender2 : 第[1]個 ---------> 2018-05-12 17:06:21 hello2
Sender1 : 第[2]個 ---------> 2018-05-12 17:06:21 hello1
Sender2 : 第[2]個 ---------> 2018-05-12 17:06:21 hello2
Sender1 : 第[3]個 ---------> 2018-05-12 17:06:21 hello1
Sender2 : 第[3]個 ---------> 2018-05-12 17:06:21 hello2
Sender1 : 第[4]個 ---------> 2018-05-12 17:06:21 hello1
Sender2 : 第[4]個 ---------> 2018-05-12 17:06:21 hello2
Receiver1  : 第[1]個 ---------> 2018-05-12 17:06:21 hello1
Receiver2 : 第[1]個 ---------> 2018-05-12 17:06:21 hello2
Receiver1  : 第[2]個 ---------> 2018-05-12 17:06:21 hello1
Receiver2 : 第[2]個 ---------> 2018-05-12 17:06:21 hello2
Receiver1  : 第[3]個 ---------> 2018-05-12 17:06:21 hello1
Receiver2 : 第[3]個 ---------> 2018-05-12 17:06:21 hello2
Receiver1  : 第[4]個 ---------> 2018-05-12 17:06:21 hello1
Receiver2 : 第[4]個 ---------> 2018-05-12 17:06:21 hello2
到這裡你可能開始有些疑惑了,我們在模擬傳送單生產者-單消費者時,你可能會想為啥是receiver1收到了訊息,而receiver2沒有訊息,為啥是receiver1而不是receiver2?
其實當我們再次模擬訪問hello時,你就會發現現在是receiver2收到訊息了,再訪問又是receiver1收到訊息了。
多次訪問hello結果如下:
Sender1 : hello1 2018-05-12 17:10:01 hello1
Receiver2 : hello1 2018-05-12 17:10:01 hello1
Sender1 : hello1 2018-05-12 17:10:06 hello1
Receiver1  : hello1 2018-05-12 17:10:06 hello1
Sender1 : hello1 2018-05-12 17:10:09 hello1
Receiver2 : hello1 2018-05-12 17:10:09 hello1
Sender1 : hello1 2018-05-12 17:10:19 hello1
Receiver1  : hello1 2018-05-12 17:10:19 hello1
這裡我們仔細研究就會發現oneToMany就是這種情況,這是為啥?
這裡就要講到RabbitMQ的訊息機制了,RabbitMQ預設的訊息機制其實是輪詢分發,只是spring-boot中結合的RabbitMQ封裝的,採用了公平分發機制。所以在這裡採用的訊息機制是公平分發。
輪詢分發是指每個消費者都會受到服務傳送來的訊息,按照依次的順序來處理而不管消費者是否有能力處理。
公平分發則是按消費者的處理能力來進行處理,通過設定prefetchCount引數來讓使用者可以根據能力處理訊息。
至於這裡為什麼是公平分發和關於訊息處理機制處理的特點後面會有文章進行介紹,這裡大致瞭解即可。
注意:多個監聽一個佇列的消費者每次只有一個消費者可以收到訊息,訊息的負載均衡也是發生在消費者之間的,即RabbitMQ會通過訊息輪詢機制來選擇消費者。
即這裡可以設定讓每個消費者不是隨機獲得,可以讓能者多得。
我們也知道每次傳送訊息都要指定交換機,為啥這裡沒有宣告交換機,也沒有使用routing_key,訊息也走通了?
這是因為RabbitMQ還有一個預設交換機:
預設交換機(default exchange)實際上是一個由訊息代理預先宣告好的沒有名字(名字為空字串)的直連交換機(direct exchange)。
它有一個特殊的屬性使得它對於簡單應用特別有用處:那就是每個新建佇列(queue)都會自動繫結到預設交換機上,繫結的路由鍵(routing key)名稱與佇列名稱相同。
舉個栗子:當你聲明瞭一個名為”hello”的佇列,AMQP代理會自動將其繫結到預設交換機上,繫結(binding)的路由鍵名稱也是為”hello”。因此,當攜帶著名為”hello”的路由鍵的訊息被髮送到預設交換機的時候,此訊息會被預設交換機路由至名為”hello”的佇列中。
換句話說,預設交換機看起來貌似能夠直接將訊息投遞給佇列,儘管技術上並沒有做相關的操作。
所以我們傳送訊息時routing_key直接為佇列名稱了。這裡就是使用了預設的直達交換機。
4、新增其他型別的交換機例項
接下來我們再來使用主題交換機、扇形交換機和頭交換機:
在RabbitConfig.java 中新增主題交換機、扇形交換機、頭交換機和相關佇列、路由鍵的宣告、繫結規則。
新增程式碼如下:
    // ===============以下是驗證topic Exchange的佇列和互動機==========

    @Bean
    public Queue queueMessage() {
        return new Queue("topic.message");
    }

    @Bean
    public Queue queueMessages() {
        return new Queue("topic.messages");
    }

    @Bean
    TopicExchange topicExchange() {
        return new TopicExchange("topicExchange");
    }

    /**
     * 將佇列topic.message與exchange繫結,binding_key為topic.message,就是完全匹配
     *
     * @param queueMessage
     * @param exchange
     * @return
     */
    @Bean
    Binding bindingExchangeMessage(Queue queueMessage, TopicExchange topicExchange) {
        return BindingBuilder.bind(queueMessage).to(topicExchange).with("topic.message");
    }

    /**
     * 將佇列topic.messages與exchange繫結,binding_key為topic.#,模糊匹配
     *
     * @param queueMessage
     * @param exchange
     * @return
     */
    @Bean
    Binding bindingExchangeMessages(Queue queueMessages, TopicExchange topicExchange) {
        return BindingBuilder.bind(queueMessages).to(topicExchange).with("topic.#");
    }

    // ===============以上是驗證topic Exchange的佇列和互動機==========

    // ===============以下是驗證Fanout Exchange的佇列和互動機==========

    @Bean
    public Queue fanoutQueueA() {
        return new Queue("fanout.A");
    }

    @Bean
    public Queue fanoutQueueB() {
        return new Queue("fanout.B");
    }

    @Bean
    public Queue fanoutQueueC() {
        return new Queue("fanout.C");
    }

    @Bean
    FanoutExchange fanoutExchange() {
        return new FanoutExchange("fanoutExchange");
    }

    @Bean
    Binding bindingExchangeA(Queue fanoutQueueA, FanoutExchange fanoutExchange) {
        return BindingBuilder.bind(fanoutQueueA).to(fanoutExchange);
    }

    @Bean
    Binding bindingExchangeB(Queue fanoutQueueB, FanoutExchange fanoutExchange) {
        return BindingBuilder.bind(fanoutQueueB).to(fanoutExchange);
    }

    @Bean
    Binding bindingExchangeC(Queue fanoutQueueC, FanoutExchange fanoutExchange) {
        return BindingBuilder.bind(fanoutQueueC).to(fanoutExchange);
    }

    // ===============以上是驗證Fanout Exchange的佇列和互動機==========

    // ===============以下是驗證Direct Exchange的佇列和互動機==========
    @Bean
    public Queue directQueueA() {
        return new Queue("direct.A");
    }

    @Bean
    public Queue directQueueB() {
        return new Queue("direct.B");
    }

    @Bean
    public Queue directQueueC() {
        return new Queue("direct.C");
    }

    @Bean
    DirectExchange directExchange() {
        return new DirectExchange("directExchange");
    }

    @Bean
    Binding bindingDirectExchangeA(Queue directQueueA, DirectExchange directExchange) {
        return BindingBuilder.bind(directQueueA).to(directExchange).with("direct.a");
    }

    @Bean
    Binding bindingDirectExchangeB(Queue directQueueB, DirectExchange directExchange) {
        return BindingBuilder.bind(directQueueB).to(directExchange).with("direct.b");
    }

    @Bean
    Binding bindingDirectExchangeC(Queue directQueueC, DirectExchange directExchange) {
        return BindingBuilder.bind(directQueueC).to(directExchange).with("direct.c");
    }

    // ===============以上是驗證Direct Exchange的佇列和互動機==========

    // ===============以下是驗證Headers Exchange的佇列和互動機==========

    @Bean
    public Queue headersQueueA() {
        return new Queue("headers.A");
    }

    @Bean
    HeadersExchange headersExchange() {
        return new HeadersExchange("headersExchange");
    }

    @Bean
    Binding bindingHeadersExchangeA(Queue headersQueueA, HeadersExchange headersExchange) {
        // 這裡x-match有兩種型別
        // all:表示所有的鍵值對都匹配才能接受到訊息
        // any:表示只要有鍵值對匹配就能接受到訊息
        return BindingBuilder.bind(headersQueueA).to(headersExchange).where("age").exists();
    }

    // ===============以上是驗證Headers Exchange的佇列和互動機==========
然後再在sender和receiver中新增相應的傳送者和接受者:
TopicSender.java、FanoutSender.java、DirectSender.java 、HeadersSender.java
TopicReceiver.java、FanoutReceiver.java、DirectReceiver.java 、HeadersReceiver.java
TopicSender.java:
package net.anumbrella.rabbitmq.sender;

import org.springframework.amqp.core.AmqpTemplate;
import org.springframework.beans.factory.annotation.Autowired;
import org.springframework.stereotype.Component;

@Component
public class TopicSender {

    @Autowired
    private AmqpTemplate rabbitTemplate;

    public void send() {
        String msg1 = "I am topic.mesaage msg======";
        System.out.println("sender1 : " + msg1);
        this.rabbitTemplate.convertAndSend("topicExchange", "topic.message", msg1);

        String msg2 = "I am topic.mesaages msg########";
        System.out.println("sender2 : " + msg2);
        this.rabbitTemplate.convertAndSend("topicExchange", "topic.messages", msg2);
    }
}
TopicReceiver.java:
package net.anumbrella.rabbitmq.receiver;

import org.springframework.amqp.rabbit.annotation.RabbitListener;
import org.springframework.stereotype.Component;

@Component

public class TopicReceiver {

    @RabbitListener(queues = "topic.message")
    public void processA(String msg) {
        System.out.println("topicMessageReceiver  : " +msg);
    }

    @RabbitListener(queues = "topic.messages")
    public void processB(String msg) {
        System.out.println("topicMessagesReceiver  : " +msg);
    }
}
FanoutSender.java:
package net.anumbrella.rabbitmq.sender;

import org.springframework.amqp.core.AmqpTemplate;
import org.springframework.beans.factory.annotation.Autowired;
import org.springframework.stereotype.Component;

@Component
public class FanoutSender {

    @Autowired
    private AmqpTemplate rabbitTemplate;

    public void send() {
        String msgString="fanoutSender : hello i am anumbrella";
        System.out.println(msgString);
        this.rabbitTemplate.convertAndSend("fanoutExchange","abcd.ee", msgString);
    }

}
FanoutReceiver.java:
package net.anumbrella.rabbitmq.receiver;

import org.springframework.amqp.rabbit.annotation.RabbitListener;
import org.springframework.stereotype.Component;

@Component

public class FanoutReceiver {

    @RabbitListener(queues = "fanout.A")
    public void processA(String msg) {
        System.out.println("FanoutReceiverA  : " + msg);
    }

    @RabbitListener(queues = "fanout.B")
    public void processB(String msg) {
        System.out.println("FanoutReceiverB  : " + msg);
    }

    @RabbitListener(queues = "fanout.C")
    public void processC(String msg) {
        System.out.println("FanoutReceiverC  : " + msg);
    }

}
DirectSender.java :
package net.anumbrella.rabbitmq.sender;
import org.springframework.amqp.core.AmqpTemplate;
import org.springframework.beans.factory.annotation.Autowired;
import org.springframework.stereotype.Component;
@Component
public class DirectSender {
@Autowired
private AmqpTemplate rabbitTemplate;
public void send() {
String msg1 = "I am direct.a msg =======";
System.out.println("sender1 : " + msg1);
this.rabbitTemplate.convertAndSend("directExchange", "direct.a", msg1);
String msg2 = "I am direct.b msg =======";
System.out.println("sender2 : " + msg2);
this.rabbitTemplate.convertAndSend("directExchange", "direct.b", msg2);
String msg3 = "I am direct.c msg =======";
System.out.println("sender3 : " + msg3);
this.rabbitTemplate