
使用Zxing玩轉二維碼白邊的各個花樣
現在在實際應用中使用的最為廣泛的二維碼生成工具就是Zxing庫,本文以Zxing-1.60版本做的研究分析,獲取最新版本的Zxing。
1.生成二維碼
簡單介紹一下Zxing二維碼庫的使用方式,Zxing庫很強大,可以生成各種格式的二維碼(分析原始碼部分時再看其他的型別),最常用的就是QR格式。
1.1程式碼
如果沒有Zxing庫,可以到我的雲盤下載,地址Zxing-1.6
把jar包下載,copy到工程的libs目錄下,buildpath即可
1.1.1 獲取編碼後的資料Bitmatrix
BitMatrix是Zxing庫定義的一個二維碼的資料類。
這個方法主要是生成二維碼的BitMatrix,實際上就是一個矩陣,二維陣列–!
獲取到Bitmap後,就可以隨意展示了
public static Bitmap generateQRCode(String content, int width, int height) {
try {
HashMap<EncodeHintType, Object> hints = new HashMap<EncodeHintType, Object>();
// 設定編碼方式utf-8
hints.put(EncodeHintType.CHARACTER_SET, "utf-8");
//設定二維碼的糾錯級別為h 1.1.2將資料Bitmatrix轉換成Bitmap
   private static Bitmap bitMatrix2Bitmap(BitMatrix matrix) {
        matrix = updateBit(matrix, 0);
        int w = matrix.getWidth();
        int h = matrix.getHeight();
        int[] rawData = new int[w * h];
        for (int i = 0; i < w; i++) {
            for (int j = 0; j < h; j++) {
                int color = Color.WHITE;
                if (matrix.get(i, j)) {
                        // 有內容的部分,顏色設定為黑色,當然這裡可以自己修改成喜歡的顏色
                    color = Color.BLACK;
                }
                rawData[i + (j * w)] = color;
            }
        }

        Bitmap bitmap = Bitmap.createBitmap(w, h, Config.RGB_565);
        bitmap.setPixels(rawData, 0, w, 0, 0, w, h);
        return bitmap;
    }
2.原始碼分析白邊的生成過程
下面就分析Zxing的原始碼以及預設白邊的形成
先看generateQRCode裡的關鍵方法MultiFormatWriter類的encode方法(ps:這個方法不重要!)
public BitMatrix encode(String contents, BarcodeFormat format, int width, int height, Map<EncodeHintType, ?> hints) throws WriterException {
         Writer writer;
         switch (format) {
             case EAN_8:
           writer = new EAN8Writer();
           break;
         case EAN_13:
           writer = new EAN13Writer();
           break;
       case UPC_A:
           writer = new UPCAWriter();
          break;
        case QR_CODE:
           writer = new QRCodeWriter();
           break;
         case CODE_39:
           writer = new Code39Writer();
          break;
         case CODE_128:
           writer = new Code128Writer();
           break;
         case ITF:
           writer = new ITFWriter();
           break;
         case PDF_417:
           writer = new PDF417Writer();
           break;
         case CODABAR:
           writer = new CodaBarWriter();
           break;
         default:
           throw new IllegalArgumentException("No encoder available for format " + format);
         }
        return writer.encode(contents, format, width, height, hints);
        }
       }
實際上這個方法就是依據format來選擇一種編碼方式,最常用的就是QR_CODE的方式了,還有其他的方式,基本不用~~有興趣的可以百度下
然後我們再看QRCodeWriter的encode方法(ps:這個方法和白邊沒關係!)
 public BitMatrix encode(String contents, BarcodeFormat format, int width, int height, Map<EncodeHintType, ?> hints)
    throws WriterException
    {
     if (contents.length() == 0) {
      throw new IllegalArgumentException("Found empty contents");
    }

     if (format != BarcodeFormat.QR_CODE) {
       throw new IllegalArgumentException("Can only encode QR_CODE, but got " + format);
    }

     if ((width < 0) || (height < 0)) {
       throw new IllegalArgumentException("Requested dimensions are too small: " + width + 'x' + height);
    }


    ErrorCorrectionLevel errorCorrectionLevel = ErrorCorrectionLevel.L;
     if (hints != null) {
       ErrorCorrectionLevel requestedECLevel = (ErrorCorrectionLevel)hints.get(EncodeHintType.ERROR_CORRECTION);
      if (requestedECLevel != null) {
         errorCorrectionLevel = requestedECLevel;
      }
     }
    // 前面的都是做編碼前的準備,安全檢驗,糾錯級別設定等
    QRCode code = new QRCode();
    // 這裡才是真正的將contents轉換成code
     Encoder.encode(contents, errorCorrectionLevel, hints, code);
     // return的時候將code轉換成BitMatrix,並加入白邊
     return renderResult(code, width, height);
       }
下面再看將code轉換成BitMatrix,並加入白邊的方法renderResult(ps:這個方法很重要,修改白邊都可以在這個方法裡修改)
private static BitMatrix renderResult(QRCode code, int width, int height) {
        ByteMatrix input = code.getMatrix();
        if (input == null) {
            throw new IllegalStateException();
        }
        int inputWidth = input.getWidth();
        int inputHeight = input.getHeight();
        // 這裡qrWidth就是原始的二維碼的寬度了,包含8單位寬度的白邊
        int qrWidth = inputWidth + 8;
        int qrHeight = inputHeight + 8;
        // 依據使用者的輸入寬高,計算最後的輸出寬高
        int outputWidth = Math.max(width, qrWidth);
        int outputHeight = Math.max(height, qrHeight);

//計算縮放比例
    int multiple = Math.min(outputWidth / qrWidth, outputHeight / qrHeight);

   // 計算白邊的寬度
        int leftPadding = (outputWidth - inputWidth * multiple) / 2;
        int topPadding = (outputHeight - inputHeight * multiple) / 2;

  BitMatrix output = new BitMatrix(outputWidth, outputHeight);

   int inputY = 0;
        // 巢狀迴圈,將ByteMatrix的內容計算padding後轉換成BitMatrix
        for (int outputY = topPadding; inputY < inputHeight; outputY += multiple) {
            int inputX = 0;
            for (int outputX = leftPadding; inputX < inputWidth; outputX += multiple) {
                if (input.get(inputX, inputY) == 1) {
                    output.setRegion(outputX, outputY, multiple, multiple);
                }
                inputX++;
            }
            inputY++;
        }

   return output;
    }
這個方法裡的程式碼不難讀懂,所以要去掉白邊實際上就很簡單了,自定義一個QRCodeWriter類,完全把Zxing包的QRCodeWriter類複製過來,然後將renderResult方法裡的padding去掉就可以了(為什麼不繼承QRCodeWriter,因為它是final類~~)。
下面是去掉padding後的程式碼
 private static BitMatrix renderResult(QRCode code, int width, int height) {
        ByteMatrix input = code.getMatrix();
        if (input == null) {
            throw new IllegalStateException();
        }
        int inputWidth = input.getWidth();
        int inputHeight = input.getHeight();
        // 依據使用者的輸入寬高,計算最後的輸出寬高
        int outputWidth = Math.max(width, inputWidth);
        int outputHeight = Math.max(height, inputHeight);

  //計算縮放比例
        int multiple = Math.min(outputWidth / inputWidth, outputHeight / inputHeight);

   BitMatrix output = new BitMatrix(outputWidth, outputHeight);
        int inputY = 0;
        // 巢狀迴圈,將ByteMatrix的內容計算padding後轉換成BitMatrix
        for (int outputY = 0; inputY < inputHeight; outputY += multiple) {
            int inputX = 0;
            for (int outputX = 0; inputX < inputWidth; outputX += multiple) {
                if (input.get(inputX, inputY) == 1) {
                    output.setRegion(outputX, outputY, multiple, multiple);
                }
                inputX++;
            }
            inputY++;
        }

   return output;
}
效果圖(為了區分白邊,將整個背景色設定成的#0f0了)
去掉白邊前:

去掉白邊後:

去掉白邊的其他方法
方法1:
這個方法就是將Zxing生成的BitMatrix更新一下去掉了周邊,並重新設定白邊的寬度,見margin
    private static BitMatrix updateBit(BitMatrix matrix, int margin) {
        int tempM = margin * 2;
        int[] rec = matrix.getEnclosingRectangle(); // 獲取二維碼圖案的屬性
        int resWidth = rec[2] + tempM;
        int resHeight = rec[3] + tempM;
        BitMatrix resMatrix = new BitMatrix(resWidth, resHeight); // 按照自定義邊框生成新的BitMatrix
        resMatrix.clear();
        for (int i = margin; i < resWidth - margin; i++) { // 迴圈,將二維碼圖案繪製到新的bitMatrix中
            for (int j = margin; j < resHeight - margin; j++) {
                if (matrix.get(i - margin + rec[0], j - margin + rec[1])) {
                    resMatrix.set(i, j);
                }
            }
        }
        return resMatrix;
    }
方法2:
在比較新的Zxing包中EncodeHintType有另外一個屬性就是Margin,可以設定這個屬性來更新,有興趣的可以去玩玩哈,這裡就不貼程式碼了
3.自定義白邊顏色
當然通過上面的閱讀,可以自定義白邊的寬度了,下面就介紹下自定義白邊顏色的方法;
當然,最簡單的自定義白邊就是使用一個imageview展示無邊的二維碼,外層view設定一個白邊背景,就可以了~
這裡要介紹的方法是修改bitMatrix2Bitmap方法,通過上文知道,通過zxing包生成的只是BitMaxtrix,這是不能直接用在imageview上的。讀者如果仔細閱讀了上文的bitMatrix2Bitmap方法就應該可以猜到這裡要介紹的方法了,不多說,程式碼如下
    private static Bitmap bitMatrix2Bitmap(BitMatrix matrix, Bitmap logBitmap) {
        int w = matrix.getWidth();
        int h = matrix.getHeight();
        int[] rec = matrix.getEnclosingRectangle();
        int[] rawData = new int[w * h];
        for (int i = 0; i < w; i++) {
            for (int j = 0; j < h; j++) {
                int color = Color.WHITE;
                if (matrix.get(i, j)) {
                    color = Color.BLACK;
                }
                // 設定白邊的顏色
                if (i < rec[0] || j < rec[1] || i > (rec[0] + rec[2]) || j > (rec[1] + rec[3])){
                    color = Color.RED;
                }
                rawData[i + (j * w)] = color;
            }
        }

        Bitmap bitmap = Bitmap.createBitmap(w, h, Config.RGB_565);
        bitmap.setPixels(rawData, 0, w, 0, 0, w, h);
        return addLogo(bitmap, logBitmap);
    }
這個方法就是可以自定義白邊顏色的方法,
效果圖
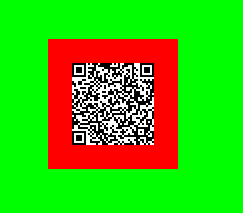
這裡需要解釋下BitMatrix的getEnclosingRectangle()獲取到的東西到底是什麼,這個方法的原始碼我就不貼了,這個方法返回一個一維陣列,長度為4
return new int[] { left, top, width, height };
left就是二維碼內容左上角的x座標,top就是左上角的y座標,with就是二維碼內容的寬度,height就是二維碼內容的高度。
所以當i和j超出二維碼內容範圍的時候就可以設定自己的邊框顏色了~~
4.二維碼新增LOGO(單個文字等)
邏輯比較簡單,獲取到二維碼的Bitmap後,Logo就是在這個Bitmap中間再繪製一個Bitmap不就可以了麼。
程式碼如下:
    private static Bitmap addLogo(Bitmap src, Bitmap logo) {
        if (logo == null) {
            return src;
        }
        // 獲取圖片的寬高
        int srcWidth = src.getWidth();
        int srcHeight = src.getHeight();
        int logoWidth = logo.getWidth();
        int logoHeight = logo.getHeight();
        if (logoWidth == 0 || logoHeight == 0) {
            return src;
        }
        // logo大小為二維碼整體大小的1/5
        float scaleFactor = srcWidth * 1.0f / 5 / logoWidth;
        Bitmap bitmap = Bitmap.createBitmap(srcWidth, srcHeight, Bitmap.Config.ARGB_8888);
        try {
            Canvas canvas = new Canvas(bitmap);
            canvas.drawBitmap(src, 0, 0, null);
            canvas.scale(scaleFactor, scaleFactor, srcWidth / 2, srcHeight / 2);
            canvas.drawBitmap(logo, (srcWidth - logoWidth) / 2, (srcHeight - logoHeight) / 2, null);
            canvas.save(Canvas.ALL_SAVE_FLAG);
            canvas.restore();
        } catch (Exception e) {
            bitmap = null;
            e.getStackTrace();
        }

        return bitmap;
    }
5.二維碼下方新增文欄位落
邏輯和新增logo是一樣的,只不過這裡新增的文字是放置在二維碼下方的一段文字,需要測定文字的大小,行高等,程式碼邏輯我就不解釋了,主要是是使用極少,專案中有一個分享需要將這個做成圖片分享到微信,後來又嫌棄樣式太不美觀丟棄了~~~不過可以將文字環繞二維碼,這個應該還是比較漂亮的==!讀者有興趣可以依照下面這個方法畫瓢啦。
    public static Bitmap addTextToBitmap(Bitmap bmpSrc, String text) {
        int srcWidth = bmpSrc.getWidth();
        int srcHeight = bmpSrc.getHeight();

        // 先計算text所需要的height
        int textSize = 20;
        int padding = 3;
        int textLinePadding = 1;
        // 每行的文字
        int perLineWords = (srcWidth - 2 * padding) / textSize;
        int lineNum = text.length() / perLineWords;
        lineNum = text.length() % perLineWords == 0 ? lineNum : lineNum + 1;
        int textTotalHeight = lineNum * (textSize + textLinePadding) + 2 * padding;

        Bitmap bitmap = Bitmap.createBitmap(srcWidth, srcHeight + textTotalHeight,
                Bitmap.Config.ARGB_8888);
        try {
            Canvas canvas = new Canvas(bitmap);
            canvas.drawColor(Color.WHITE);
            canvas.drawBitmap(bmpSrc, 0, 0, null);
            Paint paint = new Paint(Paint.ANTI_ALIAS_FLAG);
            paint.setColor(Color.BLACK);
            paint.setTextSize(textSize);
            String lineText;
            for (int i = 0, startY = srcHeight + textSize, start, end; i < lineNum; i++) {
                start = i * perLineWords;
                end = start + perLineWords;
                lineText = text.substring(start, end > text.length() ? text.length() : end);
                canvas.drawText(lineText, padding, startY, paint);
                startY += textSize + textLinePadding;
            }
            canvas.save(Canvas.ALL_SAVE_FLAG);
            canvas.restore();
        } catch (Exception e) {
            bitmap = null;
            e.getStackTrace();
        }
        return bitmap;
    }
實際上,最後的這2個部分都應該是Bitmap和Canvas的內容,這期就先到這裡了,自己不動手,程式碼永遠也不是你的!共勉!