
使用深度學習進行目標檢測
在上一篇單目視覺測距中我測試了行人測距演算法,其中最主要的一個問題就是傳統的HOG+SVM行人檢測演算法的檢測效果不好,存在的問題就是:
1. 對人的檢測框不夠精準,在人站立狀態下,頭頂和腳底都有很大的空餘部分,因為對行人測距我們要得到目標在畫面中的畫素身高,所以檢測框不準確對我們進行單目行人測距有很大的影響,在程式執行過程我們更不可能採用手工標定的方法,所以一種精準的目標檢測程式十分重要。
2. HOG+SVM的行人檢測結果準確度比較低。HOG+SVM的方法對圖片輸入的檢測效果比較好,對視訊輸入檢測效果一般,在我的實際測試中,對實驗室的一些類似人體的物體存在誤檢的情況(例如相機三腳架等物體)。演算法的檢測的準確度在視訊輸入下不能保證。
所以我們需要一種新的目標檢測演算法來對目標人進行檢測,得到目標在畫面中的畫素身高。這就是我要記錄的:使用深度學習神經網路進行目標檢測,使用的是SSD+Caffe的目標檢測的方法。
需要注意的是我的環境是Ubuntu14.04 + OpenCV3.4, OpenCV在3.3以後才整合神經網路的模組,所以在這裡我使用的是opencv3.4版本,程式在Win7 + OpenCV3.4的環境下也同樣使用。
程式如下:
# USAGE
# python real_time_object_detection.py --prototxt MobileNetSSD_deploy.prototxt.txt --model MobileNetSSD_deploy.caffemodel

# import the necessary packages
from imutils.video import VideoStream
from imutils.video import FPS
import numpy as np
import argparse
import imutils
import time
import cv2


# construct the argument parse and parse the arguments
ap = argparse.ArgumentParser()
ap.add_argument("-p", "--prototxt",default="C:\\Users\\MY\\Desktop\\personDetect\\MobileNetSSD_deploy_0.prototxt",
	help="path to Caffe 'deploy' prototxt file")
ap.add_argument("-m", "--model",default="C:\\Users\\MY\\Desktop\\personDetect\\MobileNetSSD_deploy_0.caffemodel",
	help="path to Caffe pre-trained model")
ap.add_argument("-v", "--video", default="E:\pose-estimation\object-detection-master\test",
	help="path to Caffe video file")
ap.add_argument("-c", "--confidence", type=float, default=0.2,
	help="minimum probability to filter weak detections")
args = vars(ap.parse_args())


# initialize the list of class labels MobileNet SSD was trained to
# detect, then generate a set of bounding box colors for each class
'''
CLASSES = ["background", "aeroplane", "bicycle", "bird", "boat",
	"bottle", "bus", "car", "cat", "chair", "cow", "diningtable",
	"dog", "horse", "motorbike", "person", "pottedplant", "sheep",
	"sofa", "train", "tvmonitor"]
'''
CLASSES = ["background", "aeroplane", "bicycle", "bird", "boat",
	"bottle", "bus", "car", "cat", "chair", "cow", "diningtable",
	"dog", "horse", "motorbike", "person", "pottedplant", "sheep",
	"sofa", "train", "tvmonitor"]
COLORS = np.random.uniform(0, 255, size=(len(CLASSES), 3))

# load our serialized model from disk
print("[INFO] loading model...")
net2 = cv2.dnn.readNetFromCaffe(args["prototxt"], args["model"])
# net2=cv2.dnn.readNetFromCaffe("VGG_SSD_300.prototxt","VGG_SSD_300.caffemodel")
# net2=cv2.dnn.readNetFromTensorflow("face.pb")
# initialize the video stream, allow the cammera sensor to warmup,
# and initialize the FPS counter
print("[INFO] starting video stream...")
#vs = VideoStream(src=0).start()
# vs =cv2.VideoCapture('C:\\Users\\voidking\\Desktop\\real-time-object-detection\\test_video.flv')
# vs =cv2.VideoCapture('./test_video.flv')
# vs =cv2.VideoCapture("video1.mp4")
vs =cv2.VideoCapture(0)
time.sleep(2.0)
fps = FPS().start()

# loop over the frames from the video stream
while True:
	# grab the frame from the threaded video stream and resize it
	# to have a maximum width of 400 pixels
	#frame = vs.read()
	#frame = imutils.resize(frame, width=400)

	# grab the frame from the threaded video file stream
	(grabbed,frame) = vs.read()
	# if the frame was not grabbed, then we have reached the end
	# of the stream
	if not grabbed:
		break
	frame = imutils.resize(frame, width=800)
	# grab the frame dimensions and convert it to a blob
	(h, w) = frame.shape[:2]
	blob = cv2.dnn.blobFromImage(cv2.resize(frame, (300, 300)),
		0.007843, (300, 300), 127.5)

	# pass the blob through the network and obtain the detections and
	# predictions
	net2.setInput(blob)
	detections = net2.forward()
	# print(np.max(detections[0]))

	# print(detections)
	# loop over the detections
	for i in np.arange(0, detections.shape[2]):
		# extract the confidence (i.e., probability) associated with
		# the prediction
		confidence = detections[0, 0, i, 2]

		# filter out weak detections by ensuring the `confidence` is
		# greater than the minimum confidence
		idx = int(detections[0, 0, i, 1])
		label = "{}: {:.2f}%".format(CLASSES[idx],
									 confidence * 100)

		if confidence > args["confidence"]:
                        if True:
			#if CLASSES[idx]=="person":
				# extract the index of the class label from the
				# `detections`, then compute the (x, y)-coordinates of
				# the bounding box for the object
				# idx = int(detections[0, 0, i, 1])
				box = detections[0, 0, i, 3:7] * np.array([w, h, w, h])
				(startX, startY, endX, endY) = box.astype("int")

				# draw the prediction on the frame

				cv2.rectangle(frame, (startX, startY), (endX, endY),
							  COLORS[idx], 2)
				y = startY - 15 if startY - 15 > 15 else startY + 15
				pix_person_height = endY - startY
				print ('pix_person_height = ', pix_person_height)
				print ('distance = ' , 174724 / pix_person_height)
				cv2.putText(frame, label, (startX, y),
							cv2.FONT_HERSHEY_SIMPLEX, 0.5, COLORS[idx], 2)


	# show the output frame
	cv2.imshow("Frame", frame)
	key = cv2.waitKey(1) & 0xFF

	# if the `q` key was pressed, break from the loop
	if key == ord("q"):
		break

	# update the FPS counter
	fps.update()

# stop the timer and display FPS information
fps.stop()
print("[INFO] elapsed time: {:.2f}".format(fps.elapsed()))
print("[INFO] approx. FPS: {:.2f}".format(fps.fps()))

# do a bit of cleanup
cv2.destroyAllWindows()
檢測的效果圖如下:
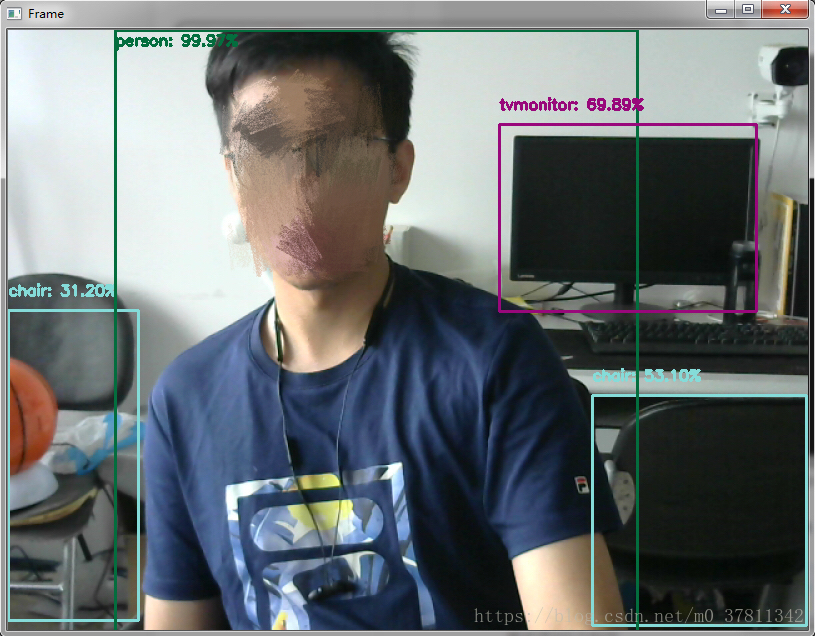
在這裡我主要將目標檢測用於檢測人,所以在目標檢測過程中,只將檢測的出的人標記出來,將97行的 if True: 改為:if CLASSES[idx]=="person": 這樣就可以使目標檢測程式結果只顯示檢測出的人,通過效果圖可以看到檢測人的效果是遠好於傳統的HOG+SVM方法的。對目標人框的比較準確,這一點對我們的單目測距程式至關重要。這裡也不由得感嘆一下深度學習技術的強大,該目標檢測程式在cpu環境下可以執行,我的筆記本上,配置為I5+8G, FPS速度在12左右,速度已經滿足要求。在後期可以新增跟蹤演算法,如KCF等,可以使速度進一步提高。
目標檢測程式主要參考了