
Spring事務管理器JDBC的實現
Spring事務管理的實現有許多細節,如果對整個介面框架有個大體瞭解會非常有利於我們理解事務,下面通過Spring的事務介面來了解Spring實現事務的具體策略。
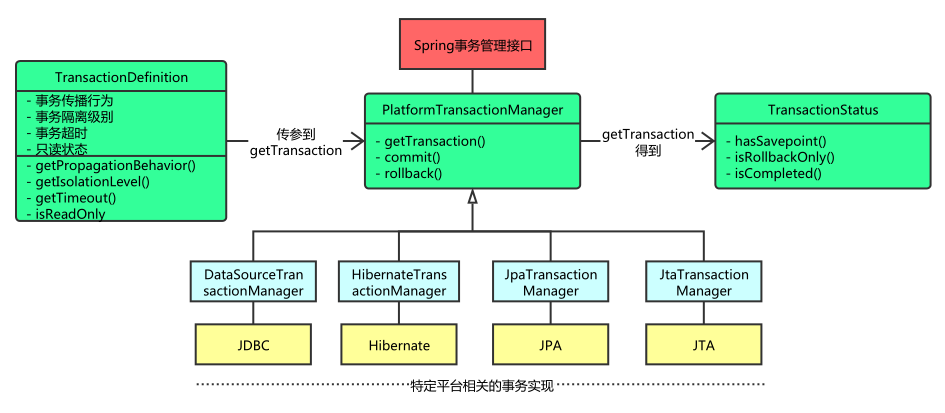
Spring事務管理涉及的介面的聯絡如下:
Spring宣告式事務管理器類:
Jdbc技術:DataSourceTransactionManager
Hibernate技術:HibernateTransactionManager
事務管理器
Spring並不直接管理事務,而是提供了多種事務管理器,他們將事務管理的職責委託給Hibernate或者JTA等持久化機制所提供的相關平臺框架的事務來實現。
Spring事務管理器的介面是org.springframework.transaction.PlatformTransactionManager,通過這個介面,Spring為各個平臺如JDBC、Hibernate等都提供了對應的事務管理器,但是具體的實現就是各個平臺自己的事情了。此介面的內容如下:
PublicinterfacePlatformTransactionManager()...{// 由TransactionDefinition得到TransactionStatus物件TransactionStatus getTransaction(TransactionDefinition definition)throwsTransactionException;// 提交Void commit(TransactionStatus status)throwsTransactionException;// 回滾Void rollback(TransactionStatus status)throws 從這裡可知具體的具體的事務管理機制對Spring來說是透明的,它並不關心那些,那些是對應各個平臺需要關心的,所以Spring事務管理的一個優點就是為不同的事務API提供一致的程式設計模型,如JTA、JDBC、Hibernate、JPA。下面分別介紹各個平臺框架實現事務管理的機制。
JDBC事務
如果應用程式中直接使用JDBC來進行持久化,DataSourceTransactionManager會為你處理事務邊界。為了使用DataSourceTransactionManager,你需要使用如下的XML將其裝配到應用程式的上下文定義中:
<bean 實際上,DataSourceTransactionManager是通過呼叫java.sql.Connection來管理事務,而後者是通過DataSource獲取到的。通過呼叫連線的commit()方法來提交事務,同樣,事務失敗則通過呼叫rollback()方法進行回滾。
註解方式宣告事務
開啟註解掃描

    <!--事務管理器類-->
    <bean id="txManager" class="org.springframework.jdbc.datasource.DataSourceTransactionManager">
        <property name="dataSource" ref="dataSource"/>
    </bean>
    <!--開啟註解掃描-->
    <context:component-scan base-package="com.juaner.spring.tx"/>

    <!--註解方式實現事務-->
    <tx:annotation-driven transaction-manager="txManager"/>
例子
<?xml version="1.0" encoding="UTF-8"?>
<beans xmlns="http://www.springframework.org/schema/beans"
	xmlns:xsi="http://www.w3.org/2001/XMLSchema-instance"
	 xmlns:context="http://www.springframework.org/schema/context"
	xmlns:aop="http://www.springframework.org/schema/aop"
	xmlns:mybatis="http://mybatis.org/schema/mybatis-spring"
	xmlns:tx="http://www.springframework.org/schema/tx"
	xsi:schemaLocation=" http://www.springframework.org/schema/beans
       http://www.springframework.org/schema/beans/spring-beans.xsd
        http://www.springframework.org/schema/context
        http://www.springframework.org/schema/context/spring-context.xsd
        http://www.springframework.org/schema/aop
        http://www.springframework.org/schema/aop/spring-aop.xsd
        http://www.springframework.org/schema/mvc
        http://www.springframework.org/schema/mvc/spring-mvc.xsd
        http://www.springframework.org/schema/jee
        http://www.springframework.org/schema/jee/spring-jee.xsd
        http://www.springframework.org/schema/tx
        http://www.springframework.org/schema/tx/spring-tx.xsd
        http://mybatis.org/schema/mybatis-spring
        http://mybatis.org/schema/mybatis-spring.xsd ">
             <!-- 這一行是讓他自動掃描註冊spring bean -->
   <context:component-scan base-package="spring.mybatis.transaction"> </context:component-scan>
    <tx:annotation-driven transaction-manager="txManager"/>
            <!-- 這一行是基於註解實現事務管理器   下面這個是具體的jdbc的事務管理器 -->
   <bean id="txManager"
          class="org.springframework.jdbc.datasource.DataSourceTransactionManager">
        <property name="dataSource" ref="dataSource"/>
    </bean>
	<bean id="dataSource" class="org.apache.commons.dbcp.BasicDataSource"
		destroy-method="close">
		<property name="driverClassName" value="com.mysql.jdbc.Driver" />
		<property name="url" value="jdbc:mysql://localhost:3306/test" />
		<property name="username" value="root" />
		<property name="password" value="123" /><!-- 其實這些引數也可以直接寫值,不用.properties檔案也行 -->
	</bean>
</beans>package spring.mybatis.transaction;
public class Account {
private String user;
private int balance;
public String getUser() {
return user;
}
public void setUser(String user) {
this.user = user;
}
public int getBalance() {
return balance;
}
public void setBalance(int balance) {
this.balance = balance;
}
}
package spring.mybatis.transaction;

import java.sql.ResultSet;
import java.sql.SQLException;
import java.util.List;

import javax.sql.DataSource;

import org.springframework.beans.factory.annotation.Autowired;
import org.springframework.jdbc.core.JdbcTemplate;
import org.springframework.jdbc.core.RowMapper;
import org.springframework.stereotype.Repository;
import org.springframework.transaction.annotation.Propagation;
import org.springframework.transaction.annotation.Transactional;

@Repository
public class AccountDao {
	private JdbcTemplate jdbcTemplate;//此處是同過Spring JDBC 連線資料庫。不是mybatis。

	@Autowired
	public void setDataSource(DataSource dataSource) {
		this.jdbcTemplate = new JdbcTemplate(dataSource);
	}

	public void resetMoney() {
		jdbcTemplate.update("update account set balance=1000");
	}

	public List<Account> accountList() {
		return this.jdbcTemplate.query("select * from account", new RowMapper<Account>() { // 消除警告的是靠
														                                 // new RowMapper<Account>的泛型
             //裡RowMapper可以將資料中的每一行資料封裝成使用者定義的類。當有了mybatis後就不用這樣了。mybatis會將查詢結果對映成就扣物件
			//sping中的RowMapper可以將資料中的每一行資料封裝成使用者定義的類。
			public Account mapRow(ResultSet rs, int rowNum) throws SQLException {
				// TODO Auto-generated method stub
				Account account = new Account();

				account.setUser(rs.getString("user"));
				account.setBalance(rs.getInt("balance"));

				return account;
			}
		});
	}

	// 下面這個就是事物
	@Transactional(propagation=Propagation.REQUIRED)
	public void transforMoney(String source, String target, double count) {

		this.jdbcTemplate.update("update account set balance=balance-? where user=?", count, source);
		// 下面故意加入錯誤,使事物中斷
		throwException();
		this.jdbcTemplate.update("update account set balance=balance+? where user=?", count, target);
	}

	private void throwException() {
		throw new RuntimeException("ERROR");
	}
}
實現類
package spring.mybatis.transaction;

import java.util.List;

import org.springframework.context.ApplicationContext;
import org.springframework.context.support.ClassPathXmlApplicationContext;

import spring.jdbc.JdbcTemplateDao;

public class TestData {
public static void main(String[] args) {
  ApplicationContext ctx=new ClassPathXmlApplicationContext("springmybatistransaction.xml");

	  AccountDao dao=ctx.getBean("accountDao", AccountDao.class);
	  dao.resetMoney();

	  /*
	   * 這裡給dao.transforMoney加try catch 是為了讓即使出錯也能打印出來餘額。。?
	   */
	   try{
	  dao.transforMoney(" LiLei", " HaiMeiMei", 521);
	   }catch(Exception e){
		   System.out.println(e.getMessage());
	   }
	   List<Account> accountList =dao.accountList();
	  for(Account account:accountList){

		  System.out.println(account.getUser()+account.getBalance());
	  }
}
}