
spring+springmvc+ibatis框架整合
由於用的jar包比較舊,這裡用的是1.7的jdk
首先建立一個動態web工程,建立時記得選上生成web.xml檔案
這是我的專案目錄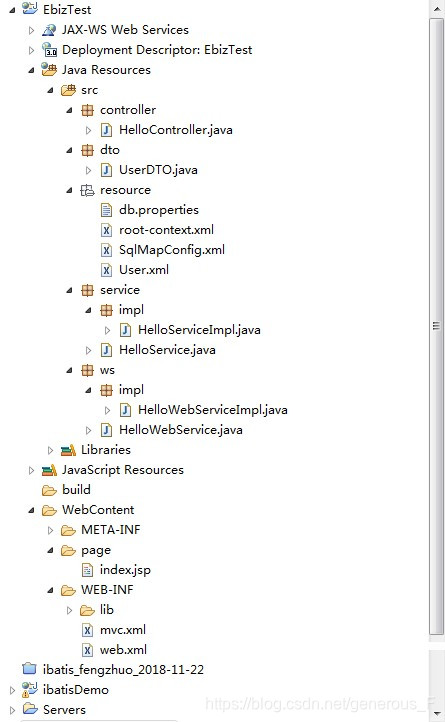
匯入jar包並載入到library中,如果是從其他工程匯入的記得複製到lib檔案下,避免奇怪的問題,修改編譯路徑到WEB-INF下classes目錄下,spring的配置可以參考這個spring簡單入門例項
注意:以下所給的程式碼都是整個步驟完成後的程式碼,有些中途測試不需要的先註釋掉,不然可能會影響執行
先配置web.xml檔案,以下是我的web.xml配置檔案
<?xml version="1.0" encoding="UTF-8"?>
<web-app xmlns:xsi="http://www.w3.org/2001/XMLSchema-instance" xmlns="http://java.sun.com/xml/ns/javaee" xsi:schemaLocation="http://java.sun.com/xml/ns/javaee http://java.sun.com/xml/ns/javaee/web-app_3_0.xsd" id="WebApp_ID" version="3.0">
  <display-name>EbizTest1</display-name>
  <welcome-file-list>
    <welcome-file>index.html</welcome-file>
    <welcome-file>index.htm</welcome-file>
    <welcome-file>index.jsp</welcome-file>
    <welcome-file>default.html</welcome-file>
    <welcome-file>default.htm</welcome-file>
    <welcome-file>default.jsp</welcome-file>
  </welcome-file-list>
  <listener>
  <!-- 監聽spring上下文容器 -->
    <listener-class>
		org.springframework.web.context.ContextLoaderListener
	</listener-class>
  </listener>
  <!-- 載入spring的xml配置檔案到 spring的上下文容器中 -->
  <context-param>
    <param-name>contextConfigLocation</param-name>
    <param-value>classpath:resource/root-context.xml</param-value>
  </context-param>
  <!-- 配置Spring MVC DispatcherServlet -->
  <servlet>
    <servlet-name>MVC</servlet-name>
    <servlet-class>org.springframework.web.servlet.DispatcherServlet</servlet-class>
    <!-- 初始化引數 -->
    <init-param>
    	<!-- 載入SpringMVC的xml到 spring的上下文容器中 -->
      	<param-name>contextConfigLocation</param-name>
     	<param-value>
				/WEB-INF/mvc.xml
		</param-value>
    </init-param>
    <load-on-startup>1</load-on-startup>
  </servlet>
  <!-- 配置DispatcherServlet所需要攔截的 url -->
  <!-- 一般配置.do,也可自定義,這裡我配置的.abc -->
  <servlet-mapping>
    <servlet-name>MVC</servlet-name>
    <url-pattern>*.abc</url-pattern>
  </servlet-mapping>

  <!-- 配置webservice -->
  <servlet>
  		<servlet-name>cxf</servlet-name>
  		<servlet-class>org.apache.cxf.transport.servlet.CXFServlet</servlet-class>
  		<load-on-startup>1</load-on-startup>
  </servlet>
  <servlet-mapping>
  		<servlet-name>cxf</servlet-name>
  		<url-pattern>/WebService/*</url-pattern>
  </servlet-mapping>
</web-app>
最後的配置webservice可以先不寫,配置webservice時需要。
接著配置mvc.xml,以下是我的mvc.xml配置問件
<?xml version="1.0" encoding="UTF-8"?>
<beans:beans xmlns="http://www.springframework.org/schema/mvc"
	xmlns:xsi="http://www.w3.org/2001/XMLSchema-instance"
	xmlns:beans="http://www.springframework.org/schema/beans"
	xmlns:p="http://www.springframework.org/schema/p"
	xmlns:aop="http://www.springframework.org/schema/aop"
	xmlns:context="http://www.springframework.org/schema/context"
	xsi:schemaLocation="http://www.springframework.org/schema/mvc
					http://www.springframework.org/schema/mvc/spring-mvc.xsd
					http://www.springframework.org/schema/aop
					http://www.springframework.org/schema/aop/spring-aop-3.2.xsd
					http://www.springframework.org/schema/beans
					http://www.springframework.org/schema/beans/spring-beans.xsd
					http://www.springframework.org/schema/context
					http://www.springframework.org/schema/context/spring-context.xsd">
	<!-- SpringMVC配置 -->

	<!-- 通過component-scan 讓Spring掃描org.swinglife.controller下的所有的類,讓Spring的程式碼註解生效 -->
	<context:component-scan base-package="controller"></context:component-scan>

	<!-- 配置SpringMVC的檢視渲染器, 讓其字首為:/ 字尾為.jsp  將檢視渲染到/page/<method返回值>.jsp中 -->
	<beans:bean
		class="org.springframework.web.servlet.view.InternalResourceViewResolver"
		p:prefix="/" p:suffix=".jsp">
	</beans:bean>


</beans:beans>
然後來配置spring的配置檔案root-context.xml
<?xml version="1.0" encoding="UTF-8"?>
<beans xmlns="http://www.springframework.org/schema/beans"
	xmlns:xsi="http://www.w3.org/2001/XMLSchema-instance"
	xmlns:context="http://www.springframework.org/schema/context"
	xmlns:jaxws="http://cxf.apache.org/jaxws"
	xsi:schemaLocation="http://www.springframework.org/schema/beans
		http://www.springframework.org/schema/beans/spring-beans-2.5.xsd
		http://www.springframework.org/schema/context
		http://www.springframework.org/schema/context/spring-context-2.5.xsd
		http://www.springframework.org/schema/tx
		http://www.springframework.org/schema/tx/spring-tx-2.5.xsd
		http://cxf.apache.org/jaxws
        http://cxf.apache.org/schemas/jaxws.xsd">
	<!-- Root Context: defines shared resources visible to all other web components -->
 	<context:component-scan base-package="service"></context:component-scan>
 	<context:component-scan base-package="ws"></context:component-scan>

 	<!-- 讀取屬性配置檔案 -->
    <bean id="propertyManager" class="org.springframework.beans.factory.config.PropertyPlaceholderConfigurer">
       <property name="locations">
          <list>
            <value>classpath:resource/db.properties</value>
          </list>
        </property>
    </bean>
 <!-- 配置資料來源,並使用屬性配置檔案中的資料 -->
    <bean id="dataSource"
       class="org.springframework.jdbc.datasource.DriverManagerDataSource">
       <property name="driverClassName" value="${driverClassName}" />
       <property name="url" value="${url}" />
       <property name="username" value="${username}" />
       <property name="password" value="${password}" />
    </bean>
 <bean id="sqlMapClient" class="org.springframework.orm.ibatis.SqlMapClientFactoryBean">
        <property name="configLocation" value="classpath:resource/SqlMapConfig.xml" />
        <property name="dataSource"><ref bean="dataSource" /></property>
   </bean>
	 <bean id="sqlMapClientTemplate"  class="org.springframework.orm.ibatis.SqlMapClientTemplate">
        <property name="sqlMapClient" ref="sqlMapClient"/>
    </bean>

    <!-- 匯入cxf的bean定義檔案 -->
	<import resource="classpath:META-INF/cxf/cxf.xml" />
	<import resource="classpath:META-INF/cxf/cxf-extension-soap.xml"/>
	<import resource="classpath:META-INF/cxf/cxf-servlet.xml" />
    <!-- 釋出webSevice -->
    <jaxws:endpoint
       id="testWS"
       implementor="#helloWebServiceImpl"
       address="/Hello"
       implementorClass="ws.HelloWebService"
    />

</beans>
最後的關於cxf和webservice的配置可以先不用
接下來就開始寫controller了,我這塊寫了個HelloController,以下是具體內容
package controller;

import javax.annotation.Resource;

import org.springframework.stereotype.Controller;
import org.springframework.web.bind.annotation.RequestMapping;
import org.springframework.web.servlet.ModelAndView;

import service.HelloService;

@Controller
@RequestMapping("/hello.abc")//要與web.xml中攔截的url相對應,否則會404
public class HelloController {
	@Resource
	public HelloService helloServiceImpl;
	/**
	 * http://localhost:8080/EbizTest/hello.abc?action=showIndex
	 * @return
	 */
	@RequestMapping(params="action=showIndex")
		public ModelAndView showIndex(){
			String msg = helloServiceImpl.sayHello();
			System.out.println(msg);
			ModelAndView mav = new ModelAndView("page/index");//這裡和springmvc的檢視渲染器的配置結合起來應該是所跳轉頁面的路徑
			return mav;
		}
}
controller需要在mvc.xml中配置掃描才能生效,一般掃描controller包
測試頁面index.jsp寫的很簡單,就一個表單
<%@ page language="java" contentType="text/html; charset=UTF-8"
    pageEncoding="UTF-8"%>
<!DOCTYPE html PUBLIC "-//W3C//DTD HTML 4.01 Transitional//EN" "http://www.w3.org/TR/html4/loose.dtd">
<html>
<head>
<meta http-equiv="Content-Type" content="text/html; charset=UTF-8">
<title>Insert title here</title>
</head>
<body>
	<form action="">
		使用者名稱:<input type="text" name="username"/><br/>
		密碼:<input type="password" name="password"/><br/>
		<input type="submit" value="提交"/><br/>
	</form>
</body>
</html>
前面的完成後就可以啟動服務測試springmvc的配置是否成功了,訪問這個地址http://localhost:8080/EbizTest/hello.abc?action=showIndex,如果跳轉到index.jsp頁面就表明配置成功了
接下來就是整合ibatis了,其中有些操作在前面配置過的配置檔案裡面已經有了(我直接放的最終的配置檔案),需要什麼操作就提一下,不再放重複東西了
第一步在root-context.xml裡面生成ibatis的操作資料庫物件sqlMapClient和sqlMapClientTemplate(spring封裝後的),而且,spring提供了datasource讀取配置,好吧,讀取配置檔案資源和連線資料庫也做了,這樣一來SqlMapConfig.xml裡面只剩載入資料庫操作的xml檔案了,SqlMapConfig.xml檔案如下
<?xml version="1.0" encoding="UTF-8" ?>
<!DOCTYPE sqlMapConfig
    PUBLIC "-//ibatis.apache.org//DTD SQL Map Config 2.0//EN"
    "http://ibatis.apache.org/dtd/sql-map-config-2.dtd">
<sqlMapConfig>
    <sqlMap resource="resource/User.xml" />
</sqlMapConfig>
User.xml檔案如下
<?xml version="1.0" encoding="UTF-8" ?>
<!DOCTYPE sqlMap
    PUBLIC "-//ibatis.apache.org//DTD SQL Map 2.0//EN"
    "http://ibatis.apache.org/dtd/sql-map-2.dtd">
<sqlMap>

    <select id="getUser" resultClass="dto.UserDTO">
        select *
        from pf_user
        where username="ww"
    </select>

</sqlMap>
可根據資料庫適當調整
資料庫的db.properties檔案如下
driverClassName=com.mysql.jdbc.Driver
url=jdbc:mysql://localhost:3306/ibatisdemo?autoReconnect=true&useUnicode=true&characterEncoding=utf8
username=root
password=root
根據資料庫的不同許進行調整
接著寫了個service進行測試,一個HelloService介面
package service;

public interface HelloService {
	public String sayHello();
}
一個實現類
package service.impl;


import javax.annotation.Resource;

import org.springframework.orm.ibatis.SqlMapClientTemplate;
import org.springframework.stereotype.Service;

import dto.UserDTO;
import service.HelloService;

@Service
public class HelloServiceImpl implements HelloService{
	@Resource(name="sqlMapClientTemplate")
	public SqlMapClientTemplate sqlMapClientTemplate;

	public String sayHello() {
		UserDTO userDTO = (UserDTO) sqlMapClientTemplate.queryForObject("getUser");

		return "hello"+userDTO.getUsername();
	}

}
實現類仍然是用註解來使其可被呼叫,注意用註解的地方都需要在root-context.xml中新增掃描
同時需要在DTO層建立一個實體類UserDTO
package dto;

public class UserDTO {
	/**
	 * 使用者名稱
	 */
	private String username;
	/**
	 * 密碼
	 */
	private String password;
	public String getUsername() {
		return username;
	}
	public void setUsername(String username) {
		this.username = username;
	}
	public String getPassword() {
		return password;
	}
	public void setPassword(String password) {
		this.password = password;
	}
	@Override
	public String toString() {
		return "UserDTO [username=" + username + ", password=" + password + "]";
	}

}
至於測試整合ibatis是否成功,也是在controller裡呼叫service中的方法來進行,由於前面給的程式碼是完整的,就不再給出了。
測試時仍然是訪問http://localhost:8080/EbizTest/hello.abc?action=showIndex,看控制檯是否輸出正確資訊,若沒輸出理想的資訊,則要檢查與資料庫的連線配置,實體類及sql語句的各種對應關係是否正確。