
Android 練習專案 ——簡單記賬軟體的實現
一、需求分析
在我們生活中經常不知道錢花在什麼地方,但是我們自己又不是很想寫在記賬本上進行管理,由於智慧手機的興起,手機離我們越來越近,導致我們生活時時刻刻都有手機的存在,所以說手機的操作離我們越來越近,趨勢越來越明顯。但是對於記賬,我們往往每個人都有自己的需求,所以對於自己來說,開發一個簡單的軟體來記賬是個非常好玩且有趣的事情。
所以自己趁著學習Android開發的機會,順便做一個練習專案,本人小白,一開始啥都不懂,但是我有一顆不斷學習的心,相信只要自己努力,怎能夠作出自己的事業。
我就簡單的分析自己需求,對於衣食住行進行分類,然後記錄每天的時間,記錄下消費的原因,最為重要的就是金額了。總會做個賬單統計,分析自己當前的支出和收入,離預算還有多少錢花費。
二、設計介面
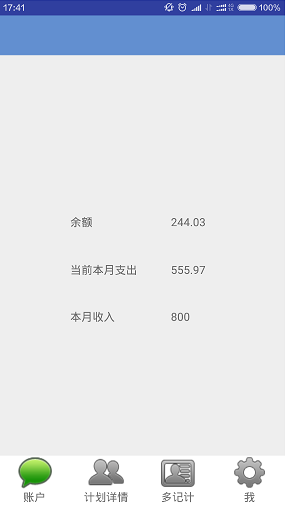
賬戶介面:
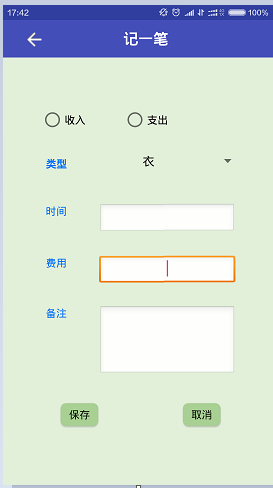
記賬介面:
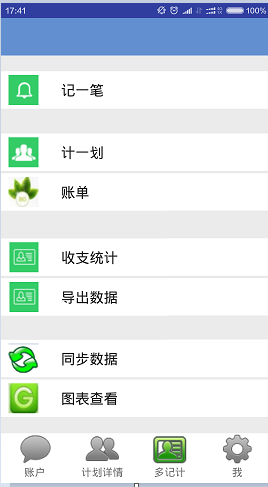
功能區介面:
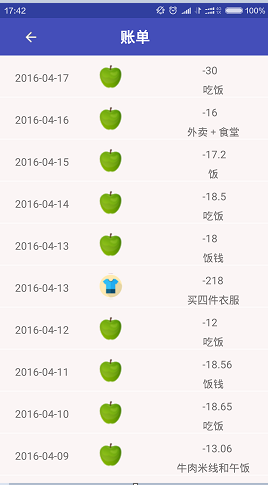
賬單顯示介面:
補充:功能區實現的功能目前有:記一筆,賬單,匯出資料,同步資料,其他功能待實現,其實我本人還想做個計一劃的實現,實現記賬和日常安排計劃同時實現。
三、程式設計
由於高仿微信的介面的實現,所有用了Fragment的佈局,滑動切換介面,點選功能區按鈕來實現對應功能的新增。
這裡面用到的技術主要有ListView,Fragment+viewpage,Activity,sqlite資料庫技術,還有Post傳參來實現同步伺服器端的資料。由於服務端框架接觸的少,所以功能只有同步資料。同步資料用到了service實現和操作excel技術。
四、程式碼實現
首先介紹主介面的實現:Fragment+activity佈局
MainActivity.java
package com.bank;
import android.os.Bundle;
import android.support.v4.app.Fragment;
import android.support.v4.app.FragmentActivity;
import android.support.v4.app.FragmentPagerAdapter;
import android.support.v4.view.ViewPager;
import android.support.v4.view.ViewPager.OnPageChangeListener;
import 接下來就是Fragment的實現,我一開始測試中用了4個Fragment來實現,由於有些還需要新增新的功能,所以第一版還是有些挫和部分功能還沒有實現。
FragmentAccount.java
package com.bank;

import android.database.Cursor;
import android.database.sqlite.SQLiteDatabase;
import android.os.Bundle;
import android.support.v4.app.Fragment;
import android.view.LayoutInflater;
import android.view.View;
import android.view.ViewGroup;
import android.widget.TextView;

import java.text.DecimalFormat;

public class FragmentAccount extends Fragment {

        private MySQLiteHelper mMysql;
        private SQLiteDatabase mDataBase;
        private TextView textRemainder,textPay,textIncome;


        @Override
        public View onCreateView(LayoutInflater inflater, ViewGroup container, Bundle savedInstanceState) {
                View view = inflater.inflate(R.layout.finance_check, container, false);

                double resultIncome = 0,resultRemainder = 0,resultPay = 0;
                textIncome      = (TextView)view.findViewById(R.id.textincome);
                textRemainder      = (TextView)view.findViewById(R.id.textremainder);
                textPay      = (TextView)view.findViewById(R.id.textpay);

                mMysql = new MySQLiteHelper(getActivity(), "finance.db", null, 1);
                mDataBase = mMysql.getReadableDatabase();

          //   String sql      = "select Fee from finance where Budget='支出'";//Cursor cursor = mDataBase.query("finance", null, null, null, null, null, null);
           //  Cursor cursor = mDataBase.query("finance", new String[]{"Fee"},"where Budget=?",new String[]{"支出"},null,null,null);
// String sql      ="insert into finance('Type','Time','Fee','Remarks','Budget') values('衣','20160330',37.6,'買衣服','支出')";
//                int i =0;
//                while( i<20)
//                {
//                        mDataBase.execSQL(sql);
//                        i++;
//                }

                Cursor cursor = mDataBase.rawQuery("select Fee,Budget from finance",null);

                cursor.moveToFirst();

                if (cursor.getCount() > 0) {
                        for (int i = 0; i < cursor.getCount(); i++) {
                                //  cursor.move(i);
                                //移動到指定記錄
                                double Fee = cursor.getDouble(cursor.getColumnIndex("Fee"));
                                String budget = cursor.getString(cursor.getColumnIndex("Budget"));
                                if(budget.equals("支出")) {
                                        resultPay += Fee;
                                } else if (budget.equals("收入")){
                                        resultIncome += Fee;
                                }
                                cursor.moveToNext();
                        }
                }
                DecimalFormat df = new DecimalFormat("###.##");
                textPay.setText(String.valueOf(df.format(resultPay)));
                textIncome.setText(String.valueOf(df.format(resultIncome)));
                textRemainder.setText(String.valueOf(df.format(resultIncome - resultPay)));

                cursor.close();
                mDataBase.close();
                mMysql.close();

                return view;
        }
}
FragmentFind.java
package com.bank;

import android.app.Notification;
import android.app.NotificationManager;
import android.app.PendingIntent;
import android.content.Context;
import android.content.Intent;
import android.database.Cursor;
import android.net.Uri;
import android.os.Bundle;
import android.os.Environment;
import android.os.Vibrator;
import android.support.v4.app.Fragment;
import android.view.LayoutInflater;
import android.view.View;
import android.view.ViewGroup;
import android.widget.FrameLayout;
import android.widget.Toast;

import org.apache.poi.hssf.usermodel.HSSFCell;
import org.apache.poi.hssf.usermodel.HSSFRow;
import org.apache.poi.hssf.usermodel.HSSFSheet;
import org.apache.poi.hssf.usermodel.HSSFWorkbook;
import org.apache.poi.poifs.filesystem.POIFSFileSystem;

import java.io.File;
import java.io.FileInputStream;
import java.io.FileOutputStream;
import java.util.ArrayList;

import android.database.sqlite.SQLiteDatabase;


public class FragmentFind extends Fragment implements View.OnClickListener {
    private FrameLayout frameLayout_recorder;
    private FrameLayout frameLayout_bills;
    private FrameLayout frameLayout_test;

    private FrameLayout frameLayout_plan;

    private FrameLayout frameLayout_SubmitData;

    private FrameLayout frameLayout_ExportData;

    //資料庫
    private MySQLiteHelper mMysql;
    private SQLiteDatabase mDataBase;

    //震動的類
    private Vibrator vibrator;


    @Override
    public View onCreateView(LayoutInflater inflater, ViewGroup container, Bundle savedInstanceState) {
        View view = inflater.inflate(R.layout.deal_data, container, false);
        frameLayout_recorder = (FrameLayout) view.findViewById(R.id.frameLayoutRecorder);
        frameLayout_bills = (FrameLayout) view.findViewById(R.id.frameLayoutStream);
        frameLayout_test = (FrameLayout) view.findViewById(R.id.frameLayoutBalance);
        frameLayout_plan = (FrameLayout) view.findViewById(R.id.frameLayoutPlan);
        frameLayout_SubmitData = (FrameLayout) view.findViewById(R.id.frameLayoutSubmitdata);
        frameLayout_ExportData = (FrameLayout) view.findViewById(R.id.frameLayoutExportdata);

        frameLayout_test.setOnClickListener(this);
        frameLayout_bills.setOnClickListener(this);
        frameLayout_recorder.setOnClickListener(this);
        frameLayout_plan.setOnClickListener(this);
        frameLayout_SubmitData.setOnClickListener(this);
        frameLayout_ExportData.setOnClickListener(this);

        return view;
    }

    @Override
    public void onClick(View view) {
        switch (view.getId()) {
            case R.id.frameLayoutRecorder:
                Intent intent = new Intent(getActivity(), RecorderActivity.class);
                startActivity(intent);
                break;
            case R.id.frameLayoutStream:
                startActivity(new Intent(getActivity(), BillsActivity.class));
                break;
            case R.id.frameLayoutBalance:
                final int SHOW_INFO = 1;
                Intent testintent = new Intent(getActivity(), TestActivity.class);
                Bundle bundle = new Bundle();
                //傳遞name引數為tinyphp
                bundle.putString("Type", "其他");
                bundle.putString("Time", "2016-05-21");
                bundle.putString("Budget", "收入");
                bundle.putDouble("Fee", 12.5);
                bundle.putInt("ID", 12);
                bundle.putString("Remarks", "現金交易");
                testintent.putExtras(bundle);
                startActivityForResult(testintent, SHOW_INFO);
                break;
            case R.id.frameLayoutPlan:
                //訊息通知欄
                //定義NotificationManager
                String ns = Context.NOTIFICATION_SERVICE;
                NotificationManager mNotificationManager = (NotificationManager) getActivity().getSystemService(ns);
                //定義通知欄展現的內容資訊
                int icon = R.drawable.back;
                CharSequence tickerText = "通知欄";
                long when = System.currentTimeMillis();
                Notification notification = new Notification(icon, tickerText, when);

                //定義下拉通知欄時要展現的內容資訊
                Context context = getActivity().getApplicationContext();
                CharSequence contentTitle = "已經完成同步";
                CharSequence contentText = "進入程式檢視詳情";
                Intent notificationIntent = new Intent(getActivity(), MainActivity.class);
                PendingIntent contentIntent = PendingIntent.getActivity(getActivity(), 0,
                        notificationIntent, 0);
                notification.setLatestEventInfo(context, contentTitle, contentText,
                        contentIntent);

                //用mNotificationManager的notify方法通知使用者生成標題欄訊息通知
                mNotificationManager.notify(1, notification);
                startActivity(new Intent(getActivity(), PlanActivity.class));
                break;
            case R.id.frameLayoutSubmitdata:
                Toast.makeText(getActivity(), "正在同步", Toast.LENGTH_SHORT).show();
                Intent dataintent = new Intent();
                dataintent.setClass(getActivity(), SubmitDataService.class);
                getActivity().startService(dataintent);
                break;
            case R.id.frameLayoutExportdata:
                Toast.makeText(getActivity(),"正在匯出資料",Toast.LENGTH_SHORT).show();
                ExportData();
                break;
            default:
                break;
        }

    }

    public void ExportData() {

        String outputFile = "finance.xls";
        try {

            // 判斷是否存在SD卡
            if (Environment.getExternalStorageState().equals(Environment.MEDIA_MOUNTED)) {
            } else {
                Toast.makeText(getActivity(), "sd卡不存在", Toast.LENGTH_LONG).show();
                return;
            }

            String sdCardRoot = Environment.getExternalStorageDirectory().getAbsolutePath() + "/Finance/";
            File file = new File(sdCardRoot + outputFile);

            // 建立新的Excel 工作簿
            HSSFWorkbook workbook = new HSSFWorkbook();

            // 在Excel工作簿中建一工作表,其名為預設值
            // 如要新建一名為"效益指標"的工作表,其語句為:
            // HSSFSheet sheet = workbook.createSheet("效益指標");
            HSSFSheet sheet = workbook.createSheet("消費記錄");
            // 在索引0的位置建立行(最頂端的行)
            HSSFRow row = sheet.createRow((short) 0);


            //建立表頭
            HSSFCell IDCell = row.createCell(0);
            IDCell.setCellType(HSSFCell.CELL_TYPE_STRING);
            IDCell.setCellValue("ID(ID號)");

            HSSFCell TypeCell = row.createCell(1);
            TypeCell.setCellType(HSSFCell.CELL_TYPE_STRING);
            TypeCell.setCellValue("Type(型別)");

            HSSFCell TimeCell = row.createCell(2);
            TimeCell.setCellType(HSSFCell.CELL_TYPE_STRING);
            TimeCell.setCellValue("Time(時間)");

            HSSFCell FeeCell = row.createCell(3);
            FeeCell.setCellType(HSSFCell.CELL_TYPE_STRING);
            FeeCell.setCellValue("Fee(費用)");

            HSSFCell RemarksCell = row.createCell(4);
            RemarksCell.setCellType(HSSFCell.CELL_TYPE_STRING);
            RemarksCell.setCellValue("Remarks(備註)");

            HSSFCell BudgetCell = row.createCell(5);
            BudgetCell.setCellType(HSSFCell.CELL_TYPE_STRING);
            BudgetCell.setCellValue("Budget(收支)");


            mMysql = new MySQLiteHelper(getActivity(), "finance.db", null, 1);
            mDataBase = mMysql.getReadableDatabase();

            Cursor cursor = mDataBase.rawQuery("select * from finance", null);
            cursor.moveToFirst();
            int columnsSize = cursor.getColumnCount();
            int number = 0;
            while (number < cursor.getCount()) {
                String budget = cursor.getString(cursor.getColumnIndex("Budget"));
                int ID = cursor.getInt(cursor.getColumnIndex("ID"));
                Double Fee = cursor.getDouble(cursor.getColumnIndex("Fee"));
                String Time = cursor.getString(cursor.getColumnIndex("Time"));
                String Remarks = cursor.getString(cursor.getColumnIndex("Remarks"));
                String Type = cursor.getString(cursor.getColumnIndex("Type"));
                row = sheet.createRow(number + 1);
                for (int i = 0; i < 6; i++) {
                    IDCell = row.createCell(i);
                    IDCell.setCellType(HSSFCell.CELL_TYPE_STRING);
                    switch (i) {
                        case 0:
                            IDCell.setCellValue(ID);
                            break;
                        case 1:
                            IDCell.setCellValue(Type);
                            break;
                        case 2:
                            IDCell.setCellValue(Time);
                            break;
                        case 3:
                            IDCell.setCellValue(Fee);
                            break;
                        case 4:
                            IDCell.setCellValue(Remarks);
                            break;
                        case 5:
                            IDCell.setCellValue(budget);
                            break;
                        default:
                            break;
                    }
                }
                cursor.moveToNext();
                number++;
            }
            cursor.close();
            mDataBase.close();
            mMysql.close();

            // 新建一輸出檔案流
            FileOutputStream fOut = new FileOutputStream(sdCardRoot + outputFile);
            // 把相應的Excel 工作簿存檔
            workbook.write(fOut);
            fOut.flush();
            // 操作結束,關閉檔案
            fOut.close();
            workbook.close();

            //訊息通知欄
            //定義NotificationManager
            String ns = Context.NOTIFICATION_SERVICE;
            NotificationManager mNotificationManager = (NotificationManager) getActivity().getSystemService(ns);
            //定義通知欄展現的內容資訊
            int icon = R.drawable.back;
            CharSequence tickerText = "通知欄";
            long when = System.currentTimeMillis();
            Notification notification = new Notification(icon, tickerText, when);

            //定義下拉通知欄時要展現的內容資訊
            Context context = getActivity().getApplicationContext();
            CharSequence contentTitle = "已經匯出資料";
            CharSequence contentText = "點選檢視檔案";

            File path = new File(Environment.getExternalStorageDirectory().getPath());

            Intent notificationIntent = new Intent(Intent.ACTION_GET_CONTENT);
            notificationIntent.setDataAndType(Uri.fromFile(file), "Finance/");

            PendingIntent contentIntent = PendingIntent.getActivity(getActivity(), 0,
                    notificationIntent, 0);
            notification.setLatestEventInfo(context, contentTitle, contentText,
                    contentIntent);

            //用mNotificationManager的notify方法通知使用者生成標題欄訊息通知
            mNotificationManager.notify(1, notification);
            vibrator = (Vibrator)getActivity().getSystemService(Context.VIBRATOR_SERVICE);
            long [] pattern = {100,400,100,400};   // 停止 開啟 停止 開啟
            vibrator.vibrate(pattern, -1);

        } catch (Exception e) {
            Toast.makeText(getActivity(), "寫入失敗" + e, Toast.LENGTH_LONG).show();
        } finally {
            //  Toast.makeText(getActivity(), "關閉", Toast.LENGTH_LONG).show();
        }
    }
}
目前完成的主要是這兩個介面的功能。
現在介紹下關於記賬介面程式碼:
BillsActivity.java,主要從資料庫獲得資料,並通過listview顯示。常按能夠刪除賬單條目。
package com.bank;
import android.app.Activity;
import android.app.AlertDialog;
import android.content.DialogInterface;
import android.database.Cursor;
import android.database.sqlite.SQLiteDatabase;
import android.os.Bundle;
import android.util.Log;
import android.view.ContextMenu;
import android.view.MotionEvent;
import android.view.View;
import android.widget.AdapterView;
import android.widget.ImageView;
import android.widget.ListView;
import android.widget.SimpleAdapter;
import android.widget.Toast;
import java.util.ArrayList;
import java.util.HashMap;
/**
* Created by zhouchenglin on 2016/4/1.
*/
public class BillsActivity extends Activity implements View.OnClickListener {
//列舉資料的ListView
private ListView mlistbills;
// 介面卡
private SimpleAdapter mlistbillsAdapter;
//資料庫
private MySQLiteHelper mMysql;
private SQLiteDatabase mDataBase;
private ImageView imageviewback;
// 儲存資料的陣列列表
ArrayList<HashMap<String, Object>> listData = new ArrayList<HashMap<String, Object>>();
public void onCreate(Bundle savedInstanceState) {
super.onCreate(savedInstanceState);
setContentView(R.layout.bills);
mlistbills = (ListView) this.findViewById(R.id.list_bills);
imageviewback = (ImageView) this.findViewById(R.id.imageviewBack);
imageviewback.setOnClickListener(this);
GetData();
mlistbillsAdapter = new SimpleAdapter(
this,
listData,
R.layout.billsitem,
new String[]{"Time", "Type", "Fee", "Remarks"},
new int[]{R.id.texttimeshow, R.id.imagetypeshow, R.id.textfeeshow, R.id.textremarksshow}
);
//賦予資料
mlistbills.setAdapter(mlistbillsAdapter);
//常按響應
mlistbills.setOnCreateContextMenuListener(listviewLongPress);
//點選事件
// mlistbills.setOnItemClickListener(listviewClick);
// mlistbills.setOnItemClickListener(listviewClick);
//
// mlistbills.setOnItemLongClickListener(listviewLongClick);
mlistbills.setOnTouchListener(onTouchListener);
}
View.OnTouchListener onTouchListener = new View.OnTouchListener() {
float x, y, ux, uy;
@Override
public boolean onTouch(View v, MotionEvent event) {
// TODO Auto-generated method stub
switch (event.getAction()) {
case MotionEvent.ACTION_DOWN:
x = event.getX();
y = event.getY();
break;
case MotionEvent.ACTION_UP:
ux = event.getX();
uy = event.getY();
int p2 = ((ListView)v).pointToPosition((int) ux, (int) uy);
return false;
}
return false;
}
};
AdapterView.OnItemLongClickListener listviewLongClick = new AdapterView.OnItemLongClickListener() {
@Override
public boolean onItemLongClick(AdapterView<?> arg0, View arg1, int arg2, long arg3) {
return false;
}
};
AdapterView.OnItemClickListener listviewClick = new AdapterView.OnItemClickListener() {
@Override
public void onItemClick(AdapterView<?> adapterView, View view, int i, long l) {
Toast.makeText(getApplicationContext(),
"weffwe", Toast.LENGTH_SHORT).show();
}
};
//從資料庫獲得介面卡資料
public void GetData() {
mMysql = new MySQLiteHelper(this, "finance.db", null, 1);
mDataBase = mMysql.getReadableDatabase();
Cursor cursor = mDataBase.rawQuery("select * from finance order by ID DESC ", null);
cursor.moveToFirst();
int columnsSize = cursor.getColumnCount();
int number = 0;
while (number < cursor.getCount()) {
// cursor.move(i);
HashMap<String, Object> map = new HashMap<String, Object>();
String budget = cursor.getString(cursor.getColumnIndex("Budget"));
map.put("ID", cursor.getString(cursor.getColumnIndex("ID")));
map.put("Fee", cursor.getDouble(cursor.getColumnIndex("Fee")));
map.put("Time", cursor.getString(cursor.getColumnIndex("Time")));
if (budget.equals("收入"))
map.put("Fee", "+" + cursor.getString(cursor.getColumnIndex("Fee")));
else
map.put("Fee", "-" + cursor.getString(cursor.getColumnIndex("Fee")));
map.put("Remarks", cursor.getString(cursor.getColumnIndex("Remarks")));
if ((cursor.getString(cursor.getColumnIndex("Type"))).equals("衣")) {
map.put("Type", R.drawable.cloth);
} else if ((cursor.getString(cursor.getColumnIndex("Type"))).equals("食")) {
map.put("Type", R.drawable.shi);
} else if ((cursor.getString(cursor.getColumnIndex("Type"))).equals("住")) {
map.put("Type", R.drawable.zhu);
} else if ((cursor.getString(cursor.getColumnIndex("Type"))).equals("行")) {
map.put("Type", R.drawable.xing);
} else if ((cursor.getString(cursor.getColumnIndex("Type"))).equals("其他")) {
map.put("Type", R.drawable.getmoney);
}
cursor.moveToNext();
listData.add(map);
number++;
System.out.println(listData);
}
cursor.close();
mDataBase.close();
mMysql.close();
}
@Override
public void onClick(View view) {
switch (view.getId()) {
case R.id.imageviewBack:
this.finish();
break;
default:
break;
}
}
// 長按事件響應
View.OnCreateContextMenuListener listviewLongPress = new View.OnCreateContextMenuListener() {
@Override
public void onCreateContextMenu(ContextMenu menu, View v, ContextMenu.ContextMenuInfo menuInfo) {
// TODO Auto-generated method stub
相關推薦
Android 練習專案 ——簡單記賬軟體的實現
一、需求分析
在我們生活中經常不知道錢花在什麼地方,但是我們自己又不是很想寫在記賬本上進行管理,由於智慧手機的興起,手機離我們越來越近,導致我們生活時時刻刻都有手機的存在,所以說手機的操作離我們越來越近,趨勢越來越明顯。但是對於記賬,我們往往每個人都有自己的需
Android練習專案 Mp3播放器實現 歌詞同步播放(四)
其實到後面就需要我們如何顯示歌詞,對於歌詞的同步顯示還是比較好實現的,主要通過判斷當前播放的時間和每個結點的歌詞的時間的大小,來同步對應到結點的資料,現在就是如何來實現這個問題。
其實,這個時候就需要自定義控制元件來實現。
第一步需要自定義View的屬性。
Android練習專案 Mp3播放器實現(一)
對於Android的學習,需要掌握的東西有點多,需要我們認真,小心,不斷的進取。前天突然有個想法,覺得Mp3播放器是一個可以練習的專案,於是在網上搜了下,發現有人已經寫了部落格,看了他們的部落格後,我覺得他們說的一點很對,Mp3播放器基本用到了Android裡面
android fragment新手簡單應用(實現介面之間的跳轉)
剛剛開始接觸android的開發,前幾天大概瞭解了fragment的簡單用法,來分享分享經驗,同時來鞏固一下自己的知識。廢話不多說,先來看看程式執行到虛擬機器上的情況。
預設介面,上部的fragment介面會顯示英文單詞 one
當點選螢幕下面的按鈕 two 時,上部分的
Android WebView的簡單使用,實現標題、載入進度提示
1.配置XML
<LinearLayout xmlns:android="http://schemas.android.com/apk/res/android"
xmlns:tools="http://schemas.android.com/tools"
andro
小KING教你做android專案(二)---實現登陸頁面並跳轉和簡單的註冊頁面
<?xml version="1.0" encoding="utf-8"?>
<LinearLayout xmlns:android="http://schemas.android.com/apk/res/android"
android:layout_width="fill_par
Android平臺Camera實時濾鏡實現方法探討(十)--代碼地址以及簡單介紹(20160118更新)
div iss 將在 spa 方法 target 用途 net dsm
簡單做了個相機和圖片編輯模塊,時間原因非常多功能還沒有做。尚有BUG,見諒,將在以後抽時間改動
代碼地址
PS:請點個Star^-^
-----------------------
IDA 調試 Android 方法及簡單的脫殼實現
all fun cati chm std function sso .apk 代碼位置 IDA 調試 Android 方法及簡單的脫殼實現
標簽: android原創逆向調試dalvik
2016-05-24 14:24 9286人閱讀 評論(3) 收藏
Unity(Android版)和Android原生APP簡單實現版本更新
directory 代碼 server 頁面 提示框 自動安裝 obj nis 查看 版本檢測接口說明:(1)請求post,無參數(2)調用地址:http://www.baidu.com/rs/ver/info(3)返回結果:{ "verCode": "2",
android RoundedBitmapDrawable最簡單方式實現圓角
轉載自原部落格地址
demo
<?xml version="1.0" encoding="utf-8"?>
<LinearLayout xmlns:android="http://schemas.android.com/apk/res/android"
xm
Android 中一個簡單垂直跑馬燈的實現
記錄一個Android中簡單實現垂直跑馬燈功能的方法:實現了垂直跑馬燈的功能。記錄一下以便日後檢視:
首先在MainActivity下新建一個名為
ScrollTextView的.java 檔案
Android Studio一個簡單橫向跑馬燈的實現
記錄一個Android中簡單實現跑馬燈功能的方法:僅僅實現了單行跑馬燈的功能,對於速度的調整 ,沒有實現。記錄一下以便日後檢視。
首先在MainActivity下新建一個名為MarqueeTextView的.java 檔案
Android 商品分類(簡單實現 僅供參考)
//匯入依賴
implementation 'com.android.support:recyclerview-v7:28.0.0'
//首先在activity頁面新增兩個水平的RecyclerView
<?xml version="1.0" encoding="
python實現簡單翻譯軟體
python實現翻譯軟體效果如圖:
需要聯網才能進行翻譯
思路:
利用Requests模組獲取有道詞典web頁面的post資訊
提取json資料資訊
通過tkinter模組生成gui介面
原始碼如下:
from tkinter import *
from tkint
Java開發專案2_個人記賬軟體
帥帥個人賬務管理專案說明
專案功能
檢視賬務 多條件組合檢視賬務 增加賬務 編輯賬務 刪除賬務 匯出賬務
表結構
CREATE TABLE personal_zhangwu (
zwid INT PRIMARY KEY AUTO_INCREMENT
Android 簡單引導頁實現
頁面邏輯
1.使用者開啟App,進入歡迎頁,在歡迎頁中判斷使用者是否第一次使用App(可以用Shared Preference記錄使用者使用狀態)。2.如果使用者第一次使用App,進入引導頁,使用者可以通過左右滑動檢視當前展示頁面,頁面可以是廣告,也可以是App使用說明。3.當用戶滑動到最後
無需第三方軟體實現Mac支援ntfs讀寫的最簡單操作
參照此方法在自己的Mac上試驗成功,現記錄此方法如下(略有改動):
本機環境:
macOS Sierra version 10.12.6
2017 款 MacBook Pro
2017.9.10
此方法對10.6以前版本的OS理論上是無效的
蘋果理論上是支援
Android 建立專案遇到的問題(真實經歷)和一個簡單App專案
一、Android第一個專案:先看個專案,遇到的問題寫在了後面
1.Android 是一個專門針對移動裝置的軟體集,它包括一個作業系統,中介軟體和一些重要的應用程式
在用eclipse IDE開發android應用程式之前,你首先要建立一個Android工程,並且建立一個啟動配置,
Maven web 專案 簡單的登入功能實現
用IDEA構建一個空的Maven web專案
下一步 直到建立完畢
搭建環境
pom.xm 檔案新增依賴
pom.xml 檔案如下:
<?xml version="1.0" encoding="UTF-8"?>
<project xmlns=
Android天氣專案更新按鈕實現旋轉
(IDE為Eclipse)
第一步:建立動畫檔案
在res資料夾下新建animator資料夾,新建animator的xml檔案
點選下一步,介面裡填寫下圖內容
檔案建好之後填寫如下內容:
(注意:android:drawable="@drawable/tit