
14 使用Flask提供REST Web服務
一. 建立API藍本
REST API相關的路由是一個自成一體的程式子集, 所以為了更好的組織程式碼, 我們最好把這些路由放到獨立的藍本中。
1)API藍本的結構
|-flasky
|-app/
|-api_1_0
|-__init__.py
|-users.py
|-posts.py
|-comments.py
|-authentication.py
|-errors.py
|-decorators.py
這個API藍本中, 各資源分別在不同的模組中實現。 藍本還包含處理認證, 錯誤以及提供自定義修飾器的模組。
2)藍本的構造檔案__init__.py
from flask import Blueprint

api = Blueprint('api', __name__)

from . import users, posts, comments, authentication, errors
3)註冊API藍本app/__init__.py
def create_app(config_name):

    #...

    from .api_1_0 import api as api_1_0_blueprint

    app.register_blueprint(api_1_0_blueprint, url_prefix='/api/v1.0')

    #...
二. 錯誤處理
1)客戶端能從web服務得到的常見狀態碼如下表所示:
| HTTP狀態碼 | 名稱 | 說明 |
| 200 | OK(成功) | 請求成功完成 |
| 201 | Created(建立) | 請求成功完成並建立了一個新資源 |
| 400 | Bad Request(壞請求) | 請求不可用或不一致 |
| 401 | Unauthorized(未授權) | 請求未包含認證資訊 |
| 403 | Forbidden(禁止) | 請求中傳送的認證密令無權訪問目標 |
| 404 | Notfound(未找到) | URL對應的資源不存在 |
| 405 | Method not allowed(不允許使用的方法) | 指定資源不支援請求使用的方法 |
| 500 | Interval server error(內部伺服器錯誤) | 處理請求的過程中發生意外錯誤 |
為所有客戶端生成相應的一種方法是, 在錯誤處理程式中根據客戶端請求的格式改寫相應, 這種技術稱為內容協商。
2)改進後的404錯誤處理程式
@main.app_errorhandler(404)

def page_not_found(e):

    if request.accept_mimetypes.accept_json and \

            not request.accept_mimetypes.accept_html: #如果客戶端只接受json相應

        response = jsonify({'error': 'not found'})

        response.code_status = 404

        return response

return render_template('404.html'), 4043)API藍本中的錯誤處理程式app/api_1_0/errors.py
def forbidden(message):
    response = jsonify({'error': 'forbidden', 'message': message})
    response.status_code = 403
    return response


def unauthorized(message):
    response = jsonify({'error': 'unauthorized', 'message': message})
    response.status_code = 401
    return response


def bad_request(message):
    response = jsonify({'error': 'bad request', 'message': message})
    response.status_code = 400
    return response

@api.errorhandler(ValidationError)#如果在api藍本註冊的路由中遇到ValidaitonError, 由改程式處理錯誤
def validation_error(e):
    return bad_request(e.args[0])
這樣檢視函式就可以呼叫這些輔助函式生成錯誤響應了
4)ValidationError自定義錯誤app/exceptions.py
class ValidationError(ValueError):

    pass
三. 使用Flask-HTTPAuth認證使用者
我們的認證支援匿名使用者, 郵箱密碼認證, token令牌認證;
1)安裝flask-httpauth
&pip install flask-httpauth
2)初始化Flask-HTTPAuth app/api_1_0/authentication.py
from flask_httpauth import HTTPBasicAuth


auth = HTTPBasicAuth()


@auth.verify_password

def verify_password(email_or_token, password):

    if email_or_token == '':

        g.current_user = AnonymousUser()

        return True

    if password == '':

        g.current_user = User.verify_auth_token(email_or_token)

        g.token_used = True

        return g.current_user is not None

    user = User.query.filter_by(email=email_or_token).first()

    if not user:

        return False

    g.token_used = False

    g.current_user = user

    return user.verify_password(password)


@auth.error_handler

def auth_error():

    return unauthorized('Invalid credentials')


#使用修飾器保護路由
@api.route('/posts/')
@auth.login_required
def get_posts():
    pass

"""
上面的程式碼是否有些不好理解? 沒關係, 我來介紹一下它的作用。
部署了上面的程式碼以後, 我們就可以使用修飾器@auth.login_reqired保護路由了,
只要客戶端向該修飾器修飾的路由發出請求, 瀏覽器就會彈出一個對話方塊要求填寫郵箱和密碼, 即需要認證
如果填寫的資訊通過認證, 則可以訪問路由, 未通過認證不可訪問路由。
"""

#...email-password認證是預設的, token認證是我們自己新增的, 因為不想每次都發送敏感資訊
#為了實現token認證我們還需要實現生成token, 驗證token, 獲取token的函式

#在那之前, 我們先處理一個問題, 在每個路由上都新增@auth.login_required修飾器稍顯麻煩,
#我們可以在before_request函式上新增該修飾器, 那樣該修飾器就會應用到所有api路由上了

@api.before_request
@auth.login_required
def before_request():
    if not g.current_user.is_anonymous and not g.current_user.confirm:
        return forbidden('Unconfirmed account')

#我們訪問任意api藍本註冊的路由, 就會先訪問@api.before_request修飾器註冊的before_request函式
#因為before_request函式被@auth.login_required修飾器修飾, 所以我們就需要通過認證
#認證通過後才可以進入before_request函式, 執行完before_request函式後自動執行我們想訪問的路由
#不過使用者要是匿名使用者或者是confirm屬性為True的使用者才可以
3)生成, 驗證token app/models.py
class User(UserMixin, db.Model):

    #...

    def generate_auth_token(self, expiration):

        s = Serializer(current_app.config['FLASKY_SECRET_KEY'], expires_in=expiration)

        return s.dumps({'id': self.id})


    @staticmethod

    def verify_auth_token(token):  #驗證失敗返回None, 驗證成功返回對應使用者

        s = Serializer(current_app.config['FLASKY_SECRET_KEY'])

        try:

            data = s.loads(token)

        except:

            return None

        return User.query.get(data['id'])
4)傳送token app/api_1_0/authentications.py
@api.route('/token')

def get_token(): #能通過認證才能訪問該路由, 有三種方式通過認證: 匿名使用者, token認證, email-password認證

    if g.current_user.is_anonymous or g.token_used == True:  #匿名使用者無法獲取token, 無法用舊token獲取新token

        return unauthorized('Invalid credentials')

    return jsonify({'token': g.current_user.generate_auth_token(expiration=3600), 'expiration': 3600})
四. 資源和json的轉換
1)post&json_post app/models.py
class Post(db.Model):

    #...

    def to_json(self):

        json_post = {

            'url': url_for('api.get_post', id=self.id, _external=True),

            'body': self.body,

            'body_html': self.body_html,

            'timestamp': self.timestamp,

            'author': url_for('api.get_user', id=self.author_id, _external=True),

            'comments': url_for('api.get_post_comments', id=self.id, _external=True),

            'comment_count': self.comments.count()

        }

        return json_post


    @staticmethod

    def from_json(json_post):

        body = json_post.get('body')

        if body == None or body == '':

            raise ValidationError('post does not have a body')

        return Post(body=body)

"""
我們建立Post例項的時候只需要使用body欄位,post的author屬性在檢視函式中定義。
"""

#http客戶端和web服務之間傳遞資訊使用json編碼, 所以web服務要實現json和資源之間的相互轉換
#把post請求發來的json轉換成資源存入資料庫
#把get請求請求的資源轉換成json傳送給客戶端
2)user&json_user app/models.py
class User(UserMixin, db.Model):

    def to_json(self):

        json_user = {
                'url': url_for('api.get_user', id=self.id, _external=True),
                'username': self.username,
                'member_since': self.member_since,
                'last_seen': self.last_seen,
                'posts': url_for('api.get_user_posts', id=self.id, _external=True),
                'followed_posts': url_for('api.get_user_followed_posts', id=self.id, _external=True),
                'post_count': self.posts.count()
                }
        return json_user
#為了保護使用者隱私, 我們沒有把email, password, role等屬性放入json字典
#這說明我們把資源轉成json時沒必要把所有屬性都放進去
#user並沒有post_count屬性, 這說明我們可以在json裡面增加虛擬屬性
3)comment&json_comment app/models.py
class Comment(db.Model):

    #...

    def to_json(self):
        json_comment = {
                'url': url_for('api.get_comment', id=self.id, _external=True),
                'body': self.body,
                'body_html': self.body_html,
                'timestamp': self.timestamp,
                'author_url': url_for('api.get_user', id=self.author.id, _external=True),
                'post_url': url_for('api.get_post', id=self.post.id, _external=True)
                }
        return json_comment

    @staticmethod
    def from_json(json_comment):
        body = json_comment.get('body')
        if body == None or body == '':
            raise ValidationError('comment does not have a body')
        return Comment(body)
五. 實現資源端點
1)app/api_1_0/posts.py
from ..models import Post, Permission
from flask import request, g, jsonify, url_for, current_app
from . import api
from .. import db
from .errors import forbidden
from .decorators import permission_required


@api.route('/posts/')
def get_posts():
    page = request.args.get('page', 1, type=int)
    pagination = Post.query.paginate(page, per_page=current_app.config['FLASKY_POSTS_PER_PAGE'], error_out=False)
    posts = pagination.items
    prev = None
    if pagination.has_prev:
        prev = url_for('api.get_posts', page=page-1, _external=True)
    next = None
    if pagination.has_next:
        next = url_for('api.get_posts', page=page+1, _external=True)
    return jsonify({
        'posts': [post.to_json() for post in posts],
        'prev': prev,
        'next': next,
        'count': pagination.total
        })


@api.route('/posts/<int:id>')
def get_post(id):
    post = Post.query.get_or_404(id)
    return jsonify(post.to_json())


@api.route('/posts/', methods=['POST'])
@permission_required(Permission.WRITE_ARTICLES) #建立文章的使用者需要寫許可權, 該修飾函式定義在文章後面
def new_post():
    post = Post.from_json(request.json) #利用請求傳送的json資料建立post例項, 如果遇到ValidationError, 由errorhandler處理,檢視函式變得簡潔
    post.author = g.current_user
    db.session.add(post)
    db.session.commit()
    return jsonify(post.to_json()), 201, \
            {'location': url_for('api.get_post', id=post.id, _external=True)}


@api.route('/posts/<id>', methods=['PUT'])
@permission_required(Permission.WRITE_ARTICLES)
def edit_post(id):
    post = Post.query.get_or_404(id)
    if g.current_user != post.author and \ #通過認證的使用者不是文章的作者, 並且不是管理員
            not g.current_user.can(Permission.ADMINISTER):
                return forbidden('Insufficient permissions')
    post.body = request.json.get('body', post.body)
    db.session.add(post)
    return jsonify(post.to_json())
2)app/api_1_0/users.py
from . import api
from ..models import User
from flask import jsonify, request, current_app, url_for


@api.route('/users/<int:id>')
def get_user(id):
    user = User.query.get_or_404(id)
    return jsonify(user.to_json())


@api.route('/users/<int:id>/posts/')
def get_user_posts(id):
    user = User.query.get_or_404(id)
    page = request.args.get('page', 1, type=int)
    pagination = user.posts.paginate(page, per_page=current_app.config['FLASKY_POSTS_PER_PAGE'], error_out=False)
    posts = pagination.items
    prev = None
    if pagination.has_prev:
        prev = url_for('api.get_user.posts', id=id, page=page-1)
    next = None
    if pagination.has_next:
        next = url_for('api.get_user_posts', id=id, page=page+1)
    return jsonify({
        'posts': [post.to_json() for post in posts],
        'prev': prev,
        'next': next,
        'count': user.posts.count()
        })

@api.route('/users/<int:id>/timeline/')
def get_user_followed_posts(id):
    user = User.query.get_or_404(id)
    page = request.args.get('page', 1, type=int)
    pagination = user.followed_posts.paginate(page, per_page=current_app.config['FLASKY_POSTS_PER_PAGE'], error_out=False)
    posts = pagination.items
    prev = None
    if pagination.has_prev:
        prev = url_for('api.get_user_followed_posts', id=id, page=page-1)
    next = None
    if pagination.has_next:
        next = url_for('api.get_user_followed_posts', id=id, page=page+1)
    return jsonify({
        'posts': [post.to_json() for post in posts],
        'prev': prev,
        'next': next,
        'count': user.followed_posts.count()
        })
3)app/api_1_0/comments.py
from . import api
from flask import request, current_app, jsonify, url_for, g
from ..models import Comment, Permission, Post
from .decorators import permission_required
from .. import db


@api.route('/comments/')
def get_comments():
    page = request.args.get('page', 1, type=int)
    pagination = Comment.query.order_by(Comment.timestamp.desc()).paginate(page, per_page=current_app.config['FLASKY_COMMENTS_PER_PAGE'], error_out=False)
    comments = pagination.items
    prev = None
    if pagination.has_prev:
        prev = url_for('api.get_comments', page=page-1)
    next = None
    if pagination.has_next:
        next = url_for('api.get_comments', page=page+1)
    return jsonify({
        'comments': [comment.to_json() for comment in comments],
        'prev': prev,
        'next': next,
        'count': pagination.total()
        })


@api.route('/comments/<int:id>')
def get_comment(id):
    comment = Comment.query.get_or_404(id)
    return jsonify(comment.to_json())


@api.route('/posts/<int:id>/comments/')
def get_post_comments(id):
    post = Post.query.get_or_404(id)
    page = request.args.get('page', 1, type=int)
    pagination = post.comments.order_by(Comment.timstamp.desc()).paginate(page, per_page=current_app.config['FLASKY_COMMENTS_PER_PAGE'], error_out=False)
    comments = pagination.items
    prev = None
    if pagination.has_prev:
        prev = url_for('api.get_post.comments', id=id, page=page-1)
    next = None
    if pagination.has_next:
        next = url_for('api.get_post_comments', id=id, page=page+1)
    return jsonify({
        'comments': [comment.to_josn() for comment in comments],
        'prev': prev,
        'next': next,
        'count': pagination.total
        })


@api.route('/posts/<int:id>/comments/', methods=['POST'])
@permission_required(Permission.COMMIT)
def new_post_comment(id):
    post = Post.query.get_or_404(id)
    comment = Comment.from_json(request.json)
    comment.author = g.current_user
    comment.post = post
    db.session.add(comment)
    db.session.commit()
    return jsonify(comment.to_json), 201, \
            {'location': url_for('api.get_comment', id=comment.id, _external=True)}
六. permission_required修飾器 app/api_1_0/decorations.py
還記得我們是如何利用該修飾器修飾路由, 以達到限制許可權使用者才能訪問路由的目的的嗎?
@api.route('/posts/', methods=['POST'])
@permission_required(Permission.WRITE_ARTICLES) #只有具有寫許可權的使用者才能訪問該路由
def new_post():
    pass
我們來推理一下permission_required函式的構造, 首先修飾器語句等價於:
new_post = permission_required(Permission.WRITE_ARTICLES)(new_post)
即:
new_post() = permission_required(Permission.WRITE_ARTICLES)(new_post)()
當用戶訪問該路由時首先需要通過認證, 通過認證以後g.current_user中儲存的就是通過認證的使用者, 然後如果使用者是匿名使用者或者confirm屬性為True, 通過before_request函式, 即可訪問路由函式new_post()
就相當於訪問:
permission_required(Permission.WRITE_ARTICLES)(new_post)()
這樣的話看來是兩層閉包, 通過兩層呼叫把Permission.WRITE_ARTICLES和new_post引數傳到最裡面的函式, 最裡面的函式進行使用者許可權認證, 通過的話執行new_post函式即可:
def permission_required(permission):

    def decorator(f):
@wraps(f)如果被修飾的函式有引數的話, 版本就是下面這樣:(有無引數都適用)
def permission_required(permission):

    def decorator(f):
        @wraps(f)
        def decorator_function(*nkwargs, **kwargs):

            if not g.current_user.can(permission):

                return forbidden('Insufficient permissions')

            return f(*nkwargs, **kwargs)

        return decorator_function

    return decorator
@wraps修飾器的作用是, 保持被修飾函式的__doc__和__name__屬性。
七. 使用HTTPie測試Web服務
測試Web服務必須使用HTTP客戶端, 最常使用的在命令列中測試Web服務的客戶端是curl, httpie, 後者命令更簡潔, 可讀性也更高, 我們使用後者。
1)安裝httpie
&pip install httpie
2)執行web服務

3)測試web服務
GET請求可按如下方式發起:
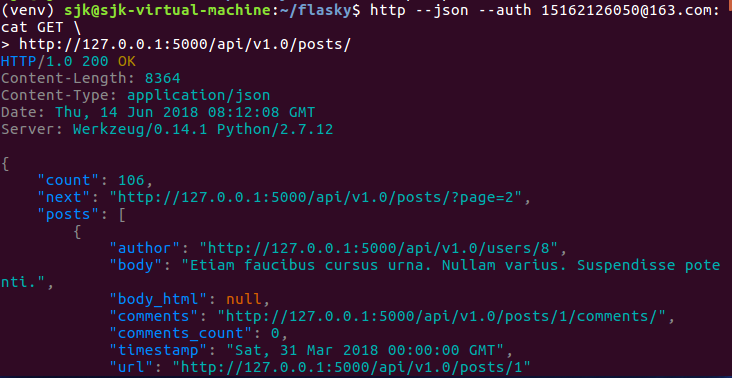
...
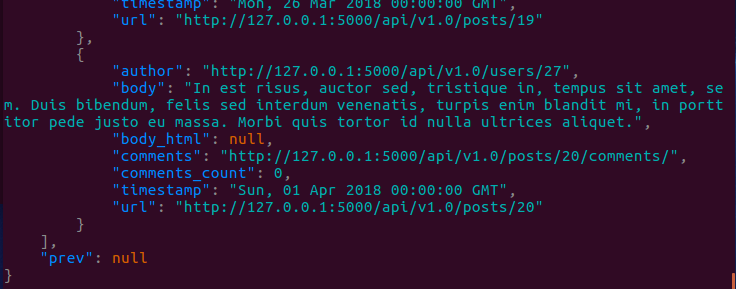
因為這是第一頁, 所以prev引數為None, 但是返回了獲取下一頁的url和總頁數。
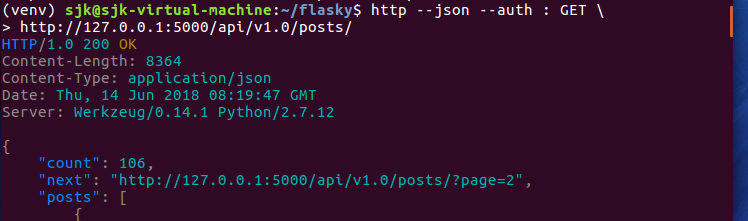
匿名使用者可傳送空郵件地址和密碼來發起相同的請求:
下面這個命令傳送POST請求以新增一篇新部落格文章:

如此推測, request.json就是字典:
{'body': "I'm adding a post2 from the *command line*."}
而且檢視函式返回語句:
    return jsonify(post.to_json()), 201, \
            {'location': url_for('api.get_post', id=post.id, _external=True)}
201是status_code,
{'location': url_for('api.get_post', id=post.id, _external=True)}是location首部。
要想使用認證令牌, 可向/api/v1.0/token 傳送請求:
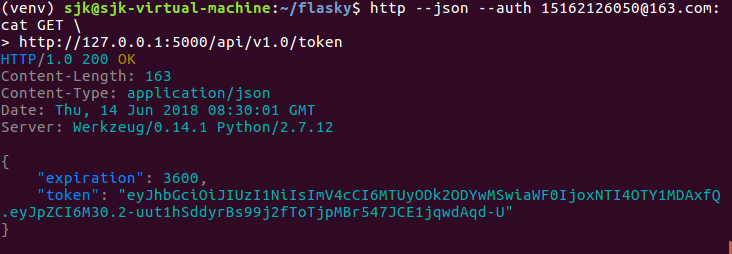
在接下來的1小時內, 這個令牌可用於訪問API, 請求時要和空密碼一起傳送:

至此, Flasky的功能開發階段就完全結束啦~~~
很顯然, 下一步我們要部署Flasky。 在部署過程中, 我們會遇到新的挑戰~