蘋果資訊推送服務(Apple Push Notification Service)使用總結
一:簡介
在使用APNS之前,有這麼幾點需要了解:
1:APNS是免費的。只要有開發者賬號便可以申請APNS證書。
2:APNS又是不可靠的,蘋果對資訊推送的可靠性不做任何保證。
3:APNS對訊息的大小是有限制的,總容量不能超過256位元組。
清楚了以上三條,各位應該對APNS適用的應用情景有所瞭解了。
APNS的工作流程如下圖所示:

1 & 2:使用者第一次安裝應用並第一次啟動時,會彈出對話方塊提示應用需要開通推送,是否允許,如果允許,應用會得到一個硬體token。
有三點需要注意:
第一,此token唯一與裝置相關,同一裝置上不同應用獲取的token是一樣的;
第二,當應用被解除安裝,然後重新安裝時,確認對話方塊不會再出現,自動繼承前一次安裝的設定資訊;
第三,推送設定可以在設定-通知中進行更改。可以選擇開啟訊息框、聲音以及badge number中的一種或多種。
3:應用將受到的token傳送到服務端,也就是APNS訊息的源頭。
4:應用伺服器通過token及證書向蘋果的訊息伺服器傳送訊息。
5:蘋果將接收到的訊息傳送到對應裝置上的對應應用。
6:如果應用未處於Active狀態(未啟動或backgroud),預設設定下,螢幕頂部會彈出訊息框,同時有聲音提示,點選改訊息框會進入應用,如不點選則應用圖示上會有badge number出現。
二:使用步驟
APNS的使用並不複雜,但容易出錯的環節比較多,特別是證書申請的部分,要特別的注意。
下面根據我按教程實際操作的步驟進行闡述:
準備工作:
A: 一個Xcode工程,我們將其命名為MyPushChat,以及一個對應的App ID.
B:一臺能用於除錯的iOS裝置(APNS只能在實體裝置上工作,模擬器無法執行)
step1:
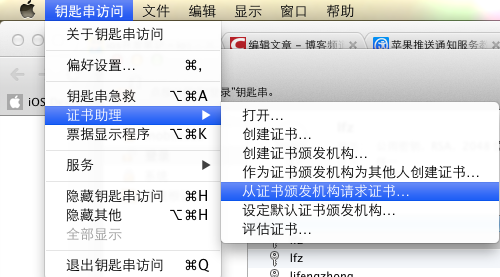
在"應用程式-使用工具"中開啟"鑰匙串訪問"(Keychain Access),如下圖所示:

在接下來的對話方塊中選擇儲存到磁碟,郵件可隨意填寫,名稱命名為MyPushChat

點選“繼續”,將檔名設為"MyPushChat",點選儲存。這樣,會得到一個名為"MyPushChat.certSigningRequest"的檔案,此檔案要妥善保管。
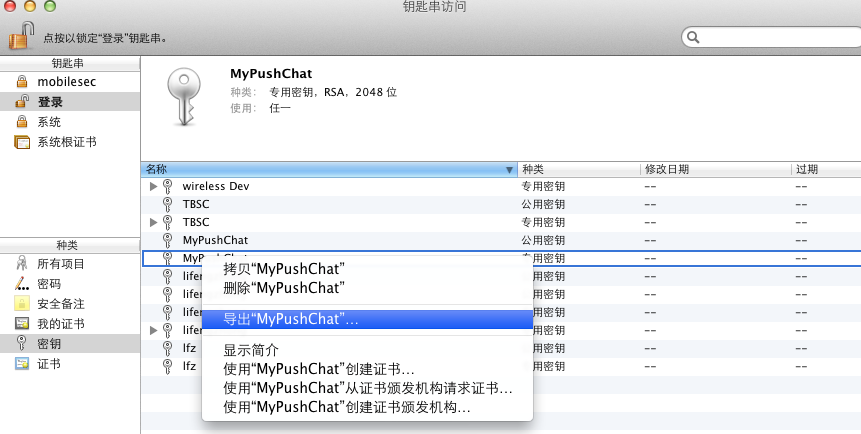
從剛剛建立的csr檔案中到處私鑰,具體操作如下圖所示:

將匯出的檔案命名為MyPushChatKey.p12,並輸入密碼,請牢記此密碼,這裡姑且設為123456abc。
此時,我們已有檔案MyPushChat.certSigningRequest,以及MyPushChatKey.p12
step2:
在App IDs中找到與MyPushChat對應的AppID, 點選右側"Configure"按鈕,勾選下圖所示選擇框:

點選”Development Push SSL Certificate“右側的configure按鈕,development版本的應用於測試,有效期只有一年,且只能使用蘋果的APNS測試伺服器,應用釋出時需要申請Distributions版本的證書。Development與Distribution版本的證書獲得的Token是不一樣的。彈出框如下所示:

上傳"MyPushChat.certSigningRequest"並點選Generate,片刻後證書生成完畢,下載,命名為“aps_developer_identity.cer”。
step3:
開啟Provision Portal,點選New Provision,將Provision File命名為"MyPushChat",選擇對應的App ID 以及Device並下載。得到檔案MyPushChat.provision。雙擊匯入此MyPushChat.Provision檔案,如果一切正常,會彈出Orgnizer, 且顯示介面如下所示:

step4:
將上面得到的檔案都儲存到桌面。開啟Console,切換到桌面。
首先將aps_developer_identity.cer轉換成MyPushChat.cert
命令:openssl x509 -in aps_developer_identity.cer -inform der-out MyPushChatCert.pem
然後將私鑰檔案轉換為MyPushChatKey.pem
命令:
openssl pkcs12 -nocerts -out MyPushChatKey.pem -in MyPushChatKey.p12
Enter Import Password:
此處密碼輸入為前面為私鑰設定的密碼: 123456abc
MAC verified OK
Enter PEM pass phrase:
這裡一定要輸入新密碼,我們設為123456abc
Verifying - Enter PEM pass phrase:
下一步,將MyPushChatKey.pem及MyPushChatCert.pem合成一個pem檔案:
命令:cat PushChatCert.pem PushChatKey.pem > ck.pem
最後,測試一下得到的ck.pem檔案
首先執行:
命令:telnet gateway.sandbox.push.apple.com 2195
如果網路正常,會出現如下所示,ctrl + C終止連線。
Trying 17.172.232.226...
Connected to gateway.sandbox.push-apple.com.akadns.net.
Escape character is '^]'.
然後使用ssl測試連線
命令:openssl s_client -connect gateway.sandbox.push.apple.com:2195 -cert MyPushChatCert.pem -key MyPushChatKey.pem
輸入密碼123456abc後,如果一切正常,會出現很多的輸出,你將可以輸入若干字元,回車後,連線將中斷。
到此,最繁瑣與易錯的過程已經完成,證書相關工作到此為止了,進入編碼階段~
step5:
1:
在專案MyPushChat中AppDelegate.m的didFinishLaunchingWithOptions中加入如下程式碼
[plain] view plaincopyprint?- [[UIApplication sharedApplication] registerForRemoteNotificationTypes:
- (UIRemoteNotificationTypeBadge | UIRemoteNotificationTypeSound | UIRemoteNotificationTypeAlert)];
[[UIApplication sharedApplication] registerForRemoteNotificationTypes:
		(UIRemoteNotificationTypeBadge | UIRemoteNotificationTypeSound | UIRemoteNotificationTypeAlert)];
本句程式碼的作用為在應用第一次啟動時彈出對話方塊讓使用者確認是否開啟訊息推送,本句註冊的訊息型別有BadgeNumber, 聲音, 頂部訊息框. 可以選擇其中的一種或多種。
2:
在AppDelegate中加入如下程式碼:
[plain] view plaincopyprint?- - (void)application:(UIApplication*)application didRegisterForRemoteNotificationsWithDeviceToken:(NSData*)deviceToken
- {
- NSLog(@"My token is: %@", deviceToken);
- }
- - (void)application:(UIApplication*)application didFailToRegisterForRemoteNotificationsWithError:(NSError*)error
- {
- NSLog(@"Failed to get token, error: %@", error);
- }
- (void)application:(UIApplication*)application didRegisterForRemoteNotificationsWithDeviceToken:(NSData*)deviceToken
{
	NSLog(@"My token is: %@", deviceToken);
}

- (void)application:(UIApplication*)application didFailToRegisterForRemoteNotificationsWithError:(NSError*)error
{
	NSLog(@"Failed to get token, error: %@", error);
}My token is:<740f4707 bebcf74f 9b7c25d4 8e335894 5f6aa01d a5ddb387 462c7eaf 61bb78ad>
將尖括號內容儲存,稍後使用
同樣,在AppDelegate中加入如下程式碼
[plain] view plaincopyprint?- - (void) application:(UIApplication *)application didReceiveRemoteNotification:(NSDictionary *)userInfo
- {
- if ( application.applicationState == UIApplicationStateActive ) {
- // 程式在執行過程中受到推送通知
- NSLog("%@", [[userInfo objectForKey: @"aps"] objectForKey: @"alert"]);
- } else {
- //程式為在執行狀態受到推送通知
- }
- }
- (void) application:(UIApplication *)application didReceiveRemoteNotification:(NSDictionary *)userInfo
{
    if ( application.applicationState == UIApplicationStateActive ) {
        // 程式在執行過程中受到推送通知
        NSLog("%@", [[userInfo objectForKey: @"aps"] objectForKey: @"alert"]);
    } else {
        //程式為在執行狀態受到推送通知
    }
}3:
下載php樣例程式,將其中的devicetoken欄位設為剛才儲存的token,注意,去掉空格。
將password設為123456abc,將message設為你想設定的內容,儲存,然後命令列下進入php原始碼路徑,執行php simplepush.php
如果人品夠好,你的裝置上馬上會咚咚的響一下~

三:其他注意事項
1:可以使用如下程式碼判斷開啟了那些型別的訊息通知:
[plain] view plaincopyprint?- UIRemoteNotificationType enabledTypes = [[UIApplication sharedApplication] enabledRemoteNotificationTypes];
- if (enabledTypes & UIRemoteNotificationTypeBadge) {
- //開啟badge number
- }
- if (enabledTypes & UIRemoteNotificationTypeSound) {
- //開啟聲音
- }
- if (enabledTypes & UIRemoteNotificationTypeAlert) {
- //開啟alert
- }
UIRemoteNotificationType enabledTypes = [[UIApplication sharedApplication] enabledRemoteNotificationTypes];
if (enabledTypes & UIRemoteNotificationTypeBadge) {
//開啟badge number
}
if (enabledTypes & UIRemoteNotificationTypeSound) {
//開啟聲音
}
if (enabledTypes & UIRemoteNotificationTypeAlert) {
//開啟alert
}
2: 推送服務端推薦使用Javapns, 使用很簡便,注意其使用的證書檔案不是pem,而是p12格式,具體生成方法為:
一:生成csr檔案(同上)
二:通過csr在蘋果網站上生成cert檔案(同上)
三:雙擊匯入生成的cert檔案,在keychain中同時選中csr的專用祕鑰及剛剛匯入的ssl證書,右鍵->匯出, 儲存為p12
其他過程相同
3: 如果有把握,可以直接使用distribution版的證書和provision檔案,但線上伺服器有一定的限制,如果使用不當,會被蘋果當ddos ban掉。
4:蘋果的推送伺服器會嚮應用伺服器返回一個傳送結果,對於一直失敗的目標,應用服務端需要進行處理。
5:傳送的message為json格式,可以在其中加入自己的欄位,但同樣,總大小不能超過256位元組。
參考文獻