
Sping Boot多模組專案的建立和配置
在SpringCloud分散式微服務當中,我們需要建立很多個微服務,假如所有的微服務都分開編寫,不方便我們的閱讀和編碼,何況一個人有可能一次性負責很多個模組。因此,我們可以利用SpringBoot的多模組開發,一個模組就是一個微服務的應用,方便我們去整體性的編寫程式碼,後期的維護和管理也更加的方便。
接下來,我們首先去建立多個模組的應用
開發環境:Spring Boot(2.0.3),IDEA(2017),Maven(3.3.9),JDK(1.8)
一:多模組的建立
首先大家可以參考我的《建立一個Spring Boot工程》,去建立一個Spring Boot工程。
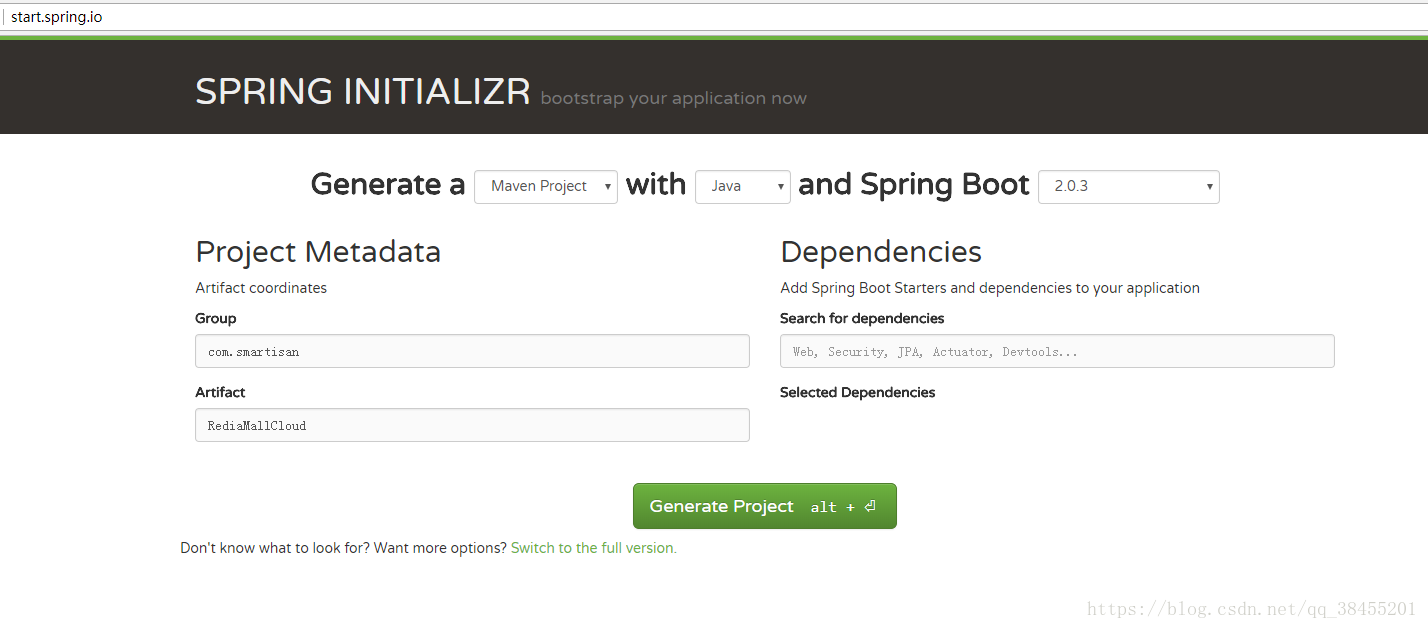
點選生成一個Spring Boot工程,把專案解壓到我們的工程目錄,然後用IDEA開啟,這個工程作為整個多模組的父工程。
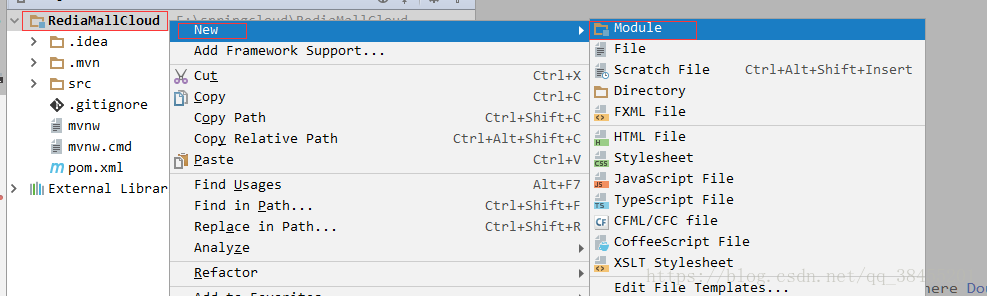
開啟之後,右鍵點選父工程的工程名,選擇New---->Module
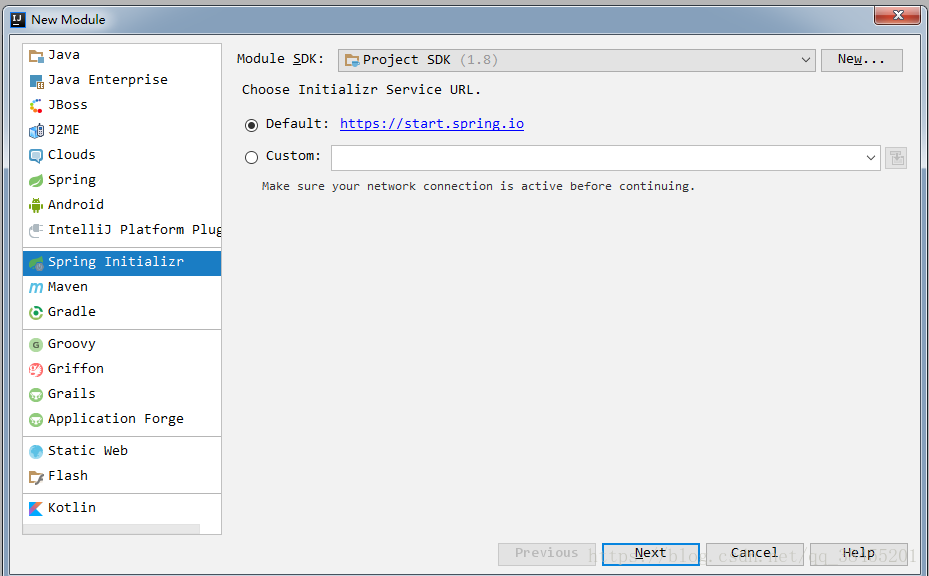
點選Module之後,進入下一個介面,然後再點選next,然後填寫模組的基本資訊
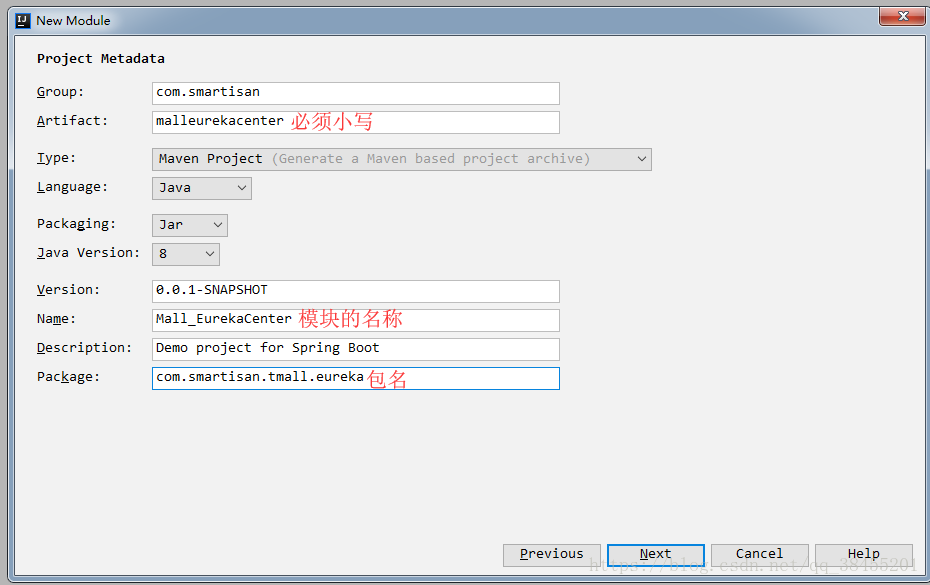
這裡需要注意的是,Artifact必須要小寫,否則會彈出artifact contains illegal characters的錯誤提示資訊。模組的名稱注意填寫,然後填寫包名(建議不要使用預設的值)。點選下一步,可以在這一步選擇Maven的依賴,假如是Web就選擇Web,並且下面還提供了很多Spring Cloud元件的依賴,按照你的需求可以選擇這一步加上或者後期再加。
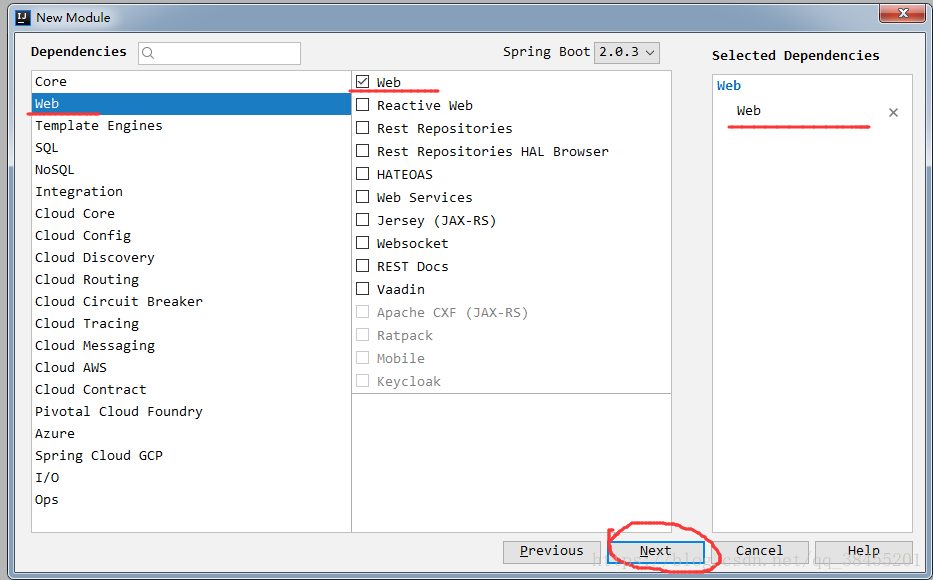
點選Next

編寫Module name,點選Finish,我們就給父工程上面增加了一個模組。
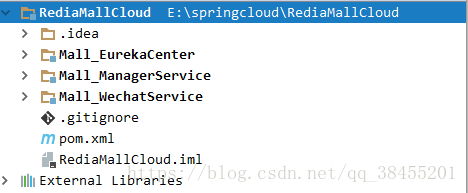
重複上面的步驟,再新增兩個個模組,總共三個模組,完畢之後目錄結構如下:

二:多模組專案的配置
我們在上面父工程上面建立了兩個新的模組,我們現在需要做一些配置
首先把父工程裡面無用的檔案以及資料夾刪除掉:包括三個模組的mvnw、mvnw.cmd檔案及.mvn資料夾,還有父模組的src目錄,因為此處的父模組只做依賴管理,不需要編寫程式碼。
第二步:在父工程的pom檔案當中,有兩個非常重要的操作,第一個就是父模組的packaging一定是pom型別,第二個就是在pom檔案當中把子模組的名稱全部新增進去。
下面為父工程的pom檔案
<?xml version="1.0" encoding="UTF-8"?>
<project xmlns="http://maven.apache.org/POM/4.0.0" xmlns:xsi="http://www.w3.org/2001/XMLSchema-instance"
	xsi:schemaLocation="http://maven.apache.org/POM/4.0.0 http://maven.apache.org/xsd/maven-4.0.0.xsd">
	<modelVersion>4.0.0</modelVersion>

	<groupId>com.smartisan</groupId>
	<artifactId>RediaMallCloud</artifactId>
	<version>0.0.1-SNAPSHOT</version>
	<!--父模組打包型別必須為pom-->
	<packaging>pom</packaging>

	<!--在父pom檔案當中新增模組的名稱,子模組pom中<name>標籤當中的值-->
	<modules>
		<module>Mall_EurekaCenter</module>
		<module>Mall_ManagerService</module>
		<module>Mall_WechatService</module>
	</modules>

	<name>RediaMallCloud</name>
	<description>Demo project for Spring Boot</description>

	<!-- parent指明繼承關係,給出被繼承的父專案的具體資訊-->
	<parent>
		<groupId>org.springframework.boot</groupId>
		<artifactId>spring-boot-starter-parent</artifactId>
		<version>2.0.3.RELEASE</version>
		<relativePath/> <!-- lookup parent from repository -->
	</parent>

	<properties>
		<project.build.sourceEncoding>UTF-8</project.build.sourceEncoding>
		<project.reporting.outputEncoding>UTF-8</project.reporting.outputEncoding>
		<java.version>1.8</java.version>
	</properties>

	<dependencies>
		<dependency>
			<groupId>org.springframework.boot</groupId>
			<artifactId>spring-boot-starter</artifactId>
		</dependency>

		<dependency>
			<groupId>org.springframework.boot</groupId>
			<artifactId>spring-boot-starter-test</artifactId>
			<scope>test</scope>
		</dependency>
	</dependencies>

	<build>
		<plugins>
			<plugin>
				<groupId>org.springframework.boot</groupId>
				<artifactId>spring-boot-maven-plugin</artifactId>
			</plugin>
		</plugins>
	</build>


</project>
第三步:子模組pom的配置,我們在子模組的pom檔案當中要進行一個操作,就是子模組的parent要使用頂層的父模組
下面貼出一個子模組的pom檔案
<?xml version="1.0" encoding="UTF-8"?>
<project xmlns="http://maven.apache.org/POM/4.0.0" xmlns:xsi="http://www.w3.org/2001/XMLSchema-instance"
	xsi:schemaLocation="http://maven.apache.org/POM/4.0.0 http://maven.apache.org/xsd/maven-4.0.0.xsd">
	<modelVersion>4.0.0</modelVersion>

	<groupId>com.smartisan</groupId>
	<artifactId>malleurekacenter</artifactId>
	<version>0.0.1-SNAPSHOT</version>
	<packaging>jar</packaging>

	<name>Mall_EurekaCenter</name>
	<description>Demo project for Spring Boot</description>

	<!-- 把原有的parent的資訊註釋掉,繼承我們的父工程-->
	<!--其他的子模組只需要把下面這個<parent>標籤當中的值更改為一樣的就可以了-->
	<parent>
		<!--<groupId>org.springframework.boot</groupId>
		<artifactId>spring-boot-starter-parent</artifactId>
		<version>2.0.3.RELEASE</version>
		<relativePath/>--> <!-- lookup parent from repository -->
		<groupId>com.smartisan</groupId>
		<artifactId>RediaMallCloud</artifactId>
		<version>0.0.1-SNAPSHOT</version>
	</parent>

	<properties>
		<project.build.sourceEncoding>UTF-8</project.build.sourceEncoding>
		<project.reporting.outputEncoding>UTF-8</project.reporting.outputEncoding>
		<java.version>1.8</java.version>
	</properties>

	<dependencies>
		<dependency>
			<groupId>org.springframework.boot</groupId>
			<artifactId>spring-boot-starter-web</artifactId>
		</dependency>

		<dependency>
			<groupId>org.springframework.boot</groupId>
			<artifactId>spring-boot-starter-test</artifactId>
			<scope>test</scope>
		</dependency>
	</dependencies>

	<build>
		<plugins>
			<plugin>
				<groupId>org.springframework.boot</groupId>
				<artifactId>spring-boot-maven-plugin</artifactId>
			</plugin>
		</plugins>
	</build>


</project>
三:配置完成的測試
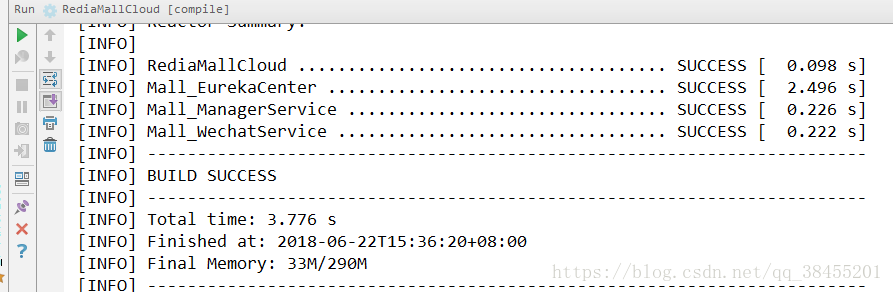
我們進行了上述的配置,進行一個最簡單的測試,開啟IDEA右邊工具欄當中的Maven Projects外掛,選擇RediaMallCloud當中的compile,點選執行。

我們可以看到,編譯已經通過了。
四:其他的一些優化
1.假如我們想統一的進行版本的管理,我們可以在父pom檔案當中引入<dependencyManagement></dependencyManagement>這個標籤,這樣我們在子pom檔案當中,相同依賴的<version>標籤就不需要寫了,因為Maven會自動的向上去尋找對應的版本號。
2.我們可以使用properties控制依賴包的版本號,便於版本維護。
父pom檔案
<?xml version="1.0" encoding="UTF-8"?>
<project xmlns="http://maven.apache.org/POM/4.0.0" xmlns:xsi="http://www.w3.org/2001/XMLSchema-instance"
	xsi:schemaLocation="http://maven.apache.org/POM/4.0.0 http://maven.apache.org/xsd/maven-4.0.0.xsd">
	<modelVersion>4.0.0</modelVersion>

	<groupId>com.smartisan</groupId>
	<artifactId>RediaMallCloud</artifactId>
	<version>0.0.1-SNAPSHOT</version>
	<!--父模組打包型別必須為pom-->
	<packaging>pom</packaging>

	<!--在父pom檔案當中新增模組的名稱,子模組pom中<name>標籤當中的值-->
	<modules>
		<module>Mall_EurekaCenter</module>
		<module>Mall_ManagerService</module>
		<module>Mall_WechatService</module>
	</modules>

	<name>RediaMallCloud</name>
	<description>Demo project for Spring Boot</description>

	<!-- parent指明繼承關係,給出被繼承的父專案的具體資訊-->
	<parent>
		<groupId>org.springframework.boot</groupId>
		<artifactId>spring-boot-starter-parent</artifactId>
		<version>2.0.3.RELEASE</version>
		<relativePath/> <!-- lookup parent from repository -->
	</parent>

	<properties>
		<project.build.sourceEncoding>UTF-8</project.build.sourceEncoding>
		<project.reporting.outputEncoding>UTF-8</project.reporting.outputEncoding>
		<java.version>1.8</java.version>
		<!-- 在properties中統一控制依賴包的版本,更清晰-->
		<dubbo.version>2.5.3</dubbo.version>
		<zkclient.version>0.10</zkclient.version>
	</properties>

	<dependencyManagement>
	<dependencies>
		<dependency>
			<groupId>org.springframework.boot</groupId>
			<artifactId>spring-boot-starter</artifactId>
		</dependency>

		<dependency>
			<groupId>org.springframework.boot</groupId>
			<artifactId>spring-boot-starter-test</artifactId>
			<scope>test</scope>
		</dependency>
		<!--新增後續dubbo專案中所需依賴,dubbo、zk-->
		<dependency>
			<groupId>com.alibaba</groupId>
			<artifactId>dubbo</artifactId>
			<!--<version>2.5.3</version>-->    <!--使用properties中配置的版本號-->
			<version>${dubbo.version}</version>
			<exclusions>
				<exclusion>
					<groupId>org.springframework</groupId>
					<artifactId>spring</artifactId>
				</exclusion>
			</exclusions>
		</dependency>

		<dependency>
			<groupId>com.101tec</groupId>
			<artifactId>zkclient</artifactId>
			<!--<version>0.10</version>-->    <!--使用properties中配置的版本號-->
			<version>${zkclient.version}</version>
		</dependency>
	</dependencies>
	</dependencyManagement>

	<build>
		<plugins>
			<plugin>
				<groupId>org.springframework.boot</groupId>
				<artifactId>spring-boot-maven-plugin</artifactId>
			</plugin>
		</plugins>
	</build>


</project>
其中一個子pom檔案
<?xml version="1.0" encoding="UTF-8"?>
<project xmlns="http://maven.apache.org/POM/4.0.0" xmlns:xsi="http://www.w3.org/2001/XMLSchema-instance"
	xsi:schemaLocation="http://maven.apache.org/POM/4.0.0 http://maven.apache.org/xsd/maven-4.0.0.xsd">
	<modelVersion>4.0.0</modelVersion>

	<groupId>com.smartisan</groupId>
	<artifactId>malleurekacenter</artifactId>
	<version>0.0.1-SNAPSHOT</version>
	<packaging>jar</packaging>

	<name>Mall_EurekaCenter</name>
	<description>Demo project for Spring Boot</description>

	<!-- 把原有的parent的資訊註釋掉,繼承我們的父工程-->
	<!--其他的子模組只需要把下面這個<parent>標籤當中的值更改為一樣的就可以了-->
	<parent>
		<!--<groupId>org.springframework.boot</groupId>
		<artifactId>spring-boot-starter-parent</artifactId>
		<version>2.0.3.RELEASE</version>
		<relativePath/>--> <!-- lookup parent from repository -->
		<groupId>com.smartisan</groupId>
		<artifactId>RediaMallCloud</artifactId>
		<version>0.0.1-SNAPSHOT</version>
	</parent>

	<properties>
		<project.build.sourceEncoding>UTF-8</project.build.sourceEncoding>
		<project.reporting.outputEncoding>UTF-8</project.reporting.outputEncoding>
		<java.version>1.8</java.version>
	</properties>

	<dependencies>
		<dependency>
			<groupId>org.springframework.boot</groupId>
			<artifactId>spring-boot-starter-web</artifactId>
		</dependency>
		<dependency>
			<groupId>org.springframework.boot</groupId>
			<artifactId>spring-boot-starter-test</artifactId>
			<scope>test</scope>
		</dependency>
		<!--新增後續dubbo專案中所需依賴,dubbo、zk。
       父模組pom中使用dependencyManagement來管理依賴版本號,子模組pom中不需要再寫版本號,exclusion也不需要-->
		<dependency>
			<groupId>com.alibaba</groupId>
			<artifactId>dubbo</artifactId>
			<!--<version>2.5.3</version>-->
			<!--<exclusions>-->
			<!--<exclusion>-->
			<!--<groupId>org.springframework</groupId>-->
			<!--<artifactId>spring</artifactId>-->
			<!--</exclusion>-->
			<!--</exclusions>-->
		</dependency>

		<dependency>
			<groupId>com.101tec</groupId>
			<artifactId>zkclient</artifactId>
			<!--<version>0.10</version>-->
		</dependency>

	</dependencies>

	<build>
		<plugins>
			<plugin>
				<groupId>org.springframework.boot</groupId>
				<artifactId>spring-boot-maven-plugin</artifactId>
			</plugin>
		</plugins>
	</build>


</project>
一步一步的走到最後面,我們已經建好了一個springboot的多模組的專案,希望看到的人都可以輕鬆的構建出來一個SpringBoot多模組出來,假如有問題的歡迎留下郵箱索要程式碼,有問題也希望大家能夠共同探討,一起進步。