cloudgo-io——基於iris框架的web小應用
web小應用之cloudgo-io
1、概述
1.1 功能
這是一個簡單的web小應用,有以下幾個功能:
- 支援靜態檔案服務
- 支援簡單的js訪問
- 提交表單,並輸出一個表格
- 對/unknow給出開發中的提示,返回碼501
1.2 執行
- 轉到main.go所在目錄,執行以下命令
go run main.go # 不指定埠預設8080

or

go run main.go -p 9090 # 指定監聽9090埠

or

go install && cloudgo-io [-p ...] # 先安裝之後可以直接使用cloudgo-io或cloudgo-io -p ...命令啟動
- 在瀏覽器位址列輸入
# 登入介面
http://localhost:yourport/login

# 靜態資原始檔服務
http://localhost:yourport/public

# 未開發
http://localhost:yourport/unknown
1.3 效果
- 主介面(背景來自我的github page)

- 支援靜態檔案服務


- 支援簡單的js訪問(可跳轉到靜態資源介面)


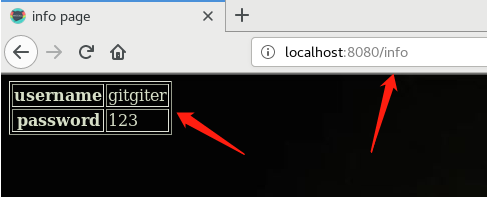
- 提交表單,並輸出一個表格


- 對/unknow給出開發中的提示,返回碼501

2、挑選框架
綜合比較了最常見的六種框架後,我選擇了iris,畢竟年份最新、功能最全、速度最快。
這是2017年的統計資料。雖然star數暫時沒有beego那麼多,但是iris比beego慢了四年誕生,發展得很快。
當然我選擇iris最大的原因,還是因為下圖,功能這麼全,早進坑早享受。不過現在iris網上的教程比較稀缺,多數需要先跟著官方example一步一步摸索。
關於速度,見iris最新官方資料。

3、檔案結構
沒有硬性規定,但是最好把負責不同模組或功能的檔案分到不同的資料夾,便於維護。我的檔案結構如下:
cloudgo-io/
    configs/
        main.tml
    static/
        css/
        js/
        img/
    services/
        GetPages.go
        ServicesManager.go
    templates/
        login.html
        info.html
- configs中的main.tml檔案可交由伺服器管理員配置伺服器後臺。雖然也可以放在程式碼中配置,但是這樣比較方便,不用每次都重新編譯程式碼。
- static存放靜態檔案。
- services存放伺服器提供服務的一系列程式碼,最後可以為這一系列服務安排一個manger統一管理,也方便統一呼叫。
- templates存放網頁的模板,在模板中需要留一些待注入的標記,有了這些預設的標記便可以在程式碼中找到對應的標記進行填充,比直接找element方便許多。
<table border="1">
    <tr>
        <th>username</th>
        <td>{{.username}}</td>
    </tr>
    <tr>
        <th>password</th>
        <td>{{.password}}</td>
    </tr>
</table>
以下介紹一些我的一些關於iris的探索成果和使用心得
4、iris的簡單使用
4.1 獲取iris
go get -u github.com/kataras/iris
4.2 使用的套路
- 最簡單版(官方例子)
package main

import "github.com/kataras/iris"

func main() {
    app := iris.Default()
    app.Get("/ping", func(ctx iris.Context) {
        ctx.JSON(iris.Map{
            "message": "pong",
        })
    })
    // listen and serve on http://0.0.0.0:8080.
    app.Run(iris.Addr(":8080"))
}
- 一般步驟:
- 1.先獲取到iris的app。可以通過iris.New方式獲取後自己配置一些引數,也可以通過iris.Default直接獲取它的一個預設的app,app的型別是iris.Application。
- 2.可選步驟(如下面我的main.go)
- 2.1 允許使用者自己設定監聽的埠——如使用pflag實現使用者指定埠。
- 2.2 設定日誌等級。預設為info等級,debug等級會輸出更多的資訊,方便除錯。
- 2.3 啟動你提供的服務。
- 2.4 其他
- 3.app.Run執行app(順便進行伺服器配置,推薦)
package main

import (
	"os"

	"github.com/gitgiter/ServiceComputing/cloudgo-io/services"

	"github.com/kataras/iris"
	"github.com/spf13/pflag"
)

const (
	// PORT 8080 (default)
	PORT string = "8080"
)

func main() {

	// get and set server listening port

	port := os.Getenv("PORT")
	if len(port) == 0 {
		port = PORT
	}

	pPort := pflag.StringP("port", "p", PORT, "http listening port")
	pflag.Parse()
	if len(*pPort) != 0 {
		port = *pPort
	}

	// get iris http server app
	app := iris.Default()

	// set logger level
	app.Logger().SetLevel("debug")

	services.StartServices(app)

	// listen and serve on http://localhost:port

	// configuring by file is more convenient
	app.Run(iris.Addr(":"+port), iris.WithConfiguration(iris.TOML("./configs/main.tml")))
}
4.3 配置
伺服器配置有三種方式:
- 第一種是直接在app.Run的時候顯式配置
app.Run(iris.Addr(":8080"), iris.WithConfiguration(iris.Configuration{
	DisableInterruptHandler:           false,
	DisablePathCorrection:             false,
	EnablePathEscape:                  false,
	FireMethodNotAllowed:              false,
	DisableBodyConsumptionOnUnmarshal: false,
	DisableAutoFireStatusCode:         false,
	TimeFormat:                        "Mon, 02 Jan 2006 15:04:05 GMT",
	Charset:                           "UTF-8",
}))
- 第二種比較推薦,便是通過配置檔案的形式,這樣便可以在修改配置的時候不需要重新編譯。如configs目錄下的main.tml是我當前的配置,讀取配置的方法就是4.2中的例子。
DisablePathCorrection = false
EnablePathEscape = false
FireMethodNotAllowed = true
DisableBodyConsumptionOnUnmarshal = false
TimeFormat = "Mon, 01 Jan 2006 15:04:05 GMT"
Charset = "UTF-8"
MyServerName = "gitgiter's iris"
- 第三種則是直接在app.Run前呼叫app.Configure方法進行設定,這種比較不推薦,效果和第一種差不多而且可讀性還沒有第一種好。
5、使用iris實現上述四種服務
5.1 靜態檔案服務
第一個引數是一個虛擬路徑,第二個引數才是真正的系統路徑。
// load static files
// first parameter is the href request url, second is the real system path
app.StaticWeb("/public", "./static")
虛擬路徑是給使用者訪問用的,如此時如果使用者要訪問我的靜態檔案目錄,只需要在瀏覽器輸入類似 ip:port/public/css/main.css 即可訪問我的靜態檔案。可以避免系統路徑改變導致使用者的訪問路徑也要改變的麻煩。
為了進一步避免這種麻煩,可以在 /public 下所有的跳轉連結,避免使用者需要記住具體的靜態檔案路徑。Context的HTML方法可以直接向頁面寫入html,這種適合寫少量HTML的時候使用,要寫大量HTML的最好的做法還是通過檔案,否則會影響程式碼可讀性且增大耦合性。
app.Get("/public", func(ctx iris.Context) {
    ctx.HTML(`<a href='/public/css/main.css'>/public/css/main.css</a><br/><br/>
        <a href='/public/img/bg.jpg'>/public/img/bg.jpg</a><br/><br/>
        <a href='/public/img/favicon.ico'>/public/img/favicon.ico</a><br/><br/>
        <a href='/public/js/showStatic.js'>/public/js/showStatic.js</a>`)
})
5.2 js請求
這裡只寫了一個很簡單的js請求作為示例,比如點選登入介面中的Response按鈕可以觸發js的頁面跳轉事件。
js檔案:
function myfunction()
{
    window.open("/public")
}
設定按鈕點選事件:
js test: <input type="button" onclick="myfunction()" value="response">
處理請求,就是5.1寫的那個。app.Get可以用來處理Get方式的請求,第一個引數為請求的url,第二個引數可以用一個函式指定請求的處理方式。
app.Get("/public", func(ctx iris.Context) {
    ...
})
5.3 表單提交,填充模板
- 表單——form。表單提交一般採用POST模式,尤其是帶有敏感資訊的表單,這樣表單的引數不會顯示在url中。action用來指定表單提交後的動作,這裡是跳轉到/info頁面。
<form method="POST" action="/info">
    username: <input type="text" name="Username"><br/><br/>
    password: <input type="password" name="Password"><br/><br/>
    <input type="submit" value="login"><br/><br/>
    js test: <input type="button" onclick="myfunction()" value="response">
</form>
- 通過檔案設定HTML檢視時需要提前註冊檢視才可以載入檢視。第一個引數指定你要載入的檢視檔案所在的資料夾,第二個引數指定要載入的檔案字尾是html。Reload設定為true可以避免每次改動模板時需要重啟app,對開發者比較友好,對使用者來說沒太大區別。
// register views from ./templates folder
app.RegisterView(iris.HTML("./templates", ".html").Reload(true))
- ReadForm讀取POST過來的表單,並繫結模板對檢視進行填充。注意讀取表單時要先定義一個結構體,這個結構體的每個欄位名稱需要和表單一致,且首字母必須大寫,表示exported。ViewData填充資料使用鍵值對即可,key就是info.html裡面定義的模板,value就是要替換的值。View載入指定檔案的檢視。
type User struct {
	Username string
	Password string
}

// GetInfoPage load html and static web
func GetInfoPage(app *iris.Application) {

	app.Post("/info", func(ctx iris.Context) {
		// get the form data
		form := User{}
		err := ctx.ReadForm(&form)
		if err != nil {
			ctx.StatusCode(iris.StatusInternalServerError)
			ctx.WriteString(err.Error())
		}

		// bind data by passing key-value pair
		username := form.Username
		password := form.Password
		ctx.ViewData("username", username)
		ctx.ViewData("password", password)
		ctx.View("info.html")
	})
}
5.4 /unknown報錯
這個和前面的網頁請求同理,不過需要通過app.StatusCode設定一個返回碼以讓使用者知道是什麼原因導致的頁面無效,預設是返回200即正常訪問。
// NotImplement returns 501 error to client
func NotImplement(app *iris.Application) {

	app.Get("/unknown", func(ctx iris.Context) {
		ctx.StatusCode(501)
		ctx.JSON(iris.Map{
			"error": "501 not implement error",
		})
	})
}


