
TPS相機及相機遮擋的一些處理方法
提要
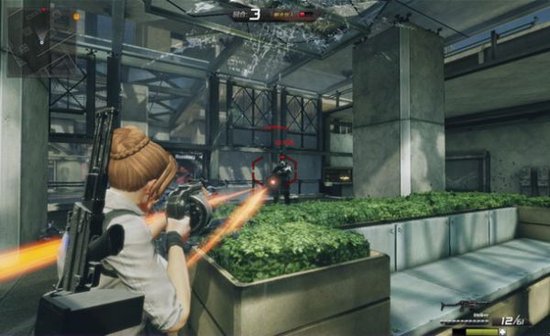
第三人稱相機有非常多種,今天要實現的一個第三人稱射擊遊戲的相機。
如果對相機控制不是很瞭解,建議看一下上一篇博文 FPS相機。
控制思路
滑鼠控制yaw和pitch,新增一個distance變數來記錄角色和相機之間的距離。通過yaw和pitch來得到相機的position。
最後新增一個向右的位移和向上的位移量,將角色放在螢幕偏左邊的位置。
transform.localEulerAngles = new Vector3(-rotationY, rotationX, 0);

characterModel.transform.forward = new Vector3(transform.forward.x, characterModel.transform.forward.y, transform.forward.z);
target.forward = new Vector3(transform.forward.x, 0, transform.forward.z);

float yaw = rotationX;
float pitch = rotationY;
float yawRed = Mathf.Deg2Rad * (yaw - 90f);
float pitchRed = Mathf.Deg2Rad * pitch;
Vector3 direction = new Vector3(-Mathf.Cos(yawRed) * Mathf.Cos(pitchRed), -Mathf.Sin(pitchRed), Mathf.Sin(yawRed) * Mathf.Cos(pitchRed));

transform.position = target.transform.position + distance * direction;
transform.position += transform.right + transform.up;
在這裡,相機只控制了model的rotation。
direction是通過yaw和pitch計算出的角色到相機的Ray的方向。
一些問題的處理
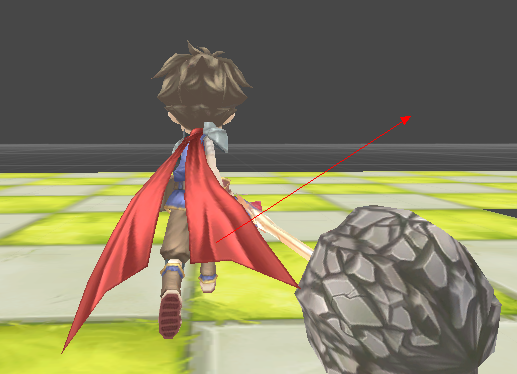
角色往斜方向跑的動畫處理
通常在TPS遊戲中,角色的背面是始終對著攝像機的。當玩家希望角色往斜方向走的時候,不能直接播放角色往前走的動畫,這時候就需要給角色Model一個額外的角度偏移量,這個偏移量由玩家的輸入決定。
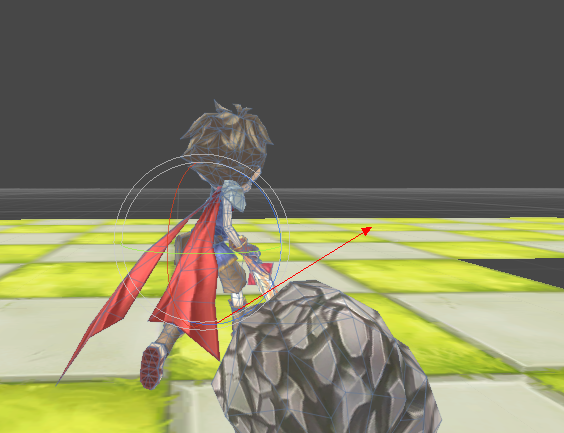
程式碼如下
	characterModel.transform.forward = new Vector3(transform.forward.x, characterModel.transform.forward.y, transform.forward.z);
				if (characterModel.transform.parent.GetComponent<Character>().characterFPAnimation.extraRotation == 0)
				{
					extraRot = Mathf.Lerp(extraRot, 0f, 10 * Time.deltaTime);
				}else
				{
					extraRot = Mathf.Lerp(extraRot, characterModel.transform.parent.GetComponent<Character>().characterFPAnimation.extraRotation, 10 * Time.deltaTime);
				}
				Quaternion targetRotation = characterModel.transform.rotation * Quaternion.AngleAxis(extraRot, Vector3.up);

				characterModel.transform.rotation = targetRotation;
添加了Lerp,讓轉身更加順滑。
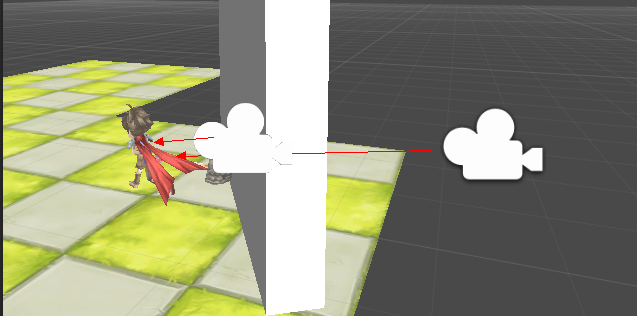
牆體遮擋
環境遮擋是第三人稱攝像機一個經常遇到問題,下面是幾個常見的方法。
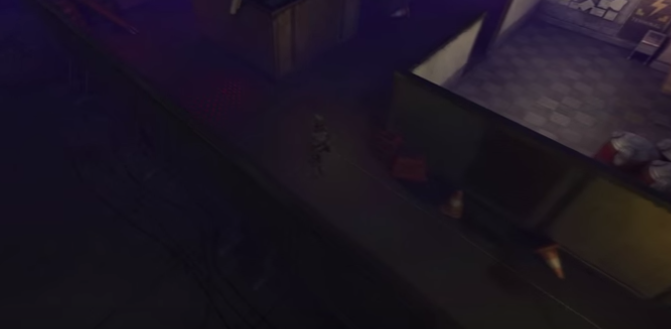
解法一 射線檢測,將相機移動到不被遮擋的位置。
在Unity官網的一個Tutorial裡面,處理的方法是將相機慢慢上移,直到看到角色(遊戲的場景是沒有天花板的)
 bool ViewingPosCheck (Vector3 checkPos)
    {
        RaycastHit hit;

        // If a raycast from the check position to the player hits something...
        if(Physics.Raycast(checkPos, player.position - checkPos, out hit, relCameraPosMag))
            // ... if it is not the player...
            if(hit.transform != player)
                // This position isn't appropriate.
                return false;

        // If we haven't hit anything or we've hit the player, this is an appropriate position.
        newPos = checkPos;
        return true;
    }


    void SmoothLookAt ()
    {
        // Create a vector from the camera towards the player.
        Vector3 relPlayerPosition = player.position - transform.position;

        // Create a rotation based on the relative position of the player being the forward vector.
        Quaternion lookAtRotation = Quaternion.LookRotation(relPlayerPosition, Vector3.up);

        // Lerp the camera's rotation between it's current rotation and the rotation that looks at the player.
        transform.rotation = Quaternion.Lerp(transform.rotation, lookAtRotation, smooth * Time.deltaTime);
    }
在Update裡面的處理是這樣的
  void FixedUpdate ()
    {
        // The standard position of the camera is the relative position of the camera from the player.
        Vector3 standardPos = player.position + relCameraPos;

        // The abovePos is directly above the player at the same distance as the standard position.
        Vector3 abovePos = player.position + Vector3.up * relCameraPosMag;

        // An array of 5 points to check if the camera can see the player.
        Vector3[] checkPoints = new Vector3[5];

        // The first is the standard position of the camera.
        checkPoints[0] = standardPos;

        // The next three are 25%, 50% and 75% of the distance between the standard position and abovePos.
        checkPoints[1] = Vector3.Lerp(standardPos, abovePos, 0.25f);
        checkPoints[2] = Vector3.Lerp(standardPos, abovePos, 0.5f);
        checkPoints[3] = Vector3.Lerp(standardPos, abovePos, 0.75f);

        // The last is the abovePos.
        checkPoints[4] = abovePos;

        // Run through the check points...
        for(int i = 0; i < checkPoints.Length; i++)
        {
            // ... if the camera can see the player...
            if(ViewingPosCheck(checkPoints[i]))
                // ... break from the loop.
                break;
        }

        // Lerp the camera's position between it's current position and it's new position.
        transform.position = Vector3.Lerp(transform.position, newPos, smooth * Time.deltaTime);

        // Make sure the camera is looking at the player.
        SmoothLookAt();
    }
從角色的腳到頭,分四個地方都進行了射線檢測,最後的結果是這樣的

類似的還可以將相機拉到被遮擋的牆前面。
檢測的程式碼如下
void ShelterTest()
	{
		RaycastResult result = new RaycastResult();
		float characterHeight = GameManager.GetInstance().character.height * 0.4f;
		Vector3 targetHeadPos = new Vector3(target.position.x, target.position.y + characterHeight, target.position.z);

		 Ray[] testRays = new Ray[5];
		 testRays[0] = new Ray(targetHeadPos, transform.position + 0.8f * transform.right + 0.5f * transform.up - targetHeadPos);
		 testRays[1] = new Ray(targetHeadPos, transform.position + 0.8f * transform.right - 0.5f * transform.up - targetHeadPos);
		 testRays[2] = new Ray(targetHeadPos, transform.position - 0.8f * transform.right + 0.5f * transform.up - targetHeadPos);
		 testRays[3] = new Ray(targetHeadPos, transform.position - 0.8f * transform.right - 0.5f * transform.up - targetHeadPos);

		 testRays[4] = new Ray(transform.position, transform.position - targetHeadPos);

		float castDist = (transform.position - targetHeadPos).magnitude;
		float[] dists = new float[5];
		for (int i = 0; i < 5; i++)
		{
			if (RaycastHelper.RaycastAll(testRays[i], castDist, true, GameManager.GetInstance().character.floorMask, out result))
			{
				Debug.DrawLine(targetHeadPos, result.point, Color.red);
				dists[i] = Vector3.Distance(result.point, targetHeadPos);
			}else
			{
				Debug.DrawLine(targetHeadPos, targetHeadPos + castDist * testRays[i].direction, Color.blue);
				dists[i] = castDist;
			}
		}

		float minDist0 = Mathf.Min(dists[0], dists[1]);
		float minDist1 = Mathf.Min(dists[2], dists[3]);
		float minDist2 = Mathf.Min(minDist0, minDist1);
		float minDist = Mathf.Min(minDist2, dists[4]);

		transform.position = targetHeadPos + minDist * testRays[4].direction.normalized;

	}
用了5根射線來檢測,為了避免fov穿牆的問題。注意是從角色射向攝像機。
解法二 半透明掉中間遮擋的物體

用raycast進行檢測,然後動態替換掉材質就可以了。
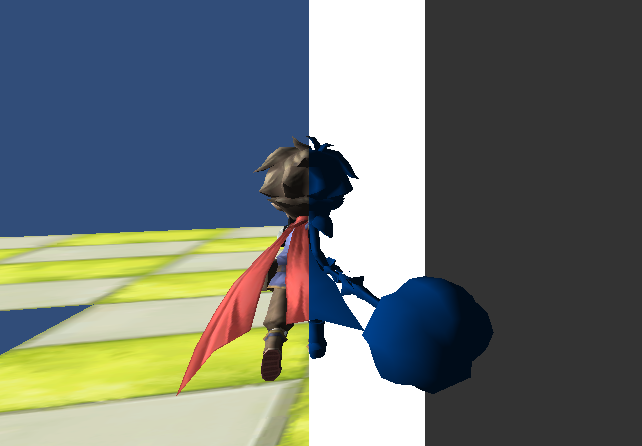
解法三 利用Stencil對角色進行重繪
對Stencil Buffer 不瞭解的請參考這一篇 : Stencil buffer
通過Ztest將角色被遮擋部分的Stencial標記出來,然後就可以對這部分的畫素進行處理。要麼用一種單色繪製出來,要麼繪製成透明,要麼繪製一個發光的描邊,都可以。
簡單的效果如下:
這裡分三個pass處理,第一遍繪製利用ZTest寫Stencil
Shader "Custom/Player" {

	Properties {
		_MaskValue("Mask Value", int) = 2
		_MainTex ("Base (RGB)", 2D) = "white" {}
	}

	SubShader {
	Tags { "RenderType"="Opaque" }
	LOD 200

	Stencil {
		Ref [_MaskValue]
		Comp always
		Pass replace
		ZFail keep
    }


		CGPROGRAM
		#pragma surface surf Lambert

		sampler2D _MainTex;

		struct Input {
			float2 uv_MainTex;
		};

		void surf (Input IN, inout SurfaceOutput o) {
			half4 c = tex2D (_MainTex, IN.uv_MainTex);
			o.Albedo = c.rgb;
			o.Alpha = c.a;
		}
		ENDCG
	}
	FallBack "Diffuse"
}
再加一個Shader來清掉ZTest
Shader "Custom/ClearZbuffer" {
	Properties {
		_MainTex ("Base (RGB) Gloss (A)", 2D) = "white" {}
	}
	SubShader {
		Tags { "RenderType"="Transparent"  "Queue"="Transparent+100"}
		LOD 80
		ColorMask 0
		ZTest Greater
		ZWrite On

		CGPROGRAM
		#pragma surface surf Lambert

		sampler2D _MainTex;

		struct Input {
			float2 uv_MainTex;
		};

		void surf (Input IN, inout SurfaceOutput o) {
			half4 c = tex2D (_MainTex, IN.uv_MainTex);
			o.Albedo = half4(1,0,0,1);
			o.Alpha = 0.3;
		}
		ENDCG
	}
	FallBack "Diffuse"
}
最後用一個Shader對被Stencil標記出來的畫素進行處理
Shader "Custom/StencilTransparent" {
	Properties {
	    _MaskValue("Mask Value", int) = 2
		_MainTex ("Base (RGB)", 2D) = "white" {}
		_TransVal ("Transparency Value", Range(0,1)) = 1.0
		_ColorAdd ("Color (Add, RGB)", Color) = (0.5,0,0)
	}
	SubShader {
		Tags { "RenderType"="Opaque" "Queue"="Transparent+100"}
		LOD 80

		Stencil {
		Ref [_MaskValue]
		Comp notequal
		Pass keep
		}

		ZTest LEqual
		ZWrite On
		Blend SrcAlpha OneMinusSrcAlpha
		BlendOp Add

		CGPROGRAM
		#pragma surface surf Lambert

		sampler2D _MainTex;
		fixed _TransVal;
		half4 _ColorAdd;

		struct Input {
			float2 uv_MainTex;
		};

		void surf (Input IN, inout SurfaceOutput o) {
			half4 c = tex2D (_MainTex, IN.uv_MainTex);
			//o.Albedo = c.rgb * half4(1,0,0,1);
			//o.Alpha = 1;
			o.Albedo = c.rgb * _ColorAdd;
			o.Alpha = _TransVal;
		}
		ENDCG
	}
	FallBack "Diffuse"
}
參考
Real-Time Cameras:A Guide for Game Designers and Developers
Unity tutorial stealth - http://unity3d.com/learn/tutorials/projects/stealth-tutorial-4x-only