
iOS 微信第三方登入的簡單實現
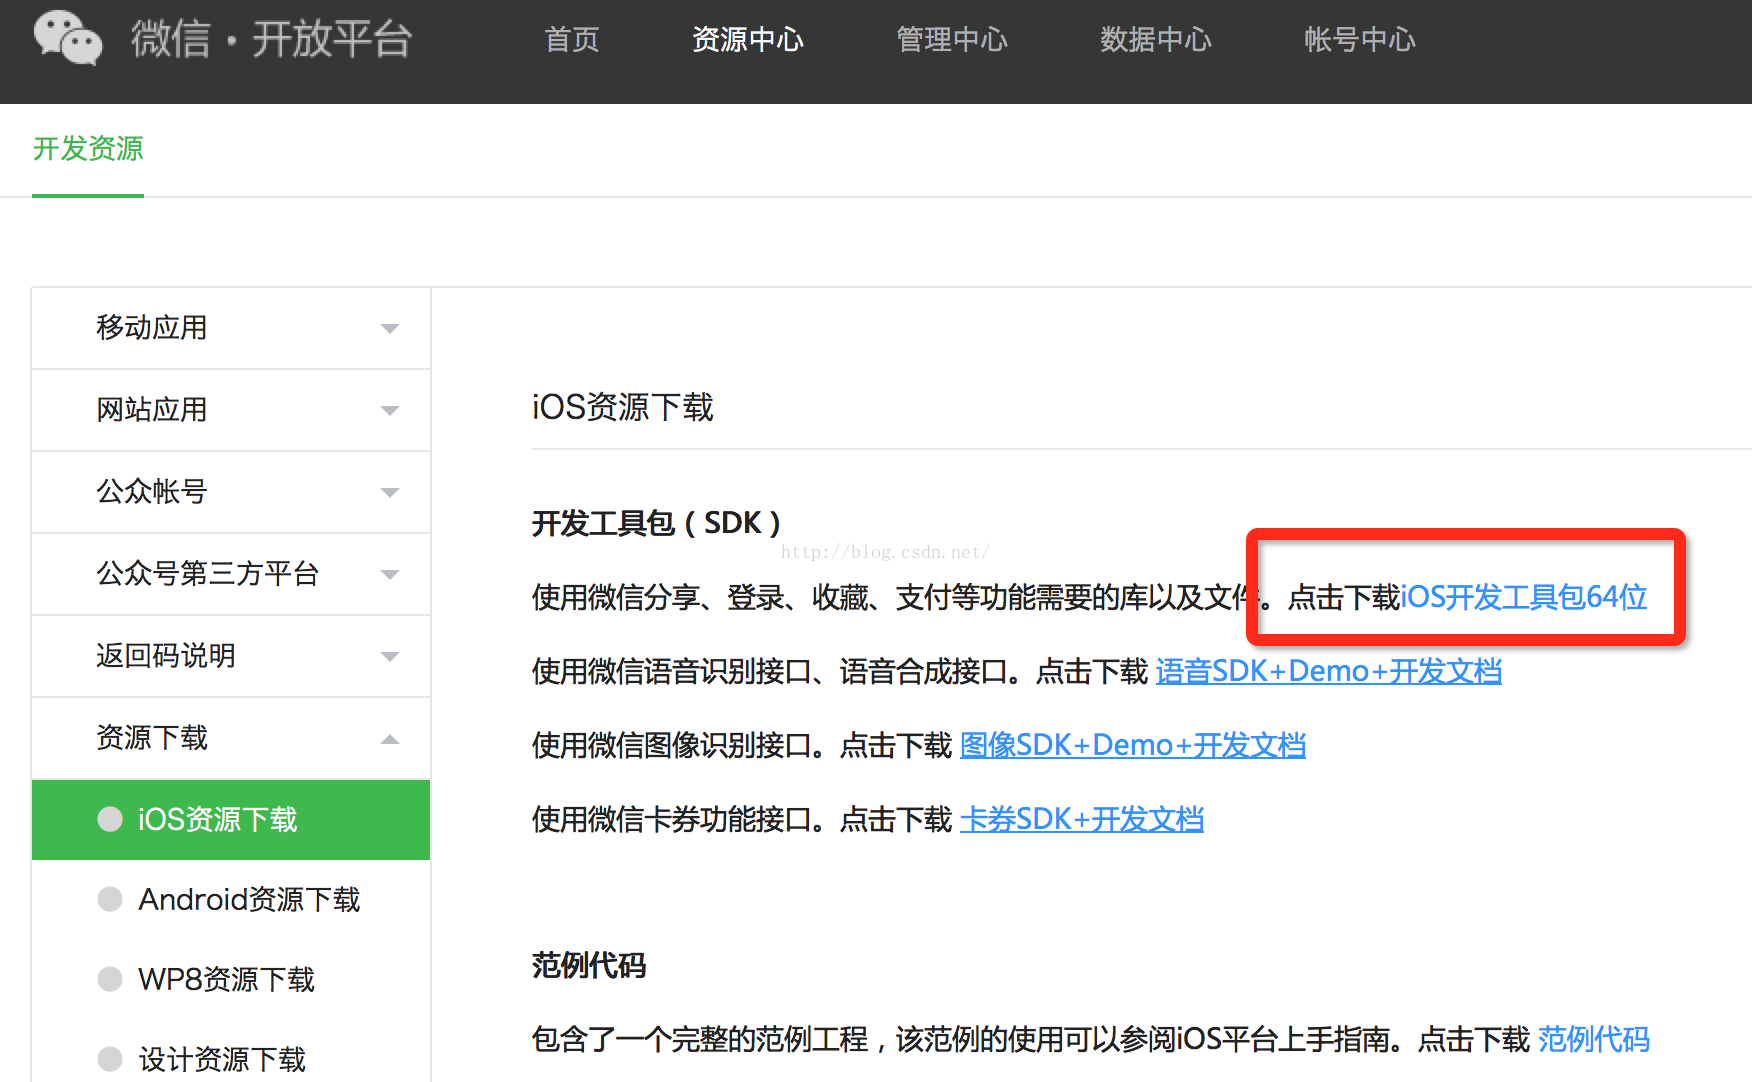
一、下載微信SDK
微信開放平臺 https://open.weixin.qq.com
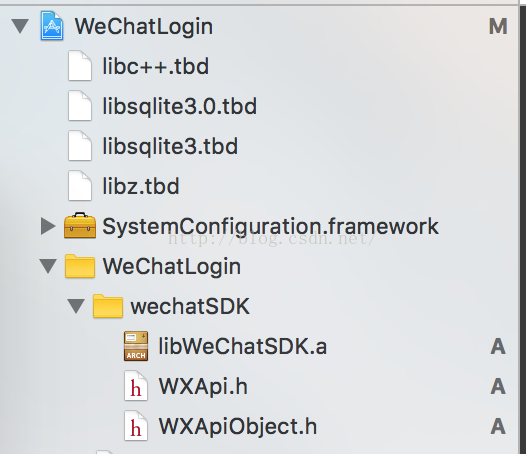
二、匯入SDK
匯入SDK,並新增依賴庫
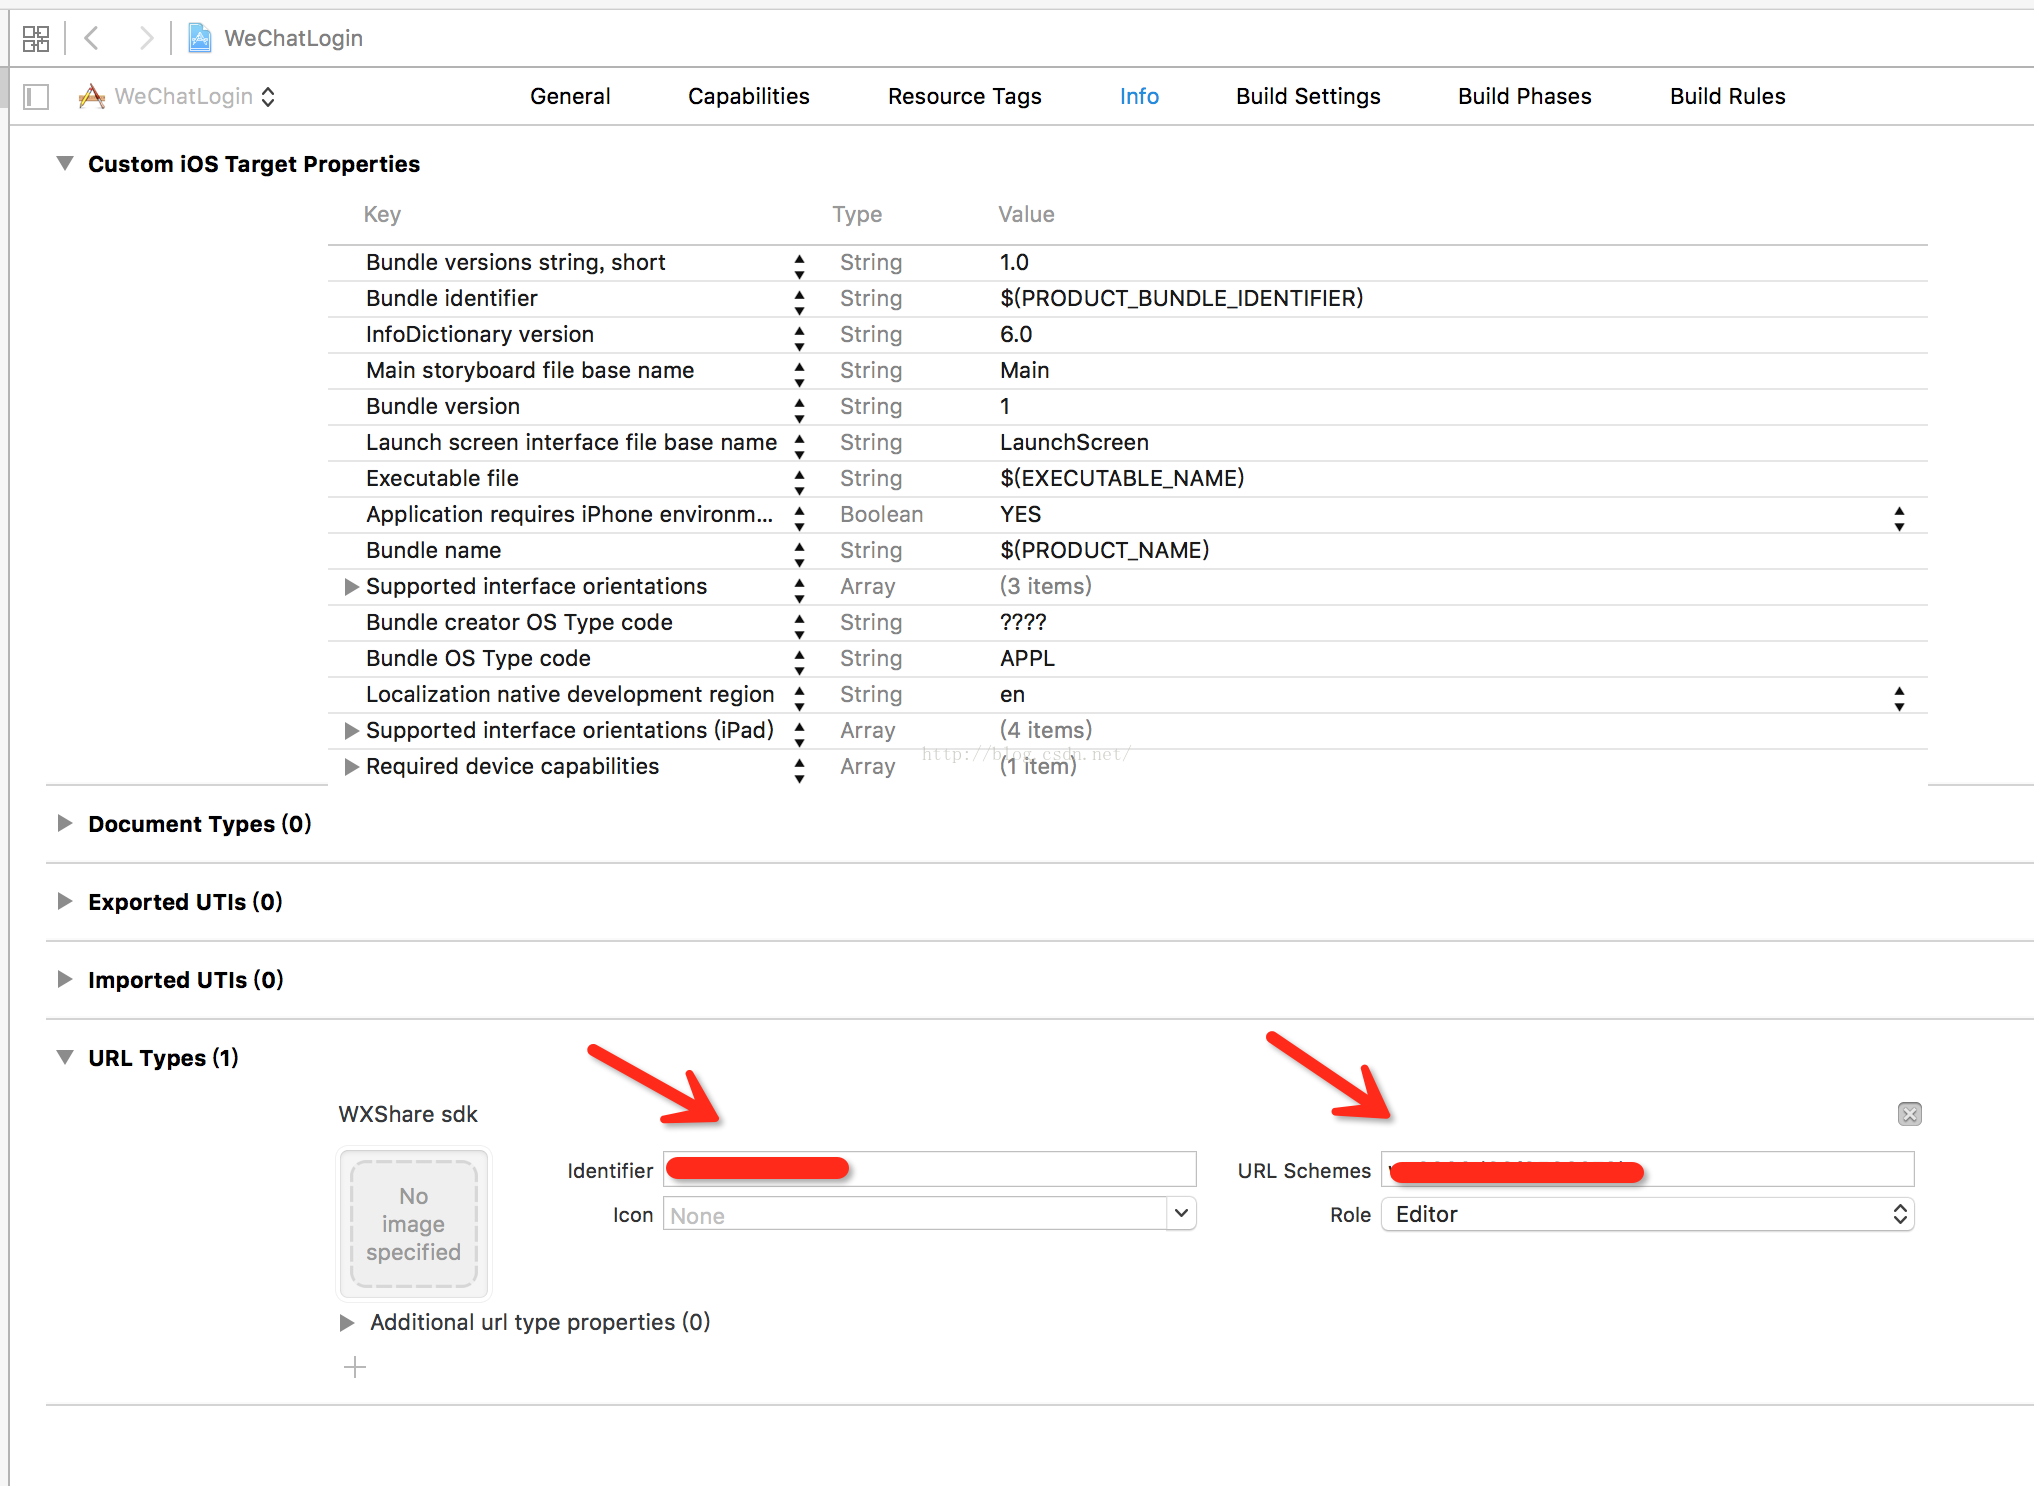
三、配置URL scheme
在Xcode中,選擇你的工程設定項,選中“TARGETS”一欄,在“info”標籤欄的“URL type“新增“URL scheme”為你所註冊的應用程式id(如下圖所示),此步為配置應用間的跳轉
四、開始編寫程式碼
1、在Appdelegate.h中引用微信檔案,宣告遵循代理。
#import <UIKit/UIKit.h>
#import "WXApi.h"

@interface AppDelegate : UIResponder <UIApplicationDelegate,WXApiDelegate>

@property (strong, nonatomic) UIWindow *window;

@end
2、註冊SDK
要使你的程式啟動後微信終端能響應你的程式,必須在程式碼中向微信終端註冊你的id。(在 AppDelegate 的 didFinishLaunchingWithOptions 函式中向微信註冊id)。
- (BOOL)application:(UIApplication *)application didFinishLaunchingWithOptions:(NSDictionary *)launchOptions {
    // Override point for customization after application launch.

    [WXApi registerApp:@"這裡填寫你的AppID"];

    return YES;
}
3、重寫AppDelegate的handleOpenURL和openURL方法
//和QQ,新浪並列回撥控制代碼
- (BOOL)application:(UIApplication *)application openURL:(NSURL *)url sourceApplication:(NSString *)sourceApplication annotation:(id)annotation
{
    return [WXApi handleOpenURL:url delegate:self];
}

- (BOOL)application:(UIApplication *)application handleOpenURL:(NSURL *)url
{
    return [WXApi handleOpenURL:url delegate:self];
}
4、呼叫微信API,呼叫微信登入
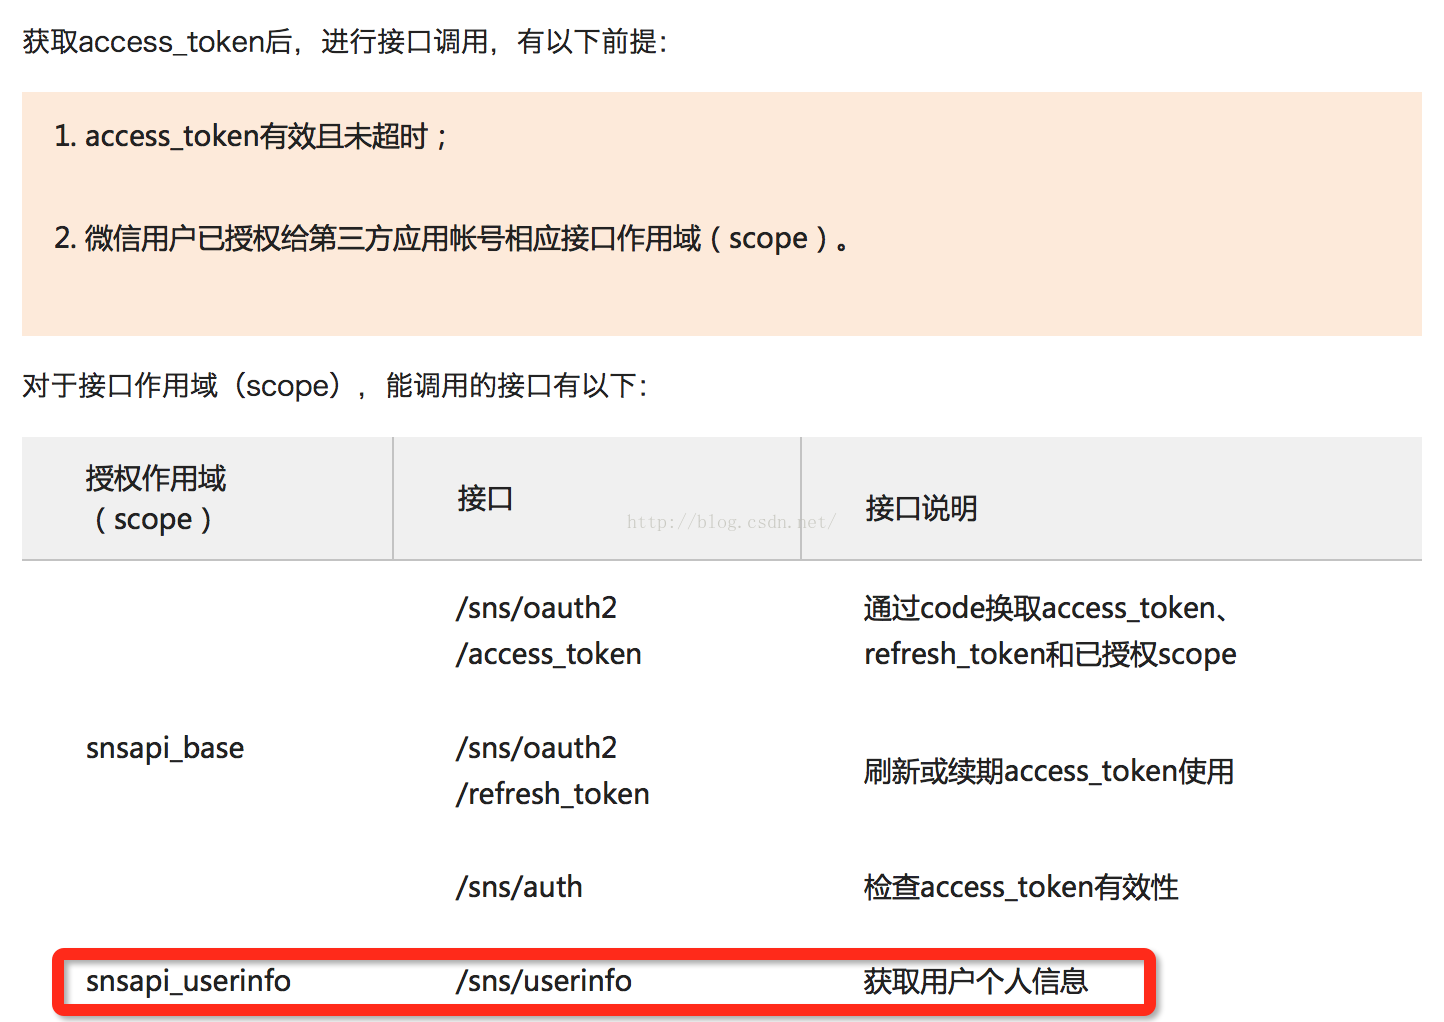
scope : 應用授權作用域,如獲取使用者個人資訊則填寫snsapi_userinfo
state :
用於保持請求和回撥的狀態,授權請求後原樣帶回給第三方。該引數可用於防止csrf攻擊(跨站請求偽造攻擊),建議第三方帶上該引數,可設定為簡單的隨機數加session進行校驗(非必填)
- (void)wechatLoginButtonPressed
{
    NSLog(@"%s",__func__);

    //構造SendAuthReq結構體
    SendAuthReq* req =[[SendAuthReq alloc] init];
    req.scope = @"snsapi_userinfo" ;
    req.state = @"123" ;
    //第三方向微信終端傳送一個SendAuthReq訊息結構
    [WXApi sendReq:req];
}
5、在Appdelegate中實現微信的代理,獲取微信返回的code,這裡我使用了通知的方法來呼叫登入controller中的相應才做,也可以使用代理、KVO等方式來實現。
//授權後回撥 WXApiDelegate
-(void)onResp:(BaseReq *)resp
{
    /*
     ErrCode ERR_OK = 0(使用者同意)
     ERR_AUTH_DENIED = -4(使用者拒絕授權)
     ERR_USER_CANCEL = -2(使用者取消)
     code    使用者換取access_token的code,僅在ErrCode為0時有效
     state   第三方程式傳送時用來標識其請求的唯一性的標誌,由第三方程式呼叫sendReq時傳入,由微信終端回傳,state字串長度不能超過1K
     lang    微信客戶端當前語言
     country 微信使用者當前國家資訊
     */

    if ([resp isKindOfClass:[SendAuthResp class]]) //判斷是否為授權請求,否則與微信支付等功能發生衝突
    {
        SendAuthResp *aresp = (SendAuthResp *)resp;
        if (aresp.errCode== 0)
        {
            NSLog(@"code %@",aresp.code);
            [[NSNotificationCenter defaultCenter] postNotificationName:@"wechatDidLoginNotification" object:self userInfo:@{@"code":aresp.code}];
        }
    }
}
相對應註冊通知方法:
    //跳轉到主介面
    [[NSNotificationCenter defaultCenter] addObserver:self selector:@selector(wechatDidLoginNotification:) name:@"wechatDidLoginNotification" object:nil];
記得在dealloc方法中移除通知,避免發生衝突:
- (void)dealloc
{
    [[NSNotificationCenter defaultCenter] removeObserver:self name:@"wechatDidLoginNotification" object:nil];
}
微信登入認證後獲取使用者的個人資訊比較麻煩,需要三個步驟:
(1)獲取微信登入code
(2)根據code獲取accessToken和openId
(3)根據accessToken和openId獲取使用者資訊
具體步驟:
剛剛我們已經在appdelegate中微信的代理中獲取到了code,下面直接來進行第二步,根據code獲取accessToken和openId:
參照微信開放平臺官方文件:
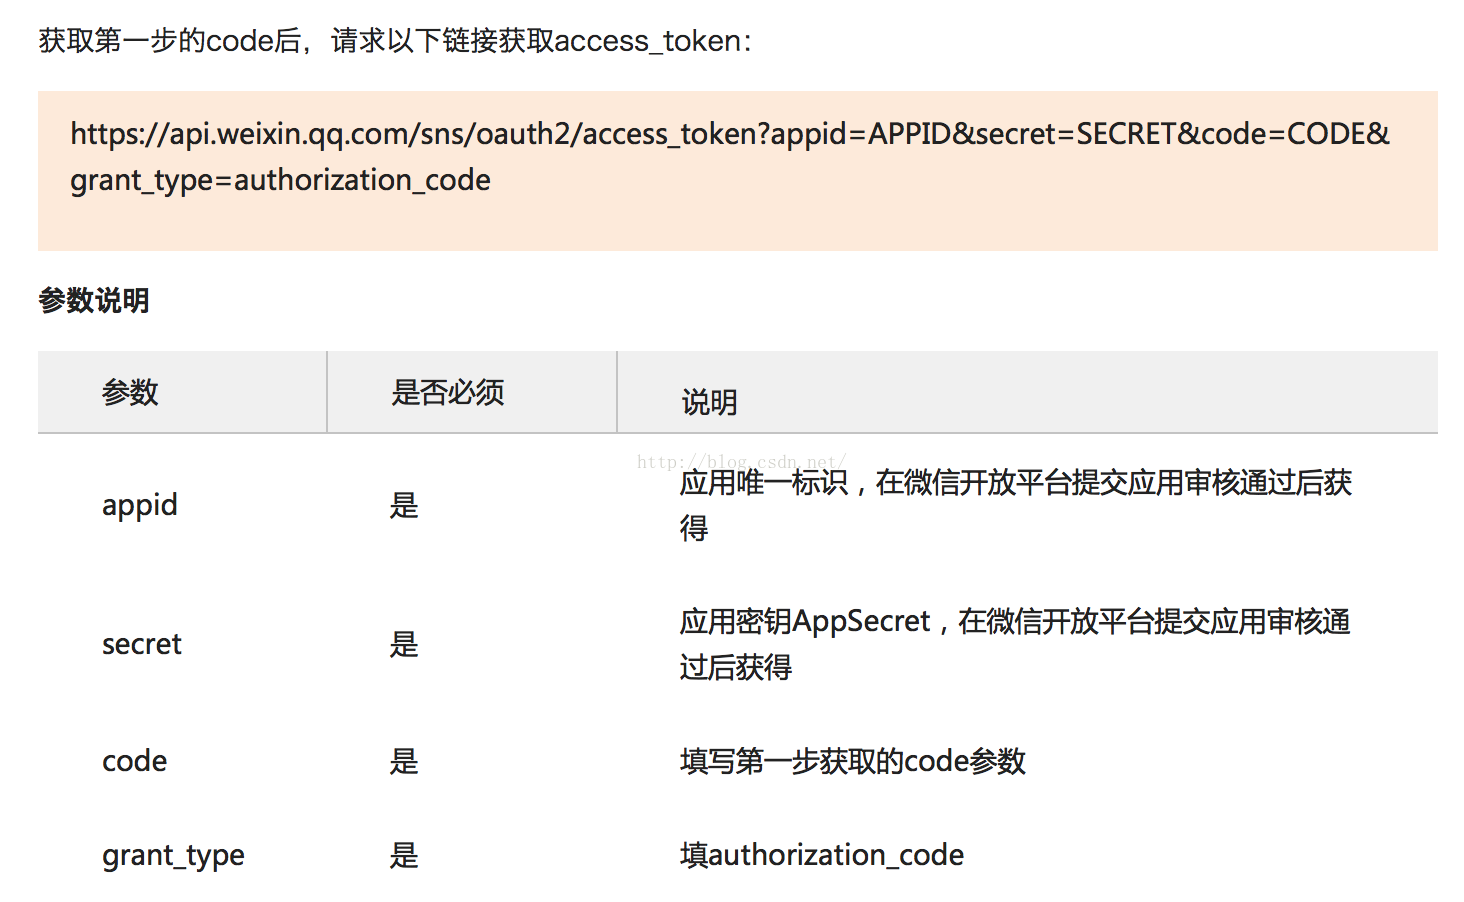
- (void)getWechatAccessTokenWithCode:(NSString *)code
{
    NSString *url =[NSString stringWithFormat:
      @"https://api.weixin.qq.com/sns/oauth2/access_token?appid=%@&secret=%@&code=%@&grant_type=authorization_code",
        WechatAppKey,WechatSecrectKey,code];

    dispatch_async(dispatch_get_global_queue(DISPATCH_QUEUE_PRIORITY_DEFAULT, 0), ^{
        NSURL *zoneUrl = [NSURL URLWithString:url];
        NSString *zoneStr = [NSString stringWithContentsOfURL:zoneUrl encoding:NSUTF8StringEncoding error:nil];
        NSData *data = [zoneStr dataUsingEncoding:NSUTF8StringEncoding];
        dispatch_async(dispatch_get_main_queue(), ^{

            if (data)
            {
                NSDictionary *dic = [NSJSONSerialization JSONObjectWithData:data
                                                                    options:NSJSONReadingMutableContainers error:nil];

                NSLog(@"%@",dic);
                NSString *accessToken = dic[@"access_token"];
                NSString *openId = dic[@"openid"];

                [self getWechatUserInfoWithAccessToken:accessToken openId:openId];
            }
        });
    });
}
現在已經獲取了微信的accessToken和openId,就可以請求相應的微信介面了。
參照文件,我們使用以下介面:
使用這個介面就可以獲取使用者資訊了,然後呼叫自己的方法進行登入,這裡可以使用openId當做賬號,他是每個微信使用者唯一對應的id
- (void)getWechatUserInfoWithAccessToken:(NSString *)accessToken openId:(NSString *)openId
{
    NSString *url =[NSString stringWithFormat:
                    @"https://api.weixin.qq.com/sns/userinfo?access_token=%@&openid=%@",accessToken,openId];

    dispatch_async(dispatch_get_global_queue(DISPATCH_QUEUE_PRIORITY_DEFAULT, 0), ^{
        NSURL *zoneUrl = [NSURL URLWithString:url];
        NSString *zoneStr = [NSString stringWithContentsOfURL:zoneUrl encoding:NSUTF8StringEncoding error:nil];
        NSData *data = [zoneStr dataUsingEncoding:NSUTF8StringEncoding];
        dispatch_async(dispatch_get_main_queue(), ^{

            if (data)
            {
                NSDictionary *dic = [NSJSONSerialization JSONObjectWithData:data
                                                                    options:NSJSONReadingMutableContainers error:nil];

                NSLog(@"%@",dic);

                NSString *openId = [dic objectForKey:@"openid"];
                NSString *memNickName = [dic objectForKey:@"nickname"];
                NSString *memSex = [dic objectForKey:@"sex"];

                [self loginWithOpenId:openId memNickName:memNickName memSex:memSex];
            }
        });

    });
}
至此,就實現了簡單的微信登入
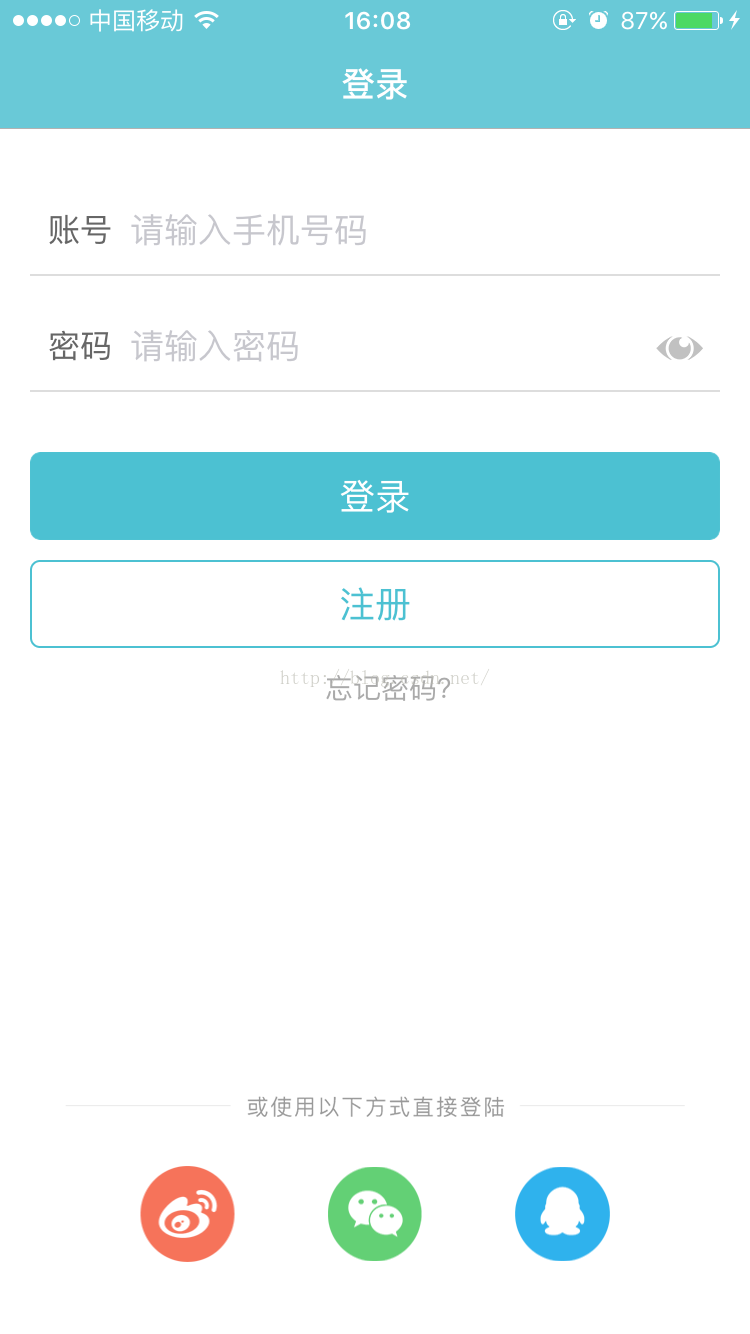
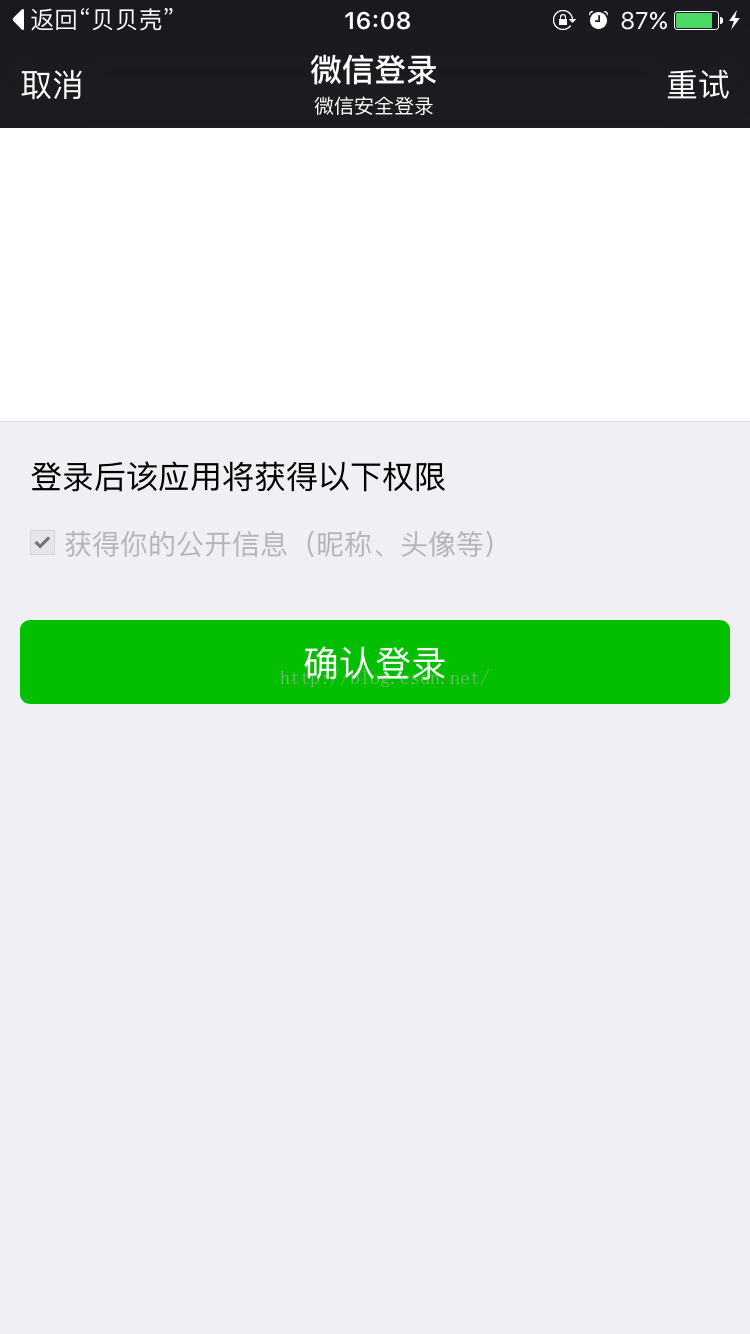
效果圖:
歡迎交流:[email protected]