
keepalived(雙主模式)+haproxy+mysql_slave
阿新 • • 發佈:2019-02-21
interval track -s pass nec 11.2 ini 地址 clean 環境說明:
debian系統
keepalived_master1 +haproxy  192.168.7.32
keepalived_master1 +haproxy  192.168.9.52
mysql_master  192.168.6.123
mysql_slave1  192.168.4.21
mysql_slave2  192.168.9.53
vip1:192.168.8.102
vip2:192.168.8.103
一 keepalvied配置
1 keepalived配置文件(master1):
! Configuration File for keepalived
global_defs {
  notification_email {
    root@localhost
    }

notification_email_from keepalived@localhost
smtp_server 127.0.0.1
smtp_connect_timeout 30
router_id HAproxy237
}

vrrp_script chk_haproxy {                                   #HAproxy 服務監控腳本
  script "/etc/keepalived/check_haproxy.sh"
  interval 2
  weight 2
}

vrrp_instance VI_1 {
  state MASTER
  interface eth0
  virtual_router_id 51
  priority 100
  advert_int 1
  authentication {
    auth_type PASS
    auth_pass 1111
}
  track_script {
    chk_haproxy
}
virtual_ipaddress {
    192.168.8.102
}
notify_master "/etc/keepalived/clean_arp.sh 192.168.8.102"
}
vrrp_instance VI_2 {
  state BACKUP
  interface eth0
  virtual_router_id 52
  priority 99
  advert_int 1
  authentication {
    auth_type PASS
    auth_pass 1111
}
virtual_ipaddress {
  192.168.8.103
}
notify_master "/etc/keepalived/clean_arp.sh 192.168.8.103"
}
master2:
! Configuration File for keepalived
global_defs {
  notification_email {
    root@localhost
    }

notification_email_from keepalived@localhost
smtp_server 127.0.0.1
smtp_connect_timeout 30
router_id HAproxy237
}

vrrp_script chk_haproxy {                                   #HAproxy 服務監控腳本
  script "/etc/keepalived/check_haproxy.sh"
  interval 2
  weight 2
}

vrrp_instance VI_1 {
  state BACKUP # 這個要跟另一臺主機相反
  interface eth0
  virtual_router_id 51
  priority 90 #
  advert_int 1
  authentication {
    auth_type PASS
    auth_pass 1111
}
  track_script {
    chk_haproxy
}
virtual_ipaddress {
    192.168.8.102
}
notify_master "/etc/keepalived/clean_arp.sh 192.168.8.102"
}
vrrp_instance VI_2 {
  state MASTER  # 這個也要跟另一臺主機的相反
  interface eth0
  virtual_router_id 52
  priority 100
  advert_int 1
  authentication {
    auth_type PASS
    auth_pass 1111
}
virtual_ipaddress {
  192.168.8.103
}
notify_master "/etc/keepalived/clean_arp.sh 192.168.8.103"
}
2 檢測haproxy的服務是否正常 (兩個keepalved上面都需要有這個腳本)
yx@keep-backup:/etc/keepalived$ cat check_haproxy.sh
#!/bin/bash
A=`ps -C haproxy --no-header | wc -l`
if [ $A -eq 0 ];then
sudo /etc/init.d/haproxy start
sleep 3
if [ `ps -C haproxy --no-header | wc -l ` -eq 0 ];then
sudo /etc/init.d/keepalived stop
fi
fi
3 設置更新虛擬服務器(VIP)地址的arp記錄到網關腳本(兩臺機器都要操作)
#!/bin/sh
VIP=$1
GATEWAY=192.168.11.254                                      #這個是本機的網卡的網關地址
/sbin/arping -I eth0 -c 5 -s $VIP $GATEWAY &>/dev/null
4 啟動keepalived服務
master1

master2
二 haproxy安裝和配置(見上一篇文章)
1 更改配置文件
2 設置啟動腳本
3 啟動
三 數據庫安裝
1 做好主從
2 在兩個從數據庫上面設置;
在slave1和slave2上分別給兩個haproxy機器授權:如果還是報錯,再嘗試給vip授權

grant all privileges on *.* to ‘yx1‘@‘192.168.7.%‘ identified by ‘123456‘;
grant all privileges on *.* to ‘yx1‘@‘192.168.9.%‘ identified by ‘123456‘;
> flush privileges;
>
四 測試keepalived+haproxy是否正常運行
1 瀏覽器訪問測試
分別用vip 102和103訪問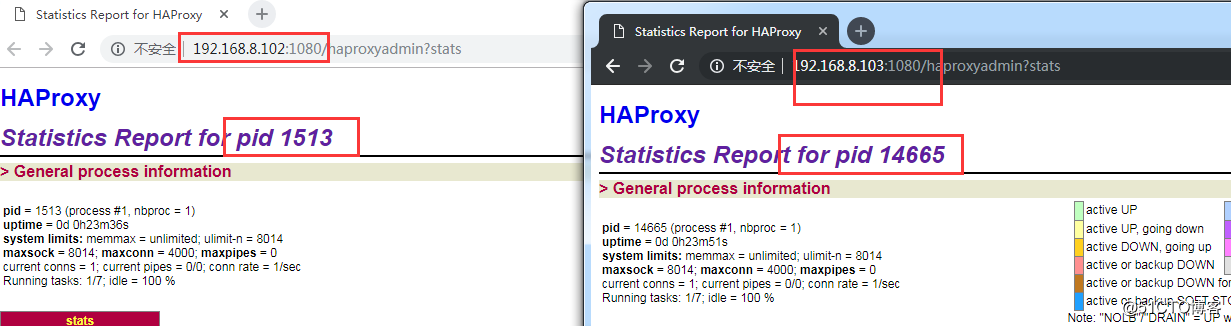
2 數據查詢測試,在客戶端上面用102和103分別去查詢從數據庫上面的東西
#用的8.102

yx@es-2:~$ mysql -h192.168.8.102 -P3306 -uyx1 -p123456 -e "use test;show tables;"
+----------------+
| Tables_in_test |
+----------------+
| tb1            |
+----------------+
yx@es-2:~$ mysql -h192.168.8.102 -P3306 -uyx1 -p123456 -e "use test;show tables;"
+----------------+
| Tables_in_test |
+----------------+
| tb1            |
| tb2            |
+----------------+

#用 8.103去測試
yx@es-2:~$ mysql -h192.168.8.103 -P3306 -uyx1 -p123456 -e "use test;show tables;"
+----------------+
| Tables_in_test |
+----------------+
| tb1            |
+----------------+
yx@es-2:~$ mysql -h192.168.8.103 -P3306 -uyx1 -p123456 -e "use test;show tables;"
+----------------+
| Tables_in_test |
+----------------+
| tb1            |
| tb2            |
+----------------+
3 停掉其中一臺keepalvied服務,再次進行上面的兩步測試,發現還是正常的,
4 停掉其中的haproxy服務,發現haproxy會立馬再啟動起來,前提是keepalived服務在運行,這是因為通過那個檢查腳本實現的

keepalived(雙主模式)+haproxy+mysql_slave