
0001 - Spring 框架和 Tomcat 容器擴展接口揭秘
前言
在 Spring 框架中,每個應用程序上下文(ApplicationContext)管理著一個 BeanFactory,BeanFactory 主要負責 Bean 定義的保存、Bean 的創建、Bean 之間依賴的自動註入等。應用程序上下文則是對 BeanFactory 和 Bean 的生命周期中的各個環節進行管理,並且提供擴展接口允許用戶對 BeanFactory 和 Bean 的各個階段進行定制,本文從以下三個點進行切入講解。
- refresh()是應用上下文刷新階段。
- getBean()是容器啟動後從 BeanFactory 獲取 Bean 過程。
- close()是銷毀應用程序上下文階段。
refresh 階段
應用程序上下文刷新操作最終調用的是 AbstractApplicationContext 的 refresh 方法,其核心執行步驟如下圖所示。

無論是解析 XML 作為 Bean 來源的 ClassPathXmlApplicationContext 還是基於掃描註解類作為 Bean 來源的 AnnotationConfigApplicationContext,在刷新上下文的過程中最終都會走這個流程,不同在於這兩者覆蓋的該流程中的一些方法可能會有不同,其實這個屬於設計模式裏面的模板模式。
獲取 BeanFactory
如上圖中,步驟(1)獲取一個 BeanFactory,對應 ClassPathXmlApplicationContext 應用程序上下文來說,這個步驟首先創建了一個 DefaultListableBeanFactory,然後解析配置 Bean 的 XML,並把 Bean 定義註冊到 BeanFactory,內部主要函數為 refreshBeanFactory,代碼如下。
    protected final void refreshBeanFactory() throws BeansException {
        if (hasBeanFactory()) {
            destroyBeans();
            closeBeanFactory();
        }
        try {
            DefaultListableBeanFactory beanFactory = createBeanFactory();
            beanFactory.setSerializationId(getId());
            customizeBeanFactory(beanFactory);
            loadBeanDefinitions(beanFactory);
            synchronized (this.beanFactoryMonitor) {
                this.beanFactory = beanFactory;
            }
        }
        catch (IOException ex) {
...        }
    }
可以通過覆蓋該步驟內的 refreshBeanFactory 方法,實現自己的 BeanFactory 創建和解析配置文件的 Bean 的策略。
標準初始化配置 BeanFactory
步驟(2)配置步驟(1)創建的 BeanFactory,比如設置 BeanFactory 工廠創建 Bean 時使用什麽樣的類加載器,默認情況下使用線程上下文類加載器(默認為 AppClassLoader)。這裏如果想實現不同的 BeanFactory 創建 Bean,使用不同的 classloader 來實現模塊隔離,可以通過在不同的 ClassPathXmlApplicationContext 上調用 setClassLoader 方法來設置不同的 classloader 來實現。另外步驟(2)還向 BeanFactory 添加了一個 BeanPostProcessor 的實現類 ApplicationContextAwareProcessor,這個後面會講到,代碼如下。
protected void prepareBeanFactory(ConfigurableListableBeanFactory beanFactory) {
        beanFactory.setBeanClassLoader(getClassLoader());
        ...
        beanFactory.addBeanPostProcessor(new ApplicationContextAwareProcessor(this));
        ...
}
子上下文對 BeanFactory 進行個性化定制的擴展
步驟(3)是在步驟(2)對 BeanFactory 進行標準初始化配置後,留出的允許子上下文對 BeanFactory 進行個性化定制的擴展,這時候會加載所有的 Bean 的定義,但是這時候還沒有 Bean 被實例化,這時允許註冊一些 BeanPostProcessors 類型的 Bean 用來在 Bean 初始化前後做一些事情。例如 XmlWebApplicationContext 上下文裏面的 postProcessBeanFactory 的實現,代碼如下。
    @Override
    protected void postProcessBeanFactory(ConfigurableListableBeanFactory beanFactory) {
        beanFactory.addBeanPostProcessor(new ServletContextAwareProcessor(this.servletContext, this.servletConfig));
...
    }
註冊了 ServletContextAwareProcessor,用來把 servletContext 設置到實現了 ServletContextAware 接口的 Bean。
用戶註冊 BeanFactoryPostProcessor 用來對 BeanFactory 進行擴展
步驟(4)執行用戶註冊的 BeanFactoryPostProcessor 擴展 Bean,用來對 BeanFactory 中的 Bean 定義進行修改,比如常見的是統一設置某些 Bean 的屬性變量值。那麽 BeanFactoryPostProcessor 為何物呢?
public interface BeanFactoryPostProcessor {
    void postProcessBeanFactory(ConfigurableListableBeanFactory beanFactory) throws BeansException;
}
如上代碼 BeanFactoryPostProcessor 是一個接口,有一個方法,該方法參數是 beanFactory,由於通過 beanFactory 可以訪問所有的 Bean 的定義,所以當我們實現了該接口,並註入實現類到 Spring 容器後,就可以在實例化 Bean 前對指定的 Bean 定義進行修改或者註冊新的 Bean。
public interface BeanDefinitionRegistryPostProcessor extends BeanFactoryPostProcessor {
    void postProcessBeanDefinitionRegistry(BeanDefinitionRegistry registry) throws BeansException;
}
如上代碼,BeanDefinitionRegistryPostProcessor 接口繼承自 BeanFactoryPostProcessor,它新添加了一個接口,用來在BeanFactoryPostProcessor 實現類中 postProcessBeanFactory 方法執行前再註冊一些 Bean 到 beanFactory 中。
基礎知識普及完畢後,下面來看步驟(4)做了什麽?
步驟(4) 首先執行實現了 BeanDefinitionRegistryPostProcessor 接口的 Bean 的 postProcessBeanDefinitionRegistry 方法,然後再執行實現了 BeanFactoryPostProcessor 接口的 Bean 的 postProcessBeanFactory 方法。由於接口的實現類可能會有多個,如果你想先執行某些接口的方法,可以通過實現 PriorityOrdered 或者 Ordered 接口給每個接口定義一個優先級,另外實現 PriorityOrdered 接口的優先級大於實現 Ordered 的優先級。
比如,基於掃描註解類作為 Bean 來源的 AnnotationConfigApplicationContext,會在 refresh 階段前註冊一個ConfigurationClassPostProcessor,它實現了 BeanDefinitionRegistryPostProcessor、PriorityOrdered 兩個接口。因為實現了第一接口,所以會在步驟(4)的時候執行 postProcessBeanDefinitionRegistry 方法,這個方法內部作用是使用ConfigurationClassParser 解析所有標註有 @Configuration 註解的類,並解析該類裏面所有標註 @Bean 的方法和標註 @Import 的bean,並註入這些解析的 Bean 到 Spring上下文容器裏面。因為實現了第二個接口,所以該類有 getOrder 方法返回該類的優先級,這裏實現為O rdered.LOWEST_PRECEDENCE,也就是優先級最低。
比如解析 ${...}占位符的 PropertyPlaceholderConfigurer 會在步驟(4)階段執行 postProcessBeanFactory(ConfigurableListableBeanFactory beanFactory) 方法對 Bean 定義的屬性值中 ${...} 進行替換,具體一個例子如下。
<bean id="propertyConfigurer" class="org.springframework.beans.factory.config.PropertyPlaceholderConfigurer">
    <property name="location">
        <value>config.properties</value>
    </property>
    <property name="fileEncoding">
        <value>UTF-8</value>
    </property>
</bean>

<bean id="testPlaceholder" class="zlx.test.annotationConfigApplicationContext.TestImpl">
    <property name="name" value="${name}"></property>
</bean>
如上代碼,首先註入了 propertyConfigurer 實例並且配置了屬性值來源為 config.properties,並且在註入 TestImpl 實例的時候使用了占位符 "${name}" 來設置 name 屬性,其中 config.properties 內容如下:
name=jiaduo
其中 TestImpl 代碼如下:
public class TestImpl {
    private String name;
    public String getName() {
        return name;
    }

    public void setName(String name) {
        this.name = name;
    }

    public void say(){
        System.out.println("hello " +name);
    }
}
那麽當我們通過運行以下代碼:
        ClassPathXmlApplicationContext cpxa = new ClassPathXmlApplicationContext("bean.xml");
        cpxa.getBean("testPlaceholder",TestImpl.class).say();
會輸出以下結果:
hello jiaduo
占位符替換的時機就是在步驟(4)執行 PropertyPlaceholderConfigurer 類的 postProcessBeanFactory 方法時候,該方法用 config.properties文件 中 key 為 name 的屬性值替換 BeanFactory 裏面 Bean 的屬性值為 "${name}"的屬性。需要註意的是這時候 Bean 還沒有被實例化,只是靜態的進行屬性值替換。
小結:BeanFactoryPostProcessor 後置處理器擴展接口是在 Bean 進行實例化前執行的,它的作用是對 BeanFactory 中 Bean 的定義做修改(比如新增 Bean 的定義,修改已有 Bean 定義,修改 Bean 的屬性值等)。
註冊 BeanPostProcessor 到 BeanFactory 的 beanPostProcessors 列表
相比 BeanFactoryPostProcessor 是在 Bean 實例化前對 BeanFactory 進行擴展,BeanPostProcessor 是在 Bean 實例化後對 Bean 進行擴展,下面看看 BeanPostProcessor 的接口定義,代碼如下。
public interface BeanPostProcessor {
    //在Bean實例化後,初始化前進行一些擴展操作
    @Nullable
    default Object postProcessBeforeInitialization(Object bean, String beanName) throws BeansException {
        return bean;
    }
    //在Bean實例化後,初始化後進行一些擴展操作
    @Nullable
    default Object postProcessAfterInitialization(Object bean, String beanName) throws BeansException {
        return bean;
    }
}
本階段就是把用戶註冊的實現了該接口的 Bean 進行收集,然後放入到 BeanFactory 的 beanPostProcessors 屬性裏面,待後面使用。
為應用上下文子類初始化一些特殊類留出的擴展
refresh 核心執行步驟(6)是為應用上下文子類初始化一些特殊類留出的擴展,例如 SpringBoot 中 AbstractApplicationContext 的子類 EmbeddedWebApplicationContext 應用程序上下文,重寫的 onRefresh 方法如下:
    protected void onRefresh() {
        super.onRefresh();
        try {
            createEmbeddedServletContainer();
        }
        catch (Throwable ex) {
            throw new ApplicationContextException("Unable to start embedded container",
                    ex);
        }
    }
如上代碼在重寫的 onRefresh 方法內創建了內嵌 Web 容器。
註冊 ApplicationListener
Spring 框架中用戶可以註冊多個 Listener 關註一個事件,當事件發生時候會通知關註該事件的所有 Listener,這類似設計模式中的觀察者模式。首先看下 ApplicationListener 接口定義,代碼如下。
public interface ApplicationListener<E extends ApplicationEvent> extends EventListener {
    void onApplicationEvent(E event);
}
ApplicationEvent為應用程序事件,對應應用程序上下文的事件類型為:
- ContextClosedEvent,當調用應用程序上下文的 close 方法時候觸發;
- ContextRefreshedEven,當調用應用程序上下文 finishRefresh 方法時候觸發;
- ContextStartedEvent,當調用應用程序上下文的 start 方法時候觸發;
- ContextStoppedEvent,當調用應用程序上下文的stop方法觸發。
本階段作用是在 BeanFactory 裏面查找註冊的 ApplicationListener 的實現 Bean,並收集起來註冊到事件廣播器裏面。
應用程序上下文刷新完畢後發送事件通知
在應用程序上下文刷新完畢後發送事件通知,AbstractApplicationContext 的中 finishRefresh 代碼如下。
protected void finishRefresh() {
    ...
    //發送ContextRefreshedEvent事件
    publishEvent(new ContextRefreshedEvent(this));
    ...
}
如果你想在應用程序上下文刷新完畢後做一些事件可以把下面的類註入到容器。
public class MyApplicationListener implements ApplicationListener<ContextRefreshedEvent>{

    @Override
    public void onApplicationEvent(ContextRefreshedEvent event) {
        System.out.println(event.toString());
    }
}
SpringBoot 中 AbstractApplicationContext 的子類 EmbeddedWebApplicationContext 應用程序上下文,重寫的 finishRefresh 代碼如下。
    protected void finishRefresh() {
        //調用AbstractApplicationContextde中finishRefresh
        super.finishRefresh();
        //啟動內嵌Web容器
        EmbeddedServletContainer localContainer = startEmbeddedServletContainer();
        if (localContainer != null) {
            publishEvent(
                    new EmbeddedServletContainerInitializedEvent(this, localContainer));
        }
    }
getBean 階段
getBean 操作最終調用的是 DefaultListableBeanFactory 的 getBean 方法,這個階段都是圍繞 Bean 進行的擴展,其核心執行步驟如下圖所示。

這些擴展大部分是實現 BeanPostProcessor 接口,接口定義如下。
public interface BeanPostProcessor {
    //在當前bean實例化後初始化前做一些事情
    @Nullable
    default Object postProcessBeforeInitialization(Object bean, String beanName) throws BeansException {
        return bean;
    }
    //在當前bean實例化後初始化後做一些事情
    @Nullable
    default Object postProcessAfterInitialization(Object bean, String beanName) throws BeansException {
        return bean;
    }
}
Bean 實例化前後的擴展接口
正常情況下註冊一個 Bean 到 Spring 容器後,會創建該 Bean 的一個實例,但是 Spring 框架預留了一個可以返回非目標 Bean 實例的擴展接口,在這個接口裏面你可以返回一個增強後的代理類的實例,下面看下 resolveBeforeInstantiation 代碼中 Bean 實例化前的擴展接口。
protected Object resolveBeforeInstantiation(String beanName, RootBeanDefinition mbd) {
        Object bean = null;
        if (!Boolean.FALSE.equals(mbd.beforeInstantiationResolved)) {
            // Make sure bean class is actually resolved at this point.
            if (!mbd.isSynthetic() && hasInstantiationAwareBeanPostProcessors()) {
                Class<?> targetType = determineTargetType(beanName, mbd);
                if (targetType != null) {
                    //調用InstantiationAwareBeanPostProcessor的實現類返回Bean實例
                    bean = applyBeanPostProcessorsBeforeInstantiation(targetType, beanName);
                ...
                }
            }
            mbd.beforeInstantiationResolved = (bean != null);
        }
        return bean;
    }
代碼 applyBeanPostProcessorsBeforeInstantiation 調用 InstantiationAwareBeanPostProcessor 實現類中postProcessBeforeInstantiation 方法,會返回一個 Bean 的實例或者返回 null。接口定義如下。
    public interface InstantiationAwareBeanPostProcessor extends BeanPostProcessor {

    //在這裏你可以返回一個代理Bean的實例
    @Nullable
    default Object postProcessBeforeInstantiation(Class<?> beanClass, String beanName) throws BeansException {
        return null;
    }

    //實例化Bean後做一些事情
    default boolean postProcessAfterInstantiation(Object bean, String beanName) throws BeansException {
        return true;
    }

    ...
}
可知 postProcessBeforeInstantiation 的第一個參數是 Class 對象,使用 Class 對象可以創建實例對象,如果 postProcessBeforeInstantiation 返回的 Bean 不為 null,則 resolveBeforeInstantiation 返回後該 Bean 的創建流程就會發生短路,也就是直接返回該 Bean。
另外由於第一個參數是 Class 對象,根據 Class 對象還可以直接獲取該類和方法上面的註解,由於實例化後的 Bean 一般都被增強過,增強後的 Bean 不能直接獲取註解信息,要使用 AopUtils 工具獲取 target,然後在獲取註解信息。使用 postProcessBeforeInstantiation 則可以直接使用 Class 對象獲取註解信息。
當 postProcessBeforeInstantiation 返回的 Bean 是 null,代碼執行到 doCreateBean 階段,會首先創建 Bean 的實例,然後在 populateBean 內調用 postProcessAfterInstantiation 對 Bean 實例化,並實現一些事情。
Bean 初始化前後擴展接口
Spring 框架在 doCreateBean 的 initializeBean 方法裏面留有 Bean 初始化前後的擴展接口,initializeBean 代碼如下。
protected Object initializeBean(final String beanName, final Object bean, @Nullable RootBeanDefinition mbd) {

...
//(1)
invokeAwareMethods(beanName, bean);
...
//(2)
Object wrappedBean = bean;
if (mbd == null || !mbd.isSynthetic()) {
    wrappedBean = applyBeanPostProcessorsBeforeInitialization(wrappedBean, beanName);
}
//(3)
try {
    invokeInitMethods(beanName, wrappedBean, mbd);
}
catch (Throwable ex) {
    ...
}
//(4)
if (mbd == null || !mbd.isSynthetic()) {
    wrappedBean = applyBeanPostProcessorsAfterInitialization(wrappedBean, beanName);
}

return wrappedBean;
}
代碼(1)調用所有的 AwareMethods,invokeAwareMethods 代碼如下。
    private void invokeAwareMethods(final String beanName, final Object bean) {
        if (bean instanceof Aware) {
            //Bean實現了BeanNameAware接口,設置Bean的名字
            if (bean instanceof BeanNameAware) {
                ((BeanNameAware) bean).setBeanName(beanName);
            }
            //Bean實現了BeanClassLoaderAware接口,設置加載該Bean的類加載器
            if (bean instanceof BeanClassLoaderAware) {
                ClassLoader bcl = getBeanClassLoader();
                if (bcl != null) {
                    ((BeanClassLoaderAware) bean).setBeanClassLoader(bcl);
                }
            }
            //Bean實現了BeanFactoryAware接口,設置該Bean所屬的BeanFactory
            if (bean instanceof BeanFactoryAware) {
                ((BeanFactoryAware) bean).setBeanFactory(AbstractAutowireCapableBeanFactory.this);
            }
        }
    }
- 如果你需要獲取 Bean 在 IOC 容器中的名字,則該 Bean 可以實現 BeanNameAware 接口。
- 如果你想要知道當前的 Bean 是哪個類加載的,則可以實現 BeanClassLoaderAware 接口。
- 如果你想要知道當前的 Bean 所屬的 BeanFactory,則可實現 BeanFactoryAware 接口,拿到 BeanFactory 後你就可以訪問 BeanFactory 裏面的所有 Bean 實例。
代碼(2)調用所有註冊的實現了 beanPostProcessor 接口的 Bean 的 postProcessBeforeInitialization 方法,實現在對 Bean 初始化前做一些定制, 在上面我們講到 beanFactory 裏面添加了一個叫做 ApplicationContextAwareProcessor 的 beanPostProcessor,這裏我們看下它的 postProcessBeforeInitialization 方法做了什麽。
    public Object postProcessBeforeInitialization(final Object bean, String beanName) throws BeansException {
        ...
        invokeAwareInterfaces(bean);
        ...
        return bean;
    }
private void invokeAwareInterfaces(Object bean) {
if (bean instanceof Aware) {
    ...
    if (bean instanceof ApplicationContextAware) {
        ((ApplicationContextAware) bean).setApplicationContext(this.applicationContext);
    }
}
}
這裏我們著重提下,如果一個 Bean 實現了 ApplicationContextAware 接口,那麽這個 Bean 裏面就可以獲取該 Bean 所屬的應用程序上下文對象,從而可以訪問應用程序上下文裏面的所有 Bean 實例。
代碼(3)中,invokeInitMethods 方法內部會調用 Bean 中的 afterPropertiesSet 方法進行屬性設置。如果 Bean 實現了 InitializingBean 接口,就調用用戶自定義的初始化方法,invokeInitMethods 代碼如下。
protected void invokeInitMethods(String beanName, final Object bean, @Nullable RootBeanDefinition mbd)
            throws Throwable {

        //執行afterPropertiesSet進行屬性設置,這個在set操作設置屬性之後執行
        boolean isInitializingBean = (bean instanceof InitializingBean);
        if (isInitializingBean && (mbd == null || !mbd.isExternallyManagedInitMethod("afterPropertiesSet"))) {

                ((InitializingBean) bean).afterPropertiesSet();
        }
        //執行用戶自定義的初始化方法
        if (mbd != null && bean.getClass() != NullBean.class) {
            String initMethodName = mbd.getInitMethodName();
            if (StringUtils.hasLength(initMethodName) &&
                    !(isInitializingBean && "afterPropertiesSet".equals(initMethodName)) &&
                    !mbd.isExternallyManagedInitMethod(initMethodName)) {
                invokeCustomInitMethod(beanName, bean, mbd);
            }
        }
    }
只有 Bean 實現了 InitializingBean接口,才會在這時候調用該 Bean 的 afterPropertiesSet 方法。這個大家應該都熟悉,需要提下的是,用戶自定義的初始化方法是指通過下面方式配置的初始化方法,在 TestImpl 裏面要寫一個 public void init()方法。
<bean id="test" class="zlx.test.annotationConfigApplicationContext.TestImpl" init-method="init"/>
小結:Spring Bean 的 set 方法設置屬性值的時機先於afterPropertiesSet,而 afterPropertiesSet 的執行時機又先於用戶自定義初始化方法。
代碼(4)在 Bean 初始化完畢後,執行實現了 beanPostProcessor 接口中 Bean 的 postProcessAfterInitialization 方法。
close 階段
當調用應用程序上下文的 close 方法後,會關閉該應用程序上下文,並且銷毀其管理的 BeanFactory 裏面的所有 Beans。close 方法的主要執行步驟如下圖所示。

- 給所有註冊了 ContextClosedEvent 事件的 ApplicationListener 發送通知。
- 銷毀應用程序上下文管理的 BeanFactory 裏面的所有 Beans。
- 關閉 BeanFactory。
- onClose 留給子類的擴展接口,子類可以實現該模板方法做一些清理工作。
發送 ContextClosedEvent 事件
當應用程序上下文關閉時候,會給所有註冊了 ContextClosedEvent 事件的 ApplicationListener 發送通知,所以用戶可以實現 ApplicationListener 並關註 ContextClosedEvent 事件(如下代碼),同時把該 Bean 註入到 Spring 容器,在應用程序上下文關閉時候做一些工作。
public class MyApplicationListener implements ApplicationListener<ContextClosedEvent>{

    @Override
    public void onApplicationEvent(ContextClosedEvent event) {
        //doSomething
    }
}
銷毀 BeanFactory 裏的所有 Beans 中的 destroyBeans 方法
這個步驟需要註意的一個擴展點是,如果註入的 Bean 實現了 DisposableBean 接口的 destroy 方法,那麽在銷毀具體的 Bean 前會調用該 Bean 的 destroy 方法,代碼如下。
protected void destroyBean(String beanName, @Nullable DisposableBean bean) {
       ...
        // Actually destroy the bean now...
        if (bean != null) {
            try {
                bean.destroy();
            }
            catch (Throwable ex) {
                logger.error("Destroy method on bean with name ‘" + beanName + "‘ threw an exception", ex);
            }
        }

        ...
}
關閉 BeanFactory 的 closeBeanFactory 模板方法
對應 AbstractApplicationContext 的子類 ClassPathXmlApplicationContext 由於是可重復刷新的應用程序上下文,所以需要把 beanFactory 設置為 null,代碼如下。
    protected final void closeBeanFactory() {
        synchronized (this.beanFactoryMonitor) {
            if (this.beanFactory != null) {
                this.beanFactory.setSerializationId(null);
                this.beanFactory = null;
            }
        }
    }
留給子類做清理工作的模板方法 onClose
onClose 是 AbstractApplicationContext 留給子類的擴展接口,子類可以實現該模板方法做一些清理工作,例如 SpringBoot 的 Web 應用程序上下文 EmbeddedWebApplicationContext 實現的 onClose方法。
    protected void onClose() {
        super.onClose();
        stopAndReleaseEmbeddedServletContainer();
    }
上面代碼用來在關閉應用程序上下文後關閉內嵌的 Web 容器。
ContextLoaderListener 擴展接口
ContextLoaderListener 一般用來啟動一個 Spring 容器或者框架的根容器,例如 Webx 框架的 WebxContextLoaderListener 就是繼承該類,實現了 Webx 框架到 Tomcat 容器的銜接點,而 SpringMVC 則通過在 ContextLoaderListener 啟動一個 IOC 來管理 bo 類的 Bean。下面首先看下 ContextLoaderListener 的類圖結構。
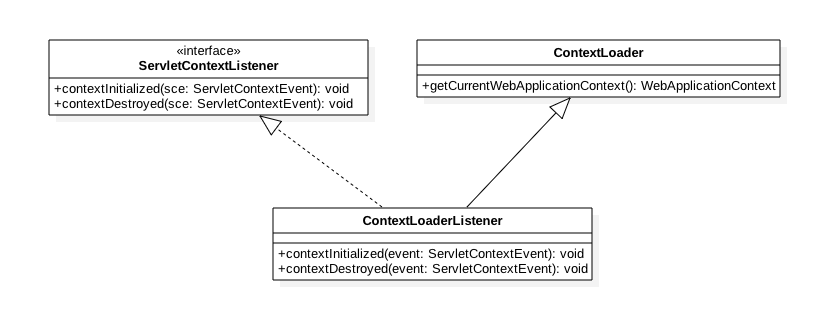
由上圖可知,ContextLoaderListener 的兩個方法都含有一個 ServletContextEvent 類型的參數。
那麽這個 ContextLoaderListener 一般是怎麽使用的呢?
ContextLoaderListener 一般按照下面方式配置到 web.xml 裏面。
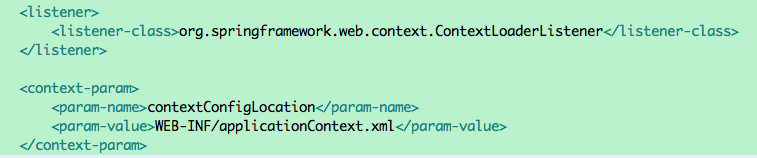
如上代碼,首先創建了一個 ContextLoaderListener 實例,該實例會創建一個 XmlWebApplicationContext 應用程序上下文,contextConfigLocation 是要告訴 ContextLoaderListener 要把哪些 Bean 註入到 XmlWebApplicationContext 管理的BeanFactory。
這裏首先有幾個問題,比如配置的全局的 contextConfigLocation 屬性是怎麽在 ContextLoaderListener 中獲取的?ContextLoaderListener 與 Tomcat 是什麽關系那?ContextLoaderListener 是如何創建的 XmlWebApplicationContext?
為了解開前兩個問題,我們需要看下 Tomcat(本文 Tomcat 版本為 apache-tomcat-8.5.12)中的一些代碼時序圖,如下圖所示。

在 Tomcat 中一個 StandardContext 代表一個 Web 應用,步驟(2)、(3)在 Web 應用啟動過程中會調用 mergeParameters 方法解析 web.xml 配置的 context-param 參數,並把這些參數設置到 ApplicationContext 中,也就是說上面配置的 contextConfigLocation 參數和值也保存到了 ApplicationContext 中。
需要註意的是這裏的 ApplicationContext 不同於 Spring 框架中的 ApplicationContext,這裏的ApplicationContext 是 Tomcat 中的 ApplicationContext,它實現了 org.apache.catalina.servlet4preview.ServletContext,是一個 ServletContext,這個 ApplicationContext 是應用級別的,每個應用維護著自己的 ApplicationContext 對象,用來保存應用級別的變量信息,其內部通過 private final ConcurrentMap<String,String> parameters = new ConcurrentHashMap<>();保存應用級別的變量信息。
步驟(4)、(5)、(6)是初始化所有在 web.xml 裏面配置的 ServletContextListener 實現類,並以 ApplicationContext 為構造函數參數創建一個 ServletContextEvent 作為 ServletContext事件(內部實際維護的是 ApplicationContext 的一個門面類 ApplicationContextFacade),然後調用所有實現類的 contextInitialized方法,並傳遞 ServletContextEvent 作為參數,至此解開了 ContextLoaderListener 與 Tomcat 的關系。也就是說在 Tomcat 的每個應用啟動過程中會調用 ContextLoaderListener 的 contextInitialized 方法並且傳遞的參數裏面包含該應用級別的一個 ApplicationContext 對象,該對象裏面包含了該應用全局作用域的變量集合。
下面看下 ContextLoaderListener 的 contextInitialized 方法時序圖,看是如何創建 XmlWebApplicationContext,並獲取到了 contextConfigLocation 變量的值,以作為 Spring 容器加載 Bean 的數據源。

- 步驟(3)創建 Spring 應用程序上下文 XmlWebApplicationContext。
- 步驟(5)設置 XmlWebApplicationContext的ServletContext 為 ApplicationContextFacade。
- 步驟(6)、(7)從 ServletContext 中獲取 contextConfigLocation 變量的值,這裏為 WEB-INF/applicationContext.xml。
- 步驟(8)設置 XmlWebApplicationContext 的配置文件為 WEB-INF/applicationContext.xml,這意味著會從 WEB-INF/applicationContext.xml 中解析 Bean 註入到 XmlWebApplicationContext 管理的 BeanFactory 中。
- 步驟(9)刷新 XmlWebApplicationContext 應用程序上下文。
- 步驟(10)保存 XmlWebApplicationContext 到 ServletContext,這樣應用裏面任何有 ServletContext 的地方就可以獲取 XmlWebApplicationContext,從而可以獲取 XmlWebApplicationContext 管理的所有 Bean。
SpringMVC 與 Tomcat 容器的銜接點
SpringMVC 是目前使用非常頻繁的框架,SpringMVC 裏面經常會使用兩級級聯容器,並且每層容器都各有用途,使用過 SpringMVC 的同學都知道,一般我們在 web.xml 裏面會配置一個 listener 和一個 dispatcher,其實這就配置了兩個 Spring IOC 容器,並且 dispatcher 容器的父容器就是 listener 的容器。
一般在 web.xml 裏面配置如下。
<listener>
    <listener-class>org.springframework.web.context.ContextLoaderListener</listener-class>
</listener>

<context-param>
    <param-name>contextConfigLocation</param-name>
    <param-value>WEB-INF/applicationContext.xml</param-value>
</context-param>
<servlet>
    <servlet-name>springmvc</servlet-name>
    <servlet-class>org.springframework.web.servlet.DispatcherServlet</servlet-class>
    <load-on-startup>1</load-on-startup>
</servlet>
其中 ContextLoaderListener 會創建一個 XMLWebApplicationContext 上下文,管理 contextConfigLocation 配置的 XML 裏面的普通 Bean,這個上面已經講過。
DispatcherServlet 也會創建一個 XMLWebApplicationContext,默認管理 web-info/springmvc-servlet.xml 裏面的 Controller Bean,下面看下創建的流程時序圖。

如圖,在 DispatcherServlet 的初始化方法中,首先從 ServletContext 的全局變量表裏面獲取 ContextLoaderListener 創建的 XMLWebApplicationContext 上下文,然後使用該 context 作為父上下文創建了 SpringMVC 的 Servlet Context 容器,並且設置 namespace 為 springmvc-servlet。這個在查找配置文件時候會用到,最後會拼接為 springmvc-servlet.xml,最後刷新 SpringMVC 的 Servlet Context 上下文。
一般我們在 lisenter 創建的父容器裏配置 bo 類,用來操作具體業務,在 dispatcher 子容器裏面配置 Controller 類,然後 Controller 裏面調用 bo 類來實現業務。
至此結合上面,通過 Tomcat 啟動過程中調用 ContextLoaderListener 的 contextInitialized 方法,首先創建了父容器用來管理 bo Bean,然後使用 DispatcherServlet 創建了子容器用來管理 Controller Bean,ContextLoaderListener 讓 SpringMVC 與 Tomcat 容器聯系起來了。
WebX 框架與 Tomcat 容器的銜接點
WebX 框架曾紅火一時,雖然現在已經不主推了,但是其使用子容器隔離不同模塊的思想還是很好的,下圖來自 Webx 官方文檔。
Webx Framework 將一個 Web 應用分解成多個小應用模塊:app1、app2,當然名字可以任意取。
每個小應用模塊獨享一個 Spring Sub Context 子容器。兩個子容器之間的 Beans 無法互相註入。
所有小應用模塊共享一個 Spring Root Context 根容器。根容器中的 Bean 可被註入到子容器的 Bean中;反之不可以。將一個大的應用分解成若幹個小應用模塊,並使它們的配置文件相對獨立,這是一種很不錯的開發實踐。
下面我們來看下 WebX 框架是如何與 Tomcat 容器進行銜接的。
要在 Web 項目中引入 Webx 框架,除了需要引入與 WebX 相關的 jar 包外,還需要在 web.xml 中配置下面的Listener,代碼如下。
    <listener>
        <listener-class>com.alibaba.citrus.webx.context.WebxContextLoaderListener</listener-class>
    </listener>
這個 WebxContextLoaderListener 類似於 SpringMVC 中配置的 ContextLoaderListener,目的就是創建 Spring 應用程序上下文,然後裝載 /WEB-INF/webx.xml、/WEB-INF/webx-*.xml。通過下面類圖知道前者繼承了後者,並且重寫了兩個方法,如下圖所示。

下面看下 WebX 創建 Root 容器上下文和 Sub 容器上下文時序圖。

如圖,代碼(5)首先創建了 WebX 的 Root 容器上下文 WebxComponentsContext,對應解析 webx.xml 配置文件,然後調用 refresh 方法解析該配置文件裏面的 bean。下面簡單列下 Spring 的容器上下文中 refresh 流程,如下圖所示。

上面 Root 容器上下文的 refresh 會走這個流程,在走這個流程的 postProcessBeanFactory 階段會調用 WebxComponentsLoader 的 postProcessBeanFactory 方法將 WebxComponentsCreator 註冊到 Root 容器。
然後在 invokeBeanFactoryPostProcessors 階段調用 WebxComponentsCreator 的 postProcessBeanFactory 方法創建並初始化所有的子容器,每個子容器使用 WebxComponentImpl 來標示。
最後在 finishRefresh 階段會發送 Root 容器已經刷新 OK 的事件,這時候會調用 WebxComponentsImpl 的 onApplicationEvent 方法,該方法會逐個調用子容器的 refresh 方法解析配置文件 webx-*.xml,至此子容器也創建完畢。
總結
本文講解了 Spring 框架的一些常用的擴展接口,希望讀者在遇到業務需求的時候能夠靈活的使用這些擴展接口做一些事情。
0001 - Spring 框架和 Tomcat 容器擴展接口揭秘