四、創建第一個springboot項目
阿新 • • 發佈:2019-02-28
分割 term hot hello 4.0 配置 解決 net com 簡介
spring boot 它的設計目的就是為例簡化開發,開啟了各種自動裝配,你不想寫各種配置文件,引入相關的依賴就能迅速搭建起一個web工程。它采用的是建立生產就緒的應用程序觀點,優先於配置的慣例。
建構準備
- jdk 1.8 或以上
- maven 3.0+
- IntelliJ IDEA
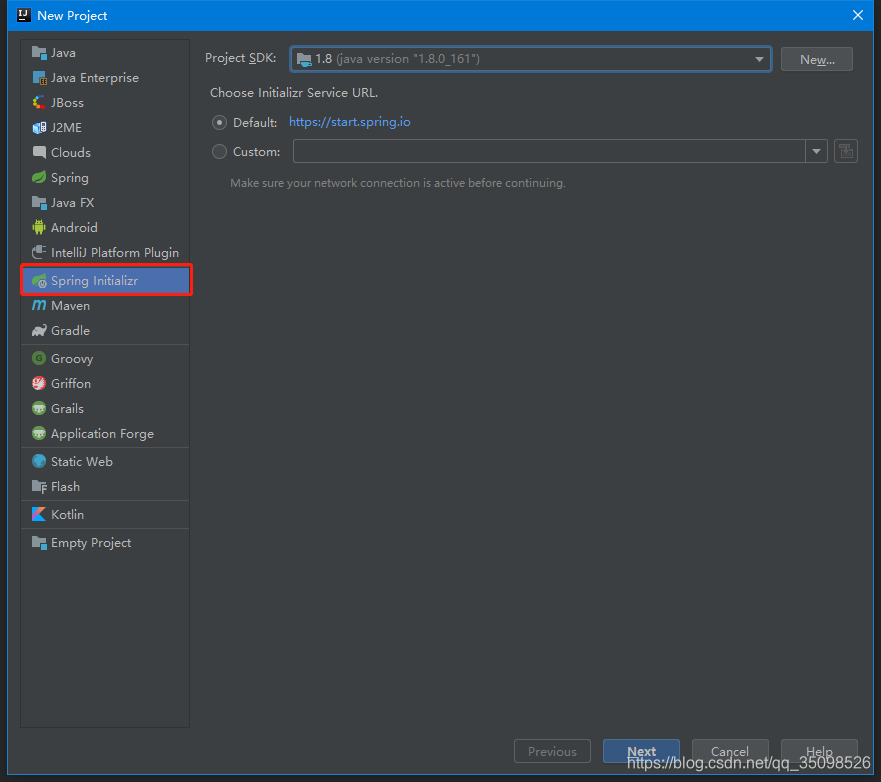
打開Idea-> new Project ->Spring Initializr ->填寫group、artifact ->鉤上web(開啟web功能)->點下一步就行了。


創建完工程,工程的目錄結構如下:
- pom文件為基本的依賴管理文件
- resouces 資源文件
- statics 靜態資源
- templates 模板資源
- application.properties 配置文件
- SpringbootApplication程序的入口。
POM文件源碼:
<?xml version="1.0" encoding="UTF-8"?>
<project xmlns="http://maven.apache.org/POM/4.0.0" xmlns:xsi="http://www.w3.org/2001/XMLSchema-instance"
         xsi:schemaLocation="http://maven.apache.org/POM/4.0.0 http://maven.apache.org/xsd/maven-4.0.0.xsd">
    <modelVersion>4.0.0</modelVersion>
    <parent>
        <groupId>org.springframework.boot</groupId>
        <artifactId>spring-boot-starter-parent</artifactId>
        <version>2.1.3.RELEASE</version>
        <relativePath/> <!-- lookup parent from repository -->
    </parent>
    <groupId>com.honghh</groupId>
    <artifactId>boot-first</artifactId>
    <version>0.0.1-SNAPSHOT</version>
    <name>boot-first</name>
    <description>Demo project for Spring Boot</description>

    <properties>
        <java.version>1.8</java.version>
    </properties>

    <dependencies>
        <dependency>
            <groupId>org.springframework.boot</groupId>
            <artifactId>spring-boot-starter-web</artifactId>
        </dependency>

        <dependency>
            <groupId>org.springframework.boot</groupId>
            <artifactId>spring-boot-starter-test</artifactId>
            <scope>test</scope>
        </dependency>
    </dependencies>

    <build>
        <plugins>
            <plugin>
                <groupId>org.springframework.boot</groupId>
                <artifactId>spring-boot-maven-plugin</artifactId>
            </plugin>
        </plugins>
    </build>

</project>
創建Controller
package com.honghh.bootfirst.controller;

import org.springframework.web.bind.annotation.RequestMapping;
import org.springframework.web.bind.annotation.RestController;

/**
 * ClassName: HelloWordController
 * Description:
 *
 * @author honghh
 * @date 2019/02/19 15:58
 */
@RestController
public class HelloWordController {
    @RequestMapping("/")
    public String index() {
        return "Hello Spring Boot!";
    }
}
啟動項目,在瀏覽器中輸入: http://localhost:8080/
啟動成功,第一個springboot項目搭建成功!
但是這個要註意一個點,現在我的controller是寫在com.honghh.bootfirst下的,所以沒有問題,我們將controller包放在com.honghh.controller下執行你會發現報404
那我們應該怎麽解決呢?
註意事項
Spring Boot 正常啟動後訪問Controller提示404
解決辦法
方法一:
以啟動類的包路徑作為頂層包路徑,列如啟動類包為com.honghh.bootfirst,那麽Controller包路徑就為com.honghh.bootfirst.controller。
方法二:
在啟動上方添加@ComponentScan註解,此註解為指定掃描路徑,例如:
@ComponentScan(basePackages = {"com.honghh.*"}) #多個不同的以逗號分割。package com.honghh.bootfirst;
import org.springframework.boot.SpringApplication;
import org.springframework.boot.autoconfigure.SpringBootApplication;
import org.springframework.context.annotation.ComponentScan;
@ComponentScan(basePackages = {"com.honghh.*"})
@SpringBootApplication
public class BootFirstApplication {
public static void main(String[] args) {
SpringApplication.run(BootFirstApplication.class, args);
}
}
文章來源: https://blog.csdn.net/qq_35098526/article/details/87715317
四、創建第一個springboot項目
