搜尋引擎(Elasticsearch索引管理2)
學完本課題,你應達成如下目標:
掌握分詞器的配置、測試
掌握文件的管理操作
掌握路由規則。
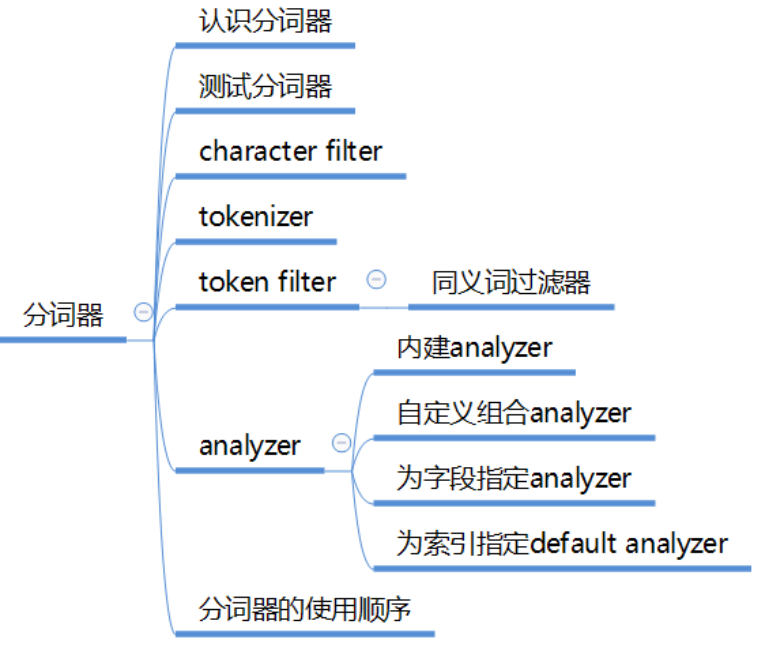
分詞器

認識分詞器
Analyzer 分析器
在ES中一個Analyzer 由下面三種元件組合而成:
character filter :字元過濾器,對文字進行字元過濾處理,如處理文字中的html標籤字元。處理完後再交給tokenizer進行分詞。一個analyzer中可包含0個或多個字元過濾器,多個按配置順序依次進行處理。
tokenizer:
token filter:詞項過濾器,對tokenizer分出的詞進行過濾處理。如轉小寫、停用詞處理、同義詞處理。一個analyzer可包含0個或多個詞項過濾器,按配置順序進行過濾。
如何測試分詞器
POST _analyze
{
  "analyzer": "whitespace",
  "text":     "The quick brown fox."
}

POST _analyze
{
  "tokenizer": "standard",
  "filter":  [ "lowercase", "asciifolding" ],
  "text":      "Is this déja vu?"
}
搞清楚position和offset
 {
      "token": "The",
      "start_offset": 0,
      "end_offset": 3,
      "type": "word",
      "position": 0
    },
    {
      "token": "quick",
      "start_offset": 4,
      "end_offset": 9,
      "type": "word",
      "position": 1
    }
內建的character filter
HTML Strip Character Filter
html_strip :過濾html標籤,解碼HTML entities like &.
Mapping Character Filter
mapping :用指定的字串替換文字中的某字串。
Pattern Replace Character Filter
pattern_replace :進行正則表示式替換。
HTML Strip Character Filter
測試:
POST _analyze
{
"tokenizer": "keyword",
"char_filter": [ "html_strip" ],
"text": "<p>I'm so <b>happy</b>!</p>"
}
在索引中配置:
PUT my_index
{
  "settings": {
    "analysis": {
      "analyzer": {
        "my_analyzer": {
          "tokenizer": "keyword",
          "char_filter": ["my_char_filter"]
        }
      },
      "char_filter": {
        "my_char_filter": {
          "type": "html_strip",
          "escaped_tags": ["b"]
        }
      }
    }
  }
}
測試:
POST my_index/_analyze
{
"analyzer": "my_analyzer",
"text": "<p>I'm so <b>happy</b>!</p>"
}
escaped_tags 用來指定例外的標籤。 如果沒有例外標籤需配置,則不需要在此進行客戶化定義,在上面的my_analyzer中直接使用 html_strip
Mapping character filter
https://www.elastic.co/guide/en/elasticsearch/reference/current/analysis-mapping-charfilter.html
Pattern Replace Character Filter
https://www.elastic.co/guide/en/elasticsearch/reference/current/analysis-pattern-replace-charfilter.html
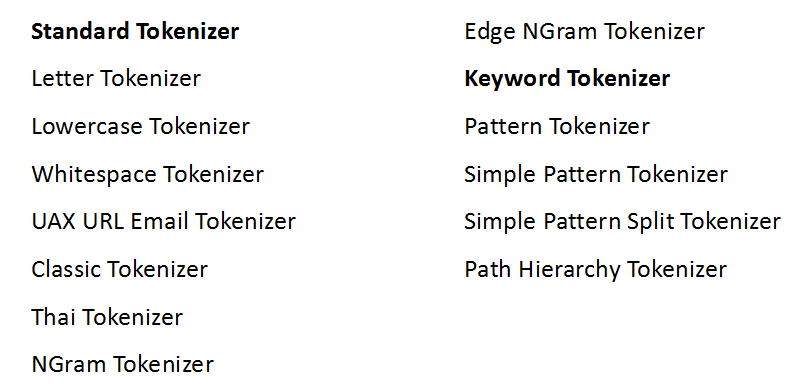
內建的Tokenizer

https://www.elastic.co/guide/en/elasticsearch/reference/current/analysis-tokenizers.html
整合的中文分詞器Ikanalyzer中提供的tokenizer:ik_smart 、 ik_max_word
測試tokenizer
POST _analyze
{
  "tokenizer":      "standard",
  "text": "張三說的確實在理"
}

POST _analyze
{
  "tokenizer":      "ik_smart",
  "text": "張三說的確實在理"
}
內建的Token Filter
ES中內建了很多Token filter ,詳細瞭解:https://www.elastic.co/guide/en/elasticsearch/reference/current/analysis-tokenizers.html
Lowercase Token Filter :lowercase 轉小寫
Stop Token Filter :stop 停用詞過濾器
Synonym Token Filter: synonym 同義詞過濾器
說明:中文分詞器Ikanalyzer中自帶有停用詞過濾功能。
Synonym Token Filter 同義詞過濾器
PUT /test_index
{
    "settings": {
        "index" : {
            "analysis" : {
                "analyzer" : {
                    "my_ik_synonym" : {
                        "tokenizer" : "ik_smart",
                        "filter" : ["synonym"]
                    }
                },
                "filter" : {
                    "synonym" : {
                        "type" : "synonym",
                        "synonyms_path" : "analysis/synonym.txt"
                    }
                }
            }
        }
    }
}
synonyms_path:指定同義詞檔案(相對config的位置)
同義詞定義格式
ES同義詞格式支援 solr、 WordNet 兩種格式。
在analysis/synonym.txt中用solr格式定義如下同義詞 檔案一定要UTF-8編碼
張三,李四
電飯煲,電飯鍋 => 電飯煲
電腦 => 計算機,computer
一行一類同義詞,=> 表示標準化為
測試:
POST test_index/_analyze
{
  "analyzer": "my_ik_synonym",
  "text": "張三說的確實在理"
}

POST test_index/_analyze
{
  "analyzer": "my_ik_synonym",
  "text": "我想買個電飯鍋和一個電腦"
}
通過例子的結果瞭解同義詞的處理行為
內建的Analyzer

https://www.elastic.co/guide/en/elasticsearch/reference/current/analysis-analyzers.html
整合的中文分詞器Ikanalyzer中提供的Analyzer:ik_smart 、 ik_max_word
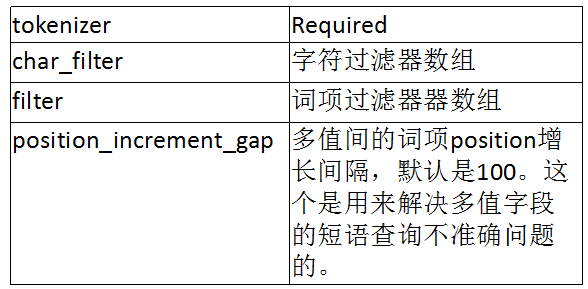
內建的和整合的analyzer可以直接使用。如果它們不能滿足我們的需要,則我們可自己組合字元過濾器、分詞器、詞項過濾器來定義自定義的analyzer
自定義 Analyzer
zero or more character filters
a tokenizer
zero or more token filters.
配置引數:

PUT my_index8
{
  "settings": {
    "analysis": {
      "analyzer": {
        "my_ik_analyzer": {
          "type": "custom",
          "tokenizer": "ik_smart",
          "char_filter": [
            "html_strip"
          ],
          "filter": [
             "synonym"
          ]
        }
      },
      "filter": {
        "synonym": {
          "type": "synonym",
          "synonyms_path": "analysis/synonym.txt"
        }
      }    }  }}
為欄位指定分詞器
PUT my_index8/_mapping/_doc
{
  "properties": {
    "title": {
        "type": "text",
        "analyzer": "my_ik_analyzer"
    }
  }
}
PUT my_index8/_mapping/_doc
{
  "properties": {
    "title": {
        "type": "text",
        "analyzer": "my_ik_analyzer",
        "search_analyzer": "other_analyzer"
    }
  }
}
PUT my_index8/_doc/1
{
  "title": "張三說的確實在理"
}

GET /my_index8/_search
{
  "query": {
    "term": {
      "title": "張三"
    }
  }
}
為索引定義個default分詞器
PUT /my_index10
{
  "settings": {
    "analysis": {
      "analyzer": {
        "default": {
          "tokenizer": "ik_smart",
          "filter": [
            "synonym"
          ]
        }
      },
      "filter": {
        "synonym": {
          "type": "synonym",
          "synonyms_path": "analysis/synonym.txt"
        }
      }
    }
  },
 "mappings": {
    "_doc": {
      "properties": {
        "title": {
          "type": "text"
        }
      }
    }
  }
}
PUT my_index10/_doc/1
{
  "title": "張三說的確實在理"
}

GET /my_index10/_search
{
  "query": {
    "term": {
      "title": "張三"
    }
  }
}
Analyzer的使用順序
我們可以為每個查詢、每個欄位、每個索引指定分詞器。
在索引階段ES將按如下順序來選用分詞:
首先選用欄位mapping定義中指定的analyzer
欄位定義中沒有指定analyzer,則選用 index settings中定義的名字為default 的analyzer。
如index setting中沒有定義default分詞器,則使用 standard analyzer.
查詢階段ES將按如下順序來選用分詞:
The analyzer defined in a full-text query.
The search_analyzer defined in the field mapping.
The analyzer defined in the field mapping.
An analyzer named default_search in the index settings.
An analyzer named default in the index settings.
The standard analyzer.
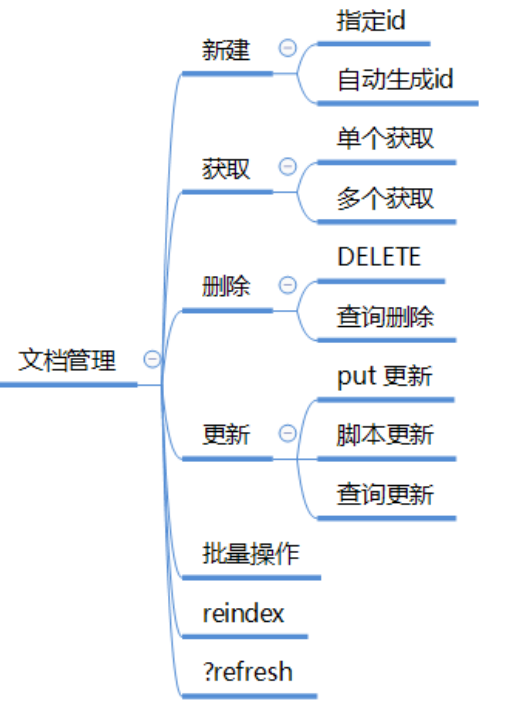
文件管理

新建文件
PUT twitter/_doc/1            指定文件id,新增/修改
{
    "id": 1,
    "user" : "kimchy",
    "post_date" : "2009-11-15T14:12:12",
    "message" : "trying out Elasticsearch"
}
POST twitter/_doc/            新增,自動生成文件id
{
    "id": 1,
    "user" : "kimchy",
    "post_date" : "2009-11-15T14:12:12",
    "message" : "trying out Elasticsearch"
}
{
  "_index": "twitter",              //所屬索引
  "_type": "_doc",                  //所屬mapping type
  "_id": "p-D3ymMBl4RK_V6aWu_V",    //文件id
  "_version": 1,                    //文件版本
  "result": "created",
  "_shards": {                      //分片的寫入情況
    "total": 3,                     //所在分片有三個副本
    "successful": 1,                //1個副本上成功寫入
    "failed": 0                     //失敗副本數
  },
  "_seq_no": 0,                     //第幾次操作該文件
  "_primary_term": 3                //詞項數
}
獲取單個文件
HEAD twitter/_doc/11 檢視是否儲存
GET twitter/_doc/1
GET twitter/_doc/1?_source=false
GET twitter/_doc/1/_source
{
  "_index": "twitter",
  "_type": "_doc",
  "_id": "1",
  "_version": 2,
  "found": true,
  "_source": {
    "id": 1,
    "user": "kimchy",
    "post_date": "2009-11-15T14:12:12",
    "message": "trying out Elasticsearch"
  }}
PUT twitter11
{                                   //獲取儲存欄位
   "mappings": {
      "_doc": {
         "properties": {
            "counter": {
               "type": "integer",
               "store": false
            },
            "tags": {
               "type": "keyword",
               "store": true
            } }   }  }}

PUT twitter11/_doc/1
{
    "counter" : 1,
    "tags" : ["red"]
}

GET twitter11/_doc/1?stored_fields=tags,counter
獲取多個文件 _mget
GET /_mget
{
    "docs" : [
        {
            "_index" : "twitter",
            "_type" : "_doc",
            "_id" : "1"
        },
        {
            "_index" : "twitter",
            "_type" : "_doc",
            "_id" : "2"
            "stored_fields" : ["field3", "field4"]
        }
    ]
}
GET /twitter/_mget
{
    "docs" : [
        {
            "_type" : "_doc",
            "_id" : "1"
        },
        {
            "_type" : "_doc",
            "_id" : "2"
        }
    ]
}
GET /twitter/_doc/_mget
{
    "docs" : [
        {
            "_id" : "1"
        },
        {
            "_id" : "2"
        }
    ]
}
GET /twitter/_doc/_mget
{
    "ids" : ["1", "2"]
}
請求引數_source stored_fields 可以用在url上也可用在請求json串中
刪除文件
DELETE twitter/_doc/1 指定文件id進行刪除
DELETE twitter/_doc/1?version=1 用版本來控制刪除
{
    "_shards" : {
        "total" : 2,
        "failed" : 0,
        "successful" : 2
    },
    "_index" : "twitter",
    "_type" : "_doc",
    "_id" : "1",
    "_version" : 2,
    "_primary_term": 1,
    "_seq_no": 5,
    "result": "deleted"
}
查詢刪除
POST twitter/_delete_by_query
{
  "query": {
    "match": {
      "message": "some message"
    }
  }
}
POST twitter/_doc/_delete_by_query?conflicts=proceed
{
  "query": {
    "match_all": {}
  }
}
當有文件有版本衝突時,不放棄刪除操作(記錄衝突的文件,繼續刪除其他複合查詢的文件)
通過task api 來檢視 查詢刪除任務
GET _tasks?detailed=true&actions=*/delete/byquery
GET /_tasks/taskId:1 查詢具體任務的狀態
POST _tasks/task_id:1/_cancel 取消任務{
"nodes" : {
"r1A2WoRbTwKZ516z6NEs5A" : {
"name" : "r1A2WoR",
"transport_address" : "127.0.0.1:9300",
"host" : "127.0.0.1",
"ip" : "127.0.0.1:9300",
"attributes" : {
"testattr" : "test",
"portsfile" : "true"
},
"tasks" : {
"r1A2WoRbTwKZ516z6NEs5A:36619" : {
"node" : "r1A2WoRbTwKZ516z6NEs5A",
"id" : 36619,
"type" : "transport",
"action" : "indices:data/write/delete/byquery",
"status" : {
"total" : 6154,
"updated" : 0,
"created" : 0,
"deleted" : 3500,
"batches" : 36,
"version_conflicts" : 0,
"noops" : 0,
"retries": 0,
"throttled_millis": 0
},
"description" : ""
} } } }}
更新文件
PUT twitter/_doc/1      指定文件id進行修改
{
    "id": 1,
    "user" : "kimchy",
    "post_date" : "2009-11-15T14:12:12",
    "message" : "trying out Elasticsearch"
}
PUT twitter/_doc/1?version=1     樂觀鎖併發更新控制
{
    "id": 1,
    "user" : "kimchy",
    "post_date" : "2009-11-15T14:12:12",
    "message" : "trying out Elasticsearch"
}
{
  "_index": "twitter",
  "_type": "_doc",
  "_id": "1",
  "_version": 3,
  "result": "updated",
  "_shards": {
    "total": 3,
    "successful": 1,
    "failed": 0
  },
  "_seq_no": 2,
  "_primary_term": 3
}
Scripted update 通過指令碼來更新文件
PUT uptest/_doc/1       1、準備一個文件
{
    "counter" : 1,
    "tags" : ["red"]
}
POST uptest/_doc/1/_update     2、對文件1的counter + 4
{
    "script" : {
        "source": "ctx._source.counter += params.count",
        "lang": "painless",
        "params" : {
            "count" : 4
        }
    }
}
POST uptest/_doc/1/_update     3、往陣列中加入元素
{
    "script" : {
        "source": "ctx._source.tags.add(params.tag)",
        "lang": "painless",
        "params" : {
            "tag" : "blue"
        }
    }
}
指令碼說明:painless是es內建的一種指令碼語言,ctx執行上下文物件(通過它還可訪問_index, _type, _id, _version, _routing and _now (the current timestamp) ),params是引數集合
Scripted update 通過指令碼來更新文件
說明:指令碼更新要求索引的_source 欄位是啟用的。更新執行流程:
1、獲取到原文件
2、通過_source欄位的原始資料,執行指令碼修改。
3、刪除原索引文件
4、索引修改後的文件
它只是降低了一些網路往返,並減少了get和索引之間版本衝突的可能性。
POST uptest/_doc/1/_update
{
    "script" : "ctx._source.new_field = 'value_of_new_field'"
}
4、新增一個欄位
POST uptest/_doc/1/_update
{
"script" : "ctx._source.remove('new_field')"
}
5、移除一個欄位POST uptest/_doc/1/_update
{
"script" : {
"source": "if (ctx._source.tags.contains(params.tag)) { ctx.op = 'delete' } else { ctx.op = 'none' }",
"lang": "painless",
"params" : {
"tag" : "green"
}
}
}
6、判斷刪除或不做什麼
POST uptest/_doc/1/_update
{
    "doc" : {
        "name" : "new_name"
    }
}
7、合併傳人的文件欄位進行更新
{
  "_index": "uptest",
  "_type": "_doc",
  "_id": "1",
  "_version": 4,
  "result": "noop",
  "_shards": {
    "total": 0,
    "successful": 0,
    "failed": 0
  }
}
8、再次執行7,更新內容相同,不需做什麼
POST uptest/_doc/1/_update
{
    "doc" : {
        "name" : "new_name"
    },
    "detect_noop": false
}
9、設定不做noop檢測
POST uptest/_doc/1/_update
{
"script" : {
"source": "ctx._source.counter += params.count",
"lang": "painless",
"params" : {
"count" : 4
}
},
"upsert" : {
"counter" : 1
}
}
10、upsert 操作:如果要更新的文件存在,則執行指令碼進行更新,如不存在,則把 upsert中的內容作為一個新文件寫入。
查詢更新
POST twitter/_update_by_query
{
  "script": {
    "source": "ctx._source.likes++",
    "lang": "painless"
  },
  "query": {
    "term": {
      "user": "kimchy"
    }
  }
}
通過條件查詢來更新文件

