
黑科技搶先嚐(續) - Windows terminal中WSL Linux 終端的極簡美化指南
目錄
- 修改預設源,為apt-get安裝提速
- 安裝python 和 python pip
- 安裝 zsh
- 安裝powerline-font中的特定字型
- 安裝powerline-shell
- 修改~目錄下的配置檔案 .bashrc 和 .zshrc
- zsh主題定製
- 安裝 oh_my_zsh
- 從 Windows 10 的 Bash 中執行 WSL
之前,本人寫了一篇文章 黑科技搶先嚐 - Windows全新終端初體驗(附無需編譯就能安裝的Preview版本及程式碼Build全過程,介紹了玩轉Windows terminal的兩種方式。
今天這篇文章,主要介紹如何美化 Windows terminal 中 WSL 的 Linux 終端,依然是以本人最熟悉的Ubuntu為例,其他版本的 Linux 請參考本文的流程換用對應的命令。假定你已按我的上一篇文章已安裝好 Windows terminal預編譯版本,同時安裝好了 Ubuntu,並設定號了 WSL的許可權,然後就可以按本文繼續操作了。
修改預設源,為apt-get安裝提速
由於 Ubuntu官方的源實在是太慢了,建議大家快取阿里雲映象的 Ubuntu 源,其具體操作步驟如下:
首先將原配置檔案備份
sudo cp /etc/apt/sources.list /etc/apt/sources.list.20190516
然後 vim 開啟sources.list,
sudo vim /etc/apt/sources.listi(插入)模式下,在末尾輸入依次輸入每一行進行替換:
:%s/security.ubuntu/mirrors.aliyun/g
:%s/archive.ubuntu/mirrors.aliyun/g
每輸入一行,回車一次,然後就替換好了。
更新源:
sudo apt update; sudo apt upgrade安裝python 和 python pip
依次輸入如下命令:
sudo apt-get install python3
sudo apt-get install build-essential
sudo apt-get install python-pip
pip install --upgrade pip
安裝 zsh
sudo apt-get install zsh安裝powerline-font中的特定字型
從github下載字型"DejaVu Sans Mono for Powerline",並安裝。安裝字型時,選擇對應的哪一個ttf字尾的安裝即可。
手動安裝字型"Fira code" 或 "DejaVu Sans Mono for Powerline"
然後在命令列應用之,具體操作是在profiles.json中把字型設定成它,即可生效。
powerline/fonts: Patched fonts for Powerline users.
https://github.com/powerline/fonts
安裝powerline-shell
cd ~
mkdir src
cd src
git clone https://github.com/b-ryan/powerline-shell
cd powerline-shell
sudo python setup.py install
修改~目錄下的配置檔案 .bashrc 和 .zshrc
首先,插入一點背景知識:
ps1格式簡介:
shell有四種不同的命令提示,稱為PS1,PS2,PS3和PS4。 PS代表Prompt String。Windows/Linux/Ubuntu都用得比較多的是PS1指令碼。
"$PS1", "Prompt String 1" 指定命令列介面中的環境變數。
先編輯檔案 .zshrc
vim ~/.zshrc在末尾加入內容:
function powerline_precmd() {

    PS1="(powerline-shell --shell zsh ?)"

}


function install_powerline_precmd() {

  for s in "${precmd_functions[@]}"; do

    if [ "$s" = "powerline_precmd" ]; then

      return

    fi

  done

  precmd_functions+=(powerline_precmd)

}


if [ "$TERM" != "linux" ]; then

    install_powerline_precmd

fi
編輯完後更新檔案 .zshrc
source ~/.zshrc再編輯檔案.bashrc
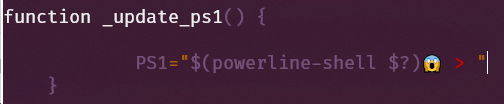
vim ~/.bashrc在末尾加入內容:
function _update_ps1() {

    PS1="(powerline-shell ?)"

}


if [ "$TERM" != "linux" ]; then

    PROMPT_COMMAND="_update_ps1; $PROMPT_COMMAND"

fi
編輯完後更新檔案 .bashrc
source ~/.bashrc然後,我隨便輸入幾個命令:
sudo su
ls
此時Windows terminal中的效果如下:

我直接就使用這個預設主題了。
那麼,如果要在命令提示符中插入emoji表情,怎麼弄呢?就在下圖相應的地方(對應檔案 .bashrc)加~
此時的 terminal 為:

更有意思的玩法可以參考:
https://loige.co/random-emoji-in-your-prompt-how-and-why/
zsh主題定製
此外,如果想更深入地定製zsh主題,推薦安裝oh_my_zsh,下面詳細介紹。
安裝 oh_my_zsh
Linux下安裝oh-my-zsh,需要在終端輸入命令:
sh -c "$(wget https://raw.githubusercontent.com/robbyrussell/oh-my-zsh/master/tools/install.sh -O -)"如果 遇到證書類似問題
apt-get install ca-certificates解決許可權問題
如果啟動時會出現zsh-syntax-highlighting許可權問題,執行下面的命令即可:
compaudit | xargs chmod g-w,o-w解除安裝oh_my_zsh的方法
uninstall_oh_my_zsh從 Windows 10 的 Bash 中執行 WSL
對於windows 10中 WSL 獨立的預設Bash視窗,只能選擇字型"DejaVu Sans Mono for Powerline",可以在介面上選擇後使用。
開始選單中搜索 bash 並開啟,

右鍵 屬性-> 字型,選字型"DejaVu Sans Mono for Powerline"。

最後的執行結果是:

Scott Hanselman:
請注意我在 prompt 中也使用了Powerline 。 我正在使用Fira Code ,它含有我需要的glyphs,但你當然也可以使用改進過的Powerline字型或使用像Nerd Fonts和它的字型補丁程式那樣的工具製作自己的字型 。 此字型補丁程式通常用於獲取你最喜歡的等寬字型,併為其新增Powerline glyphs。
注意:如果您看到字形有任何奇怪的間距問題,您可以嘗試使用--use-single-width-glyphs來解決它。 通過釋出,我認為所有這些小問題都將得到解決。 在我的終端環境下使用Fira Code沒有任何問題,您的環境可能有所不同。
參考:
修改 WSL Ubuntu 18.04 預設源為阿里雲映象 - Windows - 大象筆記
https://www.sunzhongwei.com/modify-the-wsl-ubuntu-1804-default-source-for-ali-cloud-images
b-ryan/powerline-shell: A beautiful and useful prompt for your shell
https://github.com/b-ryan/powerline-shell
How to Install Powerline Fonts, Symbols for Bash on Windows 10 - The Customize Windows
https://thecustomizewindows.com/2018/01/install-powerline-fonts-symbols-bash-windows-10/
敲黑板:更多幹貨可關注 公號「dotNET匠人」,持續輸出優質的技術文