Android6.0 Notification工作原理原始碼解析(二)
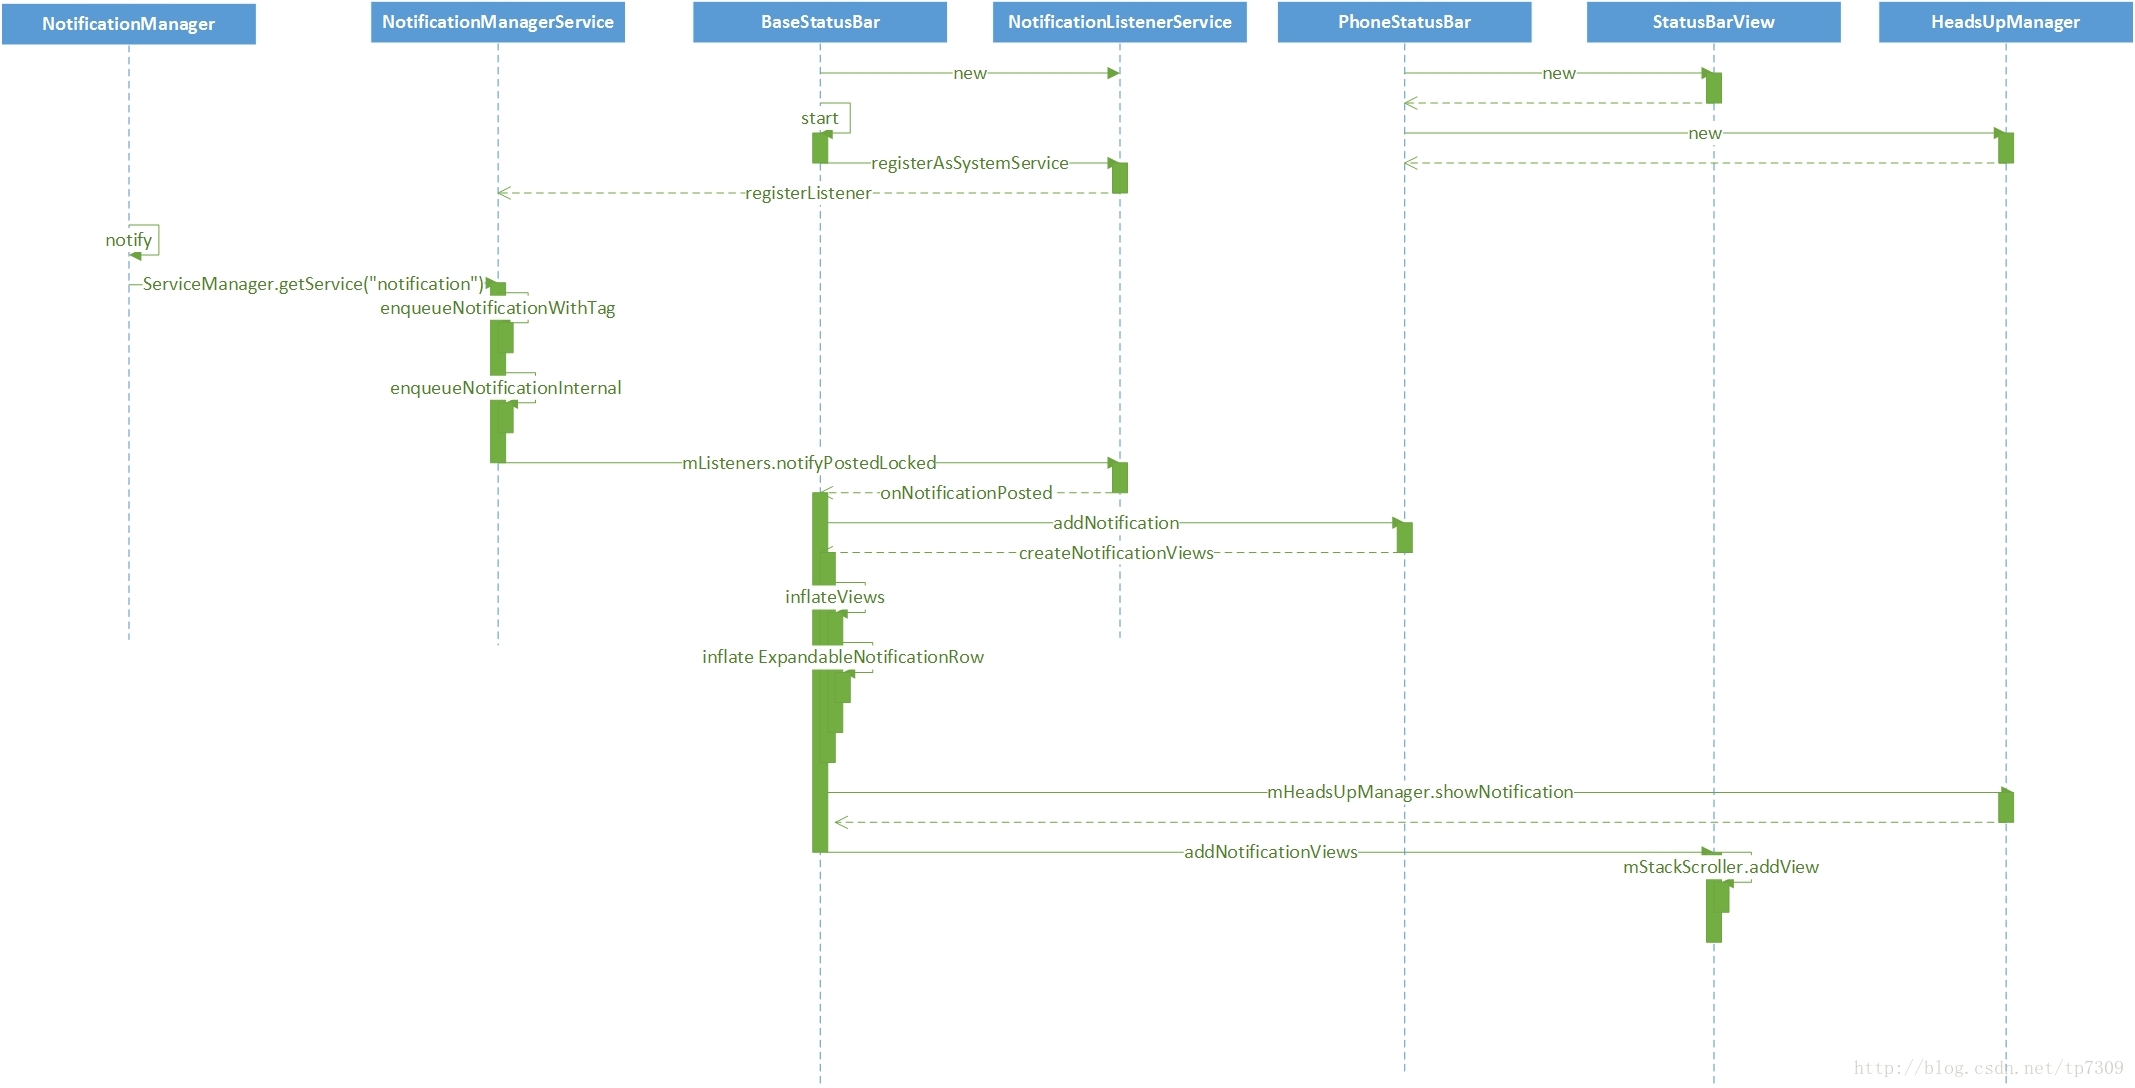
時序圖

通知的傳送是通過NotificationManager的notify()方法:
NotificationManger->notify()
public void notify(int id, Notification notification)
{
notify(null, id, notification);
}
public void notify(String tag, int id, Notification notification)
{
int[] idOut = new int[1];
INotificationManager service = getService();
String pkg = mContext.getPackageName();
...
try {
service.enqueueNotificationWithTag(pkg, mContext.getOpPackageName(), tag, id,
stripped, idOut, UserHandle.myUserId());
if (id != idOut[0]) {
Log.w(TAG, "notify: id corrupted: sent " + id + ", got back " + idOut[0]);
}
} catch (RemoteException e) {
}
}
/** @hide */
static public INotificationManager getService()
{
if (sService != null) {
return sService;
}
IBinder b = ServiceManager.getService("notification");
sService = INotificationManager.Stub.asInterface(b);
return sService;
}
可以明顯示的看到上面程式碼中的getService()通過Binder獲取到NotificationManager對應的Service,按Android系統中的命令慣例即是 NotificationManagerService, 真正的處理在此Service中。
NotificationManagerService->enqueueNotificationWithTag()
enqueueNotificationWithTag() -> enqueueNotificationInternal():
void enqueueNotificationInternal(final String pkg, final String opPkg, final int callingUid,
final int callingPid, final String tag, final int id, final Notification notification,
int[] idOut, int incomingUserId) {
...
//檢測是否是同一APP發出的,是個通知安全檢查,有問題則丟擲異常。
checkCallerIsSystemOrSameApp(pkg);
final boolean isSystemNotification = isUidSystem(callingUid) || ("android".equals(pkg)); //是否為系統通知
final boolean isNotificationFromListener = mListeners.isListenerPackage(pkg); //所有系統服務與應用已註冊的服務。
...
if (!isSystemNotification && !isNotificationFromListener) {
synchronized (mNotificationList) {
int count = 0;
final int N = mNotificationList.size();
for (int i=0; i<N; i++) {
...
count++;
//最大50條
if (count >= MAX_PACKAGE_NOTIFICATIONS) {
Slog.e(TAG, "Package has already posted " + count
+ " notifications. Not showing more. package=" + pkg);
return;
}
}
}
}
}
...
if (notification.getSmallIcon() != null) {
if (!notification.isValid()) {
throw new IllegalArgumentException("Invalid notification (): pkg=" + pkg
+ " id=" + id + " notification=" + notification);
}
}
mHandler.post(new Runnable() {
@Override
public void run() {
synchronized (mNotificationList) {
...
// blocked apps 應用被設定不允許彈出通知
if (ENABLE_BLOCKED_NOTIFICATIONS && !noteNotificationOp(pkg, callingUid)) {
if (!isSystemNotification) {
r.score = JUNK_SCORE;
Slog.e(TAG, "Suppressing notification from package " + pkg
+ " by user request.");
mUsageStats.registerBlocked(r);
}
}
if (r.score < SCORE_DISPLAY_THRESHOLD) {
// Notification will be blocked because the score is too low.
return;
}
if (notification.getSmallIcon() != null) {
StatusBarNotification oldSbn = (old != null) ? old.sbn : null;
//通知通知訊息觀察者有新通知或有通知更新。
mListeners.notifyPostedLocked(n, oldSbn);
} else {
Slog.e(TAG, "Not posting notification without small icon: " + notification); //沒圖示的通知不顯示。
if (old != null && !old.isCanceled) {
mListeners.notifyRemovedLocked(n);
}
...
}
//通知語言與震動相關處理
buzzBeepBlinkLocked(r);
}
}
});
idOut[0] = id;
}
從上面的方法中我們可以得知:
1. 如果當前應用不是系統應用並且不是已註冊的服務的話,那麼Android系統最多讓同時存在50條通知訊息。
2. 應用被設定禁止彈出通知或通知沒設定圖示的話通知也不能被彈出。
NotificationListenerService->notifyPostedLocked()
通知是被上面的mListeners.notifyPostedLocked()->notifyPosted()->INotificationListener->onNotificationPosted()方法通知到各個服務的,INotificationListener對應的處理服務即是NotificationListenerService:
private void notifyPosted(final ManagedServiceInfo info,
final StatusBarNotification sbn, NotificationRankingUpdate rankingUpdate) {
final INotificationListener listener = (INotificationListener)info.service;
StatusBarNotificationHolder sbnHolder = new StatusBarNotificationHolder(sbn);
try {
listener.onNotificationPosted(sbnHolder, rankingUpdate);
} catch (RemoteException ex) {
Log.e(TAG, "unable to notify listener (posted): " + listener, ex);
}
}
BaseStatusBar中的NotificationListenerService例項接收通知訊息
那麼這是在哪裡處理的嗎?
在Android原始碼中全域性搜尋下就可以找到以下程式碼:
private final NotificationListenerService mNotificationListener =
new NotificationListenerService() {
...
@Override
public void onNotificationPosted(final StatusBarNotification sbn,
final RankingMap rankingMap) {
if (DEBUG) Log.d(TAG, "onNotificationPosted: " + sbn);
if (sbn != null) {
mHandler.post(new Runnable() {
@Override
public void run() {
...
//// Remove existing notification to avoid stale data.
if (isUpdate) {
removeNotification(key, rankingMap);
} else {
mNotificationData.updateRanking(rankingMap); //排序
}
return;
}
if (isUpdate) {
updateNotification(sbn, rankingMap);
} else {
addNotification(sbn, rankingMap, null /* oldEntry */); //建立新通知
}
}
});
}
}
}
mNotificationListener即是NotificationListenerService的例項,它在BaseStatusBar的start方法中將此mNotificationListener關聯到NotificationManagerService中:
//BaseStatusBar.java
public void start() {
// Set up the initial notification state.
try {
mNotificationListener.registerAsSystemService(mContext,
new ComponentName(mContext.getPackageName(), getClass().getCanonicalName()),
UserHandle.USER_ALL);
} catch (RemoteException e) {
Log.e(TAG, "Unable to register notification listener", e);
}
}
//NotificationListenerService.java
@SystemApi
public void registerAsSystemService(Context context, ComponentName componentName,
int currentUser) throws RemoteException {
mSystemContext = context;
if (mWrapper == null) {
mWrapper = new INotificationListenerWrapper();
}
INotificationManager noMan = getNotificationInterface();
//即上一小節的final INotificationListener listener = (INotificationListener)info.service
noMan.registerListener(mWrapper, componentName, currentUser);
mCurrentUser = currentUser;
}
PhoneStatusBar建立通知檢視並顯示
BaseStatusBar即是用來處理狀態列相關業務的類,繼承BaseStatusBar的有PhoneStatusBar、TvStatusBar,看名字就可以得知PhoneStatusBar是用於手機螢幕而TvStatusBar是用於TV的,再繼續看PhoneStatusBar中的處理:
//PhoneStatusBar.java
@Override
public void addNotification(StatusBarNotification notification, RankingMap ranking,
Entry oldEntry) {
...
//建立通知對應的檢視
Entry shadeEntry = createNotificationViews(notification);
if (shadeEntry == null) {
return;
}
//收到通知時在螢幕上方彈出的通知提示相關處理。
boolean isHeadsUped = mUseHeadsUp && shouldInterrupt(shadeEntry);
if (isHeadsUped) {
mHeadsUpManager.showNotification(shadeEntry);
// Mark as seen immediately
setNotificationShown(notification);
}
...
addNotificationViews(shadeEntry, ranking);
...
}
上面的處理中可以很明顯的看到通過我們在最初呼叫 NotificationManager.notify() 時創建出的StatusBarNotification來創建出一個用來狀態列通知顯示的Entry,裡面存有建立好的單個通知檢視:
createNotificationViews()->inflateViews():
//BaseStatusBar.java
protected boolean inflateViews(Entry entry, ViewGroup parent) {
PackageManager pmUser = getPackageManagerForUser(
entry.notification.getUser().getIdentifier());
int maxHeight = mRowMaxHeight;
final StatusBarNotification sbn = entry.notification;
RemoteViews contentView = sbn.getNotification().contentView;
...
// create the row view
LayoutInflater inflater = (LayoutInflater) mContext.getSystemService(
Context.LAYOUT_INFLATER_SERVICE);
row = (ExpandableNotificationRow) inflater.inflate(R.layout.status_bar_notification_row,
parent, false);
//繫結點選事件處理
mNotificationClicker.register(row, sbn);
...
//呼叫RemoteViews->apply()方法繫結檢視
contentViewLocal = contentView.apply(
sbn.getPackageContext(mContext),
contentContainer,
mOnClickHandler);
...
entry.row.setHeightRange(mRowMinHeight, maxHeight);
...
從上面的程式碼中可以看到:
1. 每個通知都有個高度範圍,64dp-256dp。
2. 通知的layout模板 R.layout.status_bar_notification_row 。
3. PhoneStatusBar收到通知後最終呼叫RemoteViews->apply()來進行檢視一繫結,證實了我們上一篇文章的推測。
後面的就將View加入到StatusBarView的NotificationStackScrollLayout中,StatusBarView是在BaseStatusBar->start()方法中
