
Spring Boot入門(七):使用MyBatis訪問MySql資料庫(xml方式)
本系列部落格帶你一步一步的學習Spring Boot,如幫助到你,不勝榮幸,如有錯誤,歡迎指正!
本篇部落格我們講解下在Spring Boot中使用MyBatis訪問MySql資料庫(xml方式)的簡單用法。
本系列其它文章如下所示:
Spring Boot入門(一):使用IDEA建立Spring Boot專案並使用yaml配置檔案
Spring Boot入門(二):使用Profile實現多環境配置管理&如何獲取配置檔案值
Spring Boot入門(三):使用Scheduled註解實現定時任務
Spring Boot入門(四):開發Web Api介面常用註解總結
Spring Boot入門(五):使用JDBC訪問MySql資料庫
Spring Boot入門(六):使用MyBatis訪問MySql資料庫(註解方式)
1. 前期準備
假設你的機器已經安裝好了MySql,我們先執行如下語句建立資料庫和表:
CREATE DATABASE springbootaction_db;

create table author
(
  author_id   int auto_increment comment '作者id' primary key,
  author_name varchar(20) not null comment '姓名',
  pen_name    varchar(20) not null comment '筆名'
)
comment '作者';
2. 修改pom檔案
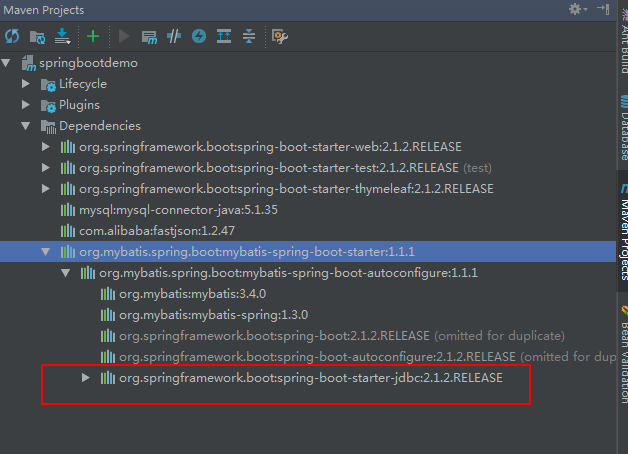
pom檔案引入mybatis的starter pom和mysql的驅動,因後面要編寫控制器,因此也引入下阿里巴巴的fastjson:
<dependency>
    <groupId>org.mybatis.spring.boot</groupId>
    <artifactId>mybatis-spring-boot-starter</artifactId>
    <version>1.1.1</version>
</dependency>

<dependency>
    <groupId>mysql</groupId>
    <artifactId>mysql-connector-java</artifactId>
    <version>5.1.35</version>
</dependency>
<dependency>
    <groupId>com.alibaba</groupId>
    <artifactId>fastjson</artifactId>
    <version>1.2.47</version>
</dependency>
說明:引入了mybatis-spring-boot-starter後,可以不再引用spring-boot-starter-jdbc,因為前者已經依賴於後者。
3. 配置資料來源
在resources/application.yml中配置資料來源:
spring:
  datasource:
    driver-class-name: com.mysql.jdbc.Driver
    url: jdbc:mysql://localhost:3306/springbootaction_db
    username: root
    password:
4. 修改配置檔案
在application.yml中新增mybatis配置:
mybatis:
  mapper-locations: classpath:mybatis/*.xml
  type-aliases-package: com.zwwhnly.springbootaction.mybatis.entity
其中,mapper-locations為mybatis xml檔案的路徑,type-aliases-package為定義的實體所在的包名。
5. 定義資料庫實體
定義資料庫實體Author:
package com.zwwhnly.springbootaction.mybatis.entity;

import com.alibaba.fastjson.annotation.JSONField;

public class Author {
    @JSONField(name = "author_id")
    private Integer authorId;
    @JSONField(name = "author_name")
    private String authorName;
    @JSONField(name = "pen_name")
    private String penName;

    public Integer getAuthorId() {
        return authorId;
    }

    public void setAuthorId(Integer authorId) {
        this.authorId = authorId;
    }

    public String getAuthorName() {
        return authorName;
    }

    public void setAuthorName(String authorName) {
        this.authorName = authorName;
    }

    public String getPenName() {
        return penName;
    }

    public void setPenName(String penName) {
        this.penName = penName;
    }
}
6. 編寫Dao層程式碼
定義介面AuthorMapperV2:
package com.zwwhnly.springbootaction.mybatis.xml;

import com.zwwhnly.springbootaction.mybatis.entity.Author;
import org.apache.ibatis.annotations.Mapper;
import org.apache.ibatis.annotations.Param;

import java.util.List;

@Mapper
public interface AuthorMapperV2 {

    int add(@Param("author_name") String authorName, @Param("pen_name") String penName);

    int update(@Param("author_name") String authorName, @Param("pen_name") String penName, @Param("id") Integer id);

    int delete(Integer id);

    Author findAuthor(@Param("id") Integer id);

    List<Author> findAuthorList();
}
注意:介面要新增@Mapper註解。
7. 編寫Service層程式碼
定義類AuthorServiceV2:
package com.zwwhnly.springbootaction.mybatis.xml;

import com.zwwhnly.springbootaction.mybatis.entity.Author;
import org.springframework.beans.factory.annotation.Autowired;
import org.springframework.stereotype.Service;

import java.util.List;

@Service
public class AuthorServiceV2 {
    @Autowired
    private AuthorMapperV2 authorMapperV2;

    public int add(String authorName, String penName) {
        return this.authorMapperV2.add(authorName, penName);
    }

    public int update(String authorName, String penName, Integer id) {
        return this.authorMapperV2.update(authorName, penName, id);
    }

    public int delete(Integer id) {
        return this.authorMapperV2.delete(id);
    }

    public Author findAuthor(Integer id) {
        return this.authorMapperV2.findAuthor(id);
    }

    public List<Author> findAuthorList() {
        return this.authorMapperV2.findAuthorList();
    }
}
注意:類新增@Service註解。
8. 新增mybatis xml檔案
在resources目錄下,新建mybatis資料夾,然後新建AuthorMapper.xml檔案,分別實現上面定義的新增,修改,刪除,獲取單個作者資訊,獲取作者列表功能:
<?xml version="1.0" encoding="UTF-8"?>
<!DOCTYPE mapper PUBLIC "-//mybatis.org//DTD Mapper 3.0//EN" "http://mybatis.org/dtd/mybatis-3-mapper.dtd">
<mapper namespace="com.zwwhnly.springbootaction.mybatis.xml.AuthorMapperV2">
    <resultMap id="authorMap" type="Author">
        <result property="authorId" column="author_id"/>
        <result property="authorName" column="author_name"/>
        <result property="penName" column="pen_name"/>
    </resultMap>

    <insert id="add">
        INSERT INTO author(author_name, pen_name)
        VALUES(#{author_name}, #{pen_name});
    </insert>
    <update id="update">
        UPDATE author
        SET author_name = #{author_name,jdbcType=VARCHAR},
        pen_name = #{pen_name,jdbcType=VARCHAR}
        WHERE author_id = #{id,jdbcType=INTEGER};
    </update>
    <delete id="delete">
        DELETE FROM author
        WHERE author_id = #{id};
    </delete>
    <select id="findAuthor" resultMap="authorMap" resultType="Author">
       SELECT author_id, author_name, pen_name
       FROM author
       WHERE author_id = #{id};
    </select>
    <select id="findAuthorList" resultMap="authorMap">
        SELECT author_id, author_name, pen_name
        FROM author;
    </select>
</mapper>
9. 編寫Controller程式碼
新建控制器AuthorControllerV2:
package com.zwwhnly.springbootaction.controller;

import com.alibaba.fastjson.JSONObject;
import com.zwwhnly.springbootaction.mybatis.entity.Author;
import com.zwwhnly.springbootaction.mybatis.xml.AuthorServiceV2;
import org.springframework.beans.factory.annotation.Autowired;
import org.springframework.web.bind.annotation.*;

import java.util.HashMap;
import java.util.List;
import java.util.Map;

@RestController
@RequestMapping(value = "/mybatis/author")
public class AuthorControllerV2 {
    @Autowired
    private AuthorServiceV2 authorServiceV2;

    /**
     * 查詢作者列表
     */
    @RequestMapping(value = "getAuthorListV2", method = RequestMethod.GET)
    public Map<String, Object> getAuthorList() {
        List<Author> authorList = this.authorServiceV2.findAuthorList();
        Map<String, Object> param = new HashMap<>();
        param.put("total", authorList.size());
        param.put("rows", authorList);
        return param;
    }

    /**
     * 查詢單個作者資訊
     */
    @RequestMapping(value = "/getAuthorV2/{authorId:\\d+}", method = RequestMethod.GET)
    public Author getAuthor(@PathVariable Integer authorId) {
        Author author = this.authorServiceV2.findAuthor(authorId);
        if (author == null) {
            throw new RuntimeException("查詢錯誤");
        }
        return author;
    }

    /**
     * 新增
     */
    @RequestMapping(value = "addV2", method = RequestMethod.POST)
    public void add(@RequestBody JSONObject jsonObject) {
        String authorName = jsonObject.getString("authorName");
        String penName = jsonObject.getString("penName");

        try {
            this.authorServiceV2.add(authorName, penName);
        } catch (Exception e) {
            e.printStackTrace();
            throw new RuntimeException("新增錯誤");
        }
    }

    /**
     * 更新
     */
    @RequestMapping(value = "/updateV2/{authorId:\\d+}", method = RequestMethod.PUT)
    public void update(@PathVariable Integer authorId, @RequestBody JSONObject jsonObject) {
        Author author = this.authorServiceV2.findAuthor(authorId);
        String authorName = jsonObject.getString("authorName");
        String penName = jsonObject.getString("penName");

        try {
            this.authorServiceV2.update(authorName, penName, author.getAuthorId());
        } catch (Exception e) {
            e.printStackTrace();
            throw new RuntimeException("更新錯誤");
        }
    }

    /**
     * 刪除
     */
    @RequestMapping(value = "/deleteV2/{authorId:\\d+}", method = RequestMethod.DELETE)
    public void delete(@PathVariable Integer authorId) {
        try {
            this.authorServiceV2.delete(authorId);
        } catch (Exception e) {
            throw new RuntimeException("刪除錯誤");
        }
    }
}
10. 使用Postman驗證
10.1 驗證新增
因為新增是Post請求,因此這裡我們使用下Postman工具:

呼叫完介面,發現數據庫新增資料成功。

然後用同樣的方法新增下魯迅的資訊。

10.2 驗證更新
呼叫更新介面將魯迅的名字從周作人修改為周樹人:
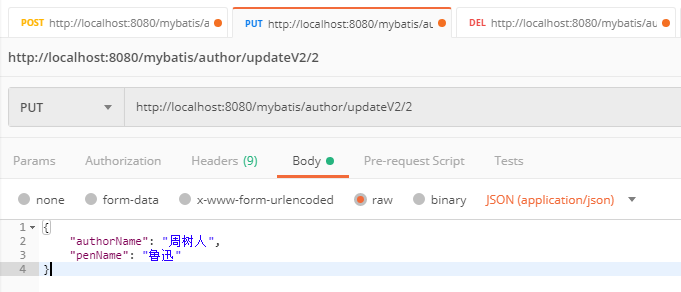
呼叫完介面,發現數據庫更新資料成功。

10.3 驗證獲取列表
在瀏覽器訪問http://localhost:8080/mybatis/author/getAuthorListV2,返回資料如下:
{
  "total": 2,
  "rows": [
    {
      "authorId": 1,
      "authorName": "王衛國",
      "penName": "路遙"
    },
    {
      "authorId": 2,
      "authorName": "周樹人",
      "penName": "魯迅"
    }
  ]
}
10.4 驗證獲取單個數據
在瀏覽器訪問http://localhost:8080/mybatis/author/getAuthorV2/1,返回如下資料:
{
  "authorId": 1,
  "authorName": "王衛國",
  "penName": "路遙"
}
10.5 驗證刪除
呼叫刪除介面,將魯迅的資料刪除:

此時訪問http://localhost:8080/mybatis/author/getAuthorListV2,返回資料只有1條了:
{
  "total": 1,
  "rows": [
    {
      "authorId": 1,
      "authorName": "王衛國",
      "penName": "路遙"
    }
  ]
}
11. 原始碼
原始碼地址:https://github.com/zwwhnly/springboot-action.git,歡迎下載。
12. 參考
Spring Boot 揭祕與實戰(二) 資料儲存篇 - MyBatis整合
歡迎掃描下方二維碼關注個人公眾號:申城異鄉人。

相關推薦
Spring Boot入門(七):使用MyBatis訪問MySql資料庫(xml方式)
本系列部落格帶你一步一步的學習Spring Boot,如幫助到你,不勝榮幸,如有錯誤,歡迎指正! 本篇部落格我們講解下在Spring Boot中使用MyBatis訪問MySql資料庫(xml方式)的簡單用法。 本系列其它文章如下所示: Spring Boot入門(一):使用IDEA建立Spring Boo
Spring Boot入門(六):使用MyBatis訪問MySql資料庫(註解方式)
本系列部落格記錄自己學習Spring Boot的歷程,如幫助到你,不勝榮幸,如有錯誤,歡迎指正! 本篇部落格我們講解下在Spring Boot中使用MyBatis訪問MySql資料庫的簡單用法。 1.前期準備 假設你的機器已經安裝好了MySql,我們先執行如下語句建立資料庫和表: CREATE DATAB
Spring Boot入門(2)使用MySQL資料庫
介紹 本文將介紹如何在Spring專案中連線、處理MySQL資料庫。 該專案使用Spring Data JPA和Hibernate來連線、處理MySQL資料庫,當然,這僅僅是其中一種方式,你也可以使用Spring JDBC或者MyBatis.
Spring Boot入門——集成Mybatis
style help 獲取自增 文件 依賴 添加 ice 配置 font 步驟: 1、新建maven項目 2、在pom.xml文件中引入相關依賴 3、創建啟動類App.java,添加自動掃描mapper 4、在application.properties文件中添加配置信息
Spring Boot (七)MyBatis代碼自動生成和輔助插件
erb resources dbcc pri artifact target 業務 ssd 只需要 一、簡介 1.1 MyBatis Generator介紹 MyBatis Generator 是MyBatis 官方出品的一款,用來自動生成MyBatis的 mapper、d
Spring Boot 入門(一):入門案例
Springboot 入門 入門案例 建立spring boot專案 在pom.xml 檔案,我們需要新增兩部分依賴。 — 讓我們的專案繼承spring-boot-starter-parent 的工程 — 加入spring-boot-starter-we
Spring Boot (七)MyBatis程式碼自動生成和輔助外掛
一、簡介 1.1 MyBatis Generator介紹 MyBatis Generator 是MyBatis 官方出品的一款,用來自動生成MyBatis的 mapper、dao、entity 的框架,讓我們省去規律性最強的一部分最基礎的程式碼編寫。 1.2 MyBatis Generator使用 MyBat
Spring Boot入門 (二) :無xml配置的實現
無xml配置的實現 自Spring3.X 以後 spring 提供了很多的註解來代替XML檔案的配置,最核心的是下面兩個註解。 ::@Configuration:: 標註該類是配置類,類似於我們定義的applicationContext.xml ::@B
Spring Boot入門二:使用ThymeLeaf+表單驗證
Thymeleaf提供了一個用於整合Spring MVC的可選模組,在應用開發中,你可以使用Thymeleaf來完全代替JSP,或其他模板引擎,如Velocity、FreeMarker等。Thymeleaf的主要目標在於提供一種可被瀏覽器正確顯示的、格式良
Spring Boot入門一:在Eclipse中使用Spring boot
新建的專案目錄大概如下 整體目錄結構和Spring專案一樣,只不過Spring boot的配置檔案遷移到了application.yml(或者application.propertis)。專案的入口為BootTestApplication.java的main函式入口。 在maven配置的pom.xml裡
Spring Boot入門(三):使用Scheduled註解實現定時任務
發布 configure code tps enables err except rup .com 在程序開發的過程中,經常會使用到定時任務來實現一些功能,比如: 系統依賴於外部系統的非核心數據,可以定時同步(每天同步一次) 系統內部一些非核心數據的統計計算,可以定時計算
(轉)Spring Boot(十七):使用 Spring Boot 上傳文件
ctype 自動 hand -h ram rect row mon enc http://www.ityouknow.com/springboot/2018/01/12/spring-boot-upload-file.html 上傳文件是互聯網中常常應用的場景之一,最典型
Spring Boot入門(一):搭建Spring Boot專案
從本篇部落格開始,我們開始進入Spring Boot的世界,它的出現使Spring的開發變得更加簡潔,因此一經推出受到眾多程式設計師的喜愛。 作為Spring Boot系列的第一篇部落格,我們先來講解下如何搭建Spring Boot專案。 如果你直接就使用的是Spring Boot,建議你有時間可以學習下S
Spring Boot入門(二):獲取配置檔案值
本篇部落格主要講解下在Spring Boot中如何獲取配置檔案的值。 1. 使用yaml配置檔案 Spring Boot預設生成的配置檔案為application.properties,不過它也支援yaml語言的配置檔案, 兩者之間的差別並不是很大,只是yaml語言的配置檔案層次結構更明顯,可讀性更強,因此目
談談今天第一次使用Mybatis訪問MySql資料庫的過程
4. 然後再在專案裡新建一個Custom的類<span style="font-size:18px;">package com.xhy; public class Custom { private Long id; private String customName; priv
Spring Boot 2.x基礎教程:使用MyBatis訪問MySQL
之前我們已經介紹了兩種在Spring Boot中訪問關係型資料庫的方式: 使用spring-boot-starter-jdbc 使用spring-boot-starter-data-jpa 雖然Spring Data JPA在國外廣泛流行,但是在國內還是MyBatis的天下。所以,今天這篇我們將具體說說如
Spring boot教程mybatis訪問MySQL的嘗試
Windows 10家庭中文版,Eclipse,Java 1.8,spring boot 2.1.0,mybatis-spring-boot-starter 1.3.2,com.github.pagehelper 5.1.6 本文記錄了昨晚到今早使用spring boot專案整合m
Spring Boot簡明教程之資料訪問(三):MyBatis
Spring Boot簡明教程之資料訪問(三):MyBatis 文章目錄 Spring Boot簡明教程之資料訪問(三):MyBatis MyBatis簡介 使用註解進行資料訪問 專案建立 專案目錄
Spring boot(七):Spring boot+ mybatis 多資料來源最簡解決方案
多資料來源一般解決哪些問題?主從模式或者業務比較複雜需要連線不同的分庫來支援業務。 直接上程式碼。 配置檔案 pom包依賴,該依賴的依賴。主要是資料庫這邊的配置: mybatis.config-locations=classpath:mybatis/mybati
Spring Boot (七): Mybatis極簡配置
Spring Boot (七): Mybatis極簡配置 1. 前言 ORM 框架的目的是簡化程式設計中的資料庫操作,經過這麼多年的發展,基本上活到現在的就剩下兩家了,一個是宣稱可以不用寫 SQL 的 Hibernate ,一個是對 SQL 非常友好的 Mybaties ,,兩者各有特點,在企業級系統開發