
緣起 Dubbo ,講講 Spring XML Schema 擴充套件機制
背景
在 Dubbo 中,可以使用 XML 配置相關資訊,也可以用來引入服務或者匯出服務。配置完成,啟動工程,Spring 會讀取配置檔案,生成注入 相關 Bean。那 Dubbo 如何實現自定義 XML 被 Spring 載入讀取?
Spring XML Schema 擴充套件機制。從 Spring 2.0 開始,Spring 開始提供了一種基於 XML Schema 格式擴充套件機制,用於定義和配置 bean。
Spring XML Schema 擴充套件機制
實現 Spring XML Schema 擴充套件,其實非常簡單,只需要完成下面四步。
- 建立 XML Schema 檔案,由於該檔案字尾名為 xsd,下面稱為 XSD 檔案。
- 編寫實現一個或多個
BeanDefinitionParser。 - 編寫
NamespaceHandler實現類。 - 註冊
NamespaceHandler以及 XSD 檔案。
我們按照以上步驟,最終完整 Spring 解析如下配置。
<?xml version="1.0" encoding="UTF-8"?>

<beans xmlns="http://www.springframework.org/schema/beans"

       xmlns:xsi="http://www.w3.org/2001/XMLSchema-instance"
       xmlns:demo="http://www.test.com/demo"
       xsi:schemaLocation="http://www.springframework.org/schema/beans https://www.springframework.org/schema/beans/spring-beans.xsd

        http://www.test.com/demo http://www.test.com/demo/demo.xsd">

    <demo:application name="test" id="test"/>
</beans>
建立 XSD 檔案
XSD 檔案,主要用來定義 XML 格式,用來驗證 XML 合法性。在 IDE 中,匯入 XSD 檔案,編輯 XML 檔案可以獲得相關提示。
下面我們生成一個 XSD 檔案。
<?xml version="1.0" encoding="UTF-8"?>
<xsd:schema xmlns="http://www.test.com/demo"
            xmlns:xsd="http://www.w3.org/2001/XMLSchema"
            xmlns:beans="http://www.springframework.org/schema/beans"
            targetNamespace="http://www.test.com/demo"
            elementFormDefault="qualified"
            attributeFormDefault="unqualified">

    <xsd:import namespace="http://www.springframework.org/schema/beans"/>

    <xsd:element name="application">
        <xsd:complexType>
            <xsd:complexContent>
                <xsd:extension base="beans:identifiedType">
                    <xsd:attribute name="name" type="xsd:string" use="required"/>
                </xsd:extension>
            </xsd:complexContent>
        </xsd:complexType>
    </xsd:element>

</xsd:schema>
上面 XSD 檔案中 http://www.test.com/demo 為自定義名稱空間地址,下面將會使用到。
實現 BeanDefinitionParser
這裡實現 BeanDefinitionParser,真正解析 XML 動作在這裡完成。
由於上面的例子比較簡單,我們可以直接繼承 Spring 提供的抽象類 AbstractSingleBeanDefinitionParser,然後實現相關方法就可以了。
public class DemoBeanDefinitionParser extends AbstractSingleBeanDefinitionParser {

    /**

     * 返回最會需要注入 Spring Bean 的型別
     * @param element
     * @return
     */
    @Override
    protected Class<?> getBeanClass(Element element) {
        return DemoApplication.class;
    }

    /***
     * 這個方法完成真正解析動作
     * @param element
     * @param builder
     */
    @Override
    protected void doParse(Element element, BeanDefinitionBuilder builder) {
        String name=element.getAttribute("name");
        builder.addPropertyValue("name",name);
    }
}
當然也可以直接實現 BeanDefinitionParser,這樣更加靈活,但是這樣相比於上面這個就比較複雜了。
public class BeanApplicationDefinitionParser implements BeanDefinitionParser {

    @Override
    public BeanDefinition parse(Element element, ParserContext parserContext) {

        String name=element.getAttribute("name");
        // Bean 定義,最後根據這個生產 Bean
        RootBeanDefinition rootBeanDefinition=new RootBeanDefinition();
        rootBeanDefinition.setBeanClass(DemoApplication.class);
        rootBeanDefinition.setLazyInit(false);
        // 新增解析的屬性
        rootBeanDefinition.getPropertyValues().add("name",name);
        // 將生成的 BeanDefinition 註冊,少了這一步將會導致最後生成 Bean 時報錯
        parserContext.getRegistry().registerBeanDefinition("application",rootBeanDefinition);
        return rootBeanDefinition;
    }
}
實現 NamespaceHandler
這一步實現 NamespaceHandler,開發者自定義 NamespaceHandler 只要繼承 NamespaceHandlerSupport 抽象類,實現 init 方法。在這個方法中註冊上面一步實現 BeanDefinitionParser。
public class DemoNameSpaceHandler extends NamespaceHandlerSupport {

    @Override

    public void init() {

        // elementName 為名稱空間
        registerBeanDefinitionParser("application",new BeanApplicationDefinitionParser());
    }
}
註冊 XSD 以及 NamespaceHandler
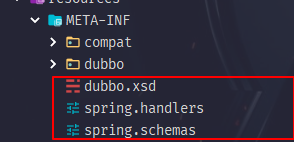
這一步我們需要在 META-INF 中生成兩個配置檔案,分別為 spring.handlers,spring.schemas。
spring.schemas 指定 XSD 檔案路徑。
http\://www.test.com/demo/demo.xsd=com/spring/learning/xml/schemas/autoring/leanrn/demo.xsdspring.handlers 指定 NamespaceHandler 完整類名,既包含前面的包名。
這裡需要注意的是
:需要進行轉義
測試執行
首先我們生產 Spring XML 配置檔案。
<?xml version="1.0" encoding="UTF-8"?>

<beans xmlns="http://www.springframework.org/schema/beans"
    xmlns:xsi="http://www.w3.org/2001/XMLSchema-instance"

       xmlns:demo="http://www.test.com/demo"
       xsi:schemaLocation="http://www.springframework.org/schema/beans https://www.springframework.org/schema/beans/spring-beans.xsd

        http://www.test.com/demo http://www.test.com/demo/demo.xsd">

    <demo:application name="test" id="test"/>
</beans>
這裡需要注意需要使用 XSD 檔案中定義 http://www.test.com/demo。
接著我們使用 SpringBoot ,匯入 XML 檔案,然後執行。
@SpringBootApplication
@ImportResource(locations = {"classpath:applicationContext.xml"})
public class XmlSchemaApplication {


    public static void main(String[] args) {
        ConfigurableApplicationContext applicationContext = SpringApplication.run(XmlSchemaApplication.class, args);
        DemoApplication demoApplication=applicationContext.getBean(DemoApplication.class);
        System.out.println("application name is "+demoApplication.getName());
    }
}
輸出結果為:
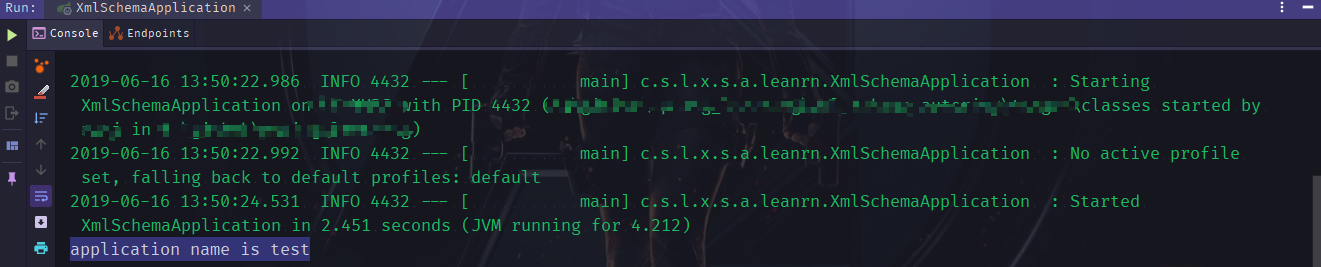
application name is test
Spring XML 擴充套件機制原始碼研究
這裡我們主要研究自定義 XML 擴充套件檔案如何被 Spring 載入。
Spring 啟動過程中會通過 BeanDefinitionDocumentReader 讀取 beans 標籤裡面所有配置,這個過程將會通過 BeanDefinitionParserDelegate#parseCustomElement 解析自定義元素。
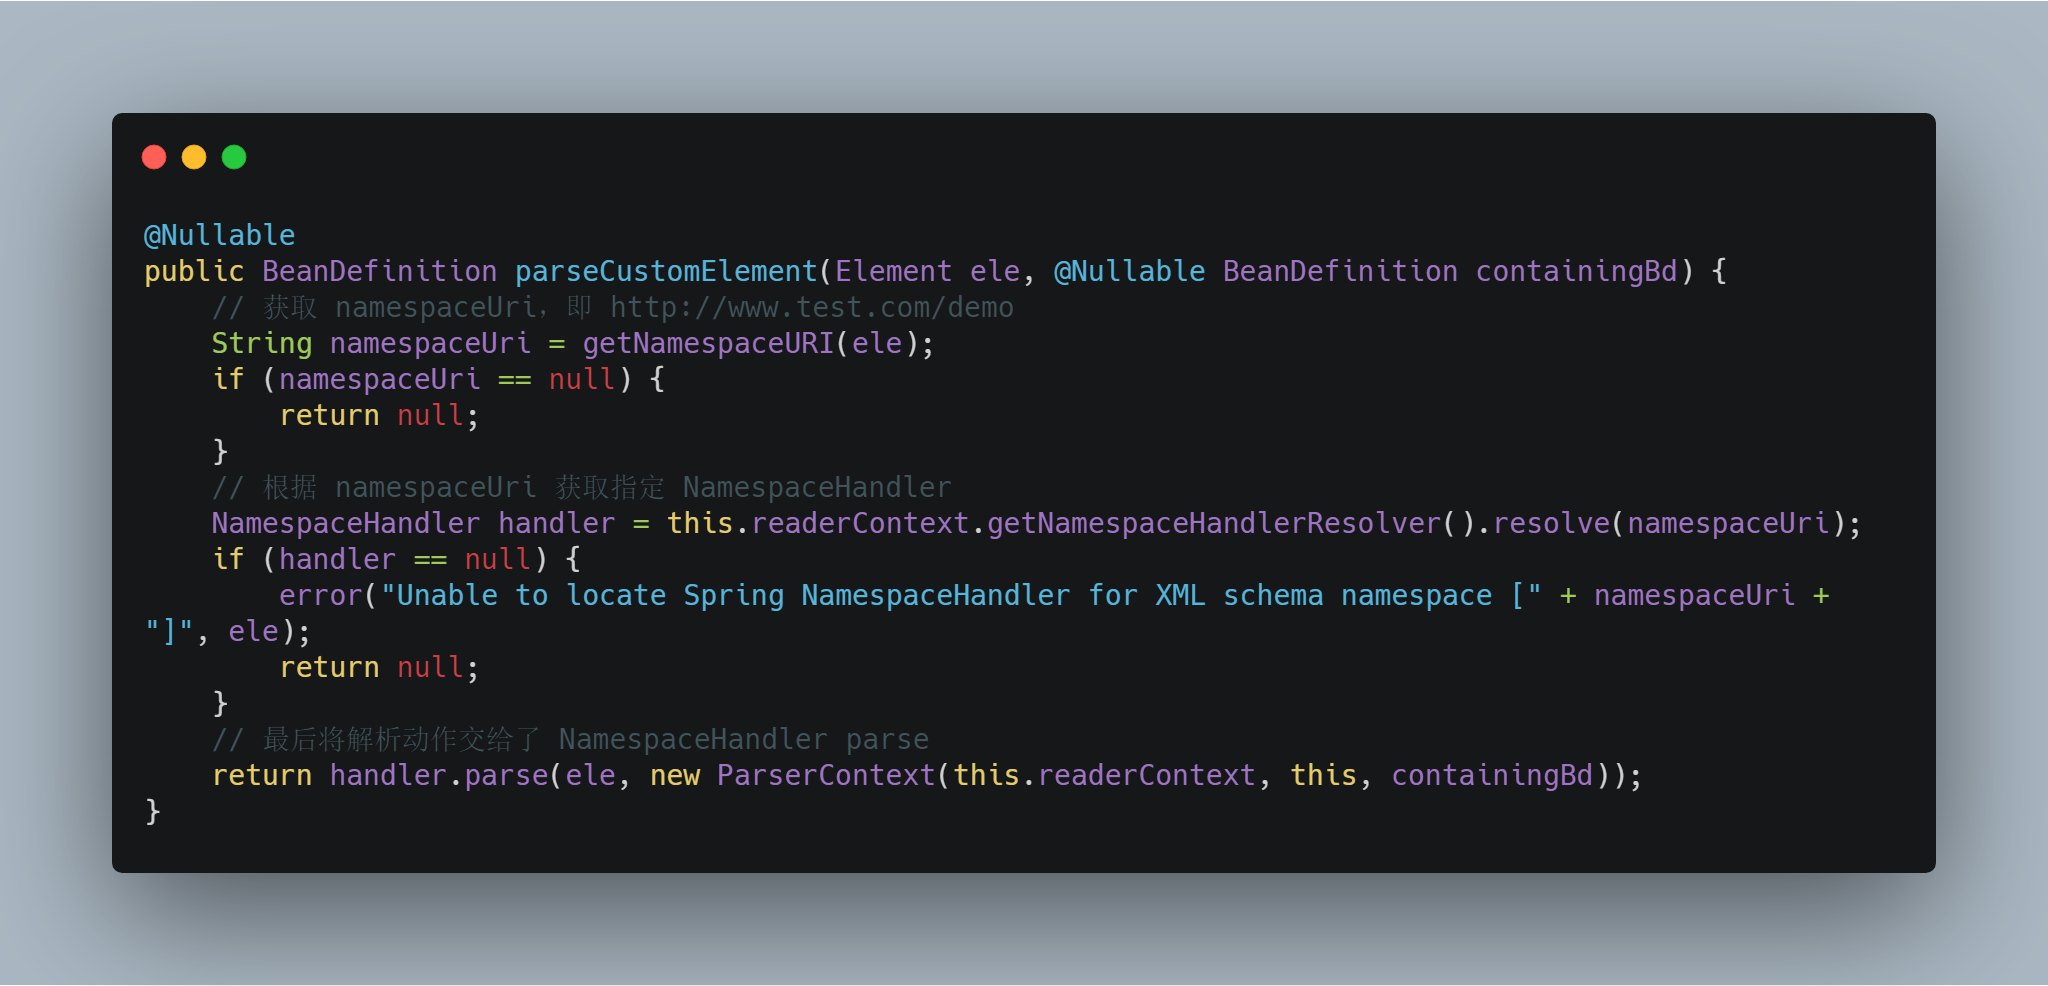
上面解析過程可以獲得自定義 NamespaceHandler,然後呼叫 parse 方法解析。
接著我們檢視 NamespaceHandlerResolver#resolve 方法,檢視如何獲取自定義 NamespaceHandler 。
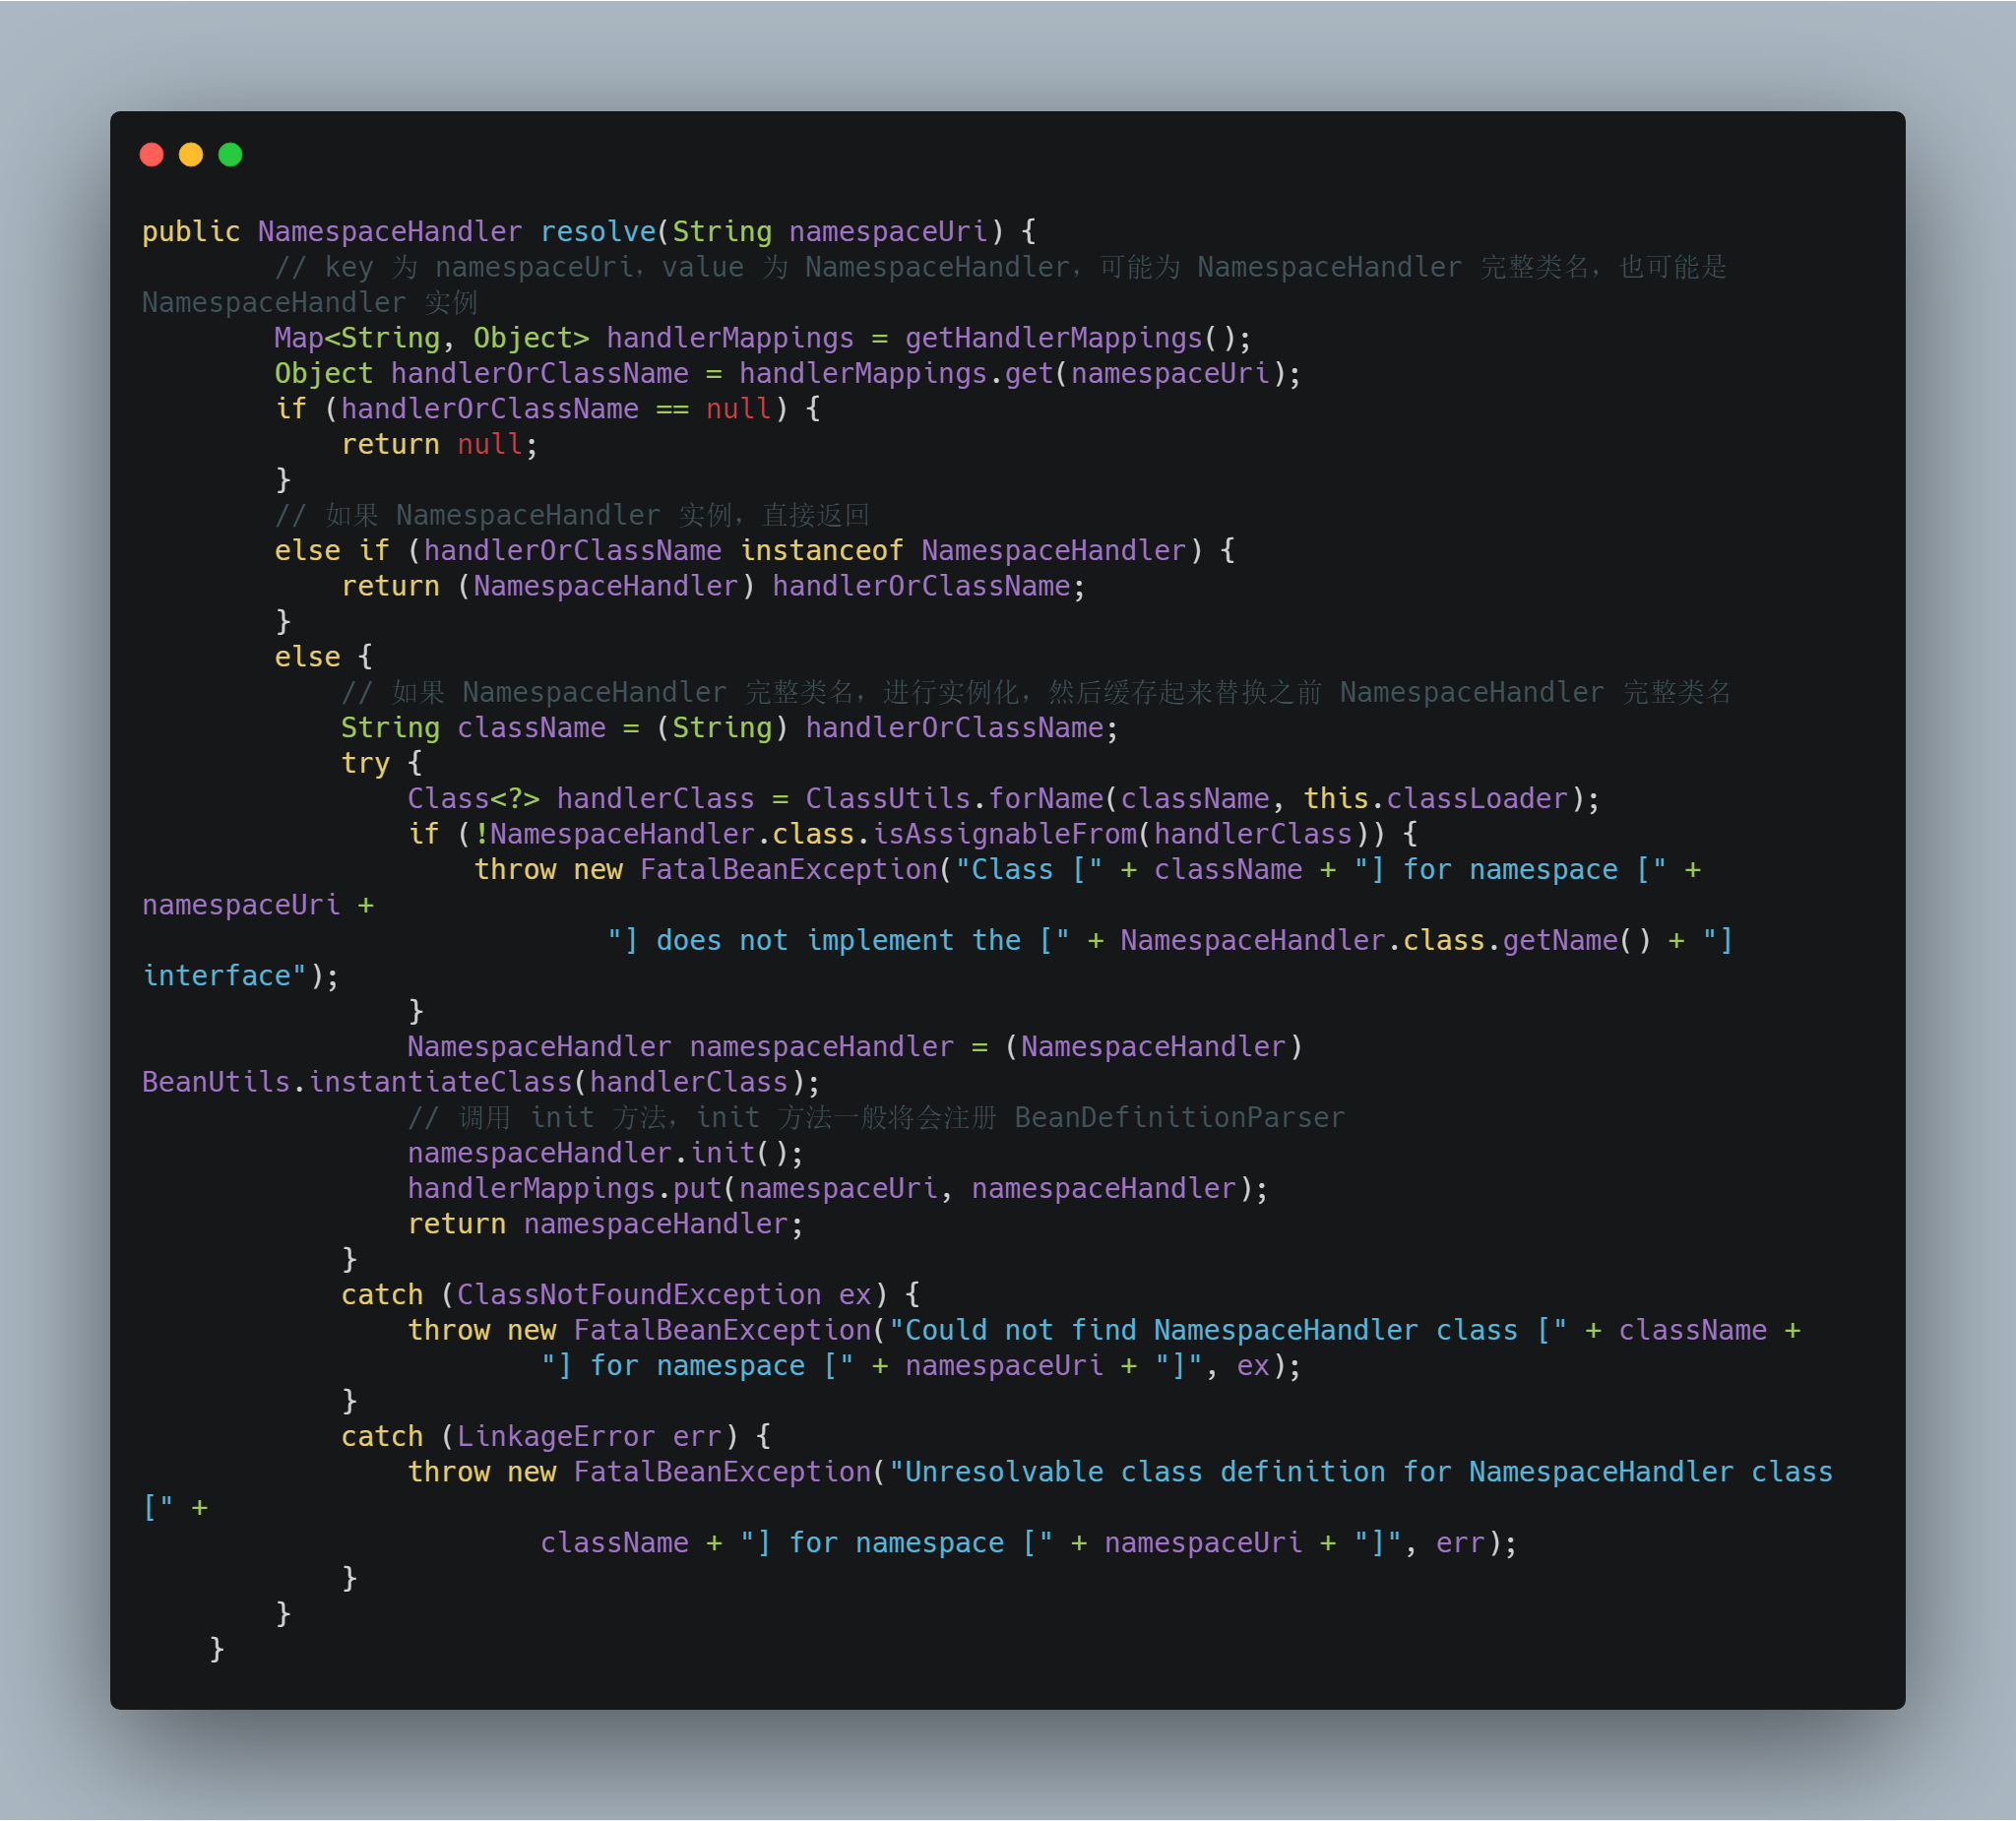
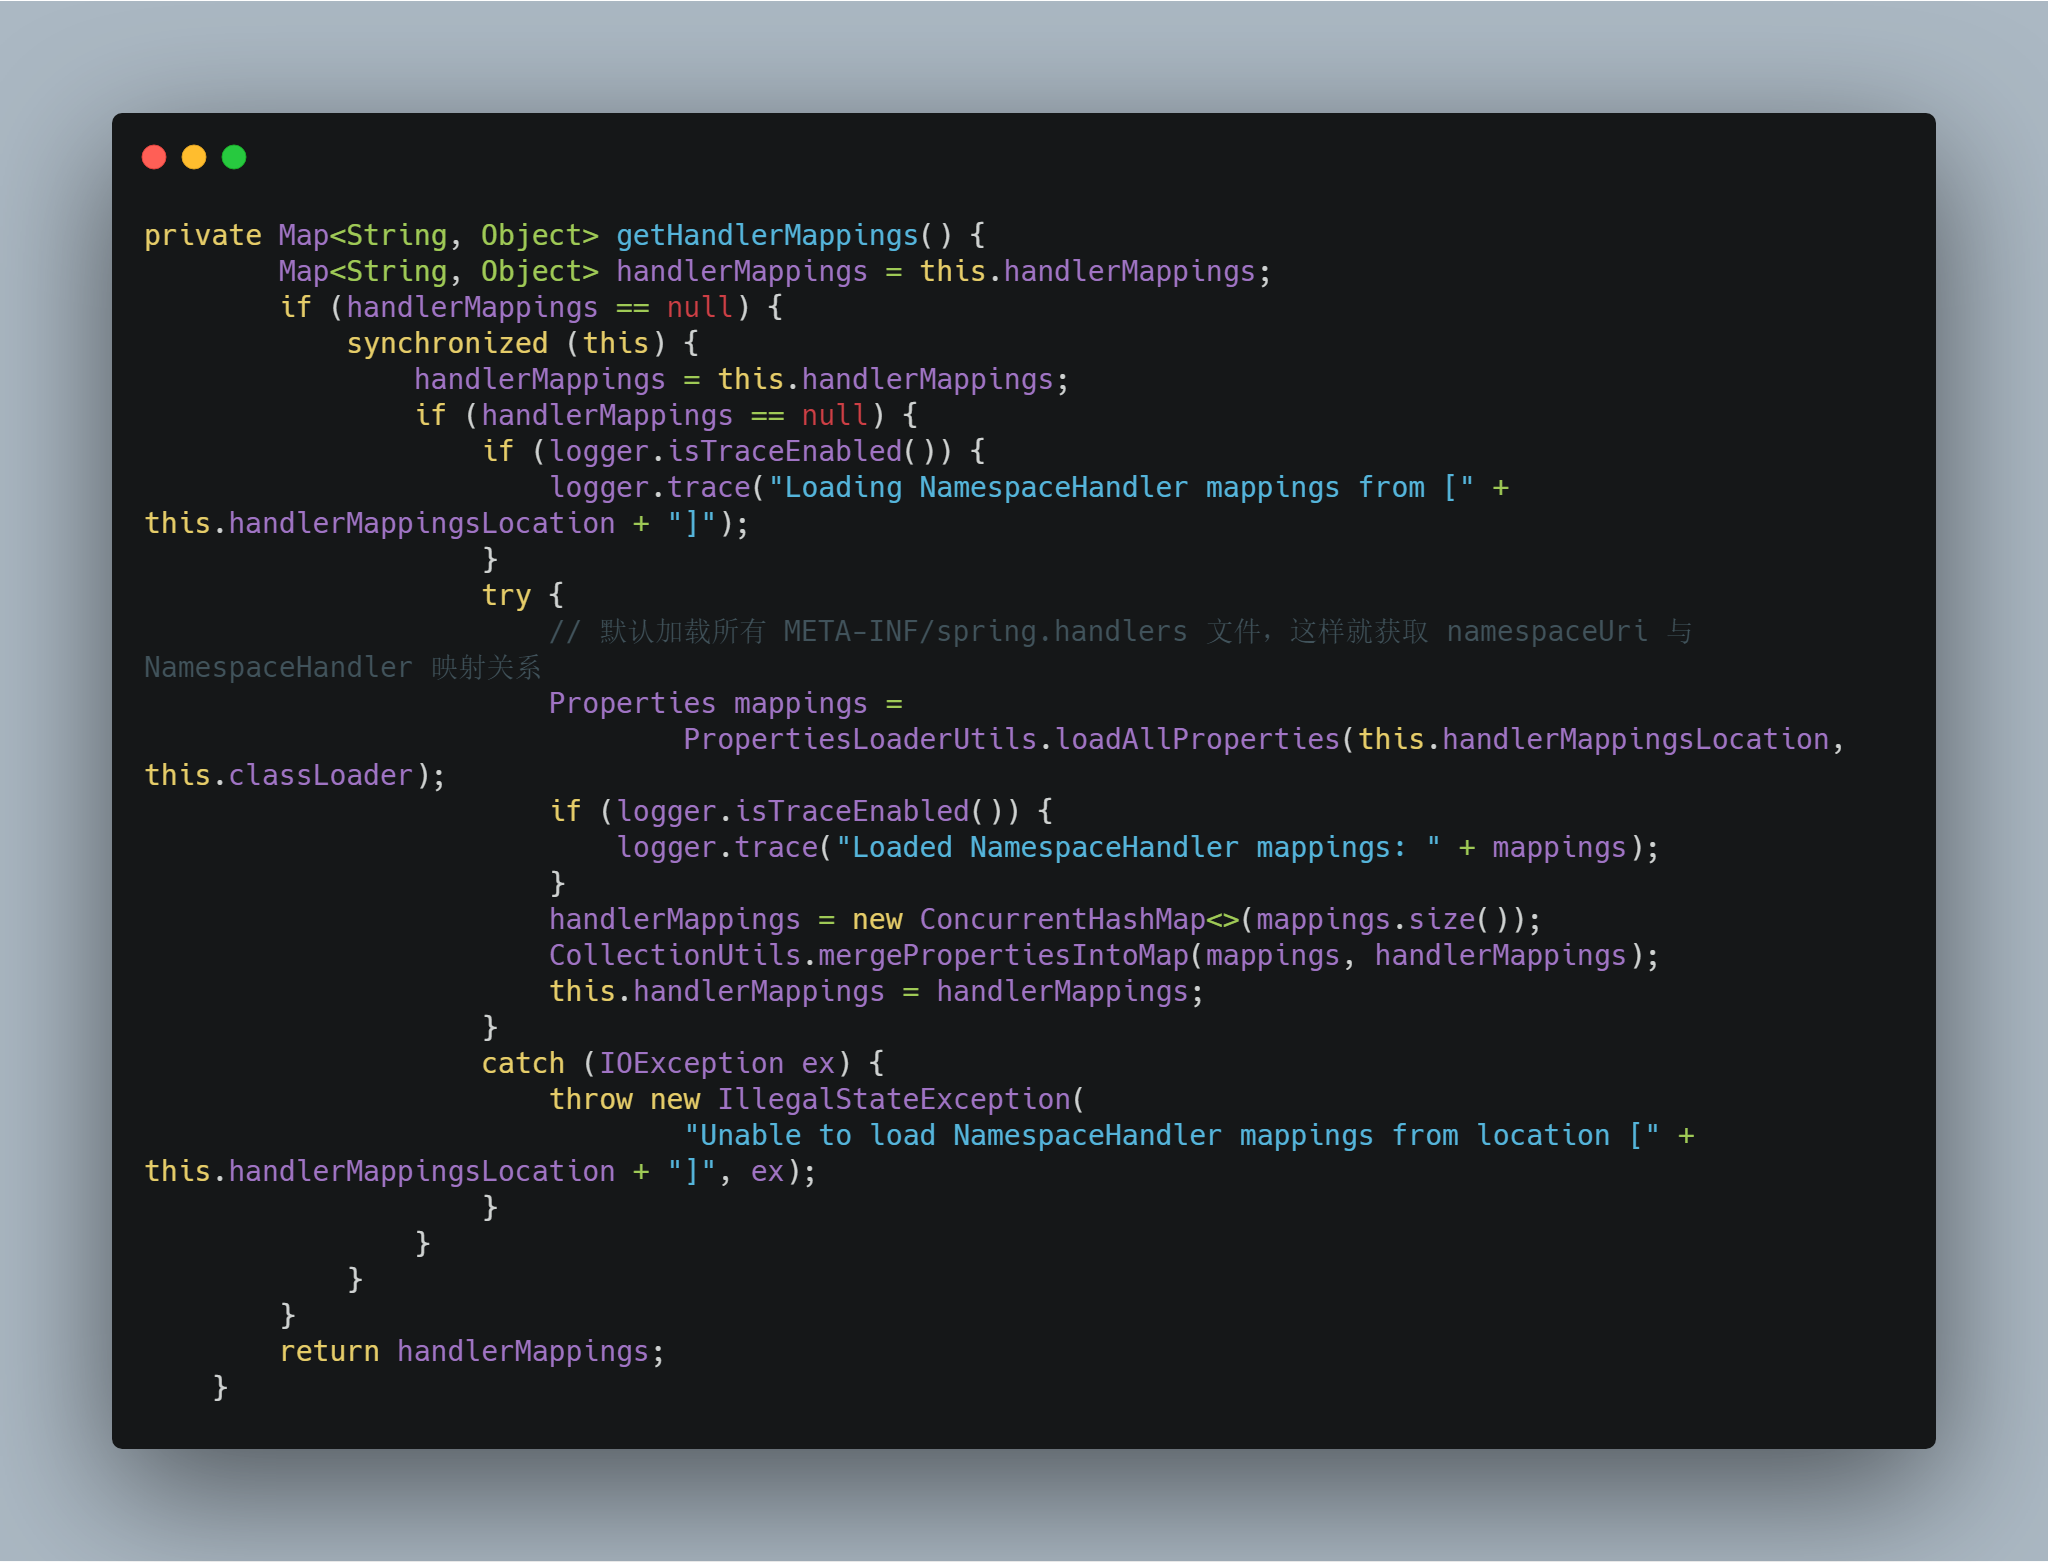
在這個方法中,主要是從 handlerMappings 快取中獲取 NamespaceHandler。而該快取來源於 getHandlerMappings 方法,這個方法將會載入我們上面自定義 spring.handlers 檔案。
看完 Spring 載入 NamespaceHandler 過程,下面我們檢視最重要 BeanDefinition 如何生成。
上面已經講到 Spring 會使用 NamespaceHandler.parse 解析,由於我們繼承了 NamespaceHandlerSupport,檢視裡面具體實現。
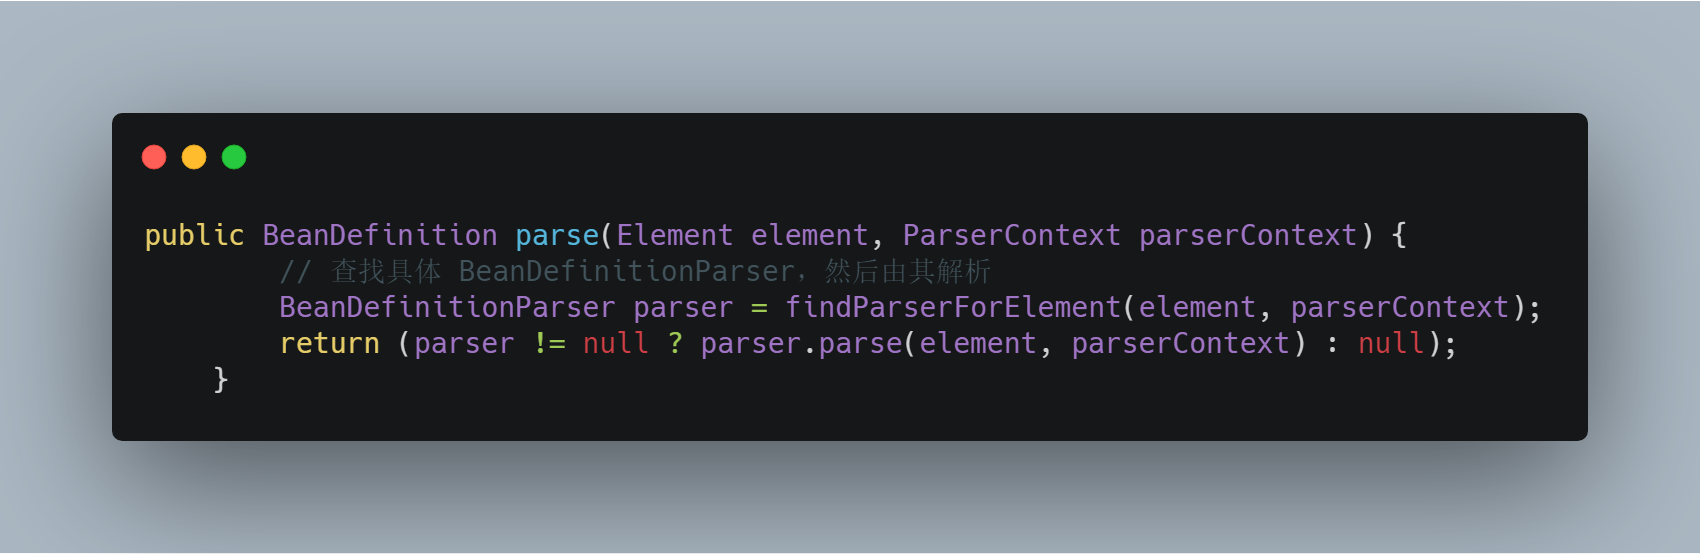
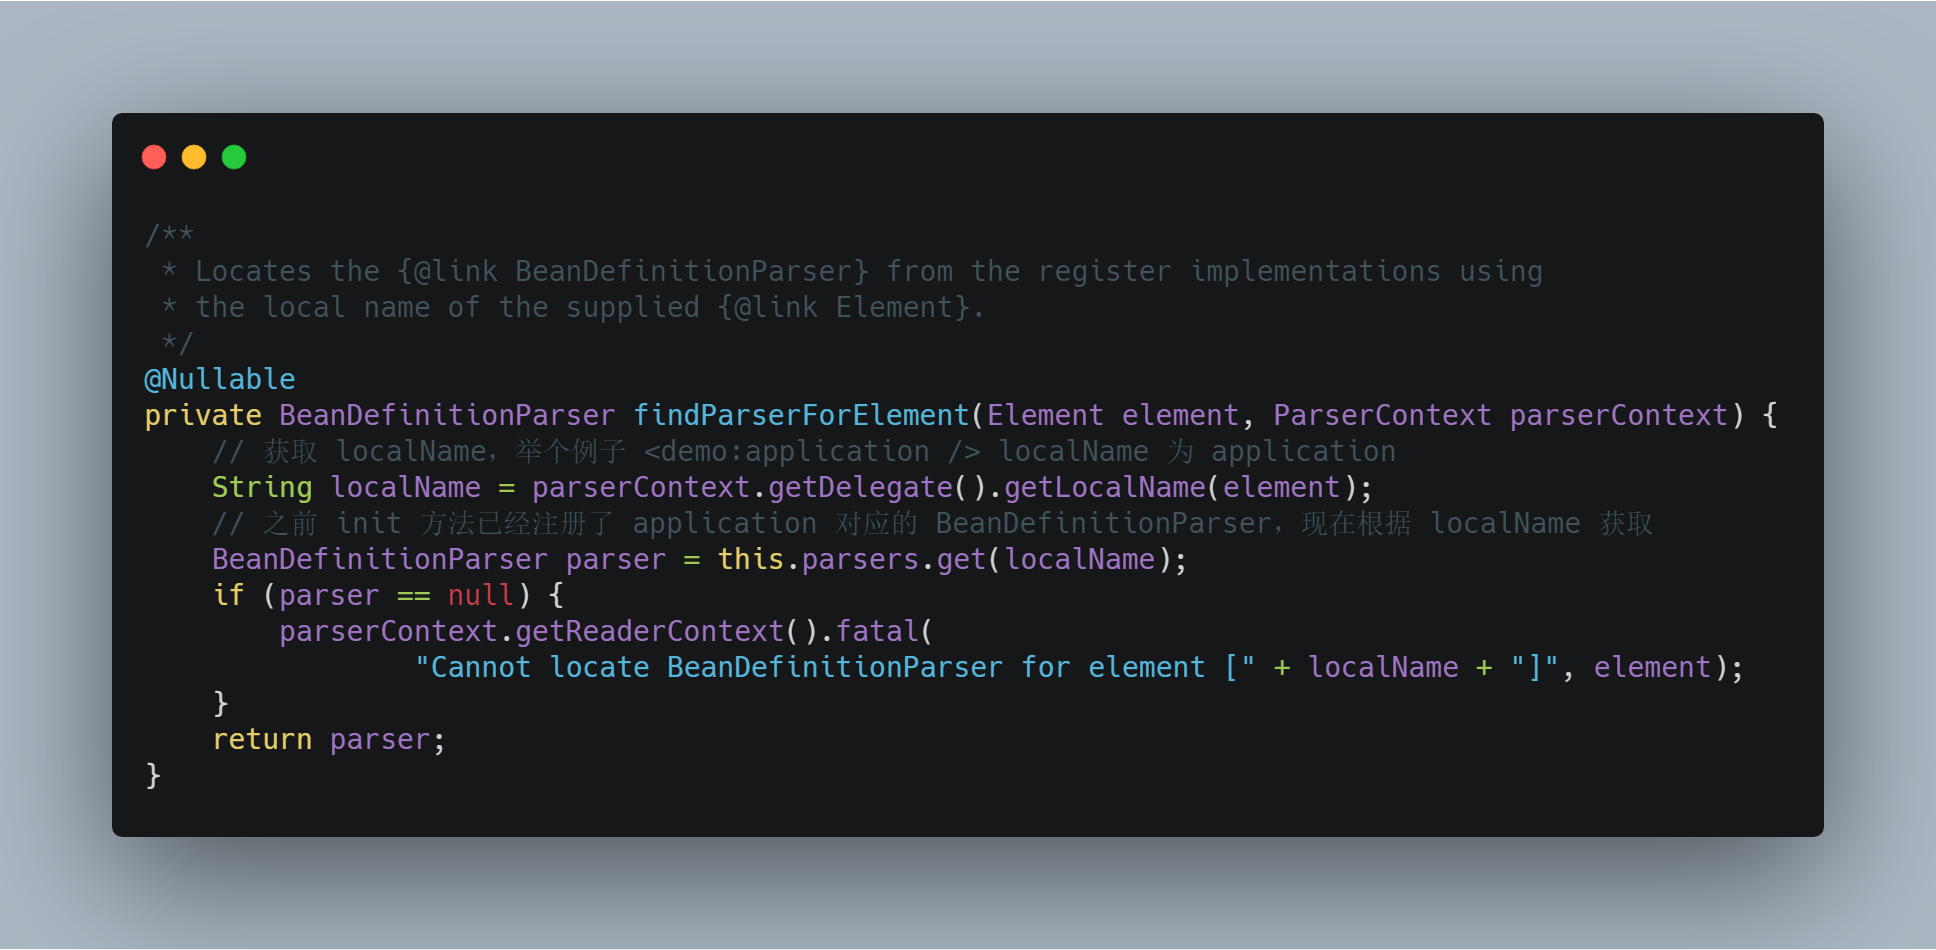
獲取到 BeanDefinition 會將其註冊到容器中,然後會通過 BeanDefinition生成 Bean。這個生成過程不屬於本章節內容,所以不再概述,感興趣同學可以自行搜尋。
Dubbo XML Schema 擴充套件實現
最後我們檢視 Dubbo XML Schema 擴充套件如何實現。
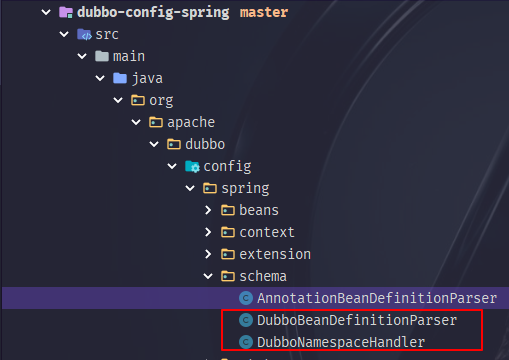
可以看到 Dubbo XML Schema 擴充套件剛好對應 Spring 四個標準的步驟。
總結
最後用一張圖片總結全文內容。

幫助文件
xsd-custom-registration
Spring中的XML schema擴充套件機制

相關推薦
緣起 Dubbo ,講講 Spring XML Schema 擴充套件機制
背景 在 Dubbo 中,可以使用 XML 配置相關資訊,也可以用來引入服務或者匯出服務。配置完成,啟動工程,Spring 會讀取配置檔案,生成注入 相關 Bean。那 Dubbo 如何實現自定義 XML 被 Spring 載入讀取? Spring XML Schema 擴充套件機制。從 Spring 2.0
聊聊spring的那些擴充套件機制
1.背景 慎入:本文將會有大量程式碼出入。 在看一些框架原始碼的時候,可以看見他們很多都會和Spring去做結合。舉個例子dubbo的配置: 很多人其實配置了也就配置了,沒有去過多的思考:為什麼這麼配置spring就能識別,dubbo就能啟動? 如果你也需
xml(可擴充套件標記語言)dtd(xml約束,文件型別定義)schema(功能比dtd更強大,用以定義xml檔案。字尾名為xsd檔案)
xml:要理解什麼是xml檔案,和html(超文字標記語言)做比較,就很清晰了。 html:是一種可在瀏覽器中顯示的檔案,主要功能是將裡面的文字內容靜態的展示出來,用於顯示資料。 html使用的標籤html語言規定好的,每個
logback-spring.xml的schema
style flow ace schema 1.0 ring target java pan <?xml version="1.0" encoding="utf-8" ?> <configuration xmlns:xsi="http://www
阿裏Dubbo瘋狂更新,關Spring Cloud什麽事?
dubbo spring cloud最近,開源社區發生了一件大事,那個全國 Java 開發者使用最廣的開源服務框架 Dubbo 低調重啟維護,並且 3 個月連續發布了 4 個維護版本。我上次在寫放棄Dubbo,選擇最流行的Spring Cloud微服務架構實踐與經驗總結這篇文章的時候,就有很多的網友給我留言說
使用web.xml方式載入Spring時,獲取Spring context的兩種方式
使用web.xml方式載入Spring時,獲取Spring context的兩種方式: 1、servlet方式載入時: 【web.xml】 <servlet> &nbs
Spring Boot中擴充套件XML請求和響應的支援
在Spring Boot中,我們大多時候都只提到和用到了針對HTML和JSON格式的請求與響應處理。那麼對於XML格式的請求要如何快速的在Controller中包裝成物件,以及如何以XML的格式返回一個物件呢? 實現原理:訊息轉換器(Message Converter) 在擴充套件上述問題之前,我們先要知
spring boot整合dubbo,Spring boot +Dubbo,簡易的配置方式
剛做完一個基於motan的專案不久,便去看看dubbo的新特性了,dubbo自上年9月恢復更新到現在大概半年多,發現已經有和spring boot整合的配置了。個人喜歡的配置方式優先順序一般都是資原始
Spring 自定義 XML 配置擴充套件
XML 配置用的越來越少了,不過還是有比較瞭解一下 Spring 對 XML 的擴充套件機制。Spring 是基於 Dom 進行操作的。 可以先看看官方文件的介紹: 9.2. XML Schema Authoring 9.2.1. Introduction Since
Spring Boot中擴充套件XML請求和響應實戰
一 點睛 對於XML格式的請求要如何快速的在Controller中包裝成物件,以及如何以XML的格式返回一個物件,被篇將討論這一方面的主題。 二 訊息轉換器 Spring Boot中處理HTTP請求的實現是採用的Spring MVC。而在Spring MVC中有一個訊息
打包spring專案遇到的坑 Unable to locate Spring NamespaceHandler for XML schema ……shcema/context 產生的原因及解決方法
圖1 圖2 問題原因:導致該問題的原因就是打包的時候,同時將 spring-context 和 spring-aop包提取到了我們的程式應用的包中,在package過程中,這2個依賴包的 XML schema 重名了,到aop將context的 spring.schemas覆
logback的使用和logback.xml詳解,在Spring專案中使用log列印日誌
一、logback的介紹 Logback是由log4j創始人設計的另一個開源日誌元件,官方網站: http://logback.qos.ch。它當前分為下面下個模組: logback-core:其它兩個模組的基礎模組 logback-classic:它是log4j的一個改良版本,同時它完整實現了sl
基於spring的schema自定義擴充套件(二)
上文分析了spring如何解析xml中標籤 自定義schema規範約束 新建test-schema.xsd檔案定義如下內容 <xsd:schema xmlns="http://www.myhost.com/schema/demo" xmlns:xsd="htt
fastJson與springmvc結合,在spring-mvc.xml中的配置,解決415報錯
<!-- 會自動註冊了validator ConversionService --> <mvc:annotation-driven> <!--enableMatrixVariables="true">-->
不認識spring xml配置檔案dtd和xsd型別,血與淚的教訓啊
今天在初次使用spring原始碼的時候,在spring4.2中使用了xsd型別的配置檔案,導致一直解析配置檔案出錯: 找不到元素 'beans' 的宣告 後來從原始碼工程的test/sources目錄中copy新的dtd格式,該巴改巴就成功了。真是汗啊(⊙﹏⊙)b 記住了,
Spring讀取Properies中引數,properies或xml檔案不在src下
首先,程式讀取取檔案, (程式碼中獲取路徑方式就比較廣泛了,例:System.getProperty("user.dir");獲取工作目錄;不像spring配置檔案中只能獲取WEB-INF或者使用classpath) String userDir=System.getPr
0920-logback-spring.xml自定義按時間分割日誌,指定某個類輸出到某個檔案
廢話不多說,直接看程式碼,裡面有註釋很好理解 目錄結構 <?xml version="1.0" encoding="utf-8" ?> <configuration xmlns="http://ch.qos.logback/xml/ns/logb
spring mvc 怎麼指定spring.xml的配置檔案,在web.xml中指定
web.xml檔案配置 <?xml version="1.0" encoding="UTF-8"?> <web-app xmlns:xsi="http://www.w3.org/2001/XMLSchema-instance" xmlns="http://
關於xmlspy對xml Schema校驗xml文件,生成指定xml格式資料的操作
對傳入xml格式的資料,往往需要轉換成指定格式的資料,這時候需要xml Schema來進行實現。傳入報文如下:Xml Schema準換模板:使用xmlSpy進行驗證,轉換後的模板為:關於xmlSpy的使用:1.將輸入xml文件和轉換xslt模板在xmlSpy中開啟2.顯示介面
建立的maven專案,右鍵new ->XML Configuration File 時,無Spring Config選項
問題描述:建立的maven專案,右鍵new ->XML Configuration File 時,無Spring Config選項。即沒有下圖中的選項 按圖示選擇,第一步;點選Modul