
Spring Boot基本操作
1 Pom****檔案
1.1 spring-boot-starter-parent
表示當前pom檔案從spring-boot-starter-parent繼承下來,在spring-boot-starter-parent中提供了很多預設配置,
可以簡化我們的開發。
<parent> <groupId>org.springframework.boot</groupId> <artifactId>spring-boot-starter-parent</artifactId> <version>2.1.4.RELEASE</version> <relativePath/> <!-- lookup parent from repository --> </parent>
- Java版本和編碼方式
<parent> <groupId>org.springframework.boot</groupId> <artifactId>spring-boot-starter-parent</artifactId> <version>2.1.4.RELEASE</version> <relativePath/> <!-- lookup parent from repository --> </parent> - 依賴管理spring-boot-dependencies <properties> <activemq.version>5.15.9</activemq.version> <antlr2.version>2.7.7</antlr2.version> <appengine-sdk.version>1.9.73</appengine-sdk.version> <artemis.version>2.6.4</artemis.version> ... </properties>
這樣比如使用starter-web的時候就不需要指定版本號 <dependency> <groupId>org.springframework.boot</groupId> <artifactId>spring-boot-starter-web</artifactId> <version>2.1.4.RELEASE</version> </dependency
使用自己的parent專案
這時候將依賴管理的問題放到dependencyManagement中。 官網說明文件見:13.2.2 Using Spring Boot without the Parent POM
<dependencyManagement> <dependencies> <dependency> <groupId>org.springframework.boot</groupId> <artifactId>spring-boot-dependencies</artifactId> <version>2.1.4.RELEASE</version> <type>pom</type> <scope>import</scope> </dependency> </dependencies> </dependencyManagement>
1.2 打包管理
使用mvn package打包的plugin。
<build> <plugins> <plugin> <groupId>org.springframework.boot</groupId> <artifactId>spring-boot-maven-plugin</artifactId> </plugin> </plugins> </build>
1.3 Starters
官網見:13.5 Starters
Starters are a set of convenient dependency descriptors that you can include in your application. You get a one-stop shop for all the Spring and related technologies that you need without having to hunt through sample code and copy-paste loads of dependency descriptors. For example, if you want to get started using Spring and JPA for database access, include the spring-boot-starter-data-jpa dependency in your project.
- 官方starter命名 spring-boot-starter-*
- 自定義starter命名 thirdpartyproject-spring-boot-starter
- spring-boot-web-starter 檢視其diagram,可以排除某個依賴
<dependency> <groupId>org.springframework.boot</groupId> <artifactId>spring-boot-starter-web</artifactId> <exclusions> <exclusion> <groupId>org.springframework.boot</groupId> <artifactId>spring-boot-starter-tomcat</artifactId> </exclusion> </exclusions> </dependency>
2 XXXApplication
2.1 @SpringBootApplication 官網見:18. Using the @SpringBootApplication Annotation 等同於@EnableAutoConfiguration,@ComponentScan和@Configuration 2.2 SpringApplication.run 官網見:23. SpringApplication 3 配置檔案 3.1 初步感受 server.port=9090 3.2 yml檔案 application.yml 3.3 給屬性注入值 實體類Person和IDCard public class Person { private String name; private int age; private Date birthday; private String[] hobbies; private IDCard idCard; ... }
public class IDCard { private int id; private String number; }
yml注入寫法
person: name: Jack age: 17 birthday: 1997/06/01 hobbies: [code,sing,share] idCard: id: 1 number: 111
Person類增加註解 @Component @ConfigurationProperties(prefix="person")
測試
@Autowired private Person person;
如果Person類上報錯,在Pom檔案中加入如下依賴
<dependency> <groupId>org.springframework.boot</groupId> <artifactId>spring-boot-configuration-processor</artifactId</dependency
4 處理動靜態資源 4.1 動態資源 官網見:90.2 Reload Templates without Restarting the Container templates resources目錄下有一個templates資料夾,可以將動態資源放到其中 引入thymeleaf
<!--thymeleaf的jar包-->
<dependency> <groupId>org.springframework.boot</groupId> <artifactId>spring-boot-starter-thymeleaf</artifactId> </dependency> templates下新建test.html檔案 <html xmlns:th="http://www.thymeleaf.org"> <head> </head> <body> <span style="color:red; font-size:30pt" th:text="${str}"></span> </body> controller中return test @Controller @RequestMapping("/gupao") public class GupaoController { @RequestMapping("/hello") public String hello(Model model){ String str="hello spring boot"; //想要動態的顯示在網頁當中 model.addAttribute("str",str); //接下來的頁面是能夠動態顯示傳過來的資料 return "test"; } } 4.2 靜態資源 static資料夾 在resources目錄下有一個static資料夾,可以將靜態資源放到其中,瀏覽器可以直接訪問。 靜態資源其他存放資料夾 "classpath:/META-INF/resources/" "classpath:/resources/" "classpath:/static/" "classpath:/public/" WebMvcAutoConfiguration原始碼分析 WebMvcAutoConfiguration--->WebMvcAutoConfigurationAdapter.addResourceHandlers(xxx)---> `this.resourceProperties.getStaticLocations()` `return this.staticLocations;` `private String[] staticLocations = CLASSPATH_RESOURCE_LOCATIONS;` `private static final String[] CLASSPATH_RESOURCE_LOCATIONS = { "classpath:/META-INF/resources/", "classpath:/resources/", "classpath:/static/", "classpath:/public/" };` 自定義靜態資原始檔夾 觀察 @ConfigurationProperties(prefix = "spring.resources", ignoreUnknownFields = false) public class ResourceProperties { 配置application.properties spring.resources.static-locations=classpath:/gupao/ 5 整合MyBatis 5.1 需求 通過Spring Boot Web專案api介面的方式,整合MyBatis實現crud的操作。 5.2 建立Spring Boot Web專案 重溫一下web專案建立的過程。 5.3 引入專案中需要的starter依賴 <dependency> <groupId>mysql</groupId> <artifactId>mysql-connector-java</artifactId> </dependency> <dependency> <groupId>org.mybatis.spring.boot</groupId> <artifactId>mybatis-spring-boot-starter</artifactId> <version>1.3.1</version> </dependency> <dependency> <groupId>org.springframework.boot</groupId> <artifactId>spring-boot-starter-thymeleaf</artifactId> </dependency> 5.4 建立資料庫表 db_gupao_springboot--->t_user 5.5 建立domain/User物件 public class User { private int id; private String username; private String password; private String number; ... } 5.6 開發dao層 @Repository @Mapper public interface UserMapper { User find(String username); List<User> list(); int insert(User user); int delete(int id); int update(User user); } 5.7 開發service層 @Service public class UserService { @Autowired public UserMapper userMapper; public User findByUsername(String username){ return userMapper.find(username); } public List<User> listUser(){ return userMapper.list(); } public int insertUser(User user){ return userMapper.insert(user); } public int updateUser(User user){ return userMapper.update(user); } public int delete(int id){ return userMapper.delete(id); } } 5.8 開發controller層 @RestController @RequestMapping(value="/user",method = {RequestMethod.GET,RequestMethod.POST}) public class UserController { @Autowired private UserService userService; @RequestMapping("/listone") @ResponseBody public User listOne(String username){ return userService.findByUsername(username); } @RequestMapping("/listall") @ResponseBody public List<User> listAll(){ return userService.listUser(); } @RequestMapping(value="/add",method= RequestMethod.POST) @ResponseBody public String add(User user){ int result=userService.insertUser(user); if(result>=1) { return "新增成功"; }else{ return "新增失敗"; } } @RequestMapping(value="/update",method= RequestMethod.POST) @ResponseBody public String update(User user){ int result=userService.updateUser(user); if(result>=1) { return "修改成功"; }else{ return "修改失敗"; } } @RequestMapping(value="/delete",method= RequestMethod.GET) @ResponseBody public String delete(int id){ int result=userService.delete(id); if(result>=1) { return "刪除成功"; }else{ return "刪除失敗"; } } } 5.9 resources目錄下建立mapper資料夾---UserMapper.xml <?xml version = "1.0" encoding = "UTF-8"?> <!DOCTYPE mapper PUBLIC "-//mybatis.org//DTD com.example.Mapper 3.0//EN" "http://mybatis.org/dtd/mybatis-3-mapper.dtd"> <mapper namespace="com.csdn.springbootmybatis.dao.UserMapper"> <resultMap id="result" type="com.gupao.springbootmybatis.domain.User"> <result property="username" column="username"/> <result property="password" column="password"/> <result property="number" column="number"/> </resultMap> <select id="find" resultMap="result"> SELECT * FROM t_user where username=#{username} </select> <select id="list" resultMap="result"> SELECT * FROM t_user </select> <insert id="insert" parameterType="com.gupao.springbootmybatis.domain.User" keyProperty="id" useGeneratedKeys="true"> INSERT INTO t_user ( id,username,password,number ) VALUES ( #{id}, #{username, jdbcType=VARCHAR}, #{password, jdbcType=VARCHAR}, #{number} ) </insert> <delete id="delete" parameterType="int"> delete from t_user where id=#{id} </delete> <update id="update" parameterType="com.gupao.springbootmybatis.domain.User"> update t_user set user.username=#{username},user.password=#{password},user.number=# {number} where user.id=#{id} </update> </mapper> 5.10 application.properties檔案配置 #資料來源 spring: datasource: url: jdbc:mysql://127.0.0.1:3306/boot?useUnicode=true&characterEncoding=UTF- 8&serverTimezone=UTC username: root password: 123456 driver-class-name: com.mysql.cj.jdbc.Driver #mybatis託管mapper檔案 mybatis: mapper-locations: classpath:mapper/*.xml 5.11 啟動專案測試 查詢 http://localhost:8888/user/listone?username=Jack 全部查詢 http://localhost:8888/user/listall 增加 http://localhost:8888/user/add?id=3&username=AAA&password=111111&number=300 更新 http://localhost:8888/user/update?id=3&username=BBB 刪除 http://localhost:8888/user/delete?id=3 6 專案打包 jar包 mvn -Dmaven.test.skip -U clean install java -jar xxx.jar war包 <groupId>com.csdn</groupId> <artifactId>springboot-demo2</artifactId> <version>0.0.1-SNAPSHOT</version> <packaging>war</packaging> 7 Spring Boot in less than 10 minutes https://www.youtube.com/watch?v=lhkwLtDIMHI&feature=youtu.be BUILD ANYTHING WITH SPRING BOOT Spring Boot is the starting point for building all Spring-based applications. Spring Boot is designed to get you up and running as quickly as possible, with minimal upfront configuration of Spring. 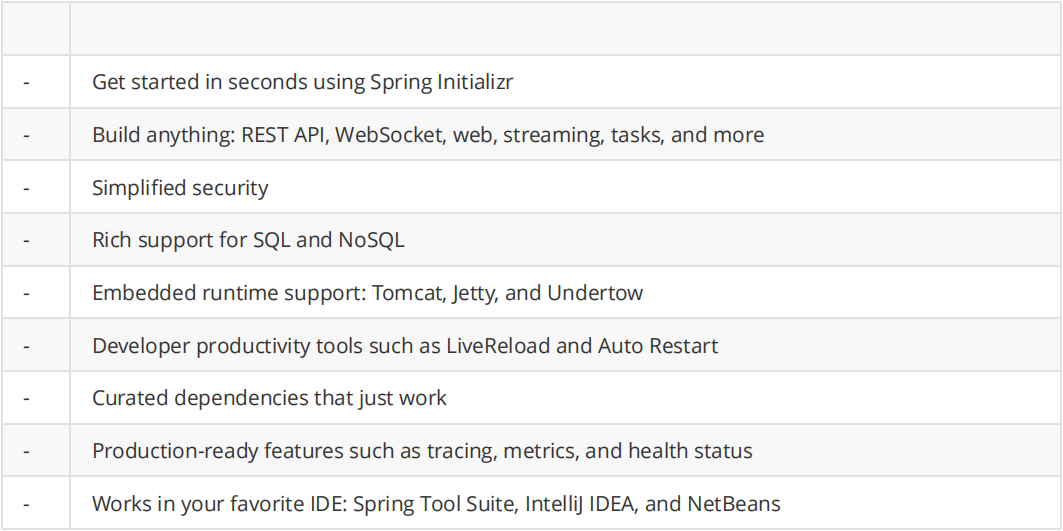 7.1 IDEA建立工程 group:com.example artifact:bootiful dependencies:Reactive Web,Reactive MongoDB,Lombok,Actuator,Security 7.2 DATA DRIVE > Spring Data integrates seamlessly with SQL and NoSQL persistence stores. Spring Data supports reactive data access,too!
@Component class DataWriter implements ApplicationRunner { private final CustomerRepository customerRepository; DataWriter(CustomerRepository customerRepository) { this.customerRepository = customerRepository; } @Override public void run(ApplicationArguments args) throws Exception { Flux.just("Jack", "Rechal", "Richard", "Jobs") .flatMap(name -> customerRepository.save(new Customer(null, name))) .subscribe(System.out::println); } } interface CustomerRepository extends ReactiveMongoRepository<Customer, String> { } @Document @NoArgsConstructor @Data class Customer { private String id,name; public Customer(String id, String name) { this.id = id; this.name = name; } } 7.3 REST On the web,nobody knows you're a reactive microservice. @SpringBootApplication public class BootifulApplication { @Bean RouterFunction<ServerResponse> routes(CustomerRepository cr){ return RouterFunctions.route(GET("/customers"),serverRequest -> ok().body(cr.findAll(),Customer.class)); } public static void main(String[] args) { SpringApplication.run(BootifulApplication.class, args); } } 7.4 OBSERVABILITY How's your app's health?Who better to articulate that then the application itself? Spring Boot featurese strong opinions,loosely held. It's easy to change any of them with properties or pluggable implementations management.endpoint.health.show-details=always management.endpoints.web.exposure.exclude=* @Bean HealthIndicator healthIndicator(){ return () -> Health.status("I <3 Production").build(); } 訪問:curl http://localhost:8080/actuator/health | jq
7.5 SECURITY Effortlessly plugin authentication and authorization in a traditional or reactive application with Spring Security @Bean MapReactiveUserDetailsService users(){ return new MapReactiveUserDetailsService(User.withDefaultPasswordEncoder().username("user").password(" pw").roles("USER").build()); }
訪問:curl -vu user:pw http://localhost:8080/customers | jq
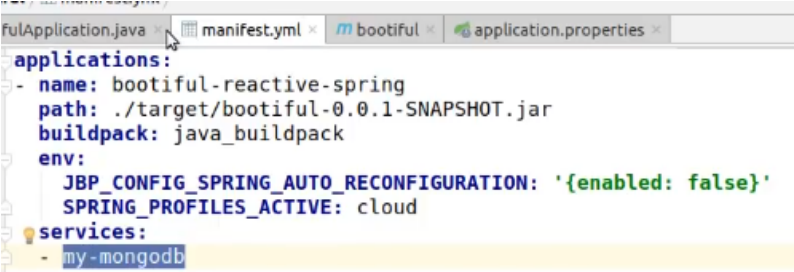
7.6 TO PRODUCTION
Let's provision a MongoDB instance,configure our application's route and MongoDB binding,and then
push our application to production with Cloud Foundry.
命令切換到bootiful根目錄下
cf services
定位到my-mongodb資料夾
複製對應檔案,修改和觀察


相關推薦
Spring Boot基本操作
1 Pom****檔案 1.1 spring-boot-starter-parent 表示當前pom檔案從spring-boot-
spring boot資料庫操作彙總
1 關於orm orm即object relational mapping,物件關係對映,即將資料庫中的表對映成物件。 常用的orm有以下: mybatis spring jdbc template hibernate spring data jpa 如果在spring boot專案中用的是my
SpringBoot 學習(一)---- SpringBoot 核心 之 Spring Boot基本配置介紹
一、關閉某個自動配置 通過上一篇 @SpringBootApplication 下的 @EnableAutoConfiguration 可知,Spring Boot 會根據專案中的jar包依賴,自動做出配置,Spring Boot支援的部分自動配置如下圖(非常多):
spring boot 基本筆記
一、Linux後臺啟動jar程式 執行:nohup java -jar xxx.jar & 命令 注意,此時程式控制臺輸出會被轉移到nohup.out檔案中,這個nohup.out檔案的位置就在jar包的當前資料夾內。 但是有時候在這一步會有問題,當把終端關閉後,程序會自
spring boot 基本依賴引入
1.基礎核心依賴 <parent> <groupId>org.springframework.boot</groupId> <artifactId>spring-boot-starter-parent<
Spring-Boot--日誌操作 配置檔案 詳細情況
如果在你的pom.xml中,依賴瞭如下內容 <dependency> <groupId>org.springframework.boot</groupId> <artifactId&
Spring-Boot--日誌操作【全域性異常捕獲訊息處理☞日誌控制檯輸出+日誌檔案記錄】
最好的演示說明,不是上來就貼配置檔案和程式碼,而是,先來一波配置檔案的註釋,再來一波程式碼的測試過程,最後再出個技術在專案中的應用效果,這樣的循序漸進的方式,才會讓讀者更加清楚的理解一項技
spring boot資料庫操作(以mysql為例)
新增資料庫支援 在maven中新增元件(pom.xml) <dependency> <groupId>org.springframework.boot</groupId>
使用P6Spy監控你的Spring boot資料庫操作
開發十年,就只剩下這套架構體系了! >>>
spring boot 下操作ES
當前頁 應用 rto rec tag reat ans lean context spring boot 下操作ES 1、引入es相關依賴 <dependency> <groupId>org.elastic
spring boot 整合thyemleaf基本使用 日期的操作(三)
<!--格式化日期,預設的以瀏覽器預設語言為格式化標準--> <span th:text="${#dates.format(key)}"></span> <hr/> <!--自定義格式--> <span th:text="${#dat
spring boot 整合thyemleaf基本使用 字串的操作(二)
thyemleaf基本使用 字串的操作的基本使用,其他的以後用到可以檢視文件或者百度。 <!--在輸入框中顯示msg的值--> <input type="text" name="username" th:value="${msg}"> <hr/> <!
Spring Boot的基本操作
1. Spring的發展 1.1. Spring1.x 時代 在Spring1.x時代,都是通過xml檔案配置bean,隨著專案的不斷擴大,需要將xml配置分放到不同的配置檔案中,需要頻繁的在java類和xml配置檔案中切換。 1.2.Spring2.x時代 隨著JDK 1.5
Spring Boot(三):AOP&日誌操作&異常處理
-1 aop str image pan handle ssa upload java代碼 一、AOP:HttpAspect.java 二、操作日誌 在HttpAspect.java中調用org.slf4j.Logger、org.slf4j.LoggerFactor
Spring Boot Starter 的基本封裝
java aop 通過 pac ket oot foundry 支持 cto 1)spring-boot-starter這是Spring Boot的核心啟動器,包含了自動配置、日誌和YAML。 2)spring-boot-starter-amqp通過spring-rabbi
Spring Boot 中配置定時任務,實現多線程操作
pre log pri http code china 部分 多線程操作 .net 參考的代碼部分 https://git.oschina.net/jokerForTao/spring_boot_schedule 一目了然!Spring Boot 中配置定時任務,實現
spring boot容器加載完後執行特定操作
文件中 code buck 線程 private tor tope gets send 有時候我們需要在spring boot容器啟動並加載完後,開一些線程或者一些程序來幹某些事情。這時候我們需要配置ContextRefreshedEvent事件來實現我們要做的事情
Spring Boot實戰之數據庫操作
應該 element face 插入 sele run 方式 不同 pan 上篇文章中已經通過一個簡單的HelloWorld程序講解了Spring boot的基本原理和使用。本文主要講解如何通過spring boot來訪問數據庫,本文會演示三種方式來訪問數據庫,第一種是
Spring Boot快速入門(五):使用MyBatis(註解形式)進行數據庫操作
訪問 ins name ont clas assert xxx main apach 原文地址:https://lierabbit.cn/articles/7 添加依賴 新建項目選擇web,MyBatis,MySQL三個依賴 對於已存在的項目可以在bulid.gradle
spring boot+tkmybatis(mapper)工具實現通用數據操作接口時遇到的問題
之前 開始 ng- key lang ces 解決 是不是 就是 最近在做一個sb+tkmybatis整合的可以提供通用數據操作接口的demo,然而出現了很詭異的事情.,使用mapper提供的selectByPrimaryKey接口返回結果時報異常: java.lang.