Spring Cloud 入門教程(七): 訊息匯流排(Spring Cloud Bus)(Greenwich.RELEASE)
阿新 • • 發佈:2019-06-26
參考網址:https://blog.csdn.net/forezp/article/details/81041062,由於此文中作者基於git和rabbitMq,為了適應內網我改造為基於mysql和kafka
一、準備工作
1、安裝kafka
參考這個:kafka在windows下的安裝(kafka_2.12-2.2.1)
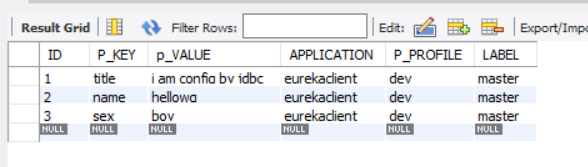
2、安裝 mysql,建立資料庫及表結構(上一篇)
3、啟動之前的專案 erurekaserver
二、新建maven專案 config-server
1、修改pom.xml
<project xmlns="http://maven.apache.org/POM/4.0.0"
	xmlns:xsi="http://www.w3.org/2001/XMLSchema-instance"
	xsi:schemaLocation="http://maven.apache.org/POM/4.0.0 http://maven.apache.org/xsd/maven-4.0.0.xsd">
	<modelVersion>4.0.0</modelVersion>

	<groupId>wg</groupId>
	<artifactId>config-server</artifactId>
	<version>0.0.1-SNAPSHOT</version>
	<packaging>jar</packaging>

	<name>config-server</name>
	<url>http://maven.apache.org</url>

	<properties>
		<project.build.sourceEncoding>UTF-8</project.build.sourceEncoding>
		<project.reporting.outputEncoding>UTF-8</project.reporting.outputEncoding>
		<spring-cloud.version>Greenwich.RELEASE</spring-cloud.version>
		<java.version>1.8</java.version>
	</properties>

	<parent>
		<groupId>org.springframework.boot</groupId>
		<artifactId>spring-boot-starter-parent</artifactId>
		<version>2.1.1.RELEASE</version>
		<relativePath /> <!-- lookup parent from repository -->
	</parent>

	<dependencies>
		<dependency>
			<groupId>org.springframework.cloud</groupId>
			<artifactId>spring-cloud-starter-netflix-eureka-client</artifactId>
		</dependency>
		<dependency>
			<groupId>org.springframework.boot</groupId>
			<artifactId>spring-boot-starter-web</artifactId>
		</dependency>
		<dependency>
			<groupId>org.springframework.cloud</groupId>
			<artifactId>spring-cloud-config-server</artifactId>
		</dependency>
		<dependency>
			<groupId>org.springframework.boot</groupId>
			<artifactId>spring-boot-starter-jdbc</artifactId>
		</dependency>
		<dependency>
			<groupId>mysql</groupId>
			<artifactId>mysql-connector-java</artifactId>
		</dependency>

		<dependency>
			<groupId>org.springframework.cloud</groupId>
			<artifactId>spring-cloud-starter-bus-kafka</artifactId>
		</dependency>
		<dependency>
			<groupId>org.springframework.cloud</groupId>
			<artifactId>spring-cloud-starter-stream-kafka</artifactId>
		</dependency>
		<dependency>
			<groupId>org.springframework.cloud</groupId>
			<artifactId>spring-cloud-bus</artifactId>
		</dependency>

		<dependency>
			<groupId>junit</groupId>
			<artifactId>junit</artifactId>
			<scope>test</scope>
		</dependency>
	</dependencies>
	<dependencyManagement>
		<dependencies>
			<dependency>
				<groupId>org.springframework.cloud</groupId>
				<artifactId>spring-cloud-dependencies</artifactId>
				<version>${spring-cloud.version}</version>
				<type>pom</type>
				<scope>import</scope>
			</dependency>
		</dependencies>
	</dependencyManagement>
</project>
2、新建ConfigServerApplication.java
package wg;

import org.springframework.boot.SpringApplication;
import org.springframework.boot.autoconfigure.SpringBootApplication;
import org.springframework.cloud.config.server.EnableConfigServer;

@SpringBootApplication
@EnableConfigServer
public class ConfigServerApplication {
	public static void main(String[] args) {
		SpringApplication.run(ConfigServerApplication.class, args);
	}
}
3、新建application.properties
spring.application.name=config-server
server.port=30000

spring.profiles.active=jdbc
spring.datasource.url=jdbc:mysql://127.0.0.1:3306/wg?useUnicode=true&characterEncoding=UTF-8&serverTimezone=GMT%2B8
spring.datasource.username=root
spring.datasource.password=root
spring.datasource.driverClassName=com.mysql.cj.jdbc.Driver

spring.cloud.config.label=master
spring.cloud.config.server.jdbc=true
spring.cloud.config.server.jdbc.sql=SELECT P_KEY, P_VALUE from CONFIG_PROPERTIES where APPLICATION=? and P_PROFILE=? and LABEL=?

spring.cloud.bus.refresh.enabled=true

spring.kafka.bootstrapServers=127.0.0.1:9092
spring.kafka.consumer.groupId:SpringCloud-bus

eureka.client.serviceUrl.defaultZone=http://localhost:8761/eureka/

management.endpoints.web.exposure.include=*
management.security.enabled=false
4、啟動專案 訪問:http://localhost:8761/

三、修改之前的專案 eurekaclient1
1 、修改 bootstrap.yml (配置檔案只保留這一份)
server:
  port: 8762
spring:
  application:
    name: eurekaclient
  cloud:
    config:
      label: master
      profile: dev
      discovery:
        enabled: true
        service-id: config-server
    bus:
      refresh:
        enabled: true
      trace:
        enabled: true
  kafka:
    bootstrap-servers: 127.0.0.1:9092
eureka:
  instance:
     instance-id: eurekaclient1
     appname: ${spring.application.name}
  client:
    serviceUrl:
      defaultZone: http://localhost:8761/eureka/
management:
  endpoints:
    web:
      exposure:
          include: '*'
  security:
    enabled: false
2、修改pom.xml
<?xml version="1.0" encoding="UTF-8"?>

<project xmlns="http://maven.apache.org/POM/4.0.0"
	xmlns:xsi="http://www.w3.org/2001/XMLSchema-instance"
	xsi:schemaLocation="http://maven.apache.org/POM/4.0.0 http://maven.apache.org/xsd/maven-4.0.0.xsd">
	<modelVersion>4.0.0</modelVersion>

	<groupId>wg</groupId>
	<artifactId>eurekaclient1</artifactId>
	<version>1.0-SNAPSHOT</version>

	<name>eurekaclient1</name>
	<!-- FIXME change it to the project's website -->
	<url>http://www.example.com</url>

	<properties>
		<project.build.sourceEncoding>UTF-8</project.build.sourceEncoding>
		<project.reporting.outputEncoding>UTF-8</project.reporting.outputEncoding>
		<spring-cloud.version>Greenwich.RELEASE</spring-cloud.version>
		<java.version>1.8</java.version>
	</properties>

	<parent>
		<groupId>org.springframework.boot</groupId>
		<artifactId>spring-boot-starter-parent</artifactId>
		<version>2.1.1.RELEASE</version>
		<relativePath /> <!-- lookup parent from repository -->
	</parent>

	<dependencies>


		<dependency>
			<groupId>org.springframework.cloud</groupId>
			<artifactId>spring-cloud-starter-bus-kafka</artifactId>
		</dependency>
		<dependency>
			<groupId>org.springframework.cloud</groupId>
			<artifactId>spring-cloud-starter-stream-kafka</artifactId>
		</dependency>
		<dependency>
			<groupId>org.springframework.cloud</groupId>
			<artifactId>spring-cloud-bus</artifactId>
		</dependency>

		<dependency>
			<groupId>org.springframework.cloud</groupId>
			<artifactId>spring-cloud-starter-netflix-eureka-client</artifactId>
		</dependency>
		<dependency>
			<groupId>org.springframework.cloud</groupId>
			<artifactId>spring-cloud-starter-config</artifactId>
		</dependency>
		<dependency>
			<groupId>org.springframework.boot</groupId>
			<artifactId>spring-boot-starter-web</artifactId>
		</dependency>
	</dependencies>
	<dependencyManagement>
		<dependencies>
			<dependency>
				<groupId>org.springframework.cloud</groupId>
				<artifactId>spring-cloud-dependencies</artifactId>
				<version>${spring-cloud.version}</version>
				<type>pom</type>
				<scope>import</scope>
			</dependency>
		</dependencies>
	</dependencyManagement>
	<build>
		<plugins>
			<plugin>
				<groupId>org.springframework.boot</groupId>
				<artifactId>spring-boot-maven-plugin</artifactId>
			</plugin>
		</plugins>
	</build>
</project>
3、修改EurekaClientApplication.java
package wg;

import org.springframework.beans.factory.annotation.Autowired;
import org.springframework.beans.factory.annotation.Value;
import org.springframework.boot.SpringApplication;
import org.springframework.boot.autoconfigure.SpringBootApplication;
import org.springframework.cloud.context.config.annotation.RefreshScope;
import org.springframework.web.bind.annotation.RequestMapping;
import org.springframework.web.bind.annotation.RestController;

import wg.config.ServerConfig;

@SpringBootApplication
@RestController
public class EurekaClientApplication {
    public static void main(String[] args) {
        SpringApplication.run(EurekaClientApplication.class, args);
    }

    @Autowired
    private ServerConfig serverConfig;

    @Value("${server.port}")
    String port;

    @RequestMapping("/")
    public String home() {
        return "hello world from port " + port+",title:"+serverConfig.getTitle()+" name:"+serverConfig.getName()+" sex:"+serverConfig.getSex();
    }
}
4、新建ServerConfig.java(位於EurekaClientApplication.java 下級包)
package wg.config;

import org.springframework.boot.context.properties.ConfigurationProperties;
import org.springframework.cloud.context.config.annotation.RefreshScope;
import org.springframework.stereotype.Component;

@Component
@ConfigurationProperties
@RefreshScope
public class ServerConfig {
	private String title;
	private String sex;
	private String name;
	public String getSex() {
		return sex;
	}
	public String getTitle() {
		return title;
	}
	public void setTitle(String title) {
		this.title = title;
	}
	public void setSex(String sex) {
		this.sex = sex;
	}
	public String getName() {
		return name;
	}
	public void setName(String name) {
		this.name = name;
	}

}
5、啟動專案,訪問http://localhost:8762/
四、測試配置重新整理
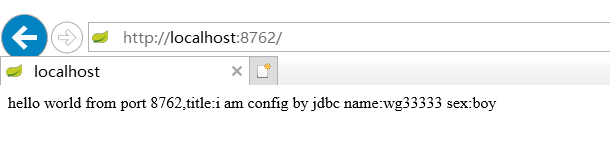
1、開啟mysql客戶端,修改 name 的值並儲存,訪問 :http://localhost:8762/ (會 發現配置 的name的值並未改變)
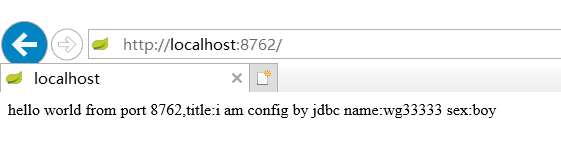
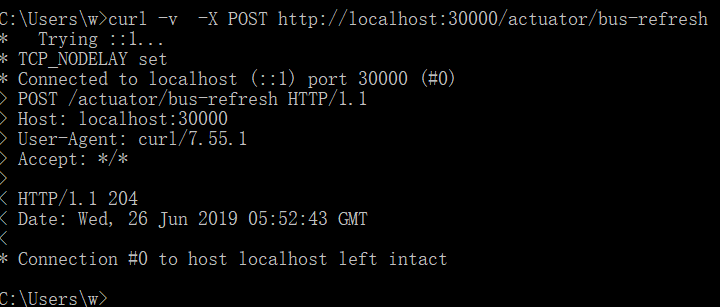
2、新建cmd視窗,執行 : curl -v -X POST http://localhost:30000/actuator/bus-refresh,然後再次訪問:http://localhost:8762/ (會 發現配置 的name的值已經更新了)