
通過Heketi管理GlusterFS為K8S叢集提供持久化儲存
參考文件:
-
Github project:https://github.com/heketi/heketi
-
MANAGING VOLUMES USING HEKETI:https://access.redhat.com/documentation/en-us/red_hat_gluster_storage/3.3/html/administration_guide/ch05s02
-
StorageClass:https://kubernetes.io/docs/concepts/storage/storage-classes/
-
StorageClass(中文):https://k8smeetup.github.io/docs/concepts/storage/storage-classes/
-
Dynamic Volume Provisioning:https://kubernetes.io/docs/concepts/storage/dynamic-provisioning/
-
nfs- provisioner:https://github.com/kubernetes-incubator/external-storage/tree/master/nfs
一.Heketi簡介
1. 簡介
Heketi是一個提供RESTful API管理GlusterFS卷的框架,便於管理員對GlusterFS進行操作:
- 可以用於管理GlusterFS卷的生命週期;
- 能夠在OpenStack,Kubernetes,Openshift等雲平臺上實現動態儲存資源供應(動態在GlusterFS叢集內選擇bricks構建volume);
- 支援GlusterFS多叢集管理。
2. 框架
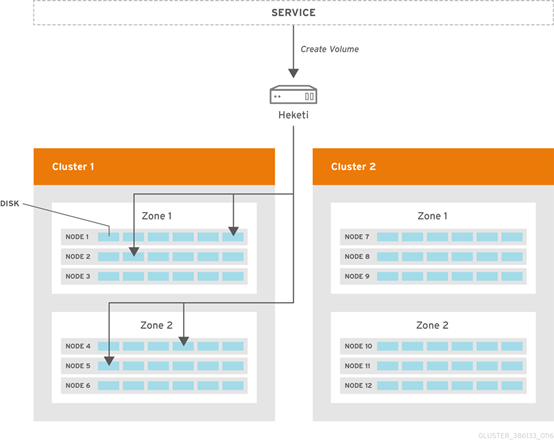
- Heketi支援GlusterFS多叢集管理;
-
在叢集中通過zone區分故障域。
二.環境
1. 環境
Kubernetes與GlusterFS叢集已提前部署完成,請參考:
- Kubernetes:https://www.cnblogs.com/netonline/tag/kubernetes/
-
GlusterFS:https://www.cnblogs.com/netonline/p/9102004.html
注意:GlusterFS只需要安裝並啟動即可,不必組建受信儲存池(trusted storage pools)
| Hostname |
IP |
Remark |
| kubenode1 |
172.30.200.21 |
|
| kubenode2 |
172.30.200.22 |
|
| kubenode3 |
172.30.200.23 |
|
| heketi |
172.30.200.80 |
selinux disabled |
| glusterfs01 |
172.30.200.81 |
|
| glusterfs02 |
172.30.200.82 |
|
| glusterfs03 |
172.30.200.83 |
2. 設定iptables
# 設定iptables,heketi預設以tcp8080埠提供RESTful API服務;
[root@heketi ~]# vim /etc/sysconfig/iptables
-A INPUT -p tcp -m state --state NEW -m tcp --dport 8080 -j ACCEPT

[root@heketi ~]# service iptables restart
三.部署heketi
1. 安裝heketi
# 新增gluster yum源,預設yum源中無相關package;
# heketi:heketi服務;
# heketi-client:heketi客戶端/命令列工具
[root@heketi ~]# yum install -y centos-release-gluster
[root@heketi ~]# yum install -y heketi heketi-client
2. 配置heketi.json

# 注意紅色字型是修改部分
[root@heketi ~]# vim /etc/heketi/heketi.json
{
  # 預設埠tcp8080
  "_port_comment": "Heketi Server Port Number",
  "port": "8080",

  # 預設值false,不需要認證
  "_use_auth": "Enable JWT authorization. Please enable for deployment",
  "use_auth": true,

  "_jwt": "Private keys for access",
  "jwt": {
    "_admin": "Admin has access to all APIs",
    "admin": {
      "key": "admin@123"
    },
    "_user": "User only has access to /volumes endpoint",
    "user": {
      "key": "user@123"
    }
  },

  "_glusterfs_comment": "GlusterFS Configuration",
  "glusterfs": {
    "_executor_comment": [
      "Execute plugin. Possible choices: mock, ssh",
      "mock: This setting is used for testing and development.",
      "      It will not send commands to any node.",
      "ssh:  This setting will notify Heketi to ssh to the nodes.",
      "      It will need the values in sshexec to be configured.",
      "kubernetes: Communicate with GlusterFS containers over",
      "            Kubernetes exec api."
],
# mock:測試環境下建立的volume無法掛載;
# kubernetes:在GlusterFS由kubernetes建立時採用
    "executor": "ssh",

    "_sshexec_comment": "SSH username and private key file information",
    "sshexec": {
      "keyfile": "/etc/heketi/heketi_key",
      "user": "root",
      "port": "22",
      "fstab": "/etc/fstab"
    },

    "_kubeexec_comment": "Kubernetes configuration",
    "kubeexec": {
      "host" :"https://kubernetes.host:8443",
      "cert" : "/path/to/crt.file",
      "insecure": false,
      "user": "kubernetes username",
      "password": "password for kubernetes user",
      "namespace": "OpenShift project or Kubernetes namespace",
      "fstab": "Optional: Specify fstab file on node.  Default is /etc/fstab"
    },

    "_db_comment": "Database file name",
    "db": "/var/lib/heketi/heketi.db",

    "_loglevel_comment": [
      "Set log level. Choices are:",
      "  none, critical, error, warning, info, debug",
      "Default is warning"
],
# 預設設定為debug,不設定時的預設值即是warning;
# 日誌資訊輸出在/var/log/message
    "loglevel" : "warning"
  }
}
3. 設定heketi免密訪問GlusterFS
# 選擇ssh執行器,heketi伺服器需要免密登陸GlusterFS叢集的各節點;
# -t:祕鑰型別;
# -q:安靜模式;
# -f:指定生成祕鑰的目錄與名字,注意與heketi.json的ssh執行器中"keyfile"值一致;
# -N:祕鑰密碼,””即為空
[root@heketi ~]# ssh-keygen -t rsa -q -f /etc/heketi/heketi_key -N ""

# heketi服務由heketi使用者啟動,heketi使用者需要有新生成key的讀賦權,否則服務無法啟動
[root@heketi ~]# chown heketi:heketi /etc/heketi/heketi_key

# 分發公鑰;
# -i:指定公鑰
[root@heketi ~]# ssh-copy-id -i /etc/heketi/heketi_key.pub [email protected]
[root@heketi ~]# ssh-copy-id -i /etc/heketi/heketi_key.pub [email protected]
[root@heketi ~]# ssh-copy-id -i /etc/heketi/heketi_key.pub [email protected]
4. 啟動heketi
# 通過yum安裝heketi,預設的systemd檔案有1處錯誤;
# /usr/lib/systemd/system/heketi.service檔案的”-config=/etc/heketi/heketi.json”應該修改為”--config=/etc/heketi/heketi.json”;
# 否則啟動時報”Error: unknown shorthand flag: 'c' in -config=/etc/heketi/heketi.json“錯,導致服務無法啟動
[root@heketi ~]# systemctl enable heketi
[root@heketi ~]# systemctl restart heketi
[root@heketi ~]# systemctl status heketi
# 驗證
[root@heketi ~]# curl http://localhost:8080/hello

四.設定GlusterFS叢集
1. 建立topology.json檔案
# 通過topology.json檔案定義組建GlusterFS叢集;
# topology指定了層級關係:clusters-->nodes-->node/devices-->hostnames/zone;
# node/hostnames欄位的manage填寫主機ip,指管理通道,在heketi伺服器不能通過hostname訪問GlusterFS節點時間不能填寫hostname;
# node/hostnames欄位的storage填寫主機ip,指儲存資料通道,與manage可以不一樣;
# node/zone欄位指定了node所處的故障域,heketi通過跨故障域建立副本,提高資料高可用性質,如可以通過rack的不同區分zone值,建立跨機架的故障域;
# devices欄位指定GlusterFS各節點的碟符(可以是多塊盤),必須是未建立檔案系統的裸裝置
[root@heketi ~]# vim /etc/heketi/topology.json
{
    "clusters": [
        {
            "nodes": [
                {
                    "node": {
                        "hostnames": {
                            "manage": [
                                "172.30.200.81"
                            ],
                            "storage": [
                                "172.30.200.81"
                            ]
                        },
                        "zone": 1
                    },
                    "devices": [
                        "/dev/sdb"
                    ]
                },
                {
                    "node": {
                        "hostnames": {
                            "manage": [
                                "172.30.200.82"
                            ],
                            "storage": [
                                "172.30.200.82"
                            ]
                        },
                        "zone": 2
                    },
                    "devices": [
                        "/dev/sdb"
                    ]
                },
                {
                    "node": {
                        "hostnames": {
                            "manage": [
                                "172.30.200.83"
                            ],
                            "storage": [
                                "172.30.200.83"
                            ]
                        },
                        "zone": 3
                    },
                    "devices": [
                        "/dev/sdb"
                    ]
                }
            ]
        }
    ]
}
2. 通過topology.json組建GlusterFS叢集
# GlusterFS叢集各節點的glusterd服務已正常啟動,但不必組建受信儲存池;
# heketi-cli命令列也可手動逐層新增cluster,node,device,volume等;
# “--server http://localhost:8080”:localhost執行heketi-cli時,可不指定;
# ”--user admin --secret admin@123 “:heketi.json中設定了認證,執行heketi-cli時需要帶上認證資訊,否則報”Error: Invalid JWT token: Unknown user”錯
[root@heketi ~]# heketi-cli --server http://localhost:8080 --user admin --secret admin@123 topology load --json=/etc/heketi/topology.json

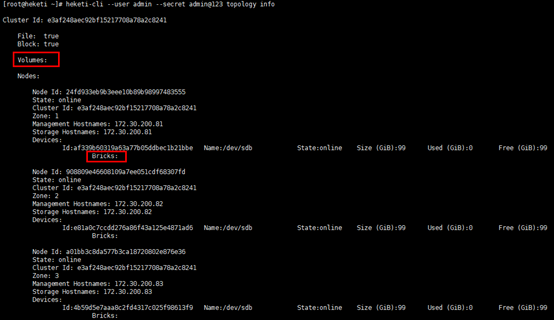
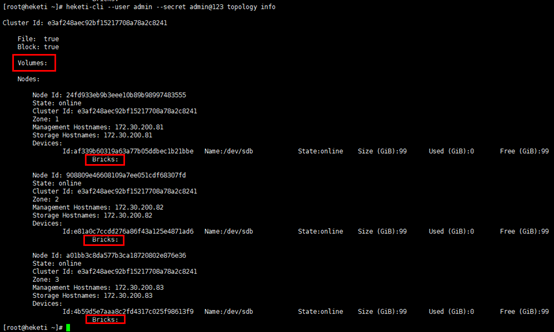
# 檢視heketi topology資訊,此時volume與brick等未建立;
# 通過”heketi-cli cluster info“可以檢視叢集相關資訊;
# 通過”heketi-cli node info“可以檢視節點相關資訊;
# 通過”heketi-cli device info“可以檢視device相關資訊
[root@heketi ~]# heketi-cli --user admin --secret admin@123 topology info
五.K8S叢集動態掛載GlusterFS儲存
1. 基於StorageClass的動態儲存流程
kubernetes共享儲存供應模式:
-
靜態模式(Static):叢集管理員手工建立PV,在定義PV時需設定後端儲存的特性;
-
動態模式(Dynamic):叢集管理員不需要手工建立PV,而是通過StorageClass的設定對後端儲存進行描述,標記為某種"型別(Class)";此時要求PVC對儲存的型別進行說明,系統將自動完成PV的建立及與PVC的繫結;PVC可以宣告Class為"",說明PVC禁止使用動態模式。
基於StorageClass的動態儲存供應整體過程如下圖所示:
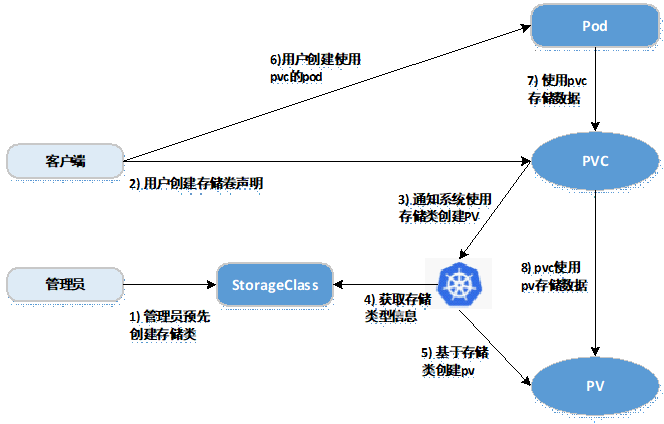
-
叢集管理員預先建立儲存類(StorageClass);
-
使用者建立使用儲存類的持久化儲存宣告(PVC:PersistentVolumeClaim);
-
儲存持久化宣告通知系統,它需要一個持久化儲存(PV: PersistentVolume);
-
系統讀取儲存類的資訊;
-
系統基於儲存類的資訊,在後臺自動建立PVC需要的PV;
-
使用者建立一個使用PVC的Pod;
-
Pod中的應用通過PVC進行資料的持久化;
-
而PVC使用PV進行資料的最終持久化處理。
2. 定義StorageClass
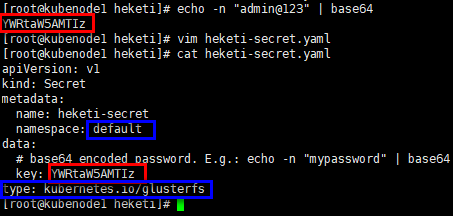
# provisioner:表示儲存分配器,需要根據後端儲存的不同而變更;
# reclaimPolicy: 預設即”Delete”,刪除pvc後,相應的pv及後端的volume,brick(lvm)等一起刪除;設定為”Retain”時則保留資料,需要手工處理
# resturl:heketi API服務提供的url;
# restauthenabled:可選引數,預設值為”false”,heketi服務開啟認證時必須設定為”true”;
# restuser:可選引數,開啟認證時設定相應使用者名稱;
# secretNamespace:可選引數,開啟認證時可以設定為使用持久化儲存的namespace;
# secretName:可選引數,開啟認證時,需要將heketi服務的認證密碼儲存在secret資源中;
# clusterid:可選引數,指定叢集id,也可以是1個clusterid列表,格式為”id1,id2”;
# volumetype:可選引數,設定卷型別及其引數,如果未分配卷型別,則有分配器決定卷型別;如”volumetype: replicate:3”表示3副本的replicate卷,”volumetype: disperse:4:2”表示disperse卷,其中‘4’是資料,’2’是冗餘校驗,”volumetype: none”表示distribute卷#
[root@kubenode1 ~]# mkdir -p heketi
[root@kubenode1 ~]# cd heketi/
[root@kubenode1 heketi]# vim gluster-heketi-storageclass.yaml
apiVersion: storage.k8s.io/v1
kind: StorageClass
metadata:
  name: gluster-heketi-storageclass
provisioner: kubernetes.io/glusterfs
reclaimPolicy: Delete
parameters:
  resturl: "http://172.30.200.80:8080"
  restauthenabled: "true"
  restuser: "admin"
  secretNamespace: "default"
  secretName: "heketi-secret"
  volumetype: "replicate:2"

# 生成secret資源,其中”key”值需要轉換為base64編碼格式
[root@kubenode1 heketi]# echo -n "admin@123" | base64

# 注意name/namespace與storageclass資源中定義一致;
# 密碼必須有“kubernetes.io/glusterfs” type
[root@kubenode1 heketi]# cat heketi-secret.yaml
apiVersion: v1
kind: Secret
metadata:
  name: heketi-secret
  namespace: default
data:
  # base64 encoded password. E.g.: echo -n "mypassword" | base64
  key: YWRtaW5AMTIz
type: kubernetes.io/glusterfs
# 建立secret資源
[root@kubenode1 heketi]# kubectl create -f heketi-secret.yaml

# 建立storageclass資源;
# 注意:storageclass資源建立後不可變更,如修改只能刪除後重建
[root@kubenode1 heketi]# kubectl create -f gluster-heketi-storageclass.yaml

# 檢視storageclass資源
[root@kubenode1 heketi]# kubectl describe storageclass gluster-heketi-storageclass

3. 定義PVC
1)定義PVC
# 注意“storageClassName”的對應關係
[root@kubenode1 heketi]# vim gluster-heketi-pvc.yaml
kind: PersistentVolumeClaim
apiVersion: v1
metadata:
  name: gluster-heketi-pvc
spec:
  storageClassName: gluster-heketi-storageclass
  # ReadWriteOnce:簡寫RWO,讀寫許可權,且只能被單個node掛載;
  # ReadOnlyMany:簡寫ROX,只讀許可權,允許被多個node掛載;
  # ReadWriteMany:簡寫RWX,讀寫許可權,允許被多個node掛載;
  accessModes:
    - ReadWriteOnce
  resources:
requests:
  # 注意格式,不能寫“GB”
      storage: 1Gi

# 建立pvc資源
[root@kubenode1 heketi]# kubectl create -f gluster-heketi-pvc.yaml
2)檢視k8s資源
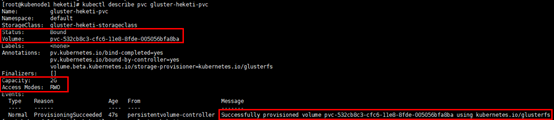
# 檢視PVC,狀態為”Bound”;
# “Capacity”為2G,是因為同步建立meta資料
[root@kubenode1 heketi]# kubectl describe pvc gluster-heketi-pvc
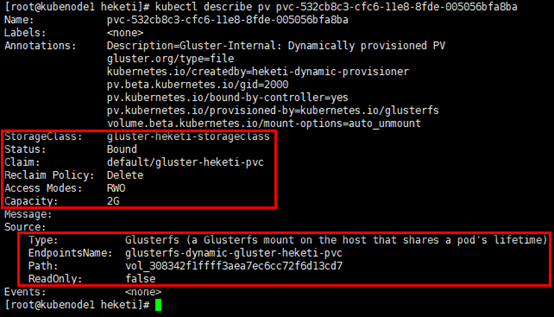
# 檢視PV詳細資訊,除容量,引用storageclass資訊,狀態,回收策略等外,同時給出GlusterFS的Endpoint與path;
[root@kubenode1 heketi]# kubectl get pv
[root@kubenode1 heketi]# kubectl describe pv pvc-532cb8c3-cfc6-11e8-8fde-005056bfa8ba
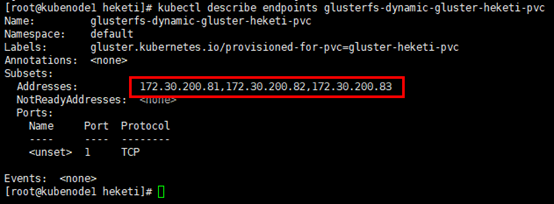
# 檢視endpoints資源,可以從pv資訊中獲取,固定格式:glusterfs-dynamic-PVC_NAME;
# endpoints資源中指定了掛載儲存時的具體地址
[root@kubenode1 heketi]# kubectl describe endpoints glusterfs-dynamic-gluster-heketi-pvc
3)檢視heketi
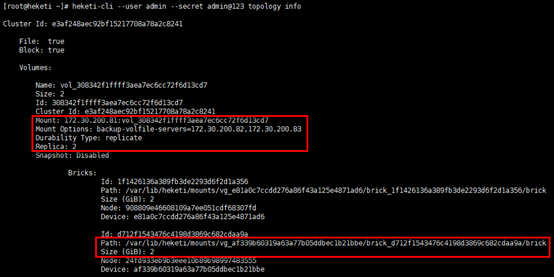
# volume與brick已經建立;
# 主掛載點(通訊)在glusterfs01節點,其餘兩個節點備選;
# 兩副本的情況下,glusterfs03節點並未建立brick
[root@heketi ~]# heketi-cli --user admin --secret admin@123 topology info
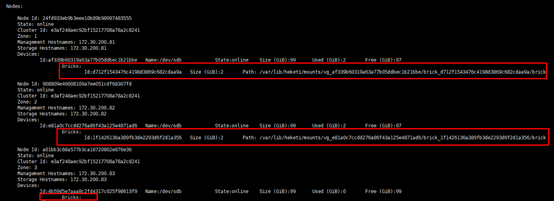
4)檢視GlusterFS節點
# 以glusterfs01節點為例
[root@glusterfs01 ~]# lsblk
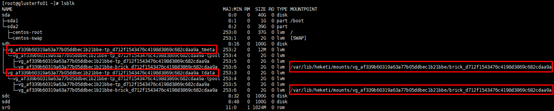
[root@glusterfs01 ~]# df -Th

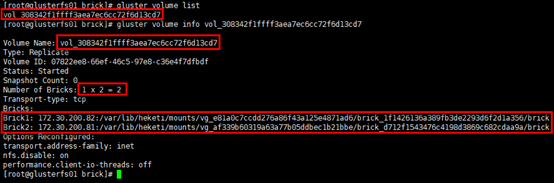
# 檢視volume的具體資訊:2副本的replicate卷;
# 另有”vgscan”,”vgdisplay”也可檢視邏輯卷組資訊等
[root@glusterfs01 ~]# gluster volume list
[root@glusterfs01 ~]# gluster volume info vol_308342f1ffff3aea7ec6cc72f6d13cd7
4. Pod掛載儲存資源
# 設定1個volume被pod引用,volume的型別為”persistentVolumeClaim”
[root@kubenode1 heketi]# vim gluster-heketi-pod.yaml
kind: Pod
apiVersion: v1
metadata:
  name: gluster-heketi-pod
spec:
  containers:
  - name: gluster-heketi-container
    image: busybox
    command:
    - sleep
    - "3600"
    volumeMounts:
    - name: gluster-heketi-volume
      mountPath: "/pv-data"
      readOnly: false
  volumes:
  - name: gluster-heketi-volume
    persistentVolumeClaim:
      claimName: gluster-heketi-pvc

# 建立pod
[root@kubenode1 heketi]# kubectl create -f gluster-heketi-pod.yaml
5. 驗證
# 在容器的掛載目錄中建立檔案
[root@kubenode1 heketi]# kubectl exec -it gluster-heketi-pod /bin/sh
/ # cd /pv-data
/pv-data # echo "This is a file!" >> a.txt
/pv-data # echo "This is b file!" >> b.txt
/pv-data # ls

# 在GlusterFS節點對應掛載目錄檢視建立的檔案;
# 掛載目錄通過”df -Th”或”lsblk”獲取
[root@glusterfs01 ~]# df -Th
[root@glusterfs01 ~]# cd /var/lib/heketi/mounts/vg_af339b60319a63a77b05ddbec1b21bbe/brick_d712f1543476c4198d3869c682cdaa9a/brick/
[root@glusterfs01 brick]# ls
[root@glusterfs01 brick]# cat a.txt
[root@glusterfs01 brick]# cat b.txt

6. 驗證StorageClass的ReclaimPolicy
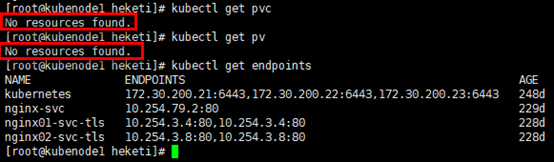
# 刪除Pod應用後,再刪除pvc
[root@kubenode1 heketi]# kubectl delete -f gluster-heketi-pod.yaml
[root@kubenode1 heketi]# kubectl delete -f gluster-heketi-pvc.yaml

# k8s資源
[root@kubenode1 heketi]# kubectl get pvc
[root@kubenode1 heketi]# kubectl get pv
[root@kubenode1 heketi]# kubectl get endpoints
# heketi
[root@heketi ~]# heketi-cli --user admin --secret admin@123 topology info
# GlusterFS節點
[root@glusterfs01 ~]# lsblk
[root@glusterfs01 ~]# df -Th
[root@glusterfs01 ~]# gluster volume list
相關推薦
通過Heketi管理GlusterFS為K8S叢集提供持久化儲存
參考文件: Github project:https://github.com/heketi/heketi MA
為Kubernetes叢集提供反向代理,從叢集外部通過標準http埠訪問kube-Dashboard等內部應用
安裝Ingress Controller Ingress Controller運行於k8s叢集的容器內,既讓每臺node監聽80和443埠,為來自叢集外部的請求提供反向代理,又能實時監聽叢集內Ingress配置,自動更新反向代理規則。 部署de
為K8S叢集建立只讀許可權帳號
參考URL: https://www.jianshu.com/p/a1a0d64f1245 https://mritd.me/2018/03/20/use-rbac-to-control-kubectl-permissions/ https://studygolang.com/articles/1173
為k8s叢集的節點預留計算資源
一、問題 二、方案細節 2.1 預留計算公式 Node Capacity --------------------------- | kube-reserved | |--------------------
4.深入k8s:容器持久化儲存
 ### 從一個例子入手PV、PVC Kubernetes 專案引入了一組叫作 Persistent Volume Claim(PVC)和 Persistent Volume(PV)的 API 物件
kubernetes實戰(九):k8s叢集動態儲存管理GlusterFS及容器化GlusterFS擴容
1、準備工作 所有節點安裝GFS客戶端 yum install glusterfs glusterfs-fuse -y 如果不是所有節點要部署GFS管理服務,就在需要部署的節點上打上標籤 [[email protected] ~]# kubectl label node k8s-nod
小白學ES 05 - 通過Kibana管理叢集服務
目錄 1 檢查叢集的健康狀況 2 檢視叢集中的節點個數 3 檢視叢集中的索引 4 簡單的索引操作 4.1 建立索引 4.2 刪除索引 前述步驟: ① 啟動Kibana; ② 通過瀏覽器訪問Kibana; ③ 進入Dev Tools(開發
k8s通過configmap管理應用配置信息
傳遞 分享圖片 token 文件內容 動態更新 rom 技術 文件 ken Secret 可以為 Pod 提供密碼、Token、私鑰等敏感數據;對於一些非敏感數據,比如應用的配置信息,則可以用 ConfigMap。 ConfigMap 的創建和使用方式與 Secret 非
CentOS7.5 Qihoo360/wayne部署(web管理K8S叢集)
# 安裝依賴包 yum install -y yum-utils device-mapper-persistent-data lvm2 # 新增Docker軟體包源 yum-config-manager \ --add-repo \ https://download.docker.com/linux/cen
Bancor 2.0協議:通過智慧合約為數字資產提供持續流動性
Bancor 協議使智慧合約區塊鏈上的自動價格發現和自主流動機制成為可能。這些智慧Token擁有一個或者多個聯結器,連線到持有其他Token的網路,允許使用者直接通過智慧Token的合約,按照一個持續計算以保持買入賣出交易量平衡的價格,立即為已連線的Token購
通過Kibana管理叢集服務
前述步驟: ① 啟動Kibana; ② 通過瀏覽器訪問Kibana; ③ 進入Dev Tools(開發者工具)介面. 1 檢查叢集的健康狀況 ES提供了一套_cat API, 可以檢視ES中的各類資料. # 查詢API: GET /_cat/healt
IDEMIA為泰國dtac提供訂閱管理平臺,以便所有使用者可使用配置eSIM的互聯手錶
法國科隆布--(美國商業資訊)--增強身份識別領域的全球領導者IDEMIA已被泰國領先的移動運營商dtac選中,將為配置嵌入式SIM卡(eSIM)的互聯手錶提供連線。 此新聞稿包含多媒體內容。完整新聞稿可在以下網址查閱:https://www.businesswire.co
Kubernetes(K8S)叢集管理Docker容器(部署篇)
今天這篇文章教給大家如何快速部署一套Kubernetes叢集。K8S叢集部署有幾種方式:kubeadm、minikube和二進位制包。前兩者屬於自動部署,簡化部署操作,我們這裡強烈推薦初學者使用二進位制
Qihoo360/wayne安裝部署管理Kubernetes(k8s)叢集
一、概述 Kubernetes 官方本身就提供了一個管理叢集的 Dashboard 外掛,但是官方的 Dashboard 外掛還是有一些侷限性,近日360開源了內部使用的 Kubernetes Dashboard 外掛:Wayne。 Wayne 是一個通用的、基於 Web 的 Kubernete
為Kubernetes叢集裡的容器提供DNS服務,用於解析service名稱
部署DNS服務 kubedns負責從KUBERNETES_SERVICE_HOST收集service+namespace與clusterIP的對映關係; dnsmasq根據kubedns收集的資訊,提供名稱解析服務。 下載映象到本地倉庫 k
華為VRP設備配置通過telnet管理
cati local cat 模式 ice 級別 int face service <Huawei>system-view //進入系統視圖 [Huawei]aaa //進入aaa配置模式 [Huawei-aaa]local-user zw password c
Kubernetes(K8S)叢集管理Docker容器
一、架構拓撲圖 二、環境規劃 角色 IP 元件 master 172.25.77.1 etcd kube-apiserver kube-
使用kubectl管理k8s叢集(二十九)
前言 在搭建k8s叢集之前,我們需要先了解下kubectl的使用,以便在叢集部署出現問題時進行檢查和處理。命令和語法記不住沒有關係,但是請記住主要的語法和命令以及幫助命令的使用。 在下一篇,我們將講述使用Kubeadm來建立k8s叢集。 目錄 使用kubectl管理k8s叢集
備戰雙 11!螞蟻金服萬級規模 K8s 叢集管理系統如何設計?
作者 | 螞蟻金服技術專家 滄漠 關注『阿里巴巴雲原生』公眾號,回覆關鍵詞“1024”,可獲取本文 PPT。 前言 Kubernetes 以其超前的設計理念和優秀的技術架構,在容器編排領域拔得頭籌。越來越多的公司開始在生產環境部署實踐 Kubernetes,在阿里巴巴和螞蟻金服 Kubernetes 已被大規
多k8s叢集管理
多叢集的切換是K8s運維中比不可少的問題,常見的基於多個叢集進行切換的方法有三種: - 切換config檔案 - 通過context進行叢集切換 - 用kubecm進行叢集切換 ## 切換config檔案 我們先看看放在`.kube`下預設的config叢集: ``` $ kubectl co