如何使用confd+ACM管理Nginx配置
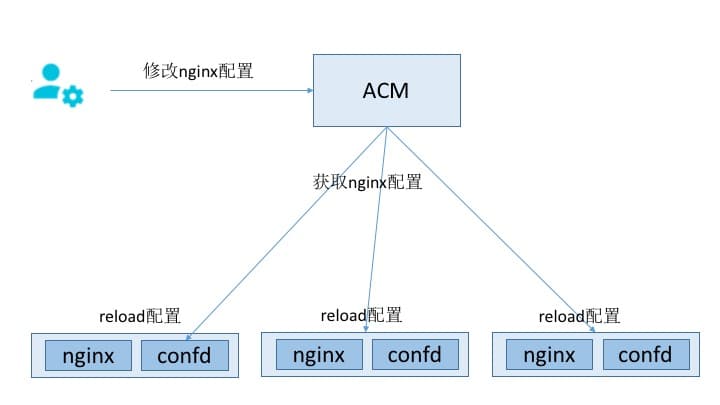
Nginx 作為優秀的開源軟體,憑藉其高效能高併發等特點,常常作為web和反向代理服務部署在生產環境中。但是當 Nginx 的規模較大時, Nginx 的運維成本也是不斷上升。本文介紹如何通過confd+ACM來管理 Nginx 配置,通過集中式的配置管理方式解決 Nginx 的大規模運維問題,運維和開發人員不用登陸到 Nginx 機器上,只需要配置好confd,然後在ACM上操作就可以動態修改 Nginx 的配置引數。

準備工作
在操作本文的示例之前需要配置好開通ACM和對confd的使用有基本概念,ACM的開通及其基本使用可以參考:這裡
confd的基本使用可以參考:這裡
Nginx 在日常開發中使用得比較多的功能是負載均衡、限流、快取等, Nginx 的使用和安裝可以在網上查閱相關資料。本文結合負載均衡和限流功能講解如何使用confd+ACM實現 Nginx 的大規模運維操作。
建立confd配置檔案
建立confd所需的toml格式配置檔案
vim /etc/confd/conf.d/myapp.tomlcheck_cmd用於檢驗 Nginx 配置的正確性,當src配置錯誤則不會覆蓋 Nginx 配置
reload_cmd用於reload Nginx 配置
[template]
src = " Nginx .conf.tmpl"
dest = "/usr/local/ Nginx /conf/ Nginx .conf"
keys = [
"/myapp/ Nginx /conf",
]

check_cmd = "/usr/local/ Nginx /sbin/ Nginx  -t -c {{.src}}"
reload_cmd = "/usr/local/ Nginx /sbin/ Nginx  -s reload"
建立模版檔案
vim /etc/confd/templates/ Nginx .conf.tmplgetv從ACM中獲取對應dataId的配置,/myapp/ Nginx /conf對應的dataId為myapp. Nginx .conf,配置格式為json格式,模版檔案包含了 Nginx 的upstream、限流、黑白名單配置內容,通過json指令解析配置檔案。upstream後端ip通過從ACM的配置的backends陣列中獲取,同樣地,白名單和黑名單ip分別儲存在whiteList和blackList的陣列中,限流的速率和併發數通過rateLimit和connectionLimit設定
...
{{$data := json (getv "/myapp/ Nginx /conf")}}
geo $whiteiplist {
    default 1;
    {{range $data.whiteList}}
    {{.}} 0;
    {{end}}
}

map $whiteiplist $limit {
    1 $binary_remote_addr;
    0 "";
}
limit_req_zone $limit zone=rateLimit:10m rate={{$data.rateLimit}}r/s;
limit_conn_zone $limit zone=connectionLimit:10m;

{{range $data.blackList}}
deny {{.}};
{{end}}
upstream myapp {
    server 11.160.65.95:8080;
}
server {
    listen       80;
    server_name  localhost;

    #charset koi8-r;

    #access_log  logs/host.access.log  main;
    location / {
        root   html;
        index  index.html index.htm;
        proxy_pass http://myapp;

        limit_conn connectionLimit {{$data.connectionLimit}};
        limit_req zone=rateLimit burst={{$data.burst}} nodelay;
    }
...
}
...
在ACM上建立所需的配置檔案
建立dataId為myapp. Nginx .conf的配置檔案,group使用預設的DEFAULT_GROUP即可,配置內容設定好上游節點、黑白名單以及限流閾值
{
"backends":["10.0.1.100:80","10.0.1.101:80"],
"whiteList":["10.0.1.102","10.0.1.103"],
"blackList":["10.0.1.104","10.0.1.104"],
"rateLimit":"10",
"connectionLimit":"10",
"burst":"10"
}
啟動confd
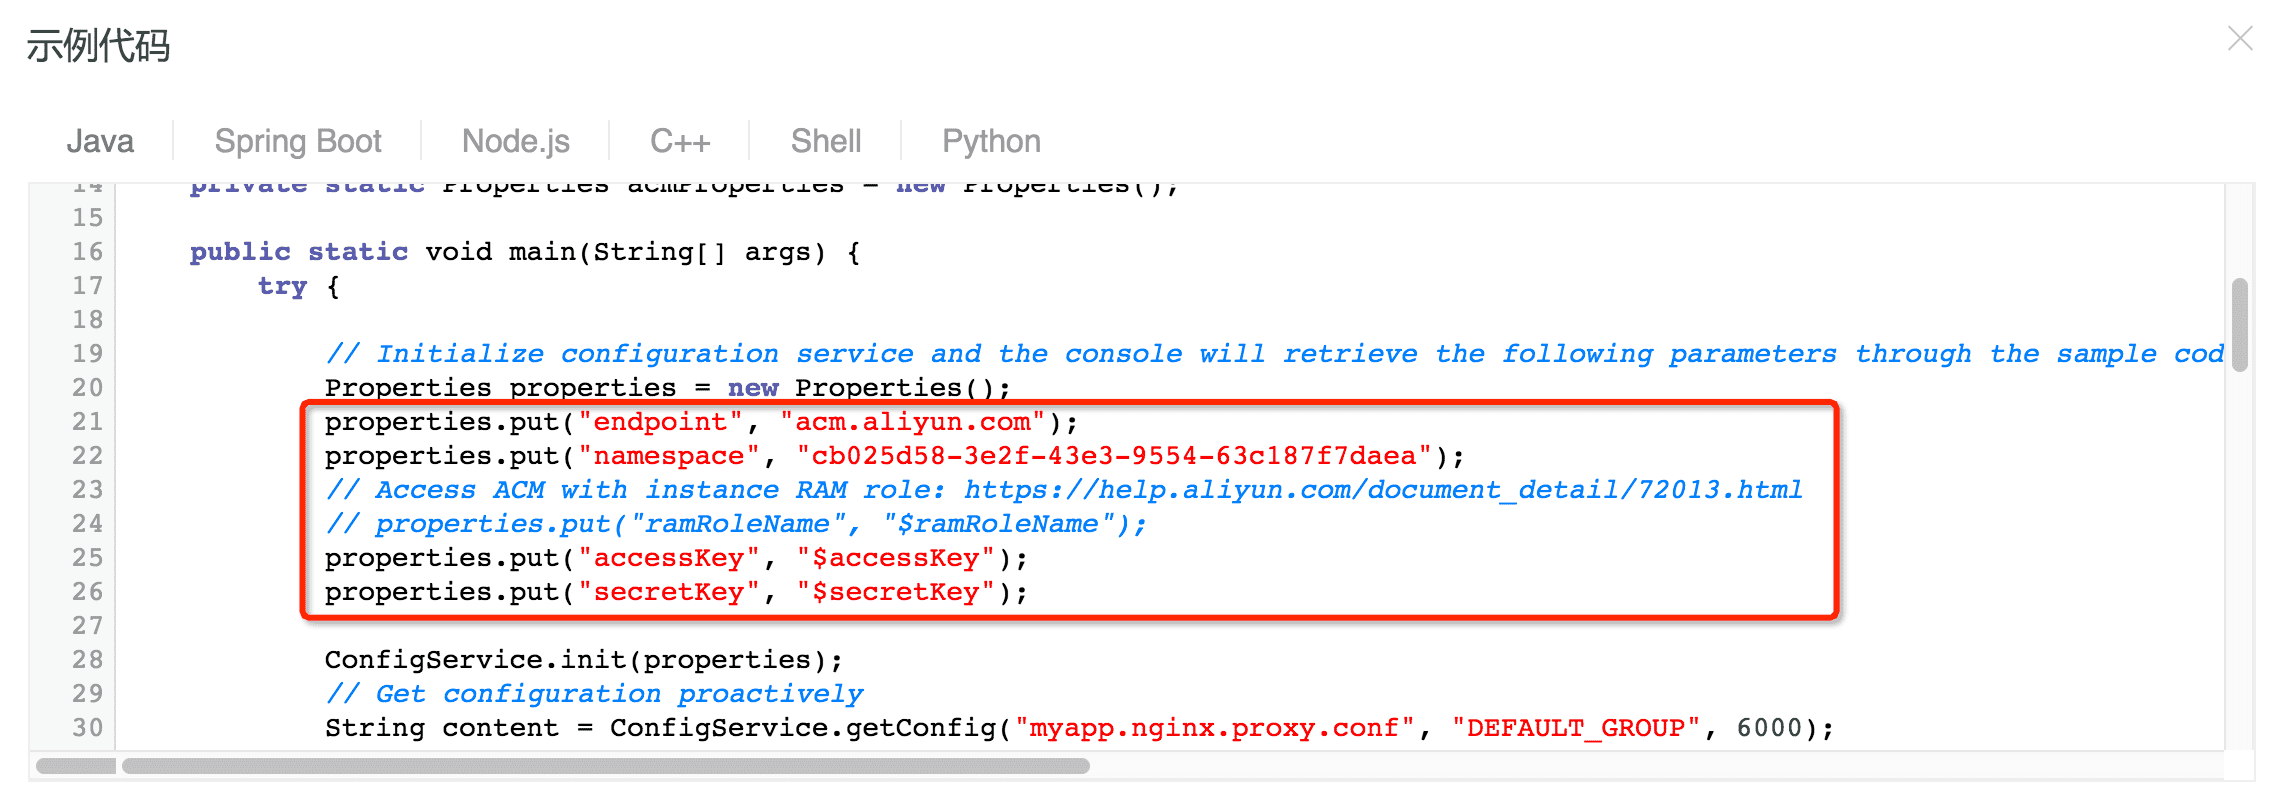
啟動confd,設定好backend、endpoint、名稱空間namespace和阿里雲賬號accessKey/secretKey
confd -backend nacos -endpoint {endpoint}:8080 -namespace {namespace} -accessKey {accessKey} -secretKey {secretKey}
生成配置檔案
confd將ACM中的引數通過模板檔案渲染生成新的 Nginx 配置檔案,檢視生成的/usr/local/ Nginx / Nginx .conf配置檔案是否符合預期,並檢查 Nginx 是否成功reload配置。
...
geo $whiteiplist {
    default 1;

    10.0.1.102 0;

    10.0.1.103 0;

}

map $whiteiplist $limit {
    1 $binary_remote_addr;
    0 "";
}

limit_req_zone $limit zone=rateLimit:10m rate=10r/s;
limit_conn_zone $limit zone=connectionLimit:10m;


deny 30.5.125.74;

deny 10.0.1.105;

upstream myapp {
    server 11.160.65.95:8080;
}
server {
    listen       80;
    server_name  localhost;
    location / {
            root   html;
            index  index.html index.htm;
            proxy_pass http://myapp;

            limit_conn connectionLimit 10;
            limit_req zone=rateLimit burst=10 nodelay;
        }
...
}
...
動態修改 Nginx 配置
執行時當需要調節 Nginx 的名單或者限流閾值的時候,可以在ACM上修改配置的內容。當然在生產環境可以使用ACM的灰度釋出功能(Beta釋出)驗證沒問題再全量釋出下去。

本文演示瞭如何使用confd+ACM管理 Nginx 配置,降低 Nginx 的運維成本。
confd+ACM的使用還可以參考:
如何在阿里雲上安全的存放您的配置 - 續
使用etcd+confd管理 Nginx 配置
本文作者:風卿,Nacos 社群 Committer
原文連結
本文為雲棲社群原創內容,未經
