
Netty進階基礎篇之Buffer篇(2)
1、Buffer概念
1.1 緩衝區獲取
Buffer緩衝區是就是一個數組,有著不同的資料型別:ByteBuffer、CharBuffer、ShortBuffer、IntBuffer、LongBuffer、FloatBuffer、DoubleBuffer,然後這些資料型別都可以通過 allocate() 獲取緩衝區。
static XxxBuffer allocate(int capacity) : 建立一個容量為 capacity 的 XxxBuffer 物件,如下:
//1. 分配一個指定大小的Byte型別的緩衝區
ByteBuffer byteBuffer = ByteBuffer.allocate(1024);
1.2 緩衝區存取資料的兩個核心方法
put() : 存入資料到緩衝區中
| put(byte b) | 將給定單個位元組寫入緩衝區的當前位置 |
| put(byte[] src) |
將 src 中的位元組寫入緩衝區的當前位置 |
| put(int index, byte b) |
將指定位元組寫入緩衝區的索引位置(不會移動 position) |
get() : 獲取緩衝區中的資料
| get() |
讀取單個位元組 |
| get(byte[] dst) |
批量讀取多個位元組到 dst 中 |
| get(int index) |
讀取指定索引位置的位元組(不會移動 position) |
byteBuffer.put(“Mujiutian”);
byteBuffer.get();
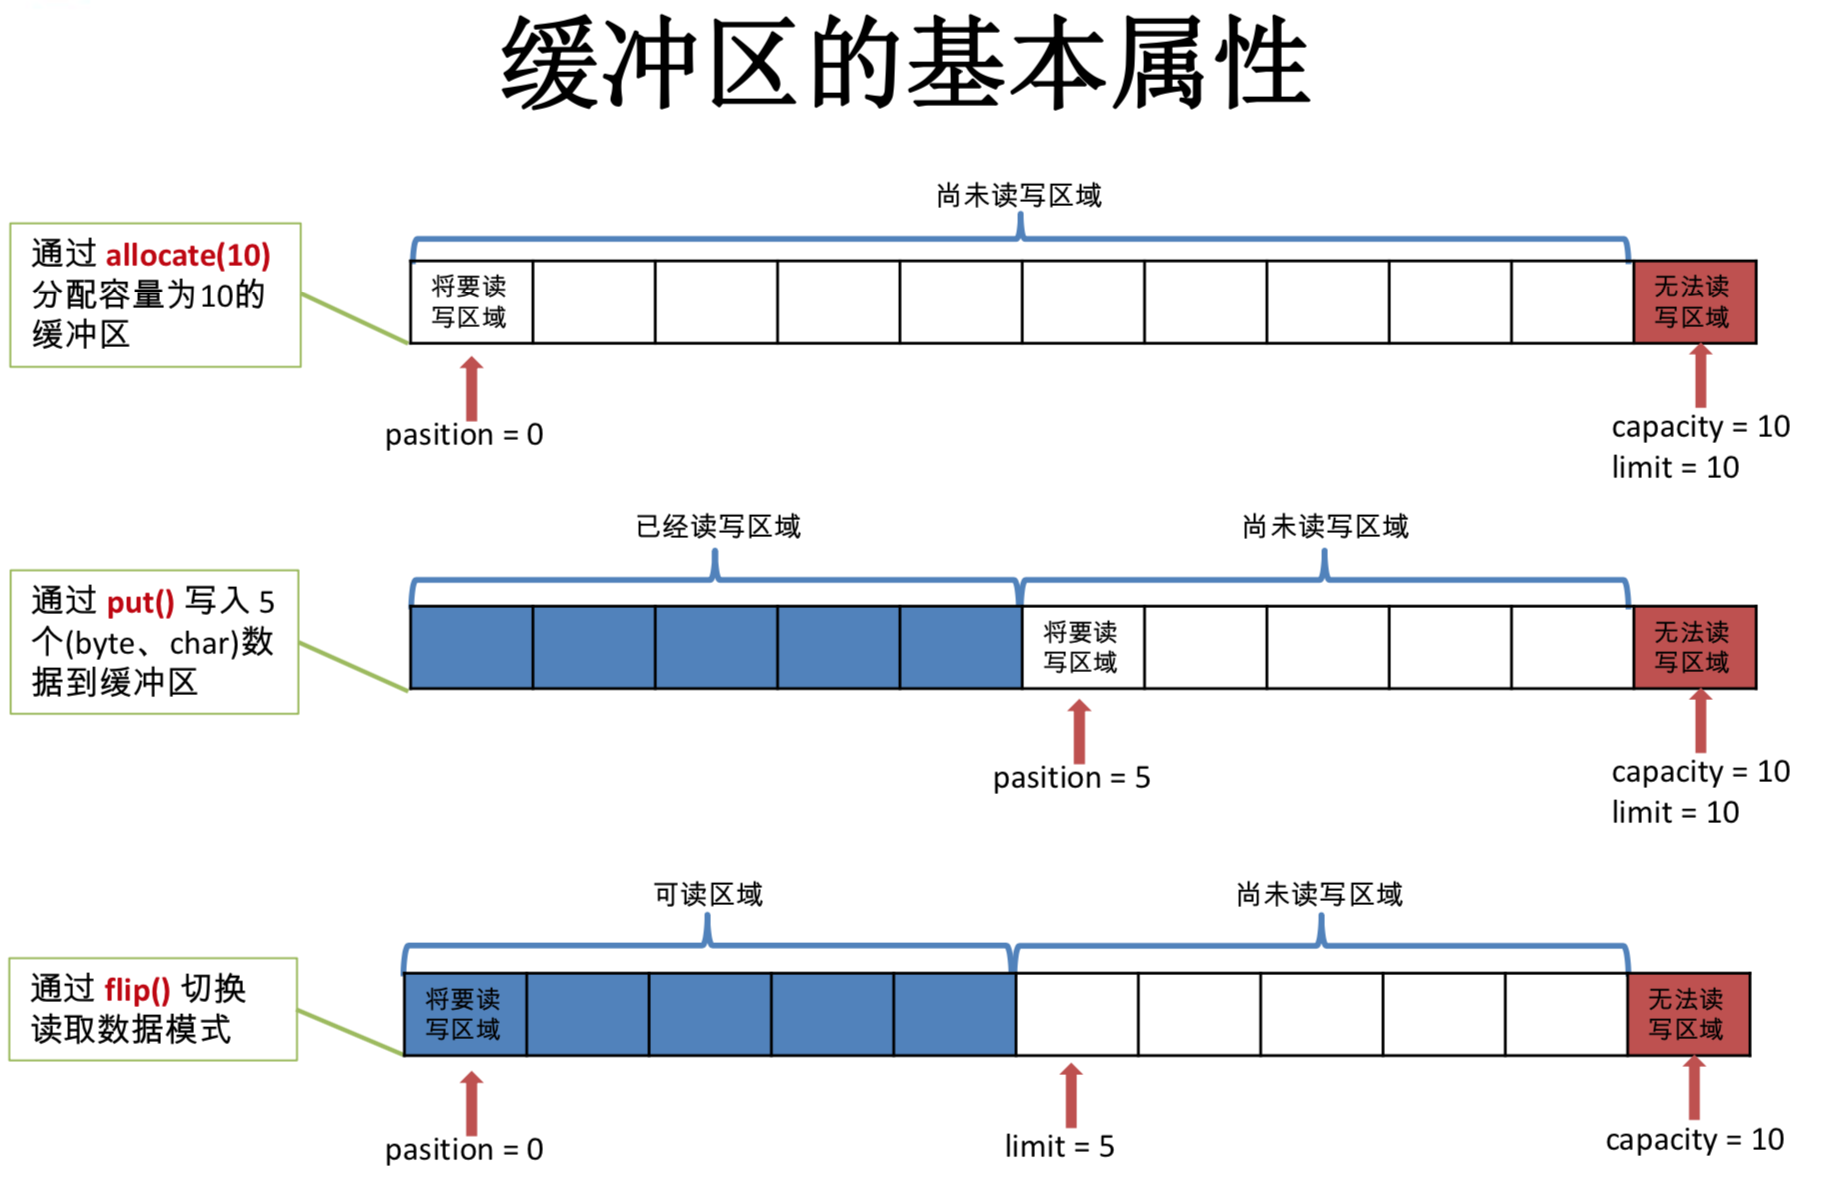
1.3 緩衝區中的四個核心屬性
0 <= mark <= position <= limit <= capacity
capacity : 容量,表示緩衝區中最大儲存資料的容量。一旦宣告不能改變。
byteBuffer.capacity()
limit : 界限,表示緩衝區中可以操作資料的大小。(limit 後資料不能進行讀寫)
byteBuffer.limit()
position : 位置,表示緩衝區中正在操作資料的位置。
byteBuffer.position()
mark : 標記,表示記錄當前 position 的位置。可以通過 reset() 恢復到 mark 的位置
byteBuffer.mark()
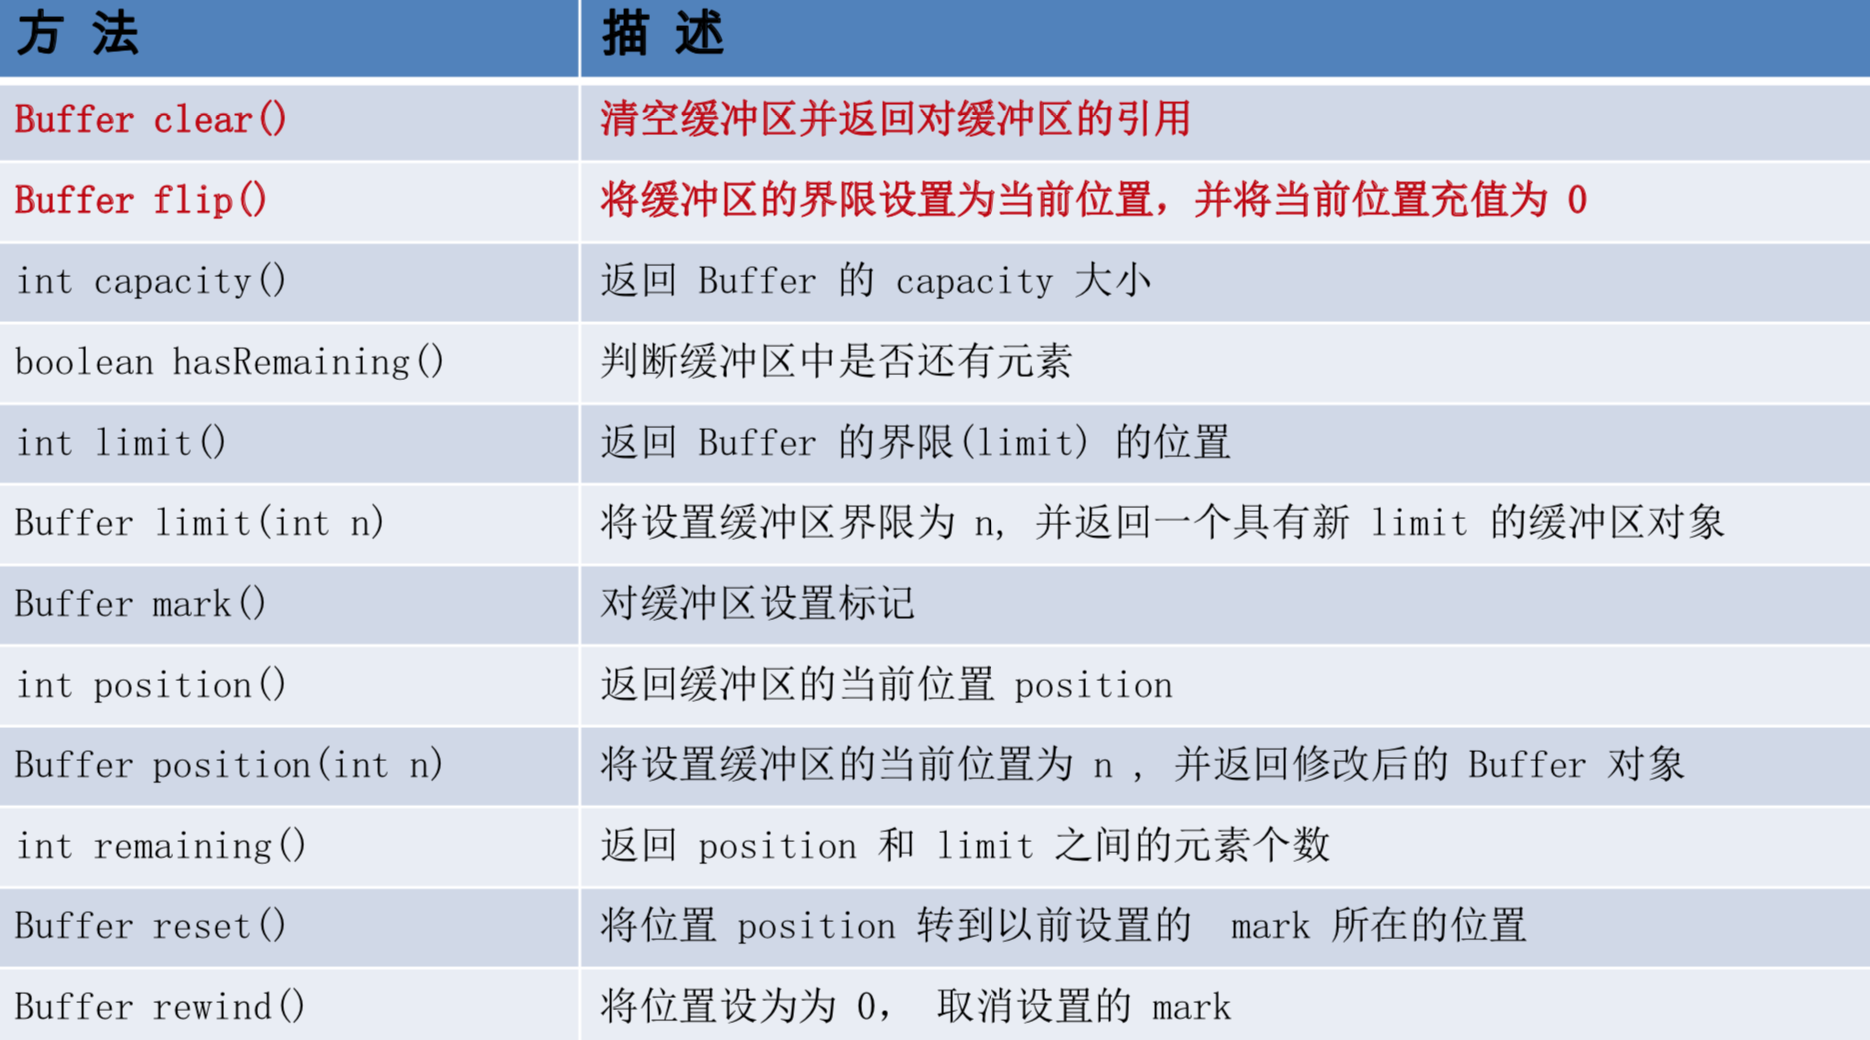
1.4 Buffer常用的方法
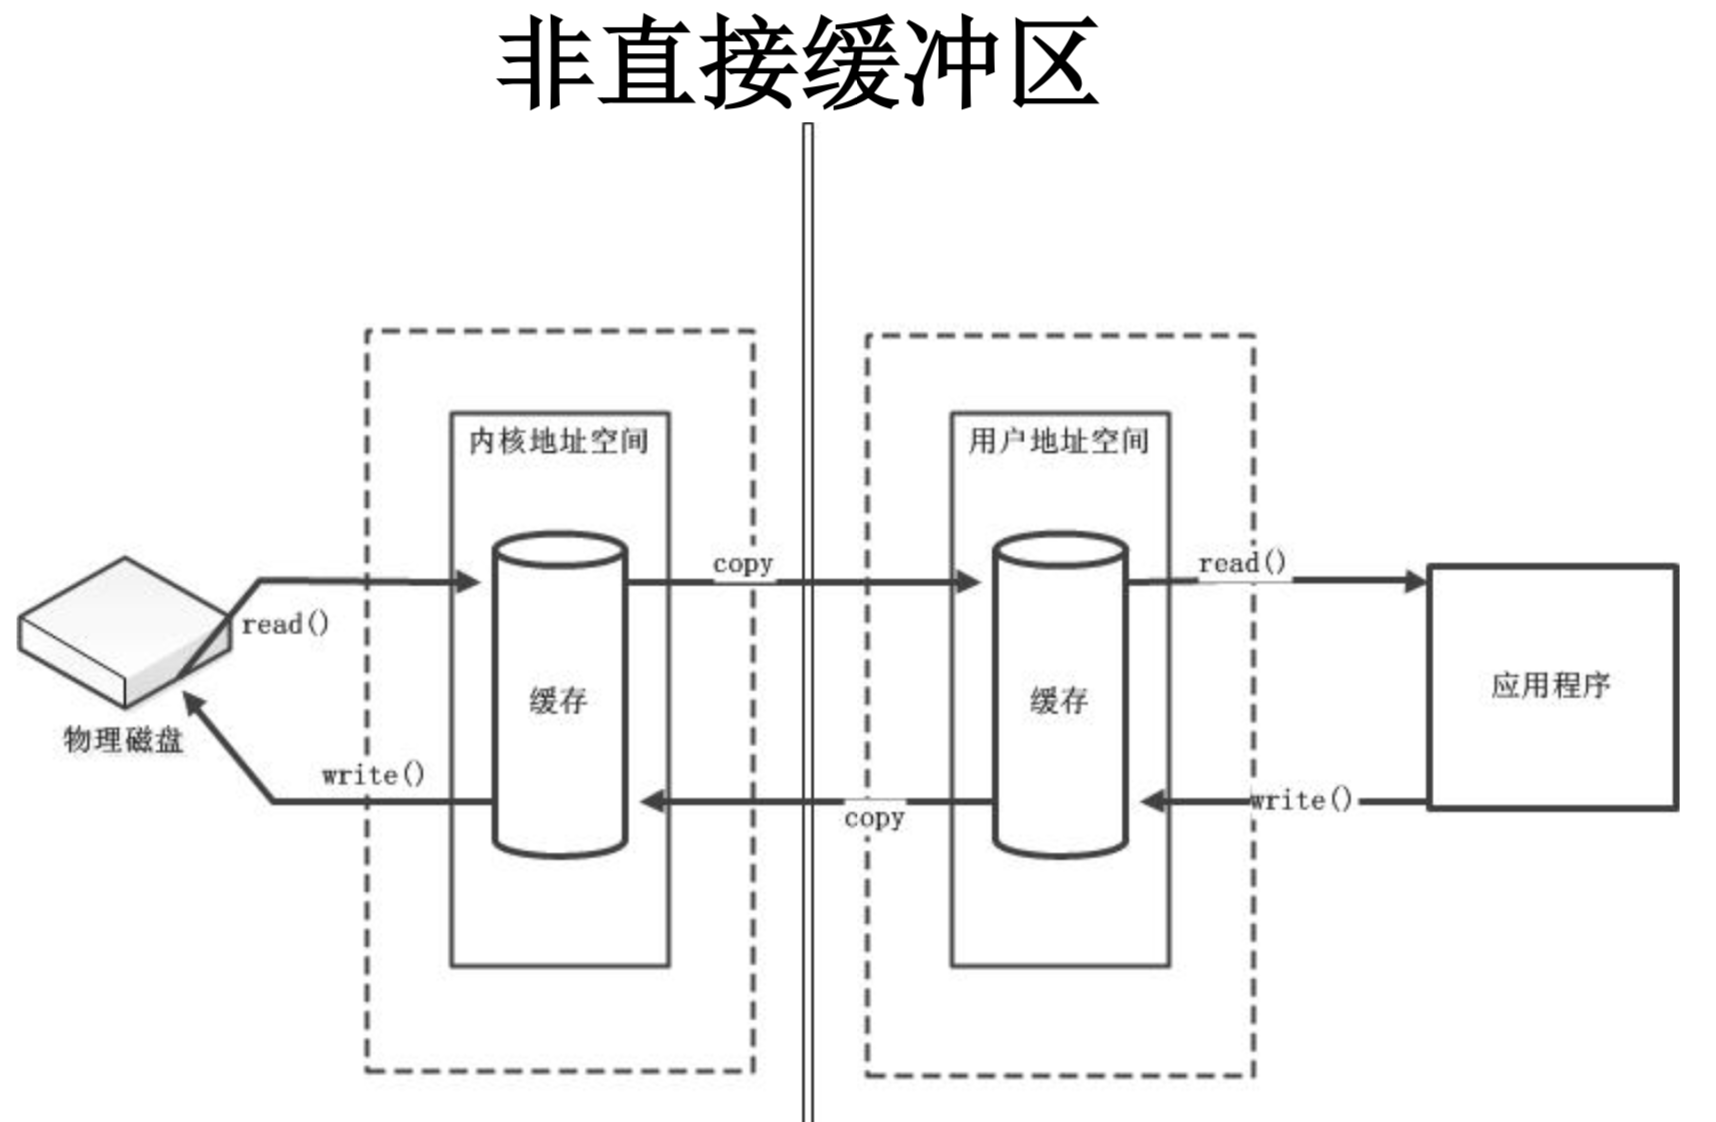
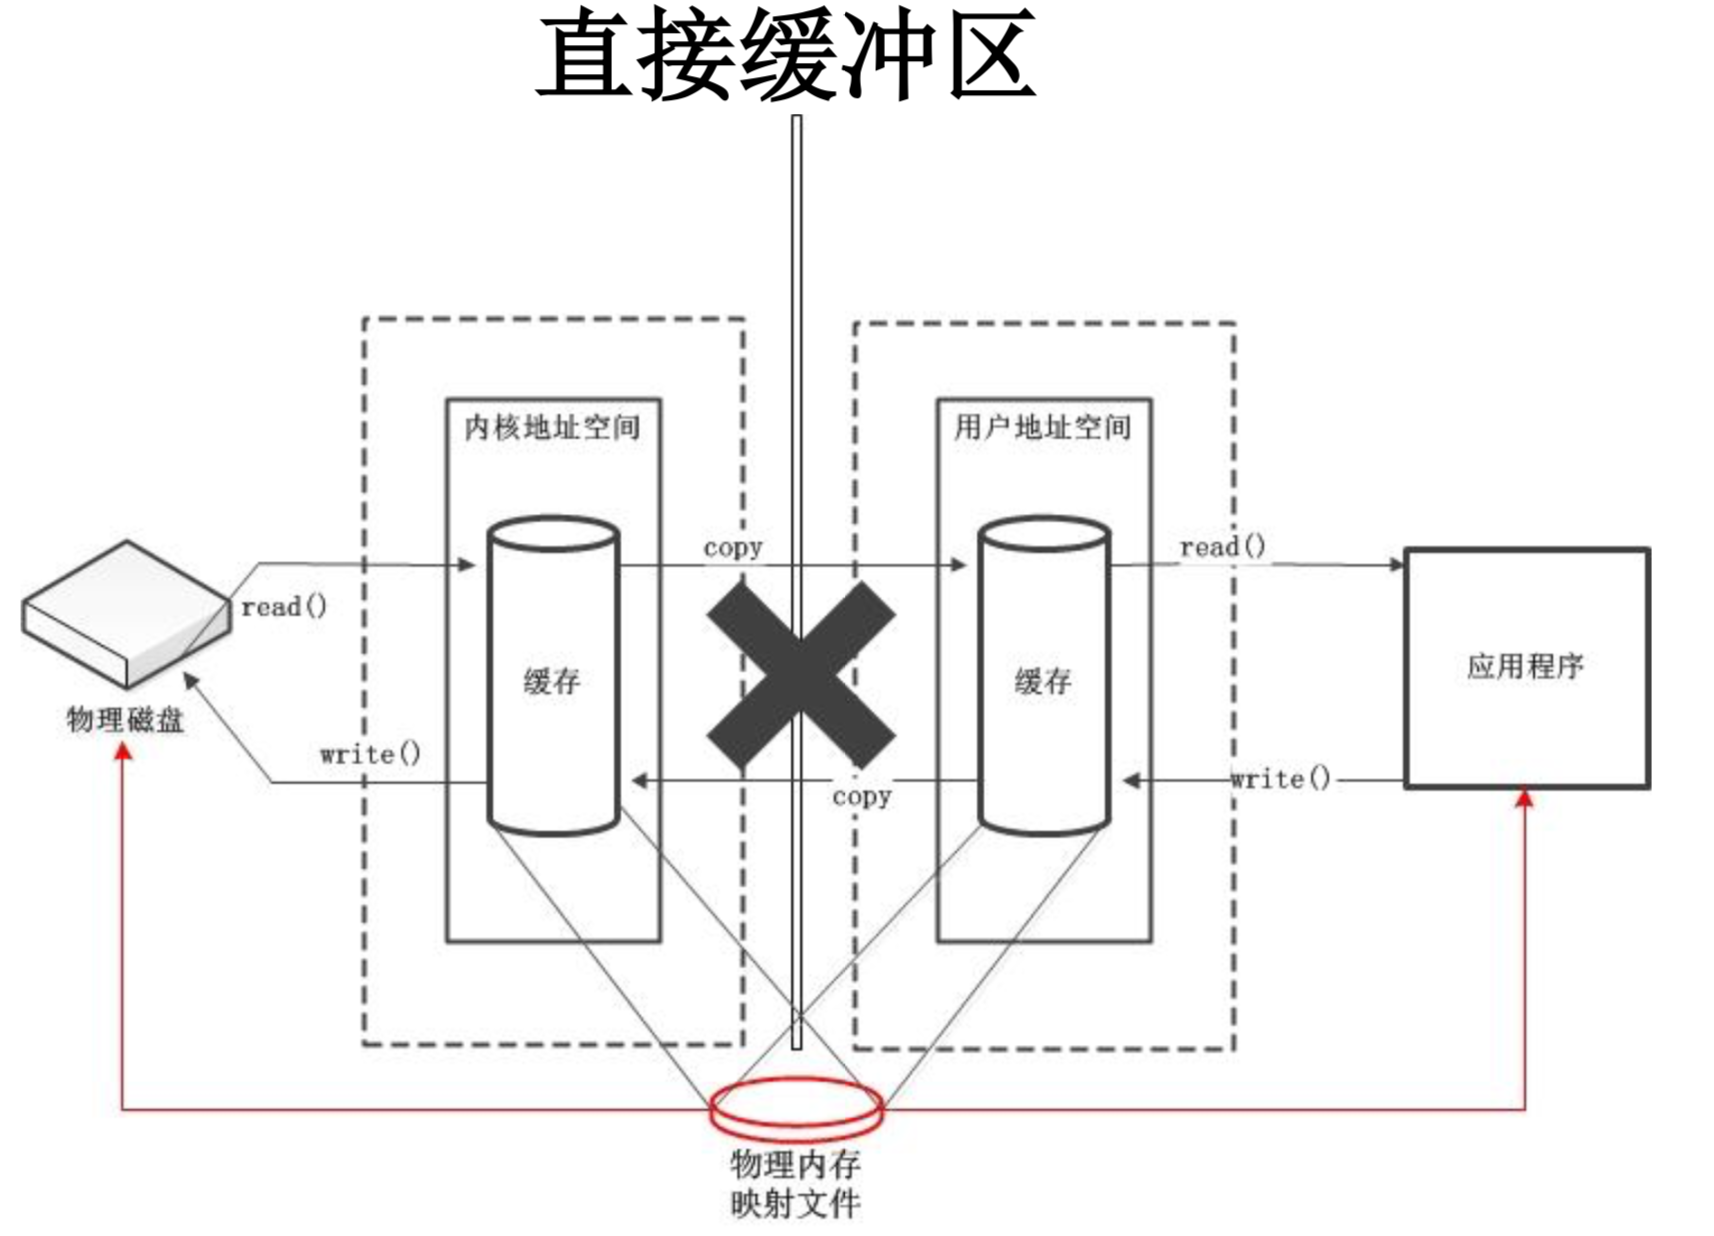
1.5、直接緩衝區與非直接緩衝區
非直接緩衝區:通過 allocate() 方法分配緩衝區,將緩衝區建立在 JVM 的記憶體中
直接緩衝區:通過 allocateDirect() 方法分配直接緩衝區,將緩衝區建立在實體記憶體中。可以提高效率
2、程式碼講解
2.1 使用緩衝區的各種方法
@Test
public void test1(){
   String str = "MuJiuTian";

   //1. 分配一個指定大小的Byte型別的緩衝區
   ByteBuffer buf = ByteBuffer.allocate(1024);

   System.out.println("-----------------allocate()----------------");
   //此時緩衝區為讀,下標位置
   System.out.println(buf.position());
   //此時緩衝區的界線,也就是臨界點,1024
   System.out.println(buf.limit());
   //緩衝區的容量
   System.out.println(buf.capacity());

   //2. 利用 put() 存入資料到緩衝區中
   buf.put(str.getBytes());

   System.out.println("-----------------put()----------------");
   //此時緩衝區為讀,下標位置已經讀到第五個了
   System.out.println(buf.position());
   System.out.println(buf.limit());
   System.out.println(buf.capacity());

   //3. 切換讀取資料模式,切換為寫的模式,也就是把剛剛讀取的內容重新從下標0開始讀
   buf.flip();

   System.out.println("-----------------flip()----------------");
   System.out.println(buf.position());
   System.out.println(buf.limit());
   System.out.println(buf.capacity());

   //4. 利用 get() 讀取緩衝區中的資料
   byte[] dst = new byte[buf.limit()];
   buf.get(dst);
   System.out.println(new String(dst, 0, dst.length));

   System.out.println("-----------------get()----------------");
   System.out.println(buf.position());
   System.out.println(buf.limit());
   System.out.println(buf.capacity());

   //5. rewind() : 可重複讀
   buf.rewind();

   System.out.println("-----------------rewind()----------------");
   System.out.println(buf.position());
   System.out.println(buf.limit());
   System.out.println(buf.capacity());

   //6. clear() : 清空緩衝區. 但是緩衝區中的資料依然存在,但是處於“被遺忘”狀態
   buf.clear();

   System.out.println("-----------------clear()----------------");
   System.out.println(buf.position());
   System.out.println(buf.limit());
   System.out.println(buf.capacity());

   System.out.println((char)buf.get());
}
結果:
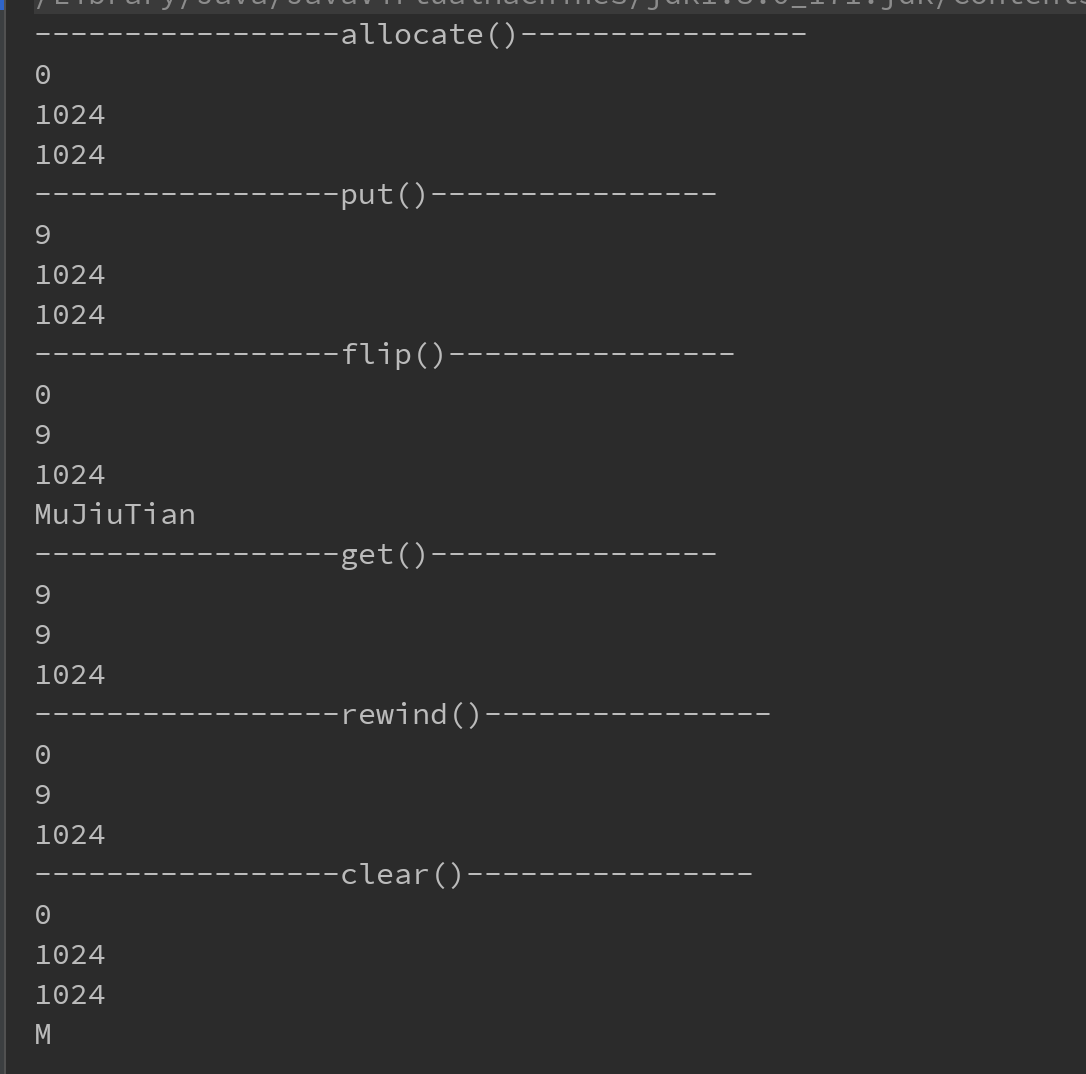
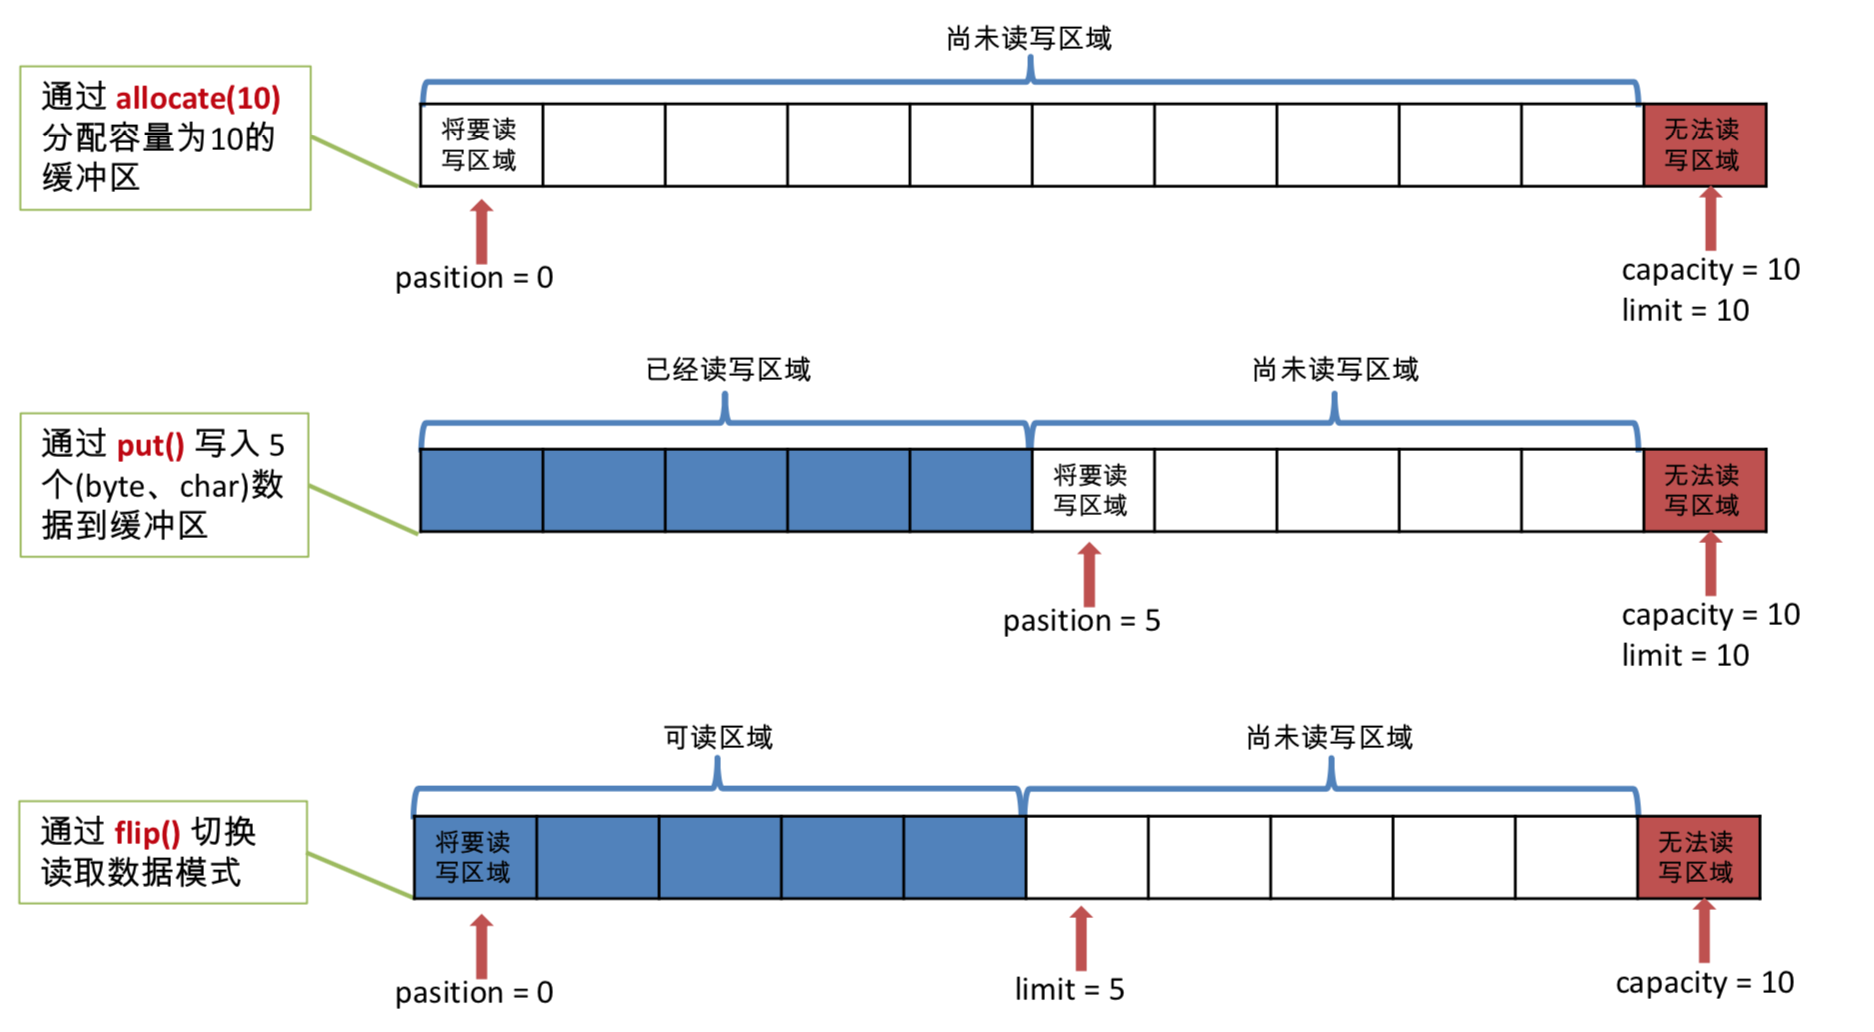
看剛剛的流程圖:
2.2 使用簡單方法掌握buffer的基本方法
@Test
public void test2(){

   String str = "Mujiutian";

   //建立Byte型別緩衝區
   ByteBuffer byteBuffer = ByteBuffer.allocate(1024);
   //此時為讀模式,讀取str內容
   byteBuffer.put(str.getBytes());
   //切換為寫的模式,處理剛剛讀取的內容
   byteBuffer.flip();

   //此時limit為9,因為讀取了Mujiutian 9個位元組
   byte[] dst = new byte[byteBuffer.limit()];
   //讀取下標0到2的位元組
   byteBuffer.get(dst, 0, 2);
   System.out.println(new String(dst, 0, 2));
   System.out.println(byteBuffer.position());

   //mark() : 標記
   byteBuffer.mark();

   byteBuffer.get(dst, 2, 2);
   System.out.println(new String(dst, 2, 2));
   System.out.println(byteBuffer.position());

   //reset() : 使用該方法,位置恢復到 mark 的位置
   byteBuffer.reset();
   System.out.println(byteBuffer.position());

   //判斷緩衝區中是否還有剩餘資料
   if(byteBuffer.hasRemaining()){
      //獲取緩衝區中可以操作的數量
      System.out.println(byteBuffer.remaining());
   }
}
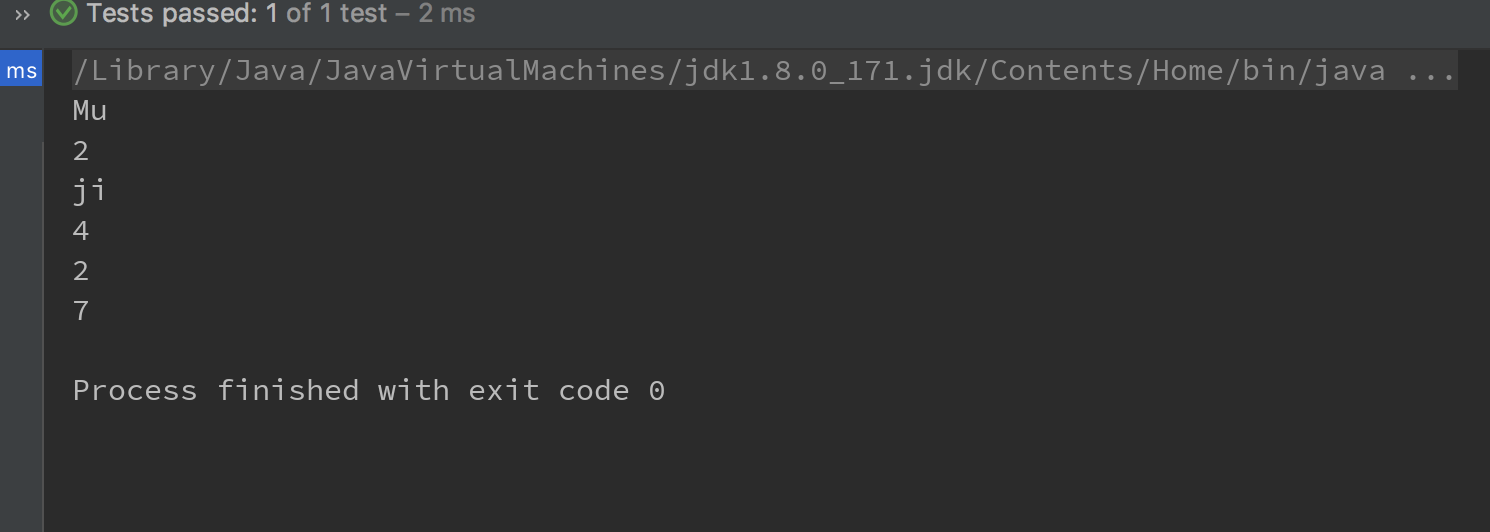
結果為:
2.3 測試是否為緩衝區
@Test
public void test3(){
//分配直接緩衝區
ByteBuffer buf = ByteBuffer.allocateDirect(1024);
System.out.println(buf.isDirect());
}