
前端從零開始學習Graphql
學習本姿勢需要電腦裝有node,vue-cli相關環境,以及要有node,express,koa,vue相關基礎
本文相關demo的github地址:
node服務:https://github.com/liuming888/graphql_node_demo.gitvue專案:https://github.com/liuming888/graphql_vue_demo.git
一 Graphql概述
它是什麼?從哪裡來?要幹什麼?
簡單地講,對於前端,它就是讓你舒舒服服發請求的
嚴格的說,它是一種api設計思想,用來取代restful api的一種前端處於主導地位的api規範。它把前端所需要的api用類似圖資料結構(graph)的方式展現出來,讓前端很方便的獲取所需要的資料。
特點
需要什麼就獲取什麼資料
支援關係資料的查詢
API無需定義各種路由,完全資料驅動
無需管理API版本,一個版本持續演進
支援大部分主流開發語言和平臺
強大的配套開發工具
起源,restful api的問題
如果採用restful api的話,後端要持續維護api doc,但是實際場景是這樣的:
1.來了新需求,後端先評估和開發,後端弄得差不多,前端才開始,然後中間後端一頓猛改
2.由於多種原因,後端經常自己偷偷改掉傳參或者返回值,完了介面報錯,測試姐姐把前端叫過去一頓批,前端一臉懵圈,仔細檢查,發現問題,找後端撕X,這樣一個迴圈非常影響開發效率。
gql出現
由於上面這一堆的問題,facebook公司2012年內部實踐了GraphQL,15年剛開源的時候引起了很多大公司和社群關注,落地了很多規範和框架。需要了解詳細歷史可以看看底下的youtube視訊。
這種叫GraphQL的東西幫助人們經過一系列定義和規範,可以傳送gql請求非常方便的拿到想要的資料,甚至還可以修改資料,而不用後臺的配合,而且一旦Schema確定(資料庫那邊定義好),前後端就可以快速並行開發,例如下圖獲得某個使用者的資訊,我想要這個使用者的什麼屬性就寫什麼,graphiQl工具可以進行完整的詳細的提示,請求主體簡單明瞭
query{
student{
id
name
age
}
course{
id
title
}
}
gql理想使用場景
資料庫建好模型,前後端可以同步開始開發需求,前端只有少數需要依賴後端介面,前端開發過程中可以方便的拿到任何想要的資料,從而節省大量聯調介面的時間,迅速的完成一個專案。
實現原理
gql的實現挺複雜的,程式碼有點難懂,不過原理說起來比較簡單易懂
var { graphql, buildSchema } = require('graphql');
// Construct a schema, using GraphQL schema language
var schema = buildSchema(`
type Query {
hello: String
}
`);
// The root provides a resolver functionfor each API endpoint
var root = {
hello: () => {
return'Hello world!';
},
};
// Run the GraphQL query '{ hello }' and print out the response
graphql(schema, '{ hello }', root).then((response) => {
console.log(response);
});
如上就是一個最簡單的node版的gql伺服器 gql把定義好的schema拿到,用root之類的resolve解析器去解析傳送來的'{ hello }'請求,然後返回給相應的json值。上面程式碼打印出的response如下
{
data:
{
hello: 'Hello world!' }
}
當然,resolve逐層解析會有一些問題,如果resolve請求資料庫,就要用到DataLoader
DataLoader是gql伺服器效能的關鍵一環,也是gql社群的主要推動完善方向,就像react裡面的shouldComponentUpdate一樣制約著gql伺服器的效能。
DataLoader 能讓我們從資料庫讀取資料並讓資料能被 GraphQL 處理,我們使用 DataLoader,而不是直接通過 SQL 查詢從資料庫獲取資料,將 DataLoader 作為代理以減少我們實際需要傳送給資料庫的 SQL 查詢。 DataLoader 使用批處理和快取的組合來實現。如果同一個客戶端請求會造成多次請求資料庫,DataLoader 會整合這些問題並從資料庫批量拉取請求資料。DataLoader 會同時快取這些資料,當有後續請求需要同樣資源時可以直接從快取獲取到。
具體使用
通過服務端對請求的元資料的type進行嚴格的定義,我們只要在客戶端傳送gql請求就能返回期望的相應型別的資料
下圖是請求格式,query【請求】,mutation【修改】和subscribe【訂閱】是三種api傳送方式,query用的多一些,mutation相對傳統的restful來說不夠可靠和安全,subscribe類似websocket
query
{
schema {
types {
id
name // 獲取根欄位名 fields {
id
name // 獲取欄位名 }
}
}
}
和restful比較的優缺點
優點
優點就是後端可以少招幾個寫介面的
前後端一起開發,節約工期
較少維護api文件,節省精力
說了這些,其實單對於前端來說,幫助不算特別大
缺點和難推廣的地方
後端或者中間層把gql封裝相應業務對接資料庫是難點,需要高階人力
需要前端多少學一點類sql語句,不過大部分場景可以封裝好固定的sql語句
封裝gql不好會產生sql效能問題,三級巢狀聯查還有n+1的老問題又會冒出來,需要持續優化
前端排除bug需要一定的後端知識,前後端架構多少了解一些
..
二 hello word
簡易版的hello world
npm install graphql
然後使用 node hello.js 以執行 hello.js 中的程式碼:
var { graphql, buildSchema } = require('graphql');
var schema = buildSchema(`
type Query {
hello: String
}
`);
var root = { hello: () => 'Hello world!' };
graphql(schema, '{ hello }', root).then((response) => {
console.log(response);
});
控制檯打印出Hello world!
express版hello world
npm install express express-graphql graphql
然後使用 node server.js 以執行 server.js 中的程式碼:
var express = require('express');
var graphqlHTTP = require('express-graphql');
var { buildSchema } = require('graphql');
var schema = buildSchema(`
type Query {
hello: String
}
`);
var root = { hello: () => 'Hello world!' };
var app = express();
app.use('/graphql', graphqlHTTP({
schema: schema,
rootValue: root,
graphiql: true, // 是否開啟除錯模式(生產環境注意得關掉)
}));
app.listen(4000, () => console.log('Now browse to localhost:4000/graphql'));
訪問http://localhost:4000/graphql
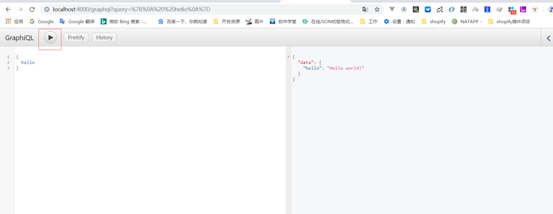
koa版hello world
npm install koa graphql koa-graphql koa-mount
然後使用 node server.js 以執行 server.js 中的程式碼:
const Koa = require('koa');
const mount = require('koa-mount');
const { buildSchema } = require('graphql');
const graphqlHTTP = require('koa-graphql');
const app = new Koa();
const schema = buildSchema(`
type Query {
hello: String
}
`);
const root = {
hello: () => 'Hello world!',
};
app.use(
mount(
'/graphql',
graphqlHTTP({
schema: schema,
rootValue: root,
graphiql: true,
})
)
);
app.use(async ctx => {
ctx.body = 'Hello World';
});
app.listen(3000);
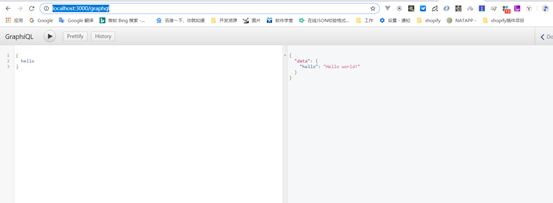
訪問 http://localhost:3000/graphql
三 進階
參考資料:用Node建立GraphQL API:程式碼量少,效能高
基於express
程式碼看 node-graphql-demo專案  然後yarn npm run dev
github地址: https://github.com/liuming888/graphql_node_demo.git master分支
建立 Project
我們現在來建立我們的 project。開啟一個新的 terminal,執行以下命令,即可使用預設值建立 package.json 檔案:
mkdir node-graphql-demo
cd node-graphql-demo
npm init -y
接下來,我們需要安裝以下依賴:
npm install graphql express express-graphql sqlite3 --save
這樣就會安裝 Express 框架,Node.js 上的 GraphQL 實現,Express 和 SQLite3 的 GraphQL 中介軟體。為簡單起見,我們使用 SQLite3 作為資料庫。
graphql 是一個支援庫,並且在我們這裡是一個必要的模組
express 是一個簡潔而靈活的 node.js Web應用框架, 提供了一系列強大特性幫助你建立各種 Web 應用,和豐富的 HTTP 工具。
express-graphql GraphQL HTTP伺服器中介軟體
SQLite是一個程序內的庫,實現了自給自足的、無伺服器的、零配置的、事務性的 SQL 資料庫引擎。它是一個零配置的資料庫,這意味著與其他資料庫一樣,您不需要在系統中配置。就像其他資料庫,SQLite 引擎不是一個獨立的程序,可以按應用程式需求進行靜態或動態連線。SQLite 直接訪問其儲存檔案
建立 GraphQL 伺服器
建立工程並引入基本依賴包之後,現在來建立 API 伺服器。在工程資料夾裡,建立 index.js 檔案,並引入下列內容:
const express = require('express');
const sqlite3 = require('sqlite3').verbose();
const graphql = require("graphql");
const ExpressGraphQL = require("express-graphql");
上面的程式碼的目的是:為Express匯入Express,SQLite3,GraphQL和GraphQL中介軟體。
接下來,新增下列程式碼,在當前資料夾中建立一個 Express 應用程式和名為 my.db 的 SQLite 3 資料庫:
const app = express();
const database = new sqlite3.Database("./my.db");
然後,新增 createContactTable() 方法,在資料庫中建立 contacts 表並馬上呼叫函式:
const createContactTable = () => {
const query = `
CREATE TABLE IF NOT EXISTS contacts (
id integer PRIMARY KEY,
firstName text,
lastName text,
email text UNIQUE)`;
return database.run(query);
}
createContactTable();
我們建立了一個 SQL 表來儲存 contacts的基本資訊。每個 contact 的基本資訊包括:唯一的標識、名、姓和 email。
接下來,新增下列程式碼來定義一個 GraphQL 型別:
const ContactType = new graphql.GraphQLObjectType({
name: "Contact",
fields: {
id: { type: graphql.GraphQLID },
firstName: { type: graphql.GraphQLString },
lastName: { type: graphql.GraphQLString },
email: { type: graphql.GraphQLString }
}
});
我們使用基本的內建 GraphQL 型別,如 GraphQLID 和 GraphQLString 來建立我們自定義型別,對應資料庫中的 contact。
相關連結:
GraphQLID: https://graphql.github.io/graphql-spec/draft/#sec-ID
GraphQLString: https://graphql.github.io/graphql-spec/draft/#sec-String
接著,定義查詢型別,如下所示:
var queryType = new graphql.GraphQLObjectType({
name: 'Query',
fields: {
contacts: {
type: graphql.GraphQLList(ContactType),
resolve: (root, args, context, info) => {
return new Promise((resolve, reject) => {
database.all("SELECT * FROM contacts;", function (err, rows) {
if (err) {
reject([]);
}
resolve(rows);
});
});
}
},
contact: {
type: ContactType,
args: {
id: {
type: new graphql.GraphQLNonNull(graphql.GraphQLID)
}
},
resolve: (root, {
id
}, context, info) => {
return new Promise((resolve, reject) => {
database.all("SELECT * FROM contacts WHERE id = (?);", [id], function (err, rows) {
if (err) {
reject(null);
}
resolve(rows[0]);
});
});
}
}
}
});
我們的查詢有兩個欄位: contacts,可以用來獲取資料庫中的所有 contacts,而 contact 則根據 id 獲取一個 contact 資訊。 contact 欄位允許所需的 id 引數為 GraphQLID 型別。
每個欄位都有一個 type,用來說明返回資料的型別,args 定義期望從客戶端得到的引數, resolve 則定義了在獲取資料邏輯中實際使用的方法。
對於前兩個欄位, resolve() 方法是實際邏輯發生的地方—— 我們簡單呼叫 database.all() 和 database.run() 方法來執行正確的 SQL 查詢,以便從 SQLite 獲取資料,返回一個 Promise 來處理得到的資料。
我們可以從resolve()方法的第二個引數訪問任何傳遞的引數。
接下來,我們建立一個 mutation 型別,用於建立、更新和刪除操作: https://graphql.github.io/graphql-spec/draft/#sec-Mutation
var mutationType = new graphql.GraphQLObjectType({
name: 'Mutation',
fields: {
createContact: {
type: ContactType,
args: {
firstName: {
type: new graphql.GraphQLNonNull(graphql.GraphQLString)
},
lastName: {
type: new graphql.GraphQLNonNull(graphql.GraphQLString)
},
email: {
type: new graphql.GraphQLNonNull(graphql.GraphQLString)
}
},
resolve: (root, {
firstName,
lastName,
}) => {
return new Promise((resolve, reject) => {
database.run('INSERT INTO contacts (firstName, lastName, email) VALUES (?,?,?);', [firstName, lastName, email], (err) => {
if (err) {
reject(null);
}
database.get("SELECT last_insert_rowid() as id", (err, row) => {
resolve({
id: row["id"],
firstName: firstName,
lastName: lastName,
email: email
});
});
});
})
}
},
updateContact: {
type: graphql.GraphQLString,
args: {
id: {
type: new graphql.GraphQLNonNull(graphql.GraphQLID)
},
firstName: {
type: new graphql.GraphQLNonNull(graphql.GraphQLString)
},
lastName: {
type: new graphql.GraphQLNonNull(graphql.GraphQLString)
},
email: {
type: new graphql.GraphQLNonNull(graphql.GraphQLString)
}
},
resolve: (root, {
id,
firstName,
lastName,
}) => {
return new Promise((resolve, reject) => {
database.run('UPDATE contacts SET firstName = (?), lastName = (?), email = (?) WHERE id = (?);', [firstName, lastName, email, id], (err) => {
if (err) {
reject(err);
}
resolve(`Contact #${id} updated`);
});
})
}
},
deleteContact: {
type: graphql.GraphQLString,
args: {
id: {
type: new graphql.GraphQLNonNull(graphql.GraphQLID)
}
},
resolve: (root, {
id
}) => {
return new Promise((resolve, reject) => {
database.run('DELETE from contacts WHERE id =(?);', [id], (err) => {
if (err) {
reject(err);
}
resolve(`Contact #${id} deleted`);
});
})
}
}
}
});
我們的 mutation 型別有三個欄位:
createContact 建立 contacts;
updateContact 更新 contacts;
deleteContact 刪除 contacts.
所有的欄位都接受符合 args 屬性定義的引數,並由一個 resolve() 方法來獲取傳遞過來的引數,執行相應的 SQL 操作,並返回一個 Promise。
然後,建立 GraphQL schema: https://graphql.github.io/graphql-spec/draft/#sec-Schema
const schema = new graphql.GraphQLSchema({
query: queryType,
mutation: mutationType
});
GraphQL schema 是 GraphQL 的核心概念,它定義了連線到伺服器的客戶端可用的功能。我們傳遞已定義的 query 和 mutation 型別到 schema。
最後,掛載到 /graphql 端點,在 4000 埠執行 Express 伺服器:
app.use("/graphql", ExpressGraphQL({ schema: schema, graphiql: true}));
app.listen(4000, () => {
console.log("GraphQL server running at http://localhost:4000.");
});
儲存 index.js 檔案,返回到你的 terminal。執行下列命令,啟動伺服器:
node index.js
怎樣使用 GraphQL API
構建客戶端前,可以使用 GraphQL 介面來測試你的 API。
訪問網址 : http://localhost:4000/graphql ,並執行下列 mutation query:
mutation {
createContact(firstName: "Jon", lastName: "Snow", email: "[email protected]") {
id,
firstName,
lastName,
}
}
使用下列 mutation,可以更新 id 為 1 的 contact:
mutation {
updateContact(id: 1, firstName: "Aegon", lastName: "Targaryen", email: "[email protected]")
}
也可以使用下列 mutation 來刪除 id 為 1 的 contact:
mutation {
deleteContact(id: 1)
}
最後,使用如下 query,可以獲取資料庫中所有 contacts 資訊:
query {
contacts {
id
firstName
lastName
}
}
使用下面 query,可以獲取一個 contact 的資訊:
query {
contact(id: 1) {
id
firstName
lastName
}
}
這裡,我們得到的是 id 為 1 的 contact 資訊。
基於koa (和express類似)
程式碼看 koa-demo專案  然後yarn npm run dev
github地址: https://github.com/liuming888/graphql_node_demo.git koa分支
建立 Project
我們現在來建立我們的 project。開啟一個新的 terminal,執行以下命令,即可使用預設值建立 package.json 檔案:
mkdir koa-demo
cd koa-demo
npm init -y
接下來,我們需要安裝以下依賴:
npm install graphql koa koa-graphql koa-mount sqlite3 --save
這樣就會安裝 koa庫,Node.js 上的 GraphQL 實現,koa 和 SQLite3 的 GraphQL 中介軟體。為簡單起見,我們使用 SQLite3 作為資料庫。
graphql 是一個支援庫,並且在我們這裡是一個必要的模組
Koa 是一個新的 web 框架,由 Express 幕後的原班人馬打造, 致力於成為 web 應用和 API 開發領域中的一個更小、更富有表現力、更健壯的基石。 通過利用 async 函式,Koa 幫你丟棄回撥函式,並有力地增強錯誤處理。 Koa 並沒有捆綁任何中介軟體, 而是提供了一套優雅的方法,幫助您快速而愉快地編寫服務端應用程式
koa-graphql GraphQL HTTP伺服器中介軟體
koa-mount 讓多個Koa.js子應用合併成一個父應用,用請求的字首區分子應用
SQLite是一個程序內的庫,實現了自給自足的、無伺服器的、零配置的、事務性的 SQL 資料庫引擎。它是一個零配置的資料庫,這意味著與其他資料庫一樣,您不需要在系統中配置。就像其他資料庫,SQLite 引擎不是一個獨立的程序,可以按應用程式需求進行靜態或動態連線。SQLite 直接訪問其儲存檔案
建立 GraphQL 伺服器
建立工程並引入基本依賴包之後,現在來建立 API 伺服器。在工程資料夾裡,建立 index.js 檔案,並引入下列內容:
const Koa = require('koa');
const mount = require('koa-mount');
const graphql = require('graphql');
const graphqlHTTP = require('koa-graphql');
const sqlite3 = require('sqlite3').verbose();
const app = new Koa();
const database = new sqlite3.Database('./my.db');
const createContactTable = () => {
const query = `
CREATE TABLE IF NOT EXISTS contacts (
id integer PRIMARY KEY,
firstName text,
lastName text,
email text UNIQUE)`;
return database.run(query);
};
// 建立了一個 SQL 表來儲存 contacts的基本資訊。每個 contact 的基本資訊包括:唯一的標識、名、姓和 email。
createContactTable();
// 定義一個 GraphQL 型別
// 使用基本的內建 GraphQL 型別,如 GraphQLID 和 GraphQLString 來建立我們自定義型別,對應資料庫中的 contact。
const ContactType = new graphql.GraphQLObjectType({
name: 'Contact',
fields: {
id: { type: graphql.GraphQLID },
firstName: { type: graphql.GraphQLString },
lastName: { type: graphql.GraphQLString },
email: { type: graphql.GraphQLString },
},
});
// 定義查詢型別
// 查詢有兩個欄位: contacts,可以用來獲取資料庫中的所有 contacts,而 contact 則根據 id 獲取一個 contact 資訊。 contact 欄位允許所需的 id 引數為 GraphQLID 型別。
var queryType = new graphql.GraphQLObjectType({
name: 'Query',
fields: {
contacts: {
type: graphql.GraphQLList(ContactType),
resolve: (root, args, context, info) => {
return new Promise((resolve, reject) => {
database.all("SELECT * FROM contacts;", function (err, rows) {
if (err) {
reject([]);
}
resolve(rows);
});
});
}
},
contact: {
type: ContactType, // 說明返回資料的型別
args: { // 定義期望從客戶端得到的引數
id: {
type: new graphql.GraphQLNonNull(graphql.GraphQLID)
}
},
resolve: (root, { // 實際邏輯發生的地方
id // resolve()方法的第二個引數訪問任何傳遞的引數
}, context, info) => {
// 簡單呼叫 database.all() 和 database.run() 方法來執行正確的 SQL 查詢,以便從 SQLite 獲取資料,返回一個 Promise 來處理得到的資料。
return new Promise((resolve, reject) => {
database.all("SELECT * FROM contacts WHERE id = (?);", [id], function (err, rows) {
if (err) {
reject(null);
}
resolve(rows[0]);
});
});
}
}
}
});
// 建立一個 mutation 型別,用於建立、更新和刪除操作
var mutationType = new graphql.GraphQLObjectType({
name: 'Mutation',
fields: { // 所有的欄位都接受符合 args 屬性定義的引數,並由一個 resolve() 方法來獲取傳遞過來的引數,執行相應的 SQL 操作,並返回一個 Promise。
createContact: { // 建立 contacts
type: ContactType,
args: {
firstName: {
type: new graphql.GraphQLNonNull(graphql.GraphQLString)
},
lastName: {
type: new graphql.GraphQLNonNull(graphql.GraphQLString)
},
email: {
type: new graphql.GraphQLNonNull(graphql.GraphQLString)
}
},
resolve: (root, {
firstName,
lastName,
}) => {
return new Promise((resolve, reject) => {
database.run('INSERT INTO contacts (firstName, lastName, email) VALUES (?,?,?);', [firstName, lastName, email], (err) => {
if (err) {
reject(null);
}
database.get("SELECT last_insert_rowid() as id", (err, row) => {
resolve({
id: row["id"],
firstName: firstName,
lastName: lastName,
email: email
});
});
});
})
}
},
updateContact: { // 更新 contacts
type: graphql.GraphQLString,
args: {
id: {
type: new graphql.GraphQLNonNull(graphql.GraphQLID)
},
firstName: {
type: new graphql.GraphQLNonNull(graphql.GraphQLString)
},
lastName: {
type: new graphql.GraphQLNonNull(graphql.GraphQLString)
},
email: {
type: new graphql.GraphQLNonNull(graphql.GraphQLString)
}
},
resolve: (root, {
id,
firstName,
lastName,
}) => {
return new Promise((resolve, reject) => {
database.run('UPDATE contacts SET firstName = (?), lastName = (?), email = (?) WHERE id = (?);', [firstName, lastName, email, id], (err) => {
if (err) {
reject(err);
}
resolve(`Contact #${id} updated`);
});
})
}
},
deleteContact: { // 刪除 contacts
type: graphql.GraphQLString,
args: {
id: {
type: new graphql.GraphQLNonNull(graphql.GraphQLID)
}
},
resolve: (root, {
id
}) => {
return new Promise((resolve, reject) => {
database.run('DELETE from contacts WHERE id =(?);', [id], (err) => {
if (err) {
reject(err);
}
resolve(`Contact #${id} deleted`);
});
})
}
}
}
});
// 建立 GraphQL schema
// GraphQL schema 是 GraphQL 的核心概念,它定義了連線到伺服器的客戶端可用的功能。我們傳遞已定義的 query 和 mutation 型別到 schema。
const schema = new graphql.GraphQLSchema({
query: queryType,
mutation: mutationType
});
app.use(
mount(
'/graphql',
graphqlHTTP({
schema: schema,
graphiql: true, //是否開啟本地除錯模式
})
)
);
app.use(async ctx => {
ctx.body = 'Hello World';
});
app.listen(3000,() => {
console.log("GraphQL server running at http://localhost:3000");
});
儲存 index.js 檔案,返回到你的 terminal。執行下列命令,啟動伺服器:
node index.js
怎樣使用 GraphQL API
構建客戶端前,可以使用 GraphQL 介面來測試你的 API。
訪問網址 : http://localhost:4000/graphql ,並執行下列 mutation query:
mutation {
createContact(firstName: "Jon", lastName: "Snow", email: "[email protected]") {
id,
firstName,
lastName,
}
}
使用下列 mutation,可以更新 id 為 1 的 contact:
mutation {
updateContact(id: 1, firstName: "Aegon", lastName: "Targaryen", email: "[email protected]")
}
也可以使用下列 mutation 來刪除 id 為 1 的 contact:
mutation {
deleteContact(id: 1)
}
最後,使用如下 query,可以獲取資料庫中所有 contacts 資訊:
query {
contacts {
id
firstName
lastName
}
}
使用下面 query,可以獲取一個 contact 的資訊:
query {
contact(id: 1) {
id
firstName
lastName
}
}
這裡,我們得到的是 id 為 1 的 contact 資訊。
四 Vue和GraphQL
參考資料 使用Vue和GraphQL構建一個CRUD APP (改資料的修改有問題,本文已修復)
相關程式碼:

node服務: https://github.com/liuming888/graphql_node_demo.gitvue專案:
https://github.com/liuming888/graphql_vue_demo.git
node服務複用上文進階中的專案(下面採用koa服務)
開啟koa-demo專案的server.js
增加一下程式碼
const cors = require('@koa/cors');
...
app.use(cors());
然後yarn add @koa/cors 再npm run dev
因為我們在兩個不同的本地埠之間傳送請求,這兩個埠被視為兩個獨立的域,因此我們需要在伺服器中啟用跨源資源共享功能
建立一個 Vue 專案
使用 Vue CLI,讓我們繼續建立一個 Vue 專案。回到終端機,執行下列命令:
vue create vue-graphql-demo
當提示對預置選項進行選擇時,你可以簡單地選擇預設設定。
等待生成專案,執行以下命令啟動開發伺服器:
cd vue-graphql-demo
npm run serve
這樣,你的應用就執行起來了,在 http://localhost:8080/ 地址下可以訪問。
安裝 Apollo 客戶端
Apollo 是一組實用程式,可以幫助你在 APP 中使用 GraphQL。它以其客戶端和伺服器而聞名。Apollo 是由 Meteor Development Group開發和維護的:https://www.meteor.io/
開啟一個新的終端,進入你的專案資料夾,執行以下命令來安裝 Apollo 客戶端到你的 Vue 專案中:
yarn add vue-apollo graphql apollo-boost
Apollo Boost 是一種無需任何手動配置就可以開始使用 Apollo 客戶端的方式。它包括一些常見的預設值,比如推薦的 InMemoryCache 和 HttpLink,它們是以推薦的引數為你進行配置的。這種零配置的方式適合快速開發使用。
修改src/main.js 檔案,程式碼如下:
import Vue from 'vue';
import ApolloClient from 'apollo-boost';
import VueApollo from 'vue-apollo';
import App from './App.vue';
import router from './router';
import store from './store';
import './registerServiceWorker';
// 建立 Apollo 客戶端的一個例項,並傳入 GraphQL 端點的 URL
const apolloClient = new ApolloClient({
uri: 'http://localhost:3000/graphql', // graphql服務的地址 (注意服務端開啟cors)
});
Vue.use(VueApollo); // 使用 VueApollo 外掛將 Apollo 整合到我們的 Vue APP 中
// 建立了 Apollo Provider,它包含所有 Vue 元件都可以使用的 Apollo Client 例項。
const apolloProvider = new VueApollo({
defaultClient: apolloClient,
});
Vue.config.productionTip = false;
new Vue({
router,
store,
render: h => h(App),
apolloProvider, // 將 Apollo Provider 新增到 Vue 例項中
}).$mount('#app');
使用 GraphQL API
將 vue-apollo 新增到 APP 後,所有元件都可以通過 apollo 選項來使用 Apollo
修改App.vue程式碼如下:
<template>
<div id="app">
<table border='1'
width='100%'
style='border-collapse: collapse;'>
<tr>
<th>First Name</th>
<th>Last Name</th>
<th>Email</th>
<th>Actions</th>
</tr>
<tr v-for='contact in contacts'
:key="contact.id">
<td>{{ contact.firstName }}</td>
<td>{{ contact.lastName }}</td>
<td>{{ contact.email }}</td>
<td>
<input type="button"
@click="selectContact(contact)"
value="Select">
<input type="button"
@click="deleteContact(contact.id)"
value="Delete">
</td>
</tr>
</table>
</br>
<form>
<label>First Name</label>
<input type="text"
name="firstName"
v-model="firstName">
</br>
<label>Last Name</label>
<input type="text"
name="lastName"
v-model="lastName">
</br>
<label>Email</label>
<input type="email"
name="email"
v-model="email">
</br>
<input v-if="!id"
type="button"
@click="createContact(firstName, lastName, email)"
value="Add">
<input v-if="id"
type="button"
@click="updateContact(id, firstName, lastName, email)"
value="Update">
<input type="button"
@click="clearForm()"
value="Clear">
</form>
</div>
</template>
<script>
import gql from "graphql-tag";
export default {
data() {
// 定義了四個元件變數,分別是 id、firstName、lastName 和 email。這些變數將被繫結到用於建立新聯絡人的 HTML Form 中
return {
id: null,
firstName: "",
lastName: "",
email: ""
};
},
apollo: {
// gql 是一個 JavaScript 模板文字標籤,它將 GraphQL 查詢字串解析到標準的 GraphQL AST 中。可以在 Github 上的官方庫中找到更多詳細資訊:
// https://github.com/apollographql/graphql-tag
// 在這個 apollo 物件中,我們添加了一個 contacts 屬性,它將儲存 contacts 查詢的結果。稍後,我們將使用它在模板中顯示聯絡人。
contacts: gql`
query {
contacts {
id
firstName
lastName
}
}
`
},
methods: {
// 新增 createContact()、updateContact() 和 deleteContact()
// 使用 this.$apollo.mutate() 方法向 GraphQL Server 傳送 mutation 查詢,並呼叫 location.reload() 方法來重新載入頁面。
createContact(firstName, lastName, email) {
console.log(`Create contact: ${email}`);
this.$apollo.mutate({
mutation: gql`
mutation createContact(
$firstName: String!
$lastName: String!
$email: String!
) {
createContact(
firstName: $firstName
lastName: $lastName
email: $email
) {
id
firstName
lastName
}
}
`,
variables: {
firstName: firstName,
lastName: lastName,
email: email
}
});
location.reload();
},
updateContact(id, firstName, lastName, email) {
console.log(
"id, firstName, lastName, email: ",
id,
firstName,
lastName,
);
console.log(`Update contact: # ${id}`);
this.$apollo.mutate({
mutation: gql`
mutation updateContact(
$id: ID!
$firstName: String!
$lastName: String!
$email: String!
) {
updateContact(
id: $id
firstName: $firstName
lastName: $lastName
email: $email
)
}
`,
variables: {
id: id,
firstName: firstName,
lastName: lastName,
email: email
}
});
location.reload();
},
deleteContact(id) {
console.log(`Delete contact: # ${id}`);
this.$apollo.mutate({
mutation: gql`
mutation deleteContact($id: ID!) {
deleteContact(id: $id)
}
`,
variables: {
id: id
}
});
location.reload();
},
selectContact(contact) {
this.id = contact.id;
this.firstName = contact.firstName;
this.lastName = contact.lastName;
this.email = contact.email;
},
clearForm() {
this.id = null;
this.firstName = "";
this.lastName = "";
this.email = "";
}
}
};
</script>
<style lang="scss">
</style>
儲存後,重新啟動vue專案,會看到以下頁面:

到此,恭喜你已經成功入門graphql了,有興趣可以自行查詢相關資料深入研究
五 總結
使用GraphQL API的目的是什麼?
建立API的目的是使自己的軟體具有可以被其他外部服務整合的能力。即使你的程式被單個前端程式所使用,也可以將此前端視為外部服務,為此,當通過API為兩者之間提供通訊時,你能夠在不同的專案中工作。
如果你在一個大型團隊中工作,可以將其拆分為建立前端和後端團隊,從而允許他們使用相同的技術,並使他們的工作更輕鬆。
優點
優點就是後端可以少招幾個寫介面的