Netty進階篇之websocket傳送訊息(8)
阿新 • • 發佈:2019-07-24
序言:Netty進階篇之簡單版websocket發訊息(7) 大概和下面的程式碼就成相似,如果不懂,可以看一下這篇部落格的詳細程式碼註釋內容
1、pom檔案
<dependency>
    <groupId>io.netty</groupId>
    <artifactId>netty-all</artifactId>
    <version>4.1.25.Final</version>
</dependency>
2、index.html
<!DOCTYPE html>
<html>
   <head>
      <meta charset="utf-8" />
      <title></title>
   </head>
   <body>
      <div>傳送訊息:</div>
      <input type="text" id="msgContent"/>
      <input type="button" value="點我傳送" onclick="CHAT.chat()"/>

      <div>接受訊息:</div>
      <div id="receiveMsg" style="background-color: gainsboro;"></div>

      <script type="application/javascript">

         window.CHAT = {
            socket: null,
            init: function() {
               if (window.WebSocket) {
                  CHAT.socket = new WebSocket("ws://192.168.31.160:8088/ws");
                  CHAT.socket.onopen = function() {
                     console.log("連線建立成功...");
                  },
                  CHAT.socket.onclose = function() {
                     console.log("連線關閉...");
                  },
                  CHAT.socket.onerror = function() {
                     console.log("發生錯誤...");
                  },
                  CHAT.socket.onmessage = function(e) {
                     console.log("接受到訊息:" + e.data);
                     var receiveMsg = document.getElementById("receiveMsg");
                     var html = receiveMsg.innerHTML;
                     receiveMsg.innerHTML = html + "<br/>" + e.data;
                  }
               } else {
                  alert("瀏覽器不支援websocket協議...");
               }
            },
            chat: function() {
               var msg = document.getElementById("msgContent");
               CHAT.socket.send(msg.value);
            }
         };
         CHAT.init();
      </script>
   </body>
</html>
3、main函式
import io.netty.bootstrap.ServerBootstrap;
import io.netty.channel.ChannelFuture;
import io.netty.channel.EventLoopGroup;
import io.netty.channel.nio.NioEventLoopGroup;
import io.netty.channel.socket.nio.NioServerSocketChannel;

public class WSServer {

   public static void main(String[] args) throws Exception {

      EventLoopGroup mainGroup = new NioEventLoopGroup();
      EventLoopGroup subGroup = new NioEventLoopGroup();

      try {
         ServerBootstrap server = new ServerBootstrap();
         server.group(mainGroup, subGroup)
            .channel(NioServerSocketChannel.class)
            .childHandler(new WSServerInitialzer());

         ChannelFuture future = server.bind(8088).sync();

         future.channel().closeFuture().sync();
      } finally {
         mainGroup.shutdownGracefully();
         subGroup.shutdownGracefully();
      }
   }
}
4、初始化類
import io.netty.channel.ChannelInitializer;
import io.netty.channel.ChannelPipeline;
import io.netty.channel.socket.SocketChannel;
import io.netty.handler.codec.http.HttpObjectAggregator;
import io.netty.handler.codec.http.HttpServerCodec;
import io.netty.handler.codec.http.websocketx.WebSocketServerProtocolHandler;
import io.netty.handler.stream.ChunkedWriteHandler;

public class WSServerInitialzer extends ChannelInitializer<SocketChannel> {

   @Override
   protected void initChannel(SocketChannel ch) throws Exception {
      ChannelPipeline pipeline = ch.pipeline();

      // websocket 基於http協議,所以要有http編解碼器
      pipeline.addLast(new HttpServerCodec());
      // 對寫大資料流的支援
      pipeline.addLast(new ChunkedWriteHandler());
      // 對httpMessage進行聚合,聚合成FullHttpRequest或FullHttpResponse
      // 幾乎在netty中的程式設計,都會使用到此hanler
      pipeline.addLast(new HttpObjectAggregator(1024*64));

      // ====================== 以上是用於支援http協議    ======================

      // ====================== 以下是支援httpWebsocket ======================

      /**
       * websocket 伺服器處理的協議,用於指定給客戶端連線訪問的路由 : /ws
       * 本handler會幫你處理一些繁重的複雜的事
       * 會幫你處理握手動作: handshaking(close, ping, pong) ping + pong = 心跳
       * 對於websocket來講,都是以frames進行傳輸的,不同的資料型別對應的frames也不同
       */
      pipeline.addLast(new WebSocketServerProtocolHandler("/ws"));

      // 自定義的handler
      pipeline.addLast(new ChatHandler());
   }
}
5、助手類
import io.netty.channel.Channel;
import io.netty.channel.ChannelHandlerContext;
import io.netty.channel.SimpleChannelInboundHandler;
import io.netty.channel.group.ChannelGroup;
import io.netty.channel.group.DefaultChannelGroup;
import io.netty.handler.codec.http.websocketx.TextWebSocketFrame;
import io.netty.util.concurrent.GlobalEventExecutor;

/**
 *
 * @Description: 處理訊息的handler
 * TextWebSocketFrame: 在netty中,是用於為websocket專門處理文字的物件,frame是訊息的載體
 */
public class ChatHandler extends SimpleChannelInboundHandler<TextWebSocketFrame> {

   // 用於記錄和管理所有客戶端的channle
   private static ChannelGroup clients =
         new DefaultChannelGroup(GlobalEventExecutor.INSTANCE);

   @Override
   protected void channelRead0(ChannelHandlerContext ctx, TextWebSocketFrame msg)
         throws Exception {
      // 獲取客戶端傳輸過來的訊息
      String content = msg.text();
      System.out.println("接受到的資料:" + content);

      //類似於for迴圈
      clients.writeAndFlush(
            new TextWebSocketFrame(
                  "[伺服器在]" + LocalDateTime.now()
                  + "接受到訊息, 訊息為:" + content));
   }

   /**
    * 當客戶端連線服務端之後(開啟連線)
    * 獲取客戶端的channle,並且放到ChannelGroup中去進行管理
    */
   @Override
   public void handlerAdded(ChannelHandlerContext ctx) throws Exception {
      clients.add(ctx.channel());
   }

   @Override
   public void handlerRemoved(ChannelHandlerContext ctx) throws Exception {
      // 當觸發handlerRemoved,ChannelGroup會自動移除對應客戶端的channel
//    clients.remove(ctx.channel());
      System.out.println("客戶端斷開,channle對應的長id為:"
                     + ctx.channel().id().asLongText());
      System.out.println("客戶端斷開,channle對應的短id為:"
                     + ctx.channel().id().asShortText());
   }
}
6、測試
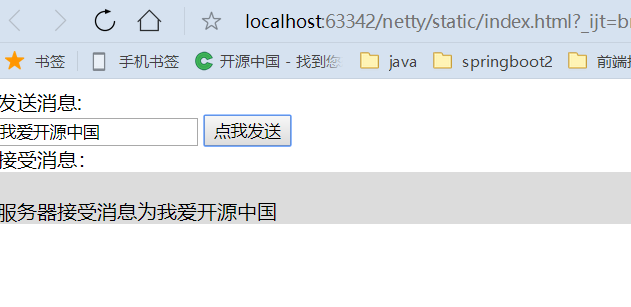
執行index.html
傳送訊息,如下server端返回訊息

