Spring Boot實踐——SpringMVC檢視解析
一、註解說明
在spring-boot+spring mvc 的專案中,有些時候我們需要自己配置一些專案的設定,就會涉及到這三個,那麼,他們之間有什麼關係呢? 首先,@EnableWebMvc=WebMvcConfigurationSupport,使用了@EnableWebMvc註解等於擴充套件了WebMvcConfigurationSupport但是沒有重寫任何方法。
所以有以下幾種使用方式:
-
@EnableWebMvc+extends WebMvcConfigurationAdapter,在擴充套件的類中重寫父類的方法即可,這種方式會遮蔽springboot的@EnableAutoConfiguration中的設定
-
extends WebMvcConfigurationSupport,在擴充套件的類中重寫父類的方法即可,這種方式會遮蔽springboot的@EnableAutoConfiguration中的設定
-
extends WebMvcConfigurationAdapter,在擴充套件的類中重寫父類的方法即可,這種方式依舊使用springboot的@EnableAutoConfiguration中的設定
具體哪種方法適合,看個人對於專案的需求和要把控的程度
在WebMvcConfigurationSupport(@EnableWebMvc)和@EnableAutoConfiguration這兩種方式都有一些預設的設定 而WebMvcConfigurationAdapter則是一個abstract class
具體如何類內如何進行個性化的設定,可以參考以下文章:
Spring Boot:定製HTTP訊息轉換器 EnableWebMvc官方文件
- 使用 @EnableWebMvc 註解,需要以程式設計的方式指定檢視檔案相關配置
/**
 * Web MVC 配置介面卡
 * @ClassName: WebAppConfigurer
 * @Description:
 * @author OnlyMate
 * @Date 2018年8月28日 下午2:39:31
 *
 * WebAppConfigurer extends WebMvcConfigurerAdapter 在Spring Boot2.0版本已過時了,用官網說的新的類替換
 *
 */
@Configuration
public class WebAppConfigurer implements WebMvcConfigurer {

    /**
     * springmvc檢視解析
     * @Title: viewResolver
     * @Description: TODO
     * @Date 2018年8月28日 下午4:46:07
     * @author OnlyMate
     * @return
     */
    @Bean
    public InternalResourceViewResolver viewResolver(){
        InternalResourceViewResolver viewResolver = new InternalResourceViewResolver();
        viewResolver.setPrefix("/WEB-INF/views/");
        viewResolver.setSuffix(".jsp");
        // viewResolver.setViewClass(JstlView.class); // 這個屬性通常並不需要手動配置,高版本的Spring會自動檢測
        return viewResolver;
    }

    /**
     * SpringBoot設定首頁
     */
    @Override
    public void addViewControllers(ViewControllerRegistry registry) {
        WebMvcConfigurer.super.addViewControllers(registry);
        registry.addViewController("/").setViewName("index");
        registry.setOrder(Ordered.HIGHEST_PRECEDENCE);
    }

}
- 使用 @EnableAutoConfiguration 註解,會讀取 application.properties 或 application.yml 檔案中的配置
檢視
## 檢視
spring.mvc.view.prefix=/WEB-INF/views/
spring.mvc.view.suffix=.jsp
或
spring:
    http:
        encoding:
            charset: UTF-8
            enabled: true
            force: true
    messages:
        encoding: UTF-8
    profiles:
        active: dev
    mvc:
        view:
            prefix: /WEB-INF/views/
            suffix: .jsp
二、模版引擎
Spring boot 在springmvc的檢視解析器方面就預設集成了ContentNegotiatingViewResolver和BeanNameViewResolver,在檢視引擎上就已經整合自動配置的模版引擎,如下:
- FreeMarker
- Groovy
- Thymeleaf
- Velocity (deprecated in 1.4)
- Mustache
JSP技術spring boot 官方是不推薦的,原因有三:
- 在tomcat上,jsp不能在巢狀的tomcat容器解析即不能在打包成可執行的jar的情況下解析
- Jetty 巢狀的容器不支援jsp
- Undertow
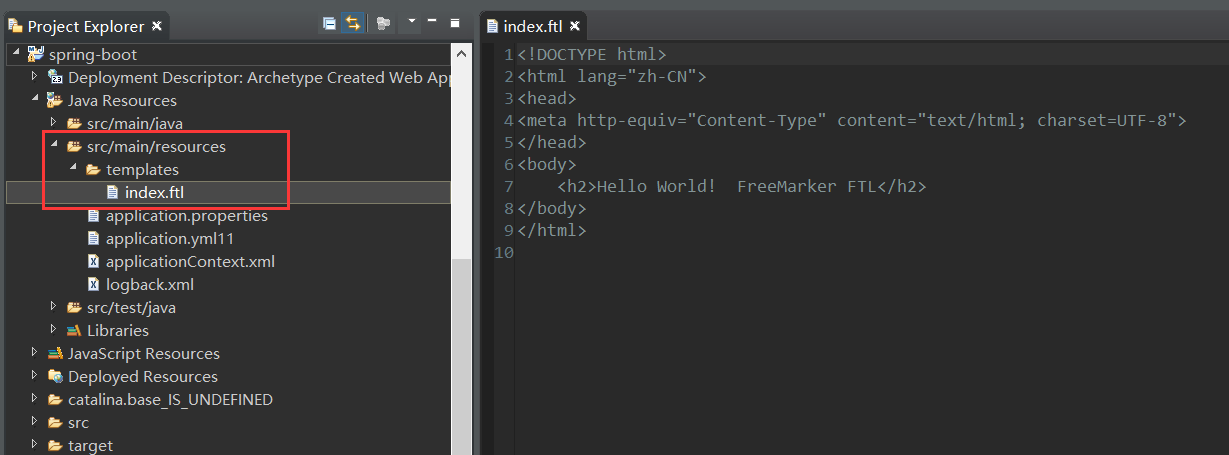
而其他的模版引擎spring boot 都支援,並預設會到classpath的templates裡面查詢模版引擎,這裡假如我們使用freemarker模版引擎
- 現在pom.xml啟動freemarker模版引擎檢視
<dependency>
    <groupId>org.springframework.boot</groupId>
    <artifactId>spring-boot-starter-freemarker</artifactId>
</dependency>
- 定義一個模版字尾是ftp,注意是在classpath的templates目錄下
 3. 在controller上返回檢視路徑
@Controller
public class HelloWorldController {
    private Logger logger = LoggerFactory.getLogger(HelloWorldController.class);

    @Value("${question}")
    private String question;
    @Value("${answer}")
    private String answer;
    @Value("${content}")
    private String content;

    @ResponseBody
    @RequestMapping("/hello")
    public String index() {
        return "hello world";
    }

    @ResponseBody
    @RequestMapping(value="/hello1")
    public String index1() {
        return question + answer;
    }

    @ResponseBody
    @RequestMapping(value="/hello2")
    public String index2() {
        return content;
    }

    @RequestMapping(value="/hello3")
    public String index3(Model model) {
        try {
            model.addAttribute("question", question);
            model.addAttribute("answer", answer);
        } catch (Exception e) {
            logger.info("HelloWorldController ==> index3 method: error", e);
        }
        return "/hello";
    }
}
如果使用@RestController,預設就會在每個方法上加上@Responsebody,方法返回值會直接被httpmessageconverter轉化,如果想直接返回檢視,需要直接指定modelAndView。
public class HelloWorldController{
    private Logger logger = LoggerFactory.getLogger(HelloWorldController.class);

    @Value("${question}")
    private String question;
    @Value("${answer}")
    private String answer;
    @Value("${content}")
    private String content;

    @RequestMapping("/hello3")
    public ModelAndView hello3() {
        try {
        model.addAttribute("question", question);
        model.addAttribute("answer", answer);
    } catch (Exception e) {
        logger.info("HelloWorldController ==> index3 method: error", e);
    }
        return new ModelAndView("hello");
    }
}
- 配置首頁
/**
 * Web MVC 配置介面卡
 * @ClassName: WebAppConfigurer
 * @Description:
 * @author OnlyMate
 * @Date 2018年8月28日 下午2:39:31
 *
 * WebAppConfigurer extends WebMvcConfigurerAdapter 在Spring Boot2.0版本已過時了,用官網說的新的類替換
 *
 */
@Configuration
public class WebAppConfigurer implements WebMvcConfigurer {/**
     * SpringBoot設定首頁
     */
    @Override
    public void addViewControllers(ViewControllerRegistry registry) {
        WebMvcConfigurer.super.addViewControllers(registry);
        registry.addViewController("/").setViewName("index");
        registry.setOrder(Ordered.HIGHEST_PRECEDENCE);
    }

}
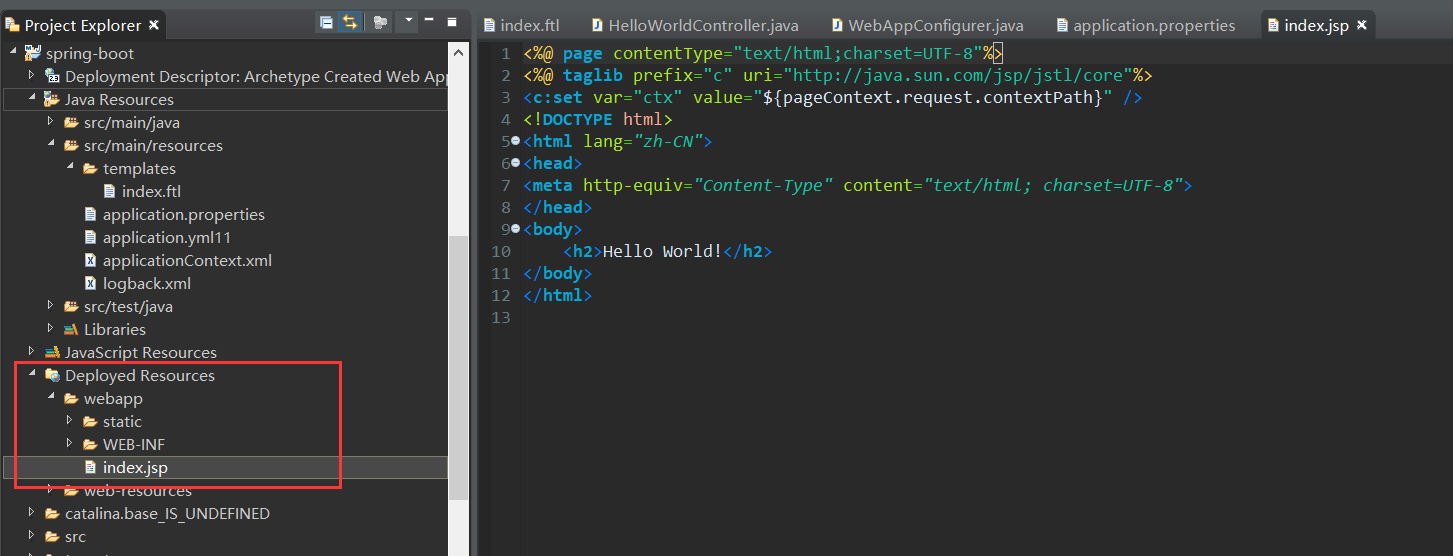
雖然,jsp技術,spring boot 官方不推薦,但考慮到是常用的技術,這裡也來整合下jsp技術
-
首先,需要在你專案上加上webapp標準的web專案資料夾

-
配置jsp的字首和字尾 參考頭部 ‘註解說明’
-
在controller中返回檢視 同freemaker的第三步
-
配置首頁 同freemaker的第四步
注意
如果出現freemarker模版引擎和jsp技術同時存在的話,springmvc會根據解析器的優先順序來返回具體的檢視,預設,FreeMarkerViewResolver的優先順序大於InternalResourceViewResolver的優先順序,所以同時存在的話,會返回freemarker檢視
相關推薦
Spring Boot實踐——SpringMVC檢視解析
一、註解說明 在spring-boot+spring mvc 的專案中,有些時候我們需要自己配置一些專案的設定,就會涉及到這三
spring boot 整合springmvc檢視技術
spring boot 在springmvc的檢視解析器方面就預設集成了ContentNegotiatingViewResolver和BeanNameViewResolver,在檢視引擎上就已經整合自動配置的模版引擎,如下: 1. FreeMarker 2.
spring boot 的conditioanal的解析
spring boot 入門一:package com.zcp.springstart2;import org.springframework.boot.SpringApplication;import org.springframework.boot.autoconfigure.SpringBootAppl
Spring Boot實踐教程(一):Hello,world!
dap con result ret guid gui dea mode 結構 ??本篇會通過完成一個常用的Helloworld示例,來開始我們的Spring Boot旅程 準備工作 15分鐘 開發環境 項目創建 ??項目創建的時候我們可以選擇通過自定義配置Maven文
Spring Boot實踐教程:開篇
mongo code 消息 發布 搭建 jdk1.8 hello 初學者 框架 前言 ??Java項目開發Spring應該是最常被用到的框架了,但是老式的配置方式讓人覺得特別的繁瑣,雖然可以通過註解去簡化xml文件的配置,但是有沒有更簡單的方式來幫我們完成這些重復性的事情呢
Spring Boot中使用FastJson解析Json數據
解析json fast nco set方法 nal group 瀏覽器中 項目啟動 完成後 首先我們創建一個maven工程,如下圖: 第二步:配置pom.xml <parent> <groupId>org.springframework.
Spring Boot實踐——三種攔截器的創建
bsp http etl 當前 出現 規範 not exe () 引用:https://blog.csdn.net/hongxingxiaonan/article/details/48090075 Spring中的攔截器 在web開發中,攔截器是經常用到的功能。它可
Spring Boot實踐——基礎和常用配置
develop google art 容器 .sql pem -i 未定義 eve 借鑒:https://blog.csdn.net/j903829182/article/details/74906948 一、Spring Boot 啟動註解說明 @SpringBoot
Spring Boot實踐——事件監聽
width tar java nco csdn ONBUILD man 初始 ebo 借鑒:https://blog.csdn.net/Harry_ZH_Wang/article/details/79691994 https://blog.csdn.net/igno
springMVC檢視解析器的配置和使用
在spring-servlet.xml中配置檢視解析器 <!-- 配置檢視解析器 --> <bean class="org.springframework.web.servlet.view.InternalResourceViewResolver"
SpringMVC檢視解析器InternalResourceViewResolver
今天在搭建SpringMVC開發框架的時候,出現freemarker的檢視沒有找到,報404錯誤。我的配置程式碼如下: <!--freemarker --> <mvc:view-controller path="/" view-name="homepage/i
springMVC檢視解析原理學習
SpringMVC如何解析檢視概述 不論控制器返回一個String,ModelAndView,View都會轉換為ModelAndView物件,由檢視解析器解析檢視,然後,進行頁面的跳轉。 檢視解析原始碼分析:重要的兩個介面ViewResolver和View。 檢視和檢視解析器
spring boot 實踐學習案例---spring boot 初學者及核心技術鞏固的最佳實踐
chapter-1-spring-boot-quickstart Spring Boot 入門、Spring Boot 配置、Web 開發、模板引擎、資料儲存、資料快取 案例更新 7 months ago
Spring Boot實踐——Mybatis分頁外掛PageHelper的使用
出自:https://blog.csdn.net/csdn_huzeliang/article/details/79350425 在springboot中使用PageHelper外掛有兩種較為相似的方式,接下來我就將這兩種方式進行總結。 方式一:使用原生的PageHelper 1.在
Spring Boot實踐——Mybatis分頁插件PageHelper的使用
page lis 屬性 gen eas col version myba bye 出自:https://blog.csdn.net/csdn_huzeliang/article/details/79350425 在springboot中使用PageHelper插件有兩種
Spring Boot(18)---啟動原理解析
Spring Boot(18)---啟動原理解析 前言 前面幾章我們見識了SpringBoot為我們做的自動配置,確實方便快捷,但是對於新手來說,如果不大懂SpringBoot內部啟動原理,以後難免會吃虧。所以這次博主就跟你們一起一步步揭開SpringBoot的神祕面紗,讓
spring boot 自定義引數解析器實現form表單型別請求或位址列請求引數下劃線轉駝峰屬性
一、定義引數解析註解 @Target(value = ElementType.PARAMETER) @Retention(RetentionPolicy.RUNTIME) public @interface ParameterModel { } 二、定義抽象類AbstractCustomiz
Spring boot自動配置原始碼解析
閱讀須知 版本:2.0.4 文章中使用/* */註釋的方法會做深入分析 正文 自動配置是Spring boot的一大亮點,讓我們從Spring繁雜的配置中脫身而出,本篇文章我們就來分析一下Spring boot自動配置的原始碼。不知道讀者是否有注意到,在分
Spring boot啟動流程原始碼解析
閱讀須知 版本:2.0.4 文章中使用/* */註釋的方法會做深入分析 正文 @SpringBootApplication public class BootApplication { public static void main(String[
Spring Boot Druid 資料來源配置解析
1、資料來源配置屬性類原始碼 package org.springframework.boot.autoconfigure.jdbc; @ConfigurationProperties( prefix = "spring.datasource" ) public class DataSour


