畫素鳥,鳥兒飛飛飛
阿新 • • 發佈:2019-09-06
學習CocosCreator有段時間了,現在花了兩天時間寫了個畫素鳥的小遊戲,這個遊戲之前又看到過,但是不知道怎麼又下架了,之前還是蠻火的遊戲,想起來後去網上看了看,原來是因為侵犯了 超級瑪麗 的遊戲元素,都是畫素級小遊戲,嗯,國外人的版權意識還是挺高的。好了,題外話就到這了,開始切入正題吧。
寫這個遊戲也不難,最主要的是思路,該怎麼去寫,我也在網上看到過 C++版 的,易語言的,Cocos2d的,都挺多的,都是大神啊

我這個是Creator版的,跟Cocos2d有點差別,但是差別又不大
好了,上程式碼(本來是想截圖的,但是想想還是要對得起自己,還是手敲吧)
這個遊戲我是用 ts 寫的,外加CocosCreator
onLoad(){
// 獲取到小鳥,管道,背景,陸地的節點, 這些this的都是先在前面聲明瞭的
// 小鳥 this.bird = cc.find('layout_wrap/node_bird', this.node) // 背景 this.bg = cc.find('layout_wrap/layout_bg', this.node) // 管道 this.pipe = cc.find('layout_wrap/layout_cont', this.node) // 陸地 this.land = cc.find('layout_wrap/layout_land', this.node) // 初始化資料 this.initData()}
// 這裡去初始化一下,一些宣告的遊戲資料
private initData(): void { this.time = 0 // 幀率(每幀呼叫,模擬小鳥扇動翅膀) this.speed = 0 // 速度 this.distance = 150 // 管道距離 this.rateSpeed = 1 // 移速 this.upSpeed = 2 // 加速 this.slowSpeed = 0.06 // 減速// 監聽執行事件 let wrap = cc.find('layout_wrap', this.node) wrap.on(cc.Node.EventType.TOUCH_START, this.runnIng.bind(this), this)
// 開始按鈕 this.starbtn = cc.find('layout_content/button_play', this.layoutstar) this.addClickEvent(this.starbtn, 'onClickStar')
// 暫停按鈕 let pausebtn = cc.find('node_score/button_pause', wrap) this.addClickEvent(pausebtn, 'onClickPause')
// 繼續按鈕 let resumebtn = cc.find('layout_pause/button_resume', wrap) this.addClickEvent(resumebtn, 'onClickResume')
// 遊戲結束,重新開始 let again = cc.find('layout_over/node_content/button_play', wrap) this.addClickEvent(again, 'onClickAgain')
// Get Ready提示節點 this.ready = cc.find('node_score/node_ready', wrap)
// 遊戲結束 this.gameover = cc.find('layout_over', wrap)
// 載入管道 this.addPipe()
// 碰撞系統 let manager = cc.director.getCollisionManager() manager.enabled = true } //下面開始寫功能 // 點選開始 protected onClickStar(): void { // 縮放介面 let act = cc.callFunc(() => { this.layoutstar.active = false this.layoutstar.destroy() }) // 這裡用到動作系統的縮放和漸隱,算是一點點動畫效果吧 let seq = cc.sequence(cc.spawn(cc.scaleTo(0.3, 0), cc.fadeOut(0.3)), act) if (this.layoutstar) { this.layoutstar.runAction(seq) } // 這裡是避免忘記吧結束介面沒有隱藏掉,
if (this.gameover) { this.gameover.active = false } } // 點選執行 private runnIng(): void { if (this.ready.active && !this.layoutstar.active) { // 隱藏Get Ready提示節點 this.ready.active = false // 顯示update, ison是作為update的開關 this.ison = true } this.speed = 2.5 // 給小鳥一個向上的加速度 } // 載入管道, 這裡的管道是通過預製體來載入上去的 private addPipe(): void { this.LoadPrefabs('node_pipe', (n: cc.Node) => { if (!n) { return }
for (let i = 0; i < 4; i++) { // 複製節點 let copy = cc.instantiate(n) // 插入節點 this.pipe.addChild(copy, i) // 調整管道位置 copy.x = this.node.width / 2 + (this.distance + copy.width) * i // 480~720 copy.y = (Math.random() * 0.5 + 1) * 480 if (i > 0) { // 相鄰管道之間的差距不超過120 this.distanceY(i, i - 1) } } }) } // 移動背景 private moveBg(bgs: cc.Node): void { bgs.x = bgs.x - 1
// 當背景移動出屏幕後,將這個背景再加到兩個背景的前面 // 畫素對齊,所以bg.x為一個確切數 if (bgs.x < -614) { bgs.x = 1228
// 調整節點順序 if (bgs == this.bg.children[0]) { this.bg.children[1].zIndex = 0 this.bg.children[2].zIndex = 1 this.bg.children[0].zIndex = 2 } else if (bgs == this.bg.children[1]) { this.bg.children[2].zIndex = 0 this.bg.children[0].zIndex = 1 this.bg.children[1].zIndex = 2 } else if (bgs == this.bg.children[2]) { this.bg.children[0].zIndex = 0 this.bg.children[1].zIndex = 1 this.bg.children[2].zIndex = 2 } } } // 移動管道 private movePipe(pipes: cc.Node): void { pipes.x = pipes.x - 2
// 當管道移動一個螢幕寬後,再將這個管道的位置改變到螢幕右側 if (pipes.x < -(pipes.width + this.node.width / 2)) { pipes.x = 515 // 480~1000 pipes.y = (Math.random() + 1) * 520 - 40 // 相鄰管道之間的差距不超過120 if (pipes == this.pipe.children[0]) { this.distanceY(0, 3) } else if (pipes == this.pipe.children[1]) { this.distanceY(1, 0) } else if (pipes == this.pipe.children[2]) { this.distanceY(2, 1) } else if (pipes == this.pipe.children[3]) { this.distanceY(3, 2) } } } // 移動陸地 private moveLand(lands: cc.Node): void { lands.x = lands.x - 2 * this.rateSpeed
// 當陸地移動一個螢幕寬後,再將這個陸地的位置改變到螢幕右側 if (lands.x < -(this.node.width)) { lands.x = this.node.width - 2 * this.rateSpeed } } // 相鄰管道之間的Y方向差距 private distanceY(a: number, b: number): void { if (Math.abs(this.pipe.children[a].y - this.pipe.children[b].y) > 140) { this.pipe.children[a].y = this.pipe.children[b].y + ((Math.random() * 2 - 1) * 140) if (this.pipe.children[a].y > 1000) { this.pipe.children[a].y = this.pipe.children[b].y - (Math.random() * 140) } else if (this.pipe.children[a].y < 480) { this.pipe.children[a].y = this.pipe.children[b].y + (Math.random() * 140) } } } // 最主要的是這個思路,要形成流暢的效果,就要每幀都去呼叫它, update(dt: number) { // 終止移動 if (this.gameover.active) { this.ison = false }
// 幀率切換節點的顯示,模擬扇翅膀 if (this.ison) { let timeTemp = this.time + dt this.time = timeTemp if (this.time > 0.5) { if (this.bird.children[0].active) { this.bird.children[0].active = false this.bird.children[1].active = true } else if (this.bird.children[1].active) { this.bird.children[1].active = false this.bird.children[2].active = true } else if (this.bird.children[2].active) { this.bird.children[2].active = false this.bird.children[3].active = true } else if (this.bird.children[3].active) { this.bird.children[3].active = false this.bird.children[0].active = true } // 別忘了要重置為零
this.time = 0 }
// 給定小鳥的下降減速 this.speed = this.speed - 0.06 // 小鳥在y軸上的移動 this.bird.y = this.bird.y + this.speed // 小鳥上飛改變方向, 通過改變旋轉方向來實現小鳥的朝向 this.bird.angle = this.speed * 10
// 移動背景 this.moveBg(this.bg.children[0]) this.moveBg(this.bg.children[1]) this.moveBg(this.bg.children[2])
// 移動管道 this.movePipe(this.pipe.children[0]) this.movePipe(this.pipe.children[1]) this.movePipe(this.pipe.children[2]) this.movePipe(this.pipe.children[3])
// 移動陸地 this.moveLand(this.land.children[0]) this.moveLand(this.land.children[1]) } } // 這是掛載在主場景上的指令碼,畫面和功能做出來了,但是如果沒有結束,那麼相信這個遊戲也不會太有趣
// 如何來結束遊戲? 那就是當小鳥裝上管道後,就結束遊戲,如果沒有,那就加分啦
// 這裡用到的是碰撞去寫的,當然也可以去用其他的方法去實現
// 這是掛載在小鳥的這個節點上的指令碼
// 載入的時候會初始分數
onLoad() { // 分數 this.gameMain.Score = 0 // 分數節點 this.topScore = cc.find('node_score/label_score', this.node.parent) } // 這裡用到的碰撞,在小鳥,管道,和中間的空隙都會繫結碰撞的元件 // 當小鳥撞在管道上,遊戲結束, // 小鳥通過中間的空隙,加一分 onCollisionEnter(other, self) { if (other.tag == 2) { this.gameMain.Score++ } else if (other.tag == 1) { this.gameOver() } // 顯示分數 this.topScore.getComponent(cc.Label).string = this.gameMain.Score.toString() } // 結束遊戲 private gameOver(): void { // 顯示結束遊戲的介面 let gameover = cc.find('layout_over', this.node.parent) gameover.active = true // 漸顯 gameover.runAction(cc.fadeTo(0.5, 255)) // 分數 let scorelabel = cc.find('node_content/sprite_panel/label_score', gameover).getComponent(cc.Label) scorelabel.string = this.gameMain.Score.toString()// 重置分數 this.scheduleOnce(() => { this.gameMain.Score = 0 }, 0.5) }
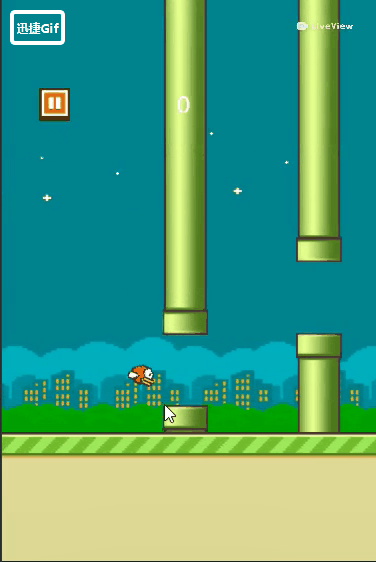
好啦,一個簡單的單機畫素鳥就做好了,想要更詳細的原始碼的小夥伴可以私聊我哦~~ 下面放出效果圖,唉,沒有掛載伺服器,無法直接上傳到web平臺,只能放出gif啦