
部落格新站規劃(一)——(整體規劃)
阿新 • • 發佈:2019-09-15
| 導讀 | 部落格是以網路作為載體,簡易迅速便捷地釋出自己的心得,及時有效輕鬆地與他人進行交流,再集豐富多彩的個性化展示於一體的綜合性平臺,那麼如何建立一個部落格新站呢? |
第一部分:系統優化與安全部分
1:開啟ssh金鑰登入,並禁用ssh密碼認證,同時修改其ssh埠為 "13520"
2:為系統建立普通賬戶wsfnk,禁止root直接登入,執行普通使用者使用key登入
3:對歷史命令新增時間戳
vi /etc/profile		#將下面內容新增進去

export HISTTIMEFORMAT="%Y-%m-%d %H:%M:%S  "
HISTSIZE=1000
4:修改系統時區為上海
cp -f /usr/share/zoneinfo/Asia/Shanghai /etc/localtime
5:鎖定apache,mysql,nginx,ftp,games,nobody,postfix,ntp等無需登入的使用者
6:修改linux系統開啟最大檔案數(修改如下檔案,新增下面內容:表示修改為65536,重啟後 ulimit -n 可以驗證)
vi /etc/security/limits.conf

*               soft   nofile       65536
*               hard   nofile       65536
第二部分:應用程式部署與安全配置部分
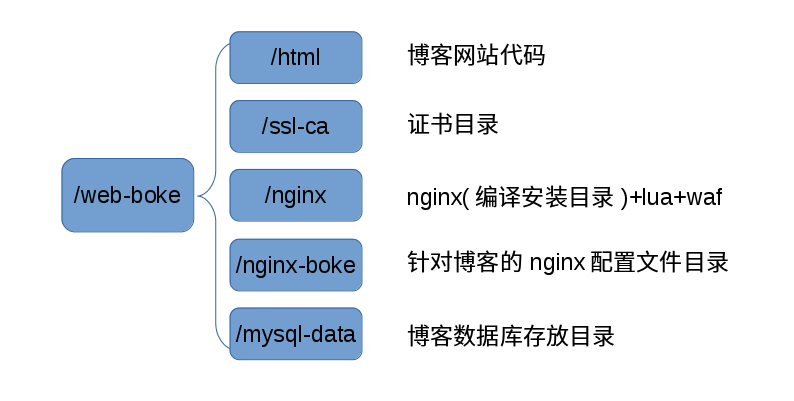
6:指定ftp用湖fnkftp的家目錄在/web-boke/html目錄,並將其限定在html目錄裡
chroot_local_user=YES
7:mysql5.7的安裝,參看https://boke.wsfnk.com/archives/49.html
8:將mysql埠改成13522,並只監聽127.0.0.1,且root不能遠端管理,並建立資料庫sjk普通賬戶,管理部落格boke資料庫
cat /etc/my.cnf

# http://dev.mysql.com/doc/refman/5.7/en/server-configuration-defaults.html
[mysqld]
port=13522
bind-address=127.0.0.1
datadir=/web-boke/mysql-data
socket=/web-boke/mysql-data/mysql.sock
log-error=/web-boke/mysql-data/mysqld.log
pid-file=/web-boke/mysql-data/mysqld.pid
symbolic-links=0
character-set-server=utf8

#log-error=/var/log/mysqld.log
#pid-file=/var/run/mysqld/mysqld.pid
[mysql]
socket=/web-boke/mysql-data/mysql.sock
default-character-set=utf8
#
[client]
socket=/web-boke/mysql-data/mysql.sock
default-character-set=utf8
9:編譯安裝nginx,並載入lua + ngx_lua_waf模組實現waf功能,參看https://boke.wsfnk.com/archives/334.html
10:將php.ini最大上傳限制改成8M,時區改成上海
vi /etc/php.ini

date.timezone = "Asia/Shanghai"
upload_max_filesize = 8m
11:php-fpm優化,將其改成執行200次php請求後,將記憶體釋放給作業系統,並將程序埠改成13521
vi /etc/php-fpm.d/www.conf

listen = 127.0.0.1:13521
pm.max_requests = 200
12:nginx優化的優化,參看https://boke.wsfnk.com/archives/47.html
第三部分:監控與分析部分
13:每週校驗網站/web-boke/html程式碼的md5值
cat /home/wsfnk/md5_check.sh

#!/bin/bash
find /web-boke/html -name "*.*" |while read line
do
md5sum $line >> boke-md5-check-`date "+%Y-%m-%d"`
done
14:配置filebeat,將nginx日誌傳送到ELK分析平臺上
#filebeat安裝
	#配置yum源(選擇版本號為5的,因為版本6的document_type欄位好像不能使用了)
	vi /etc/yum.repos.d/filebeat.repo

[elastic-5.x]
name=Elastic repository for 5.x packages
baseurl=https://artifacts.elastic.co/packages/5.x/yum
gpgcheck=1
gpgkey=https://artifacts.elastic.co/GPG-KEY-elasticsearch
enabled=1
autorefresh=1
type=rpm-md

	#安裝filebeat5
	yum install filebeat -y

	#配置filebeat
	vi /etc/filebeat/filebeat.yml

filebeat.prospectors:
- input_type: log
  paths:
    - /var/log/nginx/access.log
  document_type: wsfnk-nginx-access
#------------ Logstash output -----------------
output.logstash:
  # The Logstash hosts
  hosts: ["223.84.153.80:5044"]

	#啟動
	systemctl start filebeat
	systemctl enable filebeat