
Android開發——Toolbar常用設定
本篇筆記用來記錄常用的Toolbar設定,如Toolbar顏色設定,顯示返回按鈕,顯示右邊三個點按鈕
之前Android 使用的ActionBar,Android5.0開始,谷歌官方推薦使用Toolbar來代替ActionBar
最近慢慢開始使用上kotlin了,貼出的程式碼可能是kotlin的程式碼,見諒,如果有Java基礎的,其實還蠻簡單上手的,可以參考一下我的kotlin學習筆記
Kotlin學習筆記
1.使用Toolbar替換ActionBar
我們首先將主題設定為NoActionBar,之後在佈局xml檔案新增ToolBar
由Android Manifest檔案進入Theme,修改Theme
<!-- Base application theme. -->
<style name="AppTheme" parent="Theme.AppCompat.Light.NoActionBar">
    <!-- Customize your theme here. -->
    <item name="colorPrimary">@color/colorPrimary</item>
    <item name="colorPrimaryDark">@color/colorPrimaryDark</item>
    <item name="colorAccent">@color/colorAccent</item>
</style>
佈局xml檔案,新增Toolbar
<?xml version="1.0" encoding="utf-8"?>
<android.support.constraint.ConstraintLayout
    xmlns:android="http://schemas.android.com/apk/res/android"
    xmlns:app="http://schemas.android.com/apk/res-auto"
    xmlns:tools="http://schemas.android.com/tools"
    android:layout_width="match_parent"
    android:fitsSystemWindows="true"
    android:layout_height="match_parent"
    tools:context="com.wan.noveldownloader.activity.MainActivity">
    <android.support.v7.widget.Toolbar
        android:id="@+id/toolbar"
        app:titleTextColor="@color/white"
        android:background="@color/colorPrimary"
        android:layout_width="match_parent"
        android:layout_height="wrap_content"/>
</android.support.constraint.ConstraintLayout>
之後,在Activity程式碼中,使用setSupportToolbar,把toolbar設定進去
setContentView(R.layout.activity_main);
//findviewbyid找到toolbar例項
setSupportToolbar(toolbar);
之後執行就可以看到結果了
2.修改標題文字
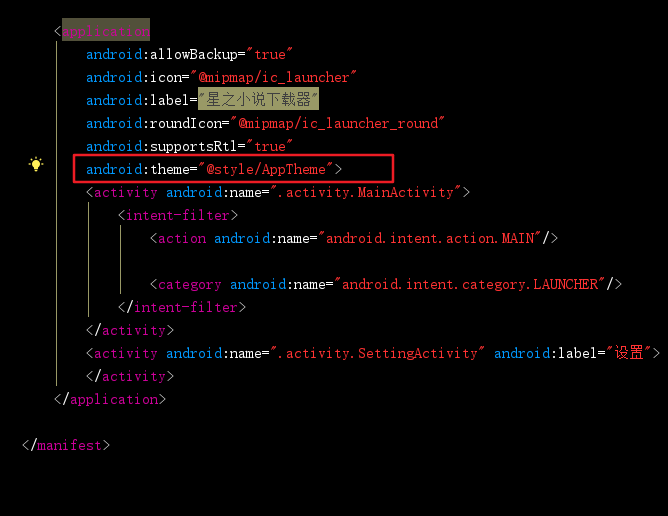
預設的Toolbar顯示的文字其實就是你當前APP專案的label,我們到AndroidManifest檔案修改Activity的label屬性,就可以達到修改文字的效果
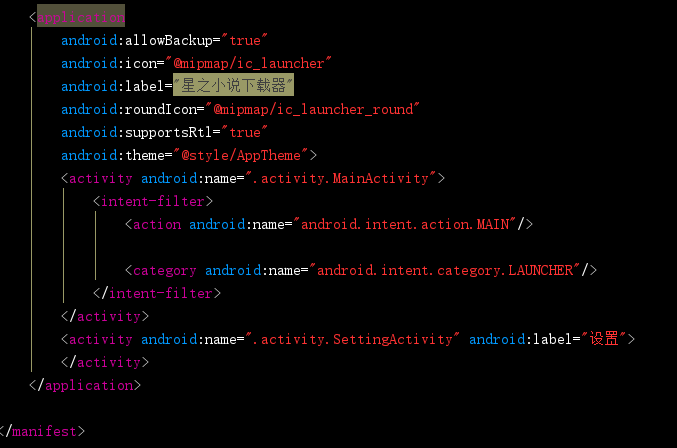
上圖中,我的APP有兩個Activity,其中,MainActivity中的toolbar沒有定義label屬性,所以,預設label屬性等於專案名,所有顯示的是“星之小說下載器”
而另外的那個SettingActivity則有label屬性,所有,顯示的文字就是“設定”
PS:如果不想要顯示文字,則通過getSupportActionBar().setDisplayShowTitleEnabled(false)實現(在setSupportToolbar方法之後)
3.修改顏色
修改背景色
修改背景顏色通過修改toolbar的background屬性達到效果
<android.support.v7.widget.Toolbar
    android:id="@+id/toolbar"
    android:background="@color/colorPrimary"
    android:layout_height="wrap_content"/>
修改標題文字顏色
修改titleTextColor屬性,需要引入app名稱空間
<android.support.v7.widget.Toolbar
    android:id="@+id/toolbar"
    app:titleTextColor="@color/white"
    android:layout_width="match_parent"
    android:layout_height="wrap_content"/>
4.顯示左邊返回按鈕
通過程式碼的方式顯示左邊的返回按鈕
setSupportActionBar(toolbar)
getSupportActionBar().setHomeButtonEnabled(true)
getSupportActionBar().setDisplayHomeAsUpEnabled(true)Activity中還需要重寫onOptionsItemSelected方法,點選返回按鈕達到返回的效果
override fun onOptionsItemSelected(item: MenuItem?): Boolean {
    if(item.itemId == android.R.id.home){
        finish()
    }
    return super.onOptionsItemSelected(item)
}
5.顯示Toolbar的選單按鈕
1.建立menu.xml
在res目錄下建立一個menu的資料夾,之後在menu資料夾中新建一個menu.xml
<?xml version="1.0" encoding="utf-8"?>
<menu xmlns:android="http://schemas.android.com/apk/res/android"
      xmlns:app="http://schemas.android.com/apk/res-auto">
    <item android:title="設定" android:id="@+id/menu_setting" app:showAsAction="always" android:icon="@drawable/icon_setting"/>
</menu>- title 標題
- icon 圖示
- showAsAction
此屬性有幾個選擇always:這個值會使選單項一直顯示在Action Bar上。ifRoom:如果有足夠的空間,這個值會使選單項顯示在Action Bar上。never:這個值使選單項永遠都不出現在Action Bar上。withText:這個值使選單項和它的圖示,選單文字一起顯示。
2.重寫onCreateMenu方法
重寫Activity中的onCreateMenu的方法,把menu.xml檔案裝載到APP中
override fun onCreateOptionsMenu(menu: Menu?): Boolean {
    menuInflater.inflate(R.menu.menu,menu)
    return true
}
3.重寫opOptionSelect方法
設定每個選單的點選事件,與設定監聽器操作類似
override fun onOptionsItemSelected(item: MenuItem?): Boolean {
    if (item?.itemId ==R.id.menu_setting) {
        startActivity(SettingActivity::class.java)
    }
    return false
}
4.setSupportToolbar
和之前的步驟一