
SpringBoot2 配置多資料來源,整合MybatisPlus增強外掛
本文原始碼:GitHub·點這裡 || GitEE·點這裡
一、專案案例簡介
1、多資料簡介
實際的專案中,經常會用到不同的資料庫以滿足專案的實際需求。隨著業務的併發量的不斷增加,一個專案使用多個數據庫:主從複製、讀寫分離、分散式資料庫等方式,越來越常見。
2、MybatisPlus簡介
MyBatis-Plus(簡稱 MP)是一個MyBatis的增強工具,在MyBatis的基礎上只做增強不做改變,為簡化開發、提高效率而生。
外掛特點
無程式碼侵入:只做增強不做改變,引入它不會對現有工程產生影響。
強大的 CRUD 操作:通過少量配置即可實現單表大部分 CRUD 操作滿足各類使用需求。
支援 Lambda 形式呼叫:通過 Lambda 表示式,方便的編寫各類查詢條件。
支援主鍵自動生成:可自由配置,解決主鍵問題。
內建程式碼生成器:採用程式碼或者 Maven 外掛可快速生成各層程式碼。
內建分頁外掛:基於 MyBatis 物理分頁,開發者無需關心具體操作。
內建效能分析外掛:可輸出 Sql 語句以及其執行時間。
二、多資料來源案例
1、專案結構
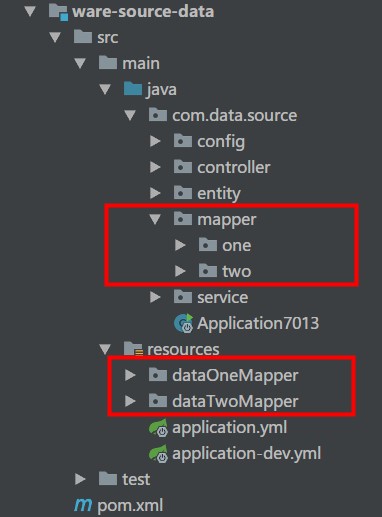
注意:mapper層和mapper.xml層分別放在不同目錄下,以便mybatis掃描載入。
2、多資料來源配置
spring:
  # 資料來源配置
  datasource:
    type: com.alibaba.druid.pool.DruidDataSource
    admin-data:
      driverClassName: com.mysql.jdbc.Driver
      dbUrl: jdbc:mysql://127.0.0.1:3306/cloud-admin-data?useUnicode=true&characterEncoding=UTF8&zeroDateTimeBehavior=convertToNull&useSSL=false
      username: root
      password: 123
      initialSize: 20
      maxActive: 100
      minIdle: 20
      maxWait: 60000
      poolPreparedStatements: true
      maxPoolPreparedStatementPerConnectionSize: 30
      timeBetweenEvictionRunsMillis: 60000
      minEvictableIdleTimeMillis: 30000
      maxEvictableIdleTimeMillis: 60000
      validationQuery: SELECT 1 FROM DUAL
      testOnBorrow: false
      testOnReturn: false
      testWhileIdle: true
      connectionProperties: druid.stat.mergeSql=true;druid.stat.slowSqlMillis=5000
      filters: stat,wall
    user-data:
      driverClassName: com.mysql.jdbc.Driver
      dbUrl: jdbc:mysql://127.0.0.1:3306/cloud-user-data?useUnicode=true&characterEncoding=UTF8&zeroDateTimeBehavior=convertToNull&useSSL=false
      username: root
      password: 123
      initialSize: 20
      maxActive: 100
      minIdle: 20
      maxWait: 60000
      poolPreparedStatements: true
      maxPoolPreparedStatementPerConnectionSize: 30
      timeBetweenEvictionRunsMillis: 60000
      minEvictableIdleTimeMillis: 30000
      maxEvictableIdleTimeMillis: 60000
      validationQuery: SELECT 1 FROM DUAL
      testOnBorrow: false
      testOnReturn: false
      testWhileIdle: true
      connectionProperties: druid.stat.mergeSql=true;druid.stat.slowSqlMillis=5000
      filters: stat,wall
這裡引數的形式是多樣的,只需要配置引數掃描即可。
3、引數掃描類
@Component
@ConfigurationProperties(prefix = "spring.datasource.admin-data")
public class DruidOneParam {
    private String dbUrl;
    private String username;
    private String password;
    private String driverClassName;
    private int initialSize;
    private int maxActive;
    private int minIdle;
    private int maxWait;
    private boolean poolPreparedStatements;
    private int maxPoolPreparedStatementPerConnectionSize;
    private int timeBetweenEvictionRunsMillis;
    private int minEvictableIdleTimeMillis;
    private int maxEvictableIdleTimeMillis;
    private String validationQuery;
    private boolean testWhileIdle;
    private boolean testOnBorrow;
    private boolean testOnReturn;
    private String filters;
    private String connectionProperties;
    // 省略 GET 和 SET
}
4、配置Druid連線池
@Configuration
@MapperScan(basePackages = {"com.data.source.mapper.one"},sqlSessionTemplateRef = "sqlSessionTemplateOne")
public class DruidOneConfig {
    private static final Logger LOGGER = LoggerFactory.getLogger(DruidOneConfig.class) ;
    @Resource
    private DruidOneParam druidOneParam ;
    @Bean("dataSourceOne")
    public DataSource dataSourceOne () {
        DruidDataSource datasource = new DruidDataSource();
        datasource.setUrl(druidOneParam.getDbUrl());
        datasource.setUsername(druidOneParam.getUsername());
        datasource.setPassword(druidOneParam.getPassword());
        datasource.setDriverClassName(druidOneParam.getDriverClassName());
        datasource.setInitialSize(druidOneParam.getInitialSize());
        datasource.setMinIdle(druidOneParam.getMinIdle());
        datasource.setMaxActive(druidOneParam.getMaxActive());
        datasource.setMaxWait(druidOneParam.getMaxWait());
        datasource.setTimeBetweenEvictionRunsMillis(druidOneParam.getTimeBetweenEvictionRunsMillis());
        datasource.setMinEvictableIdleTimeMillis(druidOneParam.getMinEvictableIdleTimeMillis());
        datasource.setMaxEvictableIdleTimeMillis(druidOneParam.getMaxEvictableIdleTimeMillis());
        datasource.setValidationQuery(druidOneParam.getValidationQuery());
        datasource.setTestWhileIdle(druidOneParam.isTestWhileIdle());
        datasource.setTestOnBorrow(druidOneParam.isTestOnBorrow());
        datasource.setTestOnReturn(druidOneParam.isTestOnReturn());
        datasource.setPoolPreparedStatements(druidOneParam.isPoolPreparedStatements());
        datasource.setMaxPoolPreparedStatementPerConnectionSize(druidOneParam.getMaxPoolPreparedStatementPerConnectionSize());
        try {
            datasource.setFilters(druidOneParam.getFilters());
        } catch (Exception e) {
            LOGGER.error("druid configuration initialization filter", e);
        }
        datasource.setConnectionProperties(druidOneParam.getConnectionProperties());
        return datasource;
    }
    @Bean
    public SqlSessionFactory sqlSessionFactoryOne() throws Exception{
        SqlSessionFactoryBean factory = new SqlSessionFactoryBean();
        ResourcePatternResolver resolver = new PathMatchingResourcePatternResolver();
        factory.setDataSource(dataSourceOne());
        factory.setMapperLocations(resolver.getResources("classpath*:/dataOneMapper/*.xml"));
        return factory.getObject();
    }
    @Bean(name="transactionManagerOne")
    public DataSourceTransactionManager transactionManagerOne(){
        return  new DataSourceTransactionManager(dataSourceOne());
    }
    @Bean(name = "sqlSessionTemplateOne")
    public SqlSessionTemplate sqlSessionTemplateOne() throws Exception {
        return new SqlSessionTemplate(sqlSessionFactoryOne());
    }
}
注意事項
- MapperScan 在指定資料來源上配置;
- SqlSessionFactory 配置掃描的Mapper.xml地址 ;
- DataSourceTransactionManager 配置該資料來源的事務;
- 兩個資料來源的配置手法相同,不贅述 ;
5、操作案例
- 資料來源一:簡單查詢
@Service
public class AdminUserServiceImpl implements AdminUserService {
    @Resource
    private AdminUserMapper adminUserMapper ;
    @Override
    public AdminUser selectByPrimaryKey (Integer id) {
        return adminUserMapper.selectByPrimaryKey(id) ;
    }
}
- 資料來源二:事務操作
@Service
public class UserBaseServiceImpl implements UserBaseService {
    @Resource
    private UserBaseMapper userBaseMapper ;
    @Override
    public UserBase selectByPrimaryKey(Integer id) {
        return userBaseMapper.selectByPrimaryKey(id);
    }
    // 使用指定資料來源的事務
    @Transactional(value = "transactionManagerTwo")
    @Override
    public void insert(UserBase record) {
        // 這裡資料寫入失敗
        userBaseMapper.insert(record) ;
        // int i = 1/0 ;
    }
}
注意:這裡的需要指定該資料來源配置的事務管理器。
三、MybatisPlus案例
1、核心依賴
<dependency>
    <groupId>com.baomidou</groupId>
    <artifactId>mybatis-plus-boot-starter</artifactId>
    <version>3.0.7.1</version>
    <exclusions>
        <exclusion>
            <groupId>com.baomidou</groupId>
            <artifactId>mybatis-plus-generator</artifactId>
        </exclusion>
    </exclusions>
</dependency>
<dependency>
    <groupId>com.baomidou</groupId>
    <artifactId>mybatis-plus</artifactId>
    <version>3.0.7.1</version>
</dependency>
2、配置檔案
mybatis-plus:
  mapper-locations: classpath*:/mapper/*.xml
  typeAliasesPackage: com.digital.market.*.entity
  global-config:
    db-config:
      id-type: AUTO
      field-strategy: NOT_NULL
      logic-delete-value: -1
      logic-not-delete-value: 0
    banner: false
  configuration:
    log-impl: org.apache.ibatis.logging.stdout.StdOutImpl
    map-underscore-to-camel-case: true
    cache-enabled: false
    call-setters-on-nulls: true
    jdbc-type-for-null: 'null'
3、分層配置
mapper層
UserBaseMapper extends BaseMapper<UserBase>
實現層
UserBaseServiceImpl extends ServiceImpl<UserBaseMapper,UserBase> implements UserBaseService
介面層
UserBaseService extends IService<UserBase>
4、mapper.xml檔案
<mapper namespace="com.plus.batis.mapper.UserBaseMapper" >
  <resultMap id="BaseResultMap" type="com.plus.batis.entity.UserBase" >
    <id column="id" property="id" jdbcType="INTEGER" />
    <result column="user_name" property="userName" jdbcType="VARCHAR" />
    <result column="pass_word" property="passWord" jdbcType="VARCHAR" />
    <result column="phone" property="phone" jdbcType="VARCHAR" />
    <result column="email" property="email" jdbcType="VARCHAR" />
    <result column="create_time" property="createTime" jdbcType="TIMESTAMP" />
    <result column="update_time" property="updateTime" jdbcType="TIMESTAMP" />
    <result column="state" property="state" jdbcType="INTEGER" />
  </resultMap>
  <sql id="Base_Column_List" >
    id, user_name, pass_word, phone, email, create_time, update_time, state
  </sql>
  <select id="selectByParam" parameterType="com.plus.batis.entity.QueryParam" resultMap="BaseResultMap">
    select * from hc_user_base
  </select>
</mapper>
注意事項
BaseMapper中的方法都已預設實現;這裡也可以自定義實現一些自己的方法。
5、演示介面
@RestController
@RequestMapping("/user")
public class UserBaseController {
    private static final Logger LOGGER = LoggerFactory.getLogger(UserBaseController.class) ;
    @Resource
    private UserBaseService userBaseService ;
    @RequestMapping("/info")
    public UserBase getUserBase (){
        return userBaseService.getById(1) ;
    }
    @RequestMapping("/queryInfo")
    public String queryInfo (){
        UserBase userBase1 = userBaseService.getOne(new QueryWrapper<UserBase>().orderByDesc("create_time")) ;
        LOGGER.info("倒敘取值:{}",userBase1.getUserName());
        Integer count = userBaseService.count() ;
        LOGGER.info("查詢總數:{}",count);
        UserBase userBase2 = new UserBase() ;
        userBase2.setId(1);
        userBase2.setUserName("spring");
        boolean resFlag = userBaseService.saveOrUpdate(userBase2) ;
        LOGGER.info("儲存更新:{}",resFlag);
        Map<String, Object> listByMap = new HashMap<>() ;
        listByMap.put("state","0") ;
        Collection<UserBase> listMap = userBaseService.listByMap(listByMap) ;
        LOGGER.info("ListByMap查詢:{}",listMap);
        boolean removeFlag = userBaseService.removeById(3) ;
        LOGGER.info("刪除資料:{}",removeFlag);
        return "success" ;
    }
    @RequestMapping("/queryPage")
    public IPage<UserBase> queryPage (){
        QueryParam param = new QueryParam() ;
        param.setPage(1);
        param.setPageSize(10);
        param.setUserName("cicada");
        param.setState(0);
        return userBaseService.queryPage(param) ;
    }
    @RequestMapping("/pageHelper")
    public PageInfo<UserBase> pageHelper (){
        return userBaseService.pageHelper(new QueryParam()) ;
    }
}
這裡pageHelper方法是使用PageHelper外掛自定義的方法。
四、原始碼地址
GitHub·地址
https://github.com/cicadasmile/middle-ware-parent
GitEE·地址
https://gitee.com/cicadasmile/middle-ware-parent
相關推薦
SpringBoot2 配置多資料來源,整合MybatisPlus增強外掛
本文原始碼:GitHub·點這裡 || GitEE·點這裡 一、專案案例簡介 1、多資料簡介 實際的專案中,經常會用到不同的資
springboot配置多資料來源並整合Druid
1.application.properties配置檔案 spring.datasource.type = com.alibaba.druid.pool.DruidDataSource #----DS1---- spring.datasource.primary.u
springboot配置多資料來源,註解操作資料庫
最近新搭建了一個專案,需要去不同的資料庫中查詢資料,需要多個數據源,在網上搜索了下,基本上實現都很複雜,下面我自己實現了一個很簡單的配置方法。 1、原來我們都是在application.yml檔案中配置資料來源,現在不需要在application.yml檔案中配置了。 &n
SpringBoot整合MybatisPlus配置多資料來源
首先建立SpringBoot專案,匯入web模組; 匯入依賴: <!--aop--> <dependency> <groupId>org.springframework.boot</groupId> <artifactId
springboot整合Mybatis配置多資料來源
springboot配置多資料來源有好幾種方式 1.application.properties配置 ## 埠 server.port=8080 # 資料庫訪問配置 spring.datasource.type=com.alibaba.druid.pool.DruidDataSource spri
springboot2.0配置多資料來源
SpringBoot 多資料來源 1.在開始之前需要宣告需要注意的一個點,在springboot2.0之後,在application.properties中datasource的url有所改動,需要修改為jdbc-url,下面我們基於JdbcTemplate介紹多資料來源的配置方式。 新增相
java配置多資料來源多連線池的工具類,這裡是mysql和mongoDB
public class DBManager { private static final String PREFIX="jdbc:apache:commons:dbcp:"; private static Log log =LogFactory.getLog(DBManager.clas
springboot+MybatisPlus配置多資料來源+aop切面
DataSource.java package com.ocean.dataSourceConfig; import java.lang.annotation.*; /** * Created with IDEA * author:QinWei * Date:2018/12/11 *
SSM整合系列之 配置多資料來源並實現手動切換資料來源可實現讀寫分離
摘要:在之前的開發中有很多場景用到了多資料來源的情況,如在做資料冷熱遷移的時候,將冷資料遷移到另一個庫,查詢冷資料時需要切換資料庫;在和天貓京東等電商對接時,因為有多套系統在同時使用,在客戶授權時,需要根據客戶使用的版本,儲存到對應的資料庫中。基於此,在這裡呢簡單實現一個SSM系統的多資
SSM整合系列之 配置多資料來源 利用AOP動態切換資料來源 實現讀寫分離
摘要:在開發的專案中大都都會使用讀寫分離的技術,本人目前開發的專案接觸到的都是主從複製(一主一從),就是一個Master資料庫,一個Slave資料庫。主庫負責資料插入、更新和實時資料查詢,從庫庫負責非實時資料查詢。在實際專案應用中,都是讀多寫少,而讀取資料通常比較複雜而且耗時,SQL語句
spring+mybatis配置多資料來源總結,重點是動態載入資料來源,支援動態切換
最近在做一款遊戲的GM管理平臺,需要連線遊戲的資料庫去查詢資料;由於遊戲的每個服的資料是獨立的,所以就有了連線多個數據庫的問題;經過一番查詢,好在mybatis的學習資源還少,很快找到了配置多資料來源的方法;感謝以下大牛分享的學習資源: http://lvdong5830
【SpringBoot】——SpringBoot 整合mybatis-plus 單資料來源 & 多資料來源,附原始碼
相信大家已經看了不少的教程了,所以在此我不在贅述。。。。。。 遇到的坑,在專案中readme.md 中有描述。具體下載下來配置比較詳細,初始化sql ,單元測試。。。檢視流程即可。 demo非常簡單,下載下來參考 readme.md 修改必要內容即可完成配
Spring3 整合MyBatis3 配置多資料來源 動態選擇SqlSessionFactory
1. Spring整合MyBatis切換SqlSessionFactory有兩種方法,第一、 繼承SqlSessionDaoSupport,重寫獲取SqlSessionFactory的方法。第二、繼承SqlSessionTemplate 重寫getSqlSessionFa
Spring3 整合MyBatis3 配置多資料來源 動態切換 選擇SqlSessionFactory
package com.hoo.framework.mybatis.support; import static java.lang.reflect.Proxy.newProxyInstance; import static org.apache.ibatis.reflection.Excepti
Spring Boot整合Druid配置多資料來源
Druid是阿里開發的資料庫連線池,功能強大,號稱Java語言中最好的資料庫連線池。本文主要介紹Srping Boot下用Druid配置多個數據源,demo環境為:Spring Boot 2.1.4.RELEASE、Druid 1.1.16。 1、引入依賴 <depen
Spring Boot入門系列(十四)使用JdbcTemplate操作資料庫,配置多資料來源!
前面介紹了Spring Boot 中的整合Mybatis並實現增刪改查、如何實現事物控制。不清楚的朋友可以看看之前的文章:https://www.cnblogs.com/zhangweizhong/category/1657780.html。 Spring Boot 除了Mybatis資料庫框架,還有Jdbc
springboot配置多資料來源之Spring Date JPA
多資料來源在專案開發中是經常遇到的,如果同一個專案的不同模組使用的是不同資料庫,就需要多資料來源的處理。現在先寫之前使用JPA的時候遇到多資料來源的配置,後續可能再來個關於mybatis的多資料來源配置。 現在有這樣的需求,專案中有兩個模組,分別是flow與imap,flow需要使用預設資料
spring boot 配置多資料來源
1.application.yml配置 server: port: 8088 spring: http: multipart: max-file-size: 50Mb max-request-size: 50Mb enabl
【Java】一次SpringMVC+ ibatis 配置多資料來源經歷
問題 如何在一個web專案中使用兩個資料來源,並且不同的介面可以按需選擇資料庫。 方案 最開始的做法 因為我們的專案用的是ibatis作為ORM框架,在其配置檔案中可以配置資料來源資訊,原始配置如下: spring-application.xm