
Springboot2.x + ShardingSphere 實現分庫分表
之前一篇文章中我們講了基於Mysql8的讀寫分離(文末有連結),這次來說說分庫分表的實現過程。
概念解析
垂直分片
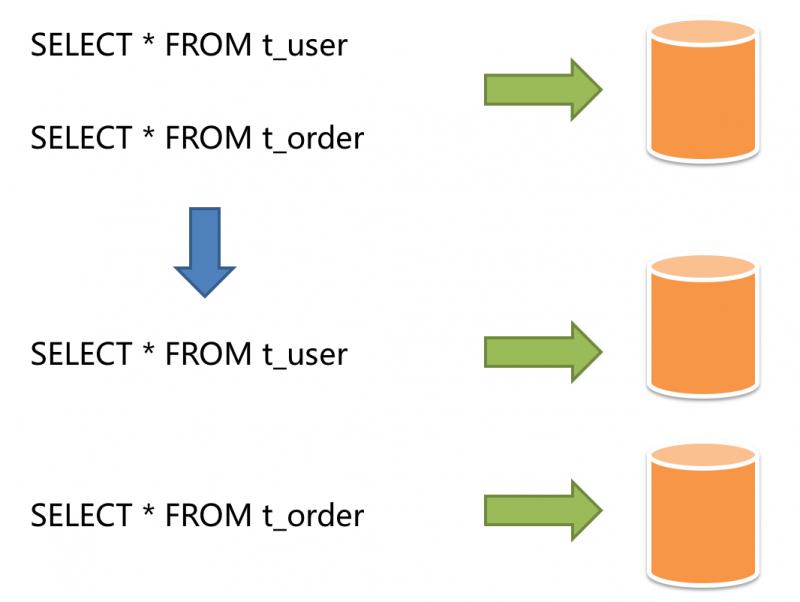
按照業務拆分的方式稱為垂直分片,又稱為縱向拆分,它的核心理念是專庫專用。 在拆分之前,一個數據庫由多個數據表構成,每個表對應著不同的業務。而拆分之後,則是按照業務將表進行歸類,分佈到不同的資料庫中,從而將壓力分散至不同的資料庫。 下圖展示了根據業務需要,將使用者表和訂單表垂直分片到不同的資料庫的方案。
垂直分片往往需要對架構和設計進行調整。通常來講,是來不及應對網際網路業務需求快速變化的;而且,它也並無法真正的解決單點瓶頸。 垂直拆分可以緩解資料量和訪問量帶來的問題,但無法根治。如果垂直拆分之後,表中的資料量依然超過單節點所能承載的閾值,則需要水平分片來進一步處理。
水平分片
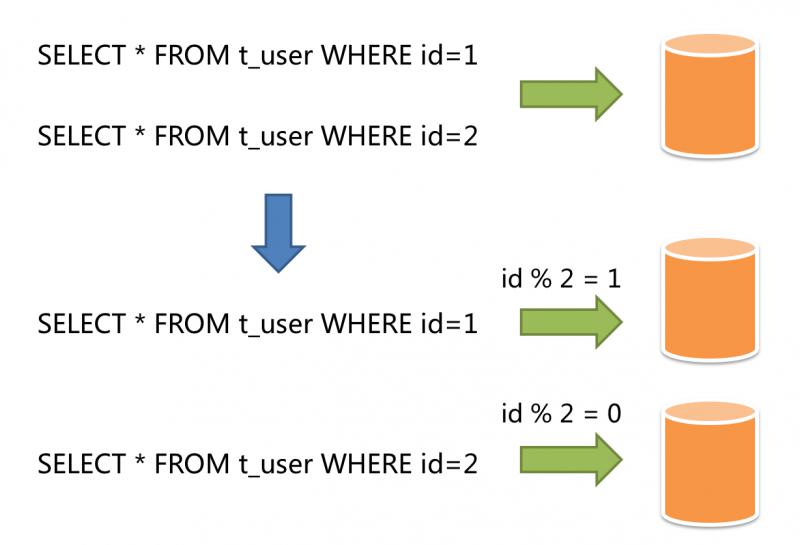
水平分片又稱為橫向拆分。 相對於垂直分片,它不再將資料根據業務邏輯分類,而是通過某個欄位(或某幾個欄位),根據某種規則將資料分散至多個庫或表中,每個分片僅包含資料的一部分。 例如:根據主鍵分片,偶數主鍵的記錄放入0庫(或表),奇數主鍵的記錄放入1庫(或表),如下圖所示。
水平分片從理論上突破了單機資料量處理的瓶頸,並且擴充套件相對自由,是分庫分表的標準解決方案。
開發準備
分庫分表常用的元件就是shardingsphere,目前已經是apache頂級專案,這次我們使用springboot2.1.9 + shardingsphere4.0.0-RC2(均為最新版本)來完成分庫分表的操作。
假設有一張訂單表,我們需要將它分成2個庫,每個庫三張表,根據id欄位取模確定最終資料的位置,資料庫環境配置如下:
- 172.31.0.129
- blog
- t_order_0
- t_order_1
- t_order_2
- blog
- 172.31.0.131
- blog
- t_order_0
- t_order_1
- t_order_2
- blog
三張表的邏輯表為t_order,大家可以根據建表語句準備好其他所有資料表。
DROP TABLE IF EXISTS `t_order_0;
CREATE TABLE `t_order_0` (
  `id` bigint(20) NOT NULL,
  `name` varchar(255) DEFAULT NULL COMMENT '名稱',
  `type` varchar(255) DEFAULT NULL COMMENT '型別',
  `gmt_create` timestamp NULL DEFAULT CURRENT_TIMESTAMP ON UPDATE CURRENT_TIMESTAMP COMMENT '建立時間',
  PRIMARY KEY (`id`)
) ENGINE=InnoDB DEFAULT CHARSET=utf8mb4 COLLATE=utf8mb4_0900_ai_ci;
注意,千萬不能將主鍵的生成規則設定成自增長,需要按照一定規則來生成主鍵,這裡使用shardingsphere中的SNOWFLAKE俗稱雪花演算法來生成主鍵
程式碼實現
- 修改pom.xml,引入相關元件
<properties>
        <java.version>1.8</java.version>
        <mybatis-plus.version>3.1.1</mybatis-plus.version>
        <sharding-sphere.version>4.0.0-RC2</sharding-sphere.version>
    </properties>

    <dependencies>
        <dependency>
            <groupId>org.springframework.boot</groupId>
            <artifactId>spring-boot-starter-web</artifactId>
        </dependency>

        <dependency>
            <groupId>org.mybatis.spring.boot</groupId>
            <artifactId>mybatis-spring-boot-starter</artifactId>
            <version>2.0.1</version>
        </dependency>

        <dependency>
            <groupId>mysql</groupId>
            <artifactId>mysql-connector-java</artifactId>
            <version>8.0.15</version>
        </dependency>

        <dependency>
            <groupId>com.baomidou</groupId>
            <artifactId>mybatis-plus-boot-starter</artifactId>
            <version>${mybatis-plus.version}</version>
        </dependency>

        <dependency>
            <groupId>org.apache.shardingsphere</groupId>
            <artifactId>sharding-jdbc-spring-boot-starter</artifactId>
            <version>${sharding-sphere.version}</version>
        </dependency>

        <dependency>
            <groupId>org.apache.shardingsphere</groupId>
            <artifactId>sharding-jdbc-spring-namespace</artifactId>
            <version>${sharding-sphere.version}</version>
        </dependency>

        <dependency>
            <groupId>org.projectlombok</groupId>
            <artifactId>lombok</artifactId>
            <optional>true</optional>
        </dependency>
        <dependency>
            <groupId>org.springframework.boot</groupId>
            <artifactId>spring-boot-starter-test</artifactId>
            <scope>test</scope>
        </dependency>
    </dependencies>

    <build>
        <plugins>
            <plugin>
                <groupId>org.springframework.boot</groupId>
                <artifactId>spring-boot-maven-plugin</artifactId>
            </plugin>
        </plugins>
</build>- 配置mysql-plus
    @Configuration
    @MapperScan("com.github.jianzh5.blog.mapper")
    public class MybatisPlusConfig {

            /**
             * 攻擊 SQL 阻斷解析器
             */
            @Bean
            public PaginationInterceptor paginationInterceptor(){
                    PaginationInterceptor paginationInterceptor = new PaginationInterceptor();
                    List<ISqlParser> sqlParserList = new ArrayList<>();
                    sqlParserList.add(new BlockAttackSqlParser());

                    paginationInterceptor.setSqlParserList(sqlParserList);
                    return new PaginationInterceptor();
            }


            /**
             * SQL執行效率外掛
             */
            @Bean
            // @Profile({"dev","test"})
            public PerformanceInterceptor performanceInterceptor() {
                    return new PerformanceInterceptor();
            }
}- 編寫實體類Order
    @Data
    @TableName("t_order")
    public class Order {
            private Long id;

            private String name;

            private String type;

            private Date gmtCreate;

}- 編寫DAO層,OrderMapper
    /**
     * 訂單Dao層
     */
    public interface OrderMapper extends BaseMapper<Order> {

}- 編寫介面及介面實現
    public interface OrderService extends IService<Order> {

    }

    /**
     * 訂單實現層
     * @author jianzh5
     * @date 2019/10/15 17:05
     */
    @Service
    public class OrderServiceImpl extends ServiceImpl<OrderMapper, Order> implements OrderService {

}- 配置檔案(配置說明見備註)
    server.port=8080

    # 配置ds0 和ds1兩個資料來源
    spring.shardingsphere.datasource.names = ds0,ds1

    #ds0 配置
    spring.shardingsphere.datasource.ds0.type = com.zaxxer.hikari.HikariDataSource
    spring.shardingsphere.datasource.ds0.driver-class-name = com.mysql.cj.jdbc.Driver
    spring.shardingsphere.datasource.ds0.jdbc-url = jdbc:mysql://192.168.249.129:3306/blog?characterEncoding=utf8&zeroDateTimeBehavior=convertToNull&useSSL=false
    spring.shardingsphere.datasource.ds0.username = root
    spring.shardingsphere.datasource.ds0.password = 000000

    #ds1 配置
    spring.shardingsphere.datasource.ds1.type = com.zaxxer.hikari.HikariDataSource
    spring.shardingsphere.datasource.ds1.driver-class-name = com.mysql.cj.jdbc.Driver
    spring.shardingsphere.datasource.ds1.jdbc-url = jdbc:mysql://192.168.249.131:3306/blog?characterEncoding=utf8&zeroDateTimeBehavior=convertToNull&useSSL=false
    spring.shardingsphere.datasource.ds1.username = root
    spring.shardingsphere.datasource.ds1.password = 000000

    # 分庫策略 根據id取模確定資料進哪個資料庫
    spring.shardingsphere.sharding.default-database-strategy.inline.sharding-column = id
    spring.shardingsphere.sharding.default-database-strategy.inline.algorithm-expression = ds$->{id % 2}

    # 具體分表策略
    # 節點 ds0.t_order_0,ds0.t_order_1,ds1.t_order_0,ds1.t_order_1
    spring.shardingsphere.sharding.tables.t_order.actual-data-nodes = ds$->{0..1}.t_order_$->{0..2}
    # 分表字段id
    spring.shardingsphere.sharding.tables.t_order.table-strategy.inline.sharding-column = id
    # 分表策略 根據id取模,確定資料最終落在那個表中
    spring.shardingsphere.sharding.tables.t_order.table-strategy.inline.algorithm-expression = t_order_$->{id % 3}


    # 使用SNOWFLAKE演算法生成主鍵
    spring.shardingsphere.sharding.tables.t_order.key-generator.column = id
    spring.shardingsphere.sharding.tables.t_order.key-generator.type = SNOWFLAKE

    #spring.shardingsphere.sharding.binding-tables=t_order

spring.shardingsphere.props.sql.show = true- 編寫單元測試,檢視結果是否正確
    public class OrderServiceImplTest extends BlogApplicationTests {
        @Autowired
        private OrderService orderService;


        @Test
        public void testSave(){
            for (int i = 0 ; i< 100 ; i++){
                Order order = new Order();
                order.setName("電腦"+i);
                order.setType("辦公");
                orderService.save(order);
            }
        }

        @Test
        public void testGetById(){
            long id = 1184489163202789377L;
            Order order  = orderService.getById(id);
            System.out.println(order.toString());
        }
    }
在資料表中檢視資料,確認資料正常插入

至此分庫分表開發完成
往期回顧
SpringBoot+Mysql8實現讀寫分離
歡迎關注我的個人公眾號:JAVA日知錄