品優購(IDEA版)-第二天
品優購-第2天
學習目標
目標1:運用AngularJS前端框架的常用指令
目標2:完成品牌管理的列表功能
目標3:完成品牌管理的分頁列表功能
目標4:完成品牌管理的增加功能
目標5:完成品牌管理的修改功能
目標6:完成品牌管理的刪除功能
目標7:完成品牌管理的條件查詢功能
目標N:通用Mapper
第1章 前端框架AngularJS入門
1.1 AngularJS簡介rJS
AngularJS 誕生於2009年,由Misko Hevery 等人建立,後為Google所收購。是一款優秀的前端JS框架,已經被用於Google的多款產品當中。AngularJS有著諸多特性,最為核心的是:MVC、模組化、自動化雙向資料繫結、依賴注入等等。

1.2 AngularJS四大特徵
1.2.1 MVC模式
Angular遵循軟體工程的MVC模式,並鼓勵展現,資料,和邏輯元件之間的鬆耦合.通過依賴注入(dependency injection),Angular為客戶端的Web應用帶來了傳統服務端的服務,例如獨立於檢視的控制。 因此,後端減少了許多負擔,產生了更輕的Web應用。
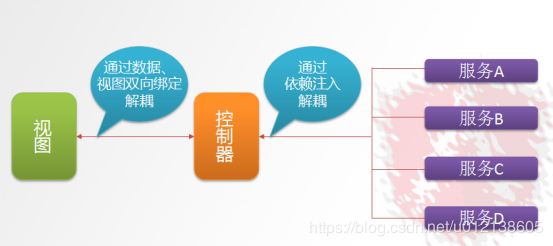
Model:資料,其實就是angular變數($scope.XX);
View: 資料的呈現,Html+Directive(指令);
Controller:操作資料,就是function,資料的增刪改查;
1.2.2 雙向繫結
AngularJS是建立在這樣的信念上的:即宣告式程式設計應該用於構建使用者介面以及編寫軟體構建,而指令式程式設計非常適合來表示業務邏輯。框架採用並擴充套件了傳統HTML,通過雙向的資料繫結來適應動態內容,雙向的資料繫結允許模型和檢視之間的自動同步。因此,AngularJS使得對DOM的操作不再重要並提升了可測試性。
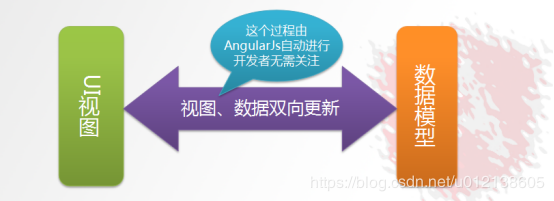
1.2.3 依賴注入
依賴注入(Dependency Injection,簡稱DI)是一種設計模式, 指某個物件依賴的其他物件無需手工建立,只需要“吼一嗓子”,則此物件在建立時,其依賴的物件由框架來自動建立並注入進來,其實就是最少知識法則;模組中所有的service和provider兩類物件,都可以根據形參名稱實現DI.
1.2.4 模組化設計
高內聚低耦合法則
1)官方提供的模組 ng、ngRoute、ngAnimate
2)使用者自定義的模組 angular.module(‘模組名’,[ ])
1.3 入門小Demo
1.3.1 表示式
<html>
<head>
    <title>入門小Demo-1</title>
    <script src="angular.min.js"></script>
</head>
<body ng-app>
{{100+100}}
</body>
</html>
執行結果如下:

表示式的寫法是{{表示式 }} 表示式可以是變數或是運算式
ng-app 指令 作用是告訴子元素以下的指令是歸angularJs的,angularJs會識別的
ng-app 指令定義了AngularJS 應用程式的 根元素。
ng-app 指令在網頁載入完畢時會自動引導(自動初始化)應用程式。
1.3.2 雙向繫結
<html>
<head>
    <title>入門小Demo-1  雙向繫結</title>
    <script src="angular.min.js"></script>
</head>
<body ng-app>
請輸入你的姓名:<input ng-model="myname">
<br>
{{myname}},你好
</body>
</html>
執行效果如下:

ng-model 指令用於繫結變數,這樣使用者在文字框輸入的內容會繫結到變數上,而表示式可以實時地輸出變數。
1.3.3 初始化指令
我們如果希望有些變數具有初始值,可以使用ng-init指令來對變數初始化:
<html>
<head>
    <title>入門小Demo-3  初始化</title>
    <script src="angular.min.js"></script>
</head>
<body ng-app   ng-init="myname='陳大海'">
請輸入你的姓名:<input ng-model="myname">
<br>
{{myname}},你好
</body>
</html>
1.3.4 控制器
<html>
<head>
    <title>入門小Demo-3  初始化</title>
    <script src="angular.min.js"></script>
    <script>
        var app=angular.module('myApp',[]); //定義了一個叫myApp的模組
        //定義控制器
        app.controller('myController',function($scope){
            $scope.add=function(){
                return parseInt($scope.x)+parseInt($scope.y);
            }
        });
    </script>
</head>
<body ng-app="myApp" ng-controller="myController">
x:<input ng-model="x" >
y:<input ng-model="y" >
運算結果:{{add()}}
</body>
</html>
執行結果如下:

ng-controller用於指定所使用的控制器。
理解 $scope:
$scope 的使用貫穿整個 AngularJS App 應用,它與資料模型相關聯,同時也是表示式執行的上下文.有了$scope就在檢視和控制器之間建立了一個通道,基於作用域檢視在修改資料時會立刻更新 $scope,同樣的$scope 發生改變時也會立刻重新渲染檢視.
1.3.5 事件指令
<html>
<head>
    <title>入門小Demo-5  事件指令</title>
    <script src="angular.min.js"></script>
    <script>
        var app=angular.module('myApp',[]); //定義了一個叫myApp的模組
        //定義控制器
        app.controller('myController',function($scope){
            $scope.add=function(){
                $scope.z= parseInt($scope.x)+parseInt($scope.y);
            }
        });
    </script>
</head>
<body ng-app="myApp" ng-controller="myController">
x:<input ng-model="x" >
y:<input ng-model="y" >
<button ng-click="add()">運算</button>
結果:{{z}}
</body>
</html>
執行結果:

ng-click 是最常用的單擊事件指令,再點選時觸發控制器的某個方法
1.3.6 迴圈陣列
<html>
<head>
    <title>入門小Demo-6  迴圈資料</title>
    <script src="angular.min.js"></script>
    <script>
        var app=angular.module('myApp',[]); //定義了一個叫myApp的模組
        //定義控制器
        app.controller('myController',function($scope){
            $scope.list= [100,192,203,434 ];//定義陣列
        });
    </script>
</head>
<body ng-app="myApp" ng-controller="myController">
<table>
<tr ng-repeat="x in list">
    <td>{{x}}</td>
</tr>
</table>
</body>
</html>
這裡的ng-repeat指令用於迴圈陣列變數。
執行結果如下:
1.3.7 迴圈物件陣列
<html>
<head>
    <title>入門小Demo-7  迴圈物件陣列</title>
    <script src="angular.min.js"></script>
    <script>
        var app=angular.module('myApp',[]); //定義了一個叫myApp的模組
        //定義控制器
        app.controller('myController',function($scope){
            $scope.list= [
                {name:'張三',shuxue:100,yuwen:93},
                {name:'李四',shuxue:88,yuwen:87},
                {name:'王五',shuxue:77,yuwen:56}
            ];//定義陣列
        });
    </script>
</head>
<body ng-app="myApp" ng-controller="myController">
<table>
<tr>
    <td>姓名</td>
    <td>數學</td>
    <td>語文</td>
</tr>
<tr ng-repeat="entity in list">
    <td>{{entity.name}}</td>
    <td>{{entity.shuxue}}</td>
    <td>{{entity.yuwen}}</td>
</tr>
</table>
</body>
</html>
執行結果如下:

1.3.8 內建服務
我們的資料一般都是從後端獲取的,那麼如何獲取資料呢?我們一般使用內建服務$http來實現。注意:以下程式碼需要在tomcat中執行。
<html>
<head>
    <title>入門小Demo-8  內建服務</title>
    <meta charset="utf-8" />
    <script src="angular.min.js"></script>
    <script>
        var app=angular.module('myApp',[]); //定義了一個叫myApp的模組
        //定義控制器
        app.controller('myController',function($scope,$http){
            $scope.findAll=function(){
                $http.get('data.json').success(
                    function(response){
                        $scope.list=response;
                    }
                );
            }
        });
    </script>
</head>
<body ng-app="myApp" ng-controller="myController" ng-init="findAll()">
<table>
<tr>
    <td>姓名</td>
    <td>數學</td>
    <td>語文</td>
</tr>
<tr ng-repeat="entity in list">
    <td>{{entity.name}}</td>
    <td>{{entity.shuxue}}</td>
    <td>{{entity.yuwen}}</td>
</tr>
</table>
</body>
</html>
建立檔案 data.json
[
    {"name":"張三","shuxue":100,"yuwen":93},
    {"name":"李四","shuxue":88,"yuwen":87},
    {"name":"王五","shuxue":77,"yuwen":56},
    {"name":"趙六","shuxue":67,"yuwen":86}
]
第2章 通用Mapper
2.1 通用Mapper介紹
通用 Mapper 提供了一些通用的方法,這些通用方法是以介面的形式提供的,它主要簡化了我們工作中常做的單表操作問題,讓MyBatis由面向過程轉換成了面向物件的操作方式,當然,MyBatis編寫SQL面向過程操作和通用Mapper面向物件操作可以共存。
為了方便測試,我們在parent工程中引入log日誌包,版本如下:
<slf4j.version>1.6.6</slf4j.version>
<log4j.version>1.2.12</log4j.version>
包引入如下:
<!-- log start -->
<dependency>
    <groupId>log4j</groupId>
    <artifactId>log4j</artifactId>
    <version>${log4j.version}</version>
</dependency>

<dependency>
    <groupId>org.slf4j</groupId>
    <artifactId>slf4j-api</artifactId>
    <version>${slf4j.version}</version>
</dependency>

<dependency>
    <groupId>org.slf4j</groupId>
    <artifactId>slf4j-log4j12</artifactId>
    <version>${slf4j.version}</version>
</dependency>
<!-- log end -->
log4j.properties
log4j.rootLogger=DEBUG,Console
log4j.appender.Console=org.apache.log4j.ConsoleAppender
log4j.appender.Console.layout=org.apache.log4j.PatternLayout
log4j.appender.Console.layout.ConversionPattern=%d [%t] %-5p [%c] - %m%n
log4j.logger.org.apache=DEBUG
2.2 配置介紹
使用通用通用Mapper首先需要引入依賴包。
<!--通用Mapper-->
<dependency>
    <groupId>tk.mybatis</groupId>
    <artifactId>mapper</artifactId>
</dependency>
替換MyBatis整合Spring的包掃描bean,修改pinyougou-mapper專案中spring-mybatis.xml
替換前:
<bean class="org.mybatis.spring.mapper.MapperScannerConfigurer"
   p:basePackage="com.pinyougou.mapper"
     p:sqlSessionFactoryBeanName="sqlSessionFactoryBean" />
替換後:
<bean class="tk.mybatis.spring.mapper.MapperScannerConfigurer"
     p:basePackage="com.pinyougou.mapper"
     p:sqlSessionFactoryBeanName="sqlSessionFactoryBean">
   <!--通用介面-->
   <property name="properties">
      <value>
         mappers=tk.mybatis.mapper.common.Mapper
      </value>
   </property>
</bean>
2.3 MyBatis+通用Mapper+Spring整合測試
在pinyougou-sellergoods-service編寫測試類
package com.pinyougou;
import org.junit.Before;
import org.junit.Test;
import org.springframework.context.ApplicationContext;
import org.springframework.context.support.ClassPathXmlApplicationContext;
public class MapperTest {
    private ApplicationContext act;
    @Before
    public void init(){
        act = new ClassPathXmlApplicationContext("classpath:spring/spring.xml");
    }
    @Test
    public void testSpring(){
        String[] names = act.getBeanDefinitionNames();

        for (String name : names) {
            System.out.println(name);
        }
    }
}
測試結果
addressMapper
areasMapper
brandMapper
citiesMapper
contentCategoryMapper
contentMapper
freightTemplateMapper
goodsDescMapper
goodsMapper
itemCatMapper
itemMapper
orderItemMapper
orderMapper
payLogMapper
provincesMapper
seckillGoodsMapper
seckillOrderMapper
sellerMapper
specificationMapper
specificationOptionMapper
typeTemplateMapper
userMapper
這裡可以看到每個介面都產生了一個代理物件,並且注入到Spring容器中,而每個介面都繼承了Mapper 介面,所以初步可以斷定,繼承通用Mapper成功,接著我們來使用通用Mapper實現增刪改查。
2.4通用Mapper的使用
2.4.1 增加操作
2.4.1.1 不忽略空值-insert
/***
 * 增加資料
 * 不忽略空值
 */
@Test
public void testInsert(){
    Brand brand = new Brand();
    brand.setName("深圳黑馬訓練營");
    //brand.setFirstChar("C");
    int acount = brandMapper.insert(brand);
    System.out.println(acount);
}
日誌:
當Brand的id、firstChar為空的時候,SQL語句仍然執行了插入操作。
==>  Preparing: INSERT INTO tb_brand ( id,name,first_char ) VALUES( ?,?,? )
==> Parameters: null, 深圳黑馬訓練營(String), null
1.4.1.2. 忽略空值-insertSelective
/***
 * 增加資料
 * 忽略空值
 */
@Test
public void testInsertSelective(){
    Brand brand = new Brand();
    brand.setName("傳智播客-黑馬訓練營");
    //brand.setFirstChar("C");
    int acount = brandMapper.insertSelective(brand);
    System.out.println(acount);
}
日誌:
當Brand的id、firstChar為空的時候,SQL語句沒有執行了插入操作。
==>  Preparing: INSERT INTO tb_brand ( name ) VALUES( ? )
==> Parameters: 傳智播客-黑馬訓練營(String)
2.4.2修改操作
2.4.2.1 根據主鍵修改資料-不忽略空值
/**
 * 需改操作
 * 不忽略空值
 */
@Test
public void testUpdateByPrimaryKey(){
    Brand brand = new Brand();
    brand.setId(25L);
    //brand.setName("深圳黑馬訓練營");
    brand.setFirstChar("S");
    //根據主鍵修改資料
    int mcount = brandMapper.updateByPrimaryKey(brand);
    System.out.println(mcount);
}
日誌:
當name為空的時候,SQL語句仍然執行修改。
==>  Preparing: UPDATE tb_brand SET name = ?,first_char = ? WHERE id = ?
==> Parameters: null, S(String), 25(Long)
2.4.2.2. 根據主鍵修改資料-忽略空值
/**
 * 需改操作
 * 忽略空值
 */
@Test
public void testUpdateByPrimaryKeySelective(){
    Brand brand = new Brand();
    brand.setId(25L);
    brand.setName("深圳黑馬訓練營");
    //brand.setFirstChar("S");
    //根據主鍵修改資料
    int mcount = brandMapper.updateByPrimaryKeySelective(brand);
    System.out.println(mcount);
}
日誌:
當name為空的時候,SQL語句不執行修改。
1
2
3
sql
==>  Preparing: UPDATE tb_brand SET name = ? WHERE id = ?
==> Parameters: 深圳黑馬訓練營(String), 25(Long)
2.4.2.3構造條件修改資料-不忽略空值
/**
 * 構造條件執行修改
 * 不忽略空值
 */
@Test
public void testUpdateByExample(){
    //firstChar=S
    Brand brand = new Brand();
    brand.setName("深圳市黑馬訓練營");

    //建立Example物件
    Example example = new Example(Brand.class);

    //Criteria 用來構造約束條件
    Example.Criteria criteria = example.createCriteria();

    //第一個引數是Brand對應的屬性,第二個引數是屬性約束值   相當於 where firstChar=S
    criteria.andEqualTo("firstChar","S");

    //條件修改資料
    int mcount = brandMapper.updateByExample(brand,example);
    System.out.println(mcount);
}
日誌:
criteria.andEqualTo(“firstChar”,“S”); 轉換成了這裡的SQL語句 where(first_char=?),這裡firstChart為空,但SQL語句仍然執行了修改。
1
2
==>  Preparing: UPDATE tb_brand SET name = ?,first_char = ? WHERE ( first_char = ? )
==> Parameters: 深圳市黑馬訓練營(String), null, S(String)
2.4.2.4 構造條件修改資料-忽略空值
/**
 * 構造條件執行修改
 * 忽略空值
 */
@Test
public void testUpdateByExampleSelective(){
    //firstChar=S
    Brand brand = new Brand();
    brand.setFirstChar("S");
    //建立Example物件
    Example example = new Example(Brand.class);
    //Criteria 用來構造約束條件
    Example.Criteria criteria = example.createCriteria();

    //第一個引數是Brand對應的屬性,第二個引數是屬性約束值   相當於 where name='深圳市黑馬訓練營'
    criteria.andEqualTo("name","深圳市黑馬訓練營");

    //條件修改資料
    int mcount = brandMapper.updateByExampleSelective(brand,example);
    System.out.println(mcount);
}
日誌:
這裡name為空,SQL語句並沒有做出修改操作。
==>  Preparing: UPDATE tb_brand SET first_char = ? WHERE ( name = ? )
==> Parameters: S(String), 深圳市黑馬訓練營(String)
2.4.3查詢操作
1.4.3.1. 根據主鍵查詢
/***
 * 根據主鍵查詢
 */
@Test
public void testSelectByPrimaryKey(){
    long id = 25L;
    Brand brand = brandMapper.selectByPrimaryKey(id);
    System.out.println(brand);
}
日誌:
==>  Preparing: SELECT id,name,first_char FROM tb_brand WHERE id = ?
==> Parameters: 25(Long)
Brand{id=25, name='深圳市黑馬訓練營', firstChar='S'}
2.4.3.1查詢單條記錄
/***
 * 查詢單個記錄
 */
@Test
public void testSelectOne(){
    Brand brand = new Brand();
    brand.setId(25L);
    brand.setName("深圳市黑馬訓練營");
    Brand brand1 = brandMapper.selectOne(brand);
    System.out.println(brand1);
}
日誌:
==>  Preparing: SELECT id,name,first_char FROM tb_brand WHERE id = ? AND name = ?
==> Parameters: 25(Long), 深圳市黑馬訓練營(String)
Brand{id=25, name='深圳市黑馬訓練營', firstChar='S'}
注意:
這裡需要注意一下,複合該條件的資料,資料庫裡必須<=1條,如果大於了1條資料,則會報錯
TooManyResultsException: Expected one result (or null) to be returned by selectOne(), but found: 32.4.3.2 根據條件查詢-Example
/***
 * 根據條件執行查詢
 */
@Test
public void testExample(){
    Example example = new Example(Brand.class);
    Example.Criteria criteria = example.createCriteria();
    //id IN(1,2,5,6)
    List<Long> ids = new ArrayList<Long>();
    ids.add(1L);
    ids.add(2L);
    ids.add(5L);
    ids.add(6L);

    //第二個引數是個集合物件即可,注意集合物件這裡對應的型別雖然是Object,不過要和你資料庫對應的型別保持一致
    criteria.andIn("id",ids);

    //執行查詢
    List<Brand> brands = brandMapper.selectByExample(example);

    for (Brand brand : brands) {
        System.out.println(brand);
    }
}
日誌:
==>  Preparing: SELECT id,name,first_char FROM tb_brand WHERE ( id in ( ? , ? , ? , ? ) )
==> Parameters: 1(Long), 2(Long), 5(Long), 6(Long)
Brand{id=1, name='聯想', firstChar='L'}
Brand{id=2, name='華為', firstChar='H'}
Brand{id=5, name='OPPO', firstChar='O'}
Brand{id=6, name='深圳市黑馬訓練營', firstChar='S'}
2.4.3.3 根據條件查詢-JavaBean
/***
 * 根據條件查詢
 * 入參:JavaBean
 */
@Test
public void testSelect(){
    Brand brand = new Brand();
    brand.setId(25L);
    brand.setName("深圳市黑馬訓練營");
    //把brand作為查詢條件,這裡會忽略空值
    List<Brand> brands = brandMapper.select(brand);
    for (Brand bd : brands) {
        System.out.println(bd);
    }
}
日誌:
==>  Preparing: SELECT id,name,first_char FROM tb_brand WHERE id = ? AND name = ?
==> Parameters: 25(Long), 深圳市黑馬訓練營(String)
Brand{id=25, name='深圳市黑馬訓練營', firstChar='S'}
2.4.3.4 查詢所有
/***
 * 查詢所有
 */
@Test
public void testSelectAll(){
    //執行查詢
    List<Brand> brands = brandMapper.selectAll();

    for (Brand brand : brands) {
        System.out.println(brand);
    }
}
日誌:
==>  Preparing: SELECT id,name,first_char FROM tb_brand
==> Parameters:
Brand{id=1, name='聯想', firstChar='L'}
Brand{id=2, name='華為', firstChar='H'}
Brand{id=3, name='深圳市黑馬訓練營', firstChar='S'}
...........................................
2.4.3.5 統計查詢
/***
 * 統計查詢-總記錄數
 */
@Test
public void testSelectCount(){
    //查詢總記錄數
    int count = brandMapper.selectCount(null);
    System.out.println(count);
}
日誌:
==>  Preparing: SELECT COUNT(id) FROM tb_brand
==> Parameters:
25
2.4.4 刪除操作
2.4.4.1 根據主鍵刪除
/***
 * 根據ID刪除
 */
@Test
public void testDeleteByPrimaryKey(){
    long id = 25;
    int dcount = brandMapper.deleteByPrimaryKey(id);
    System.out.println(dcount);
}
日誌:
==>  Preparing: DELETE FROM tb_brand WHERE id = ?
==> Parameters: 25(Long)
2.4.4.2 條件刪除-Example
/***
 * 條件刪除
 */
@Test
public void testDeleteByExample(){
    Example example = new Example(Brand.class);
    Example.Criteria criteria = example.createCriteria();
    //where id between 23 and 28
    criteria.andBetween("id",23L,28L);
    //根據條件刪除
    int dcount = brandMapper.deleteByExample(example);
    System.out.println(dcount);
}
日誌:
==>  Preparing: DELETE FROM tb_brand WHERE ( id between ? and ? )
==> Parameters: 23(Long), 28(Long)
2.4.4.3 條件刪除-JavaBean
/***
 * 條件刪除
 * 入參:javaBean
 */
@Test
public void testDelete(){
    Brand brand = new Brand();
    brand.setName("阿凡達");
    //根據條件刪除
    int dcount = brandMapper.delete(brand);
    System.out.println(dcount);
}
日誌:
==>  Preparing: DELETE FROM tb_brand WHERE name = ?
==> Parameters: 阿凡達(String)
第3章 分頁工具
在做專案的時候,分頁屬於很常見的,但通常都有繁瑣的封裝。這裡提供了一個通用分頁外掛pagehelper,能滿足我們工作中的基本需求。
3.1 配置介紹
首先需要引入對應的依賴
<!--分頁工具包-->
<dependency>
    <groupId>com.github.pagehelper</groupId>
    <artifactId>pagehelper</artifactId>
</dependency>
然後需要配置一個mybatis攔截器,在pinyougou-mapper專案的mybatis.xml中加入如下外掛程式碼
<plugins>
    <!-- com.github.pagehelper為PageInterceptor類所在包名 -->
    <plugin interceptor="com.github.pagehelper.PageInterceptor">
        <property name="reasonable" value="true"/>
    </plugin>
</plugins>
上述配置也可以不配置在mybatis.xml中,也可以配置在spring-mybatis.xml的SqlSessionFactoryBean中,程式碼如下:
<!-- SqlSessionFactoryBean -->
<bean id="sqlSessionFactoryBean" class="org.mybatis.spring.SqlSessionFactoryBean">
    <property name="configLocation" value="classpath:mybatis/mybatis.xml" />
    <property name="typeAliasesPackage" value="com.pinyougou.model" />
    <property name="mapperLocations">
        <list>
            <value>classpath:com/pinyougou/mapper/*Mapper.xml</value>
        </list>
    </property>
    <property name="dataSource" ref="dataSource" />

    <!--分頁外掛配置-->
    <property name="plugins">
        <array>
            <bean class="com.github.pagehelper.PageInterceptor">
                <!--配置分頁屬性-->
                <property name="properties">
                    <props>
                        <!--指定資料庫方言-->
                        <prop key="helperDialect">mysql</prop>
                        <!--合理化分頁操作-->
                        <prop key="reasonable">true</prop>
                    </props>
                </property>
            </bean>
        </array>
    </property>
</bean>
3.2 分頁類介紹
PageInfo類既包含我們工作中的分頁資訊,也包含分頁查詢的集合物件,所以很實用,如下程式碼:
public class PageInfo<T> implements Serializable {
    private static final long serialVersionUID = 1L;
    //當前頁
    private int pageNum;
    //每頁的數量
    private int pageSize;
    //當前頁的數量
    private int size;
    //當前頁面第一個元素在資料庫中的行號
    private int startRow;
    //當前頁面最後一個元素在資料庫中的行號
    private int endRow;
    //總記錄數
    private long total;
    //總頁數
    private int pages;
    //結果集
    private List<T> list;
    //前一頁
    private int prePage;
    //下一頁
    private int nextPage;
    //是否為第一頁
    private boolean isFirstPage = false;
    //是否為最後一頁
    private boolean isLastPage = false;
    //是否有前一頁
    private boolean hasPreviousPage = false;
    //是否有下一頁
    private boolean hasNextPage = false;
    //導航頁碼數
    private int navigatePages;
    //所有導航頁號
    private int[] navigatepageNums;
    //導航條上的第一頁
    private int navigateFirstPage;
    //導航條上的最後一頁
    private int navigateLastPage;
     //........略
}
3.3 分頁外掛的使用
分頁外掛的使用很簡單,配置好了後,直接呼叫PageHelper的靜態方法startPage即可實現分頁,其他查詢正常寫就行了,注意一點,呼叫startPage的方法必須寫在執行查詢selectAll()前面,否則分頁無效。
/**
 * 分頁測試
 */
@Test
public void testPage(){
    //page 當前頁    size 每頁顯示多少條
    int page = 1,size=10;
    //分頁處理,只需要呼叫PageHelper.startPage靜態方法即可。S
    PageHelper.startPage(page,size);

    //查詢
    List<Brand> brands = brandMapper.selectAll();

    //獲取分頁資訊,注意這裡傳入了brands集合物件
    PageInfo<Brand> pageInfo = new PageInfo<Brand>(brands);
    System.out.println(pageInfo);
}
日誌:
==>  Preparing: SELECT count(0) FROM tb_brand
==> Parameters:
------------------------------------------------------------------------------------------------------------------------------------------------
==>  Preparing: SELECT id,name,first_char FROM tb_brand LIMIT ?
==> Parameters: 10(Integer)
------------------------------------------------------------------------------------------------------------------------------------------------
PageInfo{pageNum=1, pageSize=10, size=10, startRow=1, endRow=10, total=22, pages=3, list=Page{count=true, pageNum=1, pageSize=10, startRow=0, endRow=10, total=22, pages=3, reasonable=true, pageSizeZero=false}, prePage=0, nextPage=2, isFirstPage=true, isLastPage=false, hasPreviousPage=false, hasNextPage=true, navigatePages=8, navigateFirstPage=1, navigateLastPage=3, navigatepageNums=[1, 2, 3]}
第4章 品牌列表的實現
品牌分頁實現,記得再pinyougou-sellergoods-interface中引入分頁包
<!--分頁工具包-->
<dependency>
    <groupId>com.github.pagehelper</groupId>
    <artifactId>pagehelper</artifactId>
</dependency>
4.1 需求分析
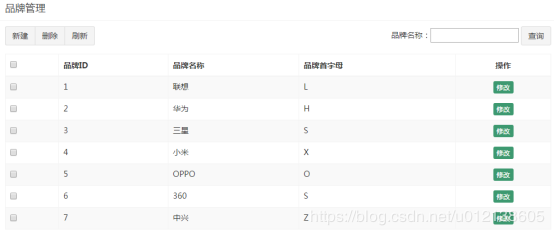
實現品牌列表的查詢(不用分頁和條件查詢)效果如下:
4.2 前端程式碼
4.2.1 拷貝資源
將“資源/靜態原型/運營商管理後臺”下的頁面資源拷貝到pinyougou-manager-web下
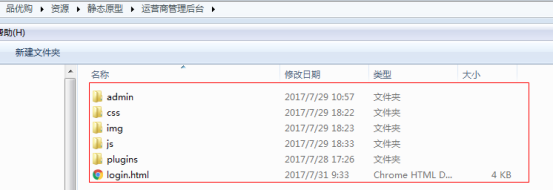
其中plugins資料夾中包括了angularJS 、bootstrap、JQuery等常用前端庫,我們將在專案中用到
4.2.2 引入JS
修改brand.html ,引入JS
<script src="/plugins/angularjs/angular.min.js"></script>指定模組和控制器
<body ng-app="pinyougou" ng-controller="brandController" class="hold-transition skin-red sidebar-mini">ng-app 指令中定義的就是模組的名稱
ng-controller 指令用於為你的應用新增控制器。
在控制器中,你可以編寫程式碼,製作函式和變數,並使用 scope 物件來訪問。
4.2.3 編寫JS程式碼
<script>
   /******
   * 1、引入angularjs
   * 2、傳送請求
   * 3、顯示資料
   *****/

   //定義一個模組
   var app = angular.module("pinyougou",[]);

   /*****
    * 定義一個controller
    * 傳送HTTP請求從後臺獲取資料
    ****/
   app.controller("brandController",function($scope,$http){
      //建立一個方法
      //獲取所有的品牌資訊
      $scope.getPage=function(page,size){
         //傳送請求獲取資料
         $http.post("/brand/list.shtml?page="+page+"&size="+size).success(function(response){
            //集合資料
            $scope.list = response.list;
         });
      }
   });
</script>
4.3.4 迴圈顯示錶格資料
<tbody>
<tr ng-repeat="entity in list">
   <td><input  type="checkbox" ng-model="id" ></td>
   <td>{{entity.id}}</td>
   <td>{{entity.name}}</td>
   <td>{{entity.firstChar}}</td>
   <td class="text-center">
      <button type="button" class="btn bg-olive btn-xs" data-toggle="modal" data-target="#editModal"  >修改</button>
   </td>
</tr>
</tbody>
4.3.5 初始化呼叫
<body ng-app="pinyougou" ng-controller="brandController" ng-init="getPage(1,10)" class="hold-transition skin-red sidebar-mini">第5章 品牌列表分頁的實現
5.1 需求分析
在品牌管理下方放置分頁欄,實現分頁功能
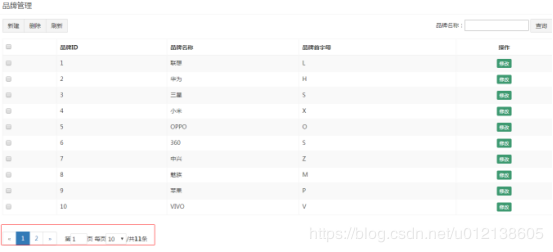
5.2 後端程式碼
5.2.1 服務介面層
在pinyougou-sellergoods-interface的BrandService.java 增加方法定義
/***
 * 分頁返回列表
 * @param pageNum
 * @param pageSize
 * @return
 */
public PageInfo<Brand> getAll(int pageNum, int pageSize);
5.2.2 服務實現層
在pinyougou-sellergoods-service的BrandServiceImpl.java中實現該方法y:
public PageInfo<Brand> getAll(int pageNum, int pageSize) {
    //執行分頁
    PageHelper.startPage(pageNum,pageSize);
    //List<Brand> all = brandMapper.getAllBrand();
    List<Brand> all = brandMapper.selectAll();

    PageInfo<Brand> pageInfo = new PageInfo<Brand>(all);
    return pageInfo;
}
PageHelper為MyBatis分頁外掛
5.2.3 控制層
在pinyougou-manager-web工程的BrandController.java新增方法
/***
 * 分頁查詢資料
 * 獲取JSON資料
 * @return
 */
@RequestMapping(value = "/list")
public PageInfo<Brand> list(@RequestParam(value = "page", required = false, defaultValue = "1") int page,
                            @RequestParam(value = "size", required = false, defaultValue = "10") int size) {
    return brandService.getAll(page, size);
}
5.3 前端程式碼控制層
5.3.1 HTML
在brand.html引入分頁元件
<!--分頁相關引入-->
<link rel="stylesheet" href="/plugins/angularjs/pagination.css">
<script src="/plugins/angularjs/pagination.js"></script>
構建app模組時引入pagination模組
//定義一個模組
var app = angular.module("pinyougou",["pagination"]); //引入分頁模組
頁面的表格下放置分頁元件
<!--分頁-->
<tm-pagination conf="paginationConf"></tm-pagination>
5.3.2 JS程式碼
在brandController中新增如下程式碼
/***
 * 分頁控制元件配置
 * currentPage:當前頁
 * totalItems:共有多少條記錄
 * itemsPerPage:每頁顯示多少條
 * perPageOptions:每頁多少條選項條
 * onChange:引數發生變化時執行
 * */
$scope.paginationConf = {
   currentPage: 1,
   totalItems: 10,
   itemsPerPage: 10,
   perPageOptions: [10, 20, 30, 40, 50],
   onChange: function(){
      $scope.reloadList();//重新載入
   }
};
//重新載入
$scope.reloadList=function(){
   $scope.getPage($scope.paginationConf.currentPage,$scope.paginationConf.itemsPerPage);
}
在頁面的body元素上去掉ng-init指令的呼叫
<body ng-app="pinyougou" ng-controller="brandController" class="hold-transition skin-red sidebar-mini">5.3.3 完整程式碼
<script>
   /******
    * 步驟分析:
    * 1、引入angularjs
    * 2、傳送請求
    * 3、顯示資料
    *****/
    //定義一個模組
   var app = angular.module("pinyougou",["pagination"]);

   /*****
    * 定義一個controller
    * 傳送HTTP請求從後臺獲取資料
    ****/
   app.controller("brandController",function($scope,$http){
      /***
       * 分頁控制元件配置
       * currentPage:當前頁
       * totalItems:共有多少條記錄
       * itemsPerPage:每頁顯示多少條
       * perPageOptions:每頁多少條選項條
       * onChange:引數發生變化時執行
       * */
      $scope.paginationConf = {
         currentPage: 1,
         totalItems: 10,
         itemsPerPage: 10,
         perPageOptions: [10, 20, 30, 40, 50],
         onChange: function(){
            $scope.reloadList();//重新載入
         }
      };

      //建立一個方法
      //獲取所有的品牌資訊
      $scope.getPage=function(page,size){
         //傳送請求獲取資料
         $http.post("/brand/list.shtml?page="+page+"&size="+size).success(function(response){
            //集合資料
            $scope.list = response.list;

            //分頁資料
            $scope.paginationConf.totalItems=response.total;
         });
      }

      //重新載入
      $scope.reloadList=function(){
         $scope.getPage($scope.paginationConf.currentPage,$scope.paginationConf.itemsPerPage);
      }
   });
</script>
5.3.4 效果
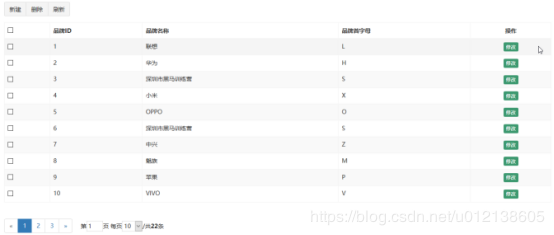
第6章 增加品牌
6.1 需求分析
實現品牌增加功能
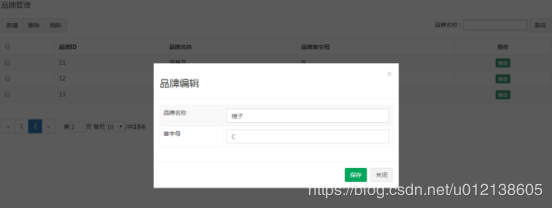
6.2 後端程式碼
6.2.1 控制層
在pinyougou-manager-web的BrandController中增加add方法,同時相應JSON資料。
/***
 * 增加品牌資料
 * @param brand
 * 響應資料:success
 *                  true:成功  false:失敗
 *           message
 *                  響應的訊息
 *
 */
@RequestMapping(value = "/add",method = RequestMethod.POST)
public Map<String,Object> add(@RequestBody Brand brand){
    //存放響應訊息
    Map<String,Object> dataMap = new HashMap<String,Object>();

    try {
        //執行增加
        int acount = brandService.add(brand);

        if(acount>0){
            //增加成功
            dataMap.put("success",true);
            dataMap.put("message","增加品牌成功");
        }
    } catch (Exception e) {
        e.printStackTrace();
        dataMap.put("success",false);
        dataMap.put("message","增加品牌失敗");
    }
    return dataMap;
}
6.2.2 服務介面層
在pinyougou-sellergoods-interface的BrandService.java新增方法定義
/***
 * 增加品牌資訊
 * @param brand
 * @return
 */
int add(Brand brand);
6.2.3 服務實現層
在com.pinyougou.sellergoods.service.impl的BrandServiceImpl.java實現該方法
@Override
public int add(Brand brand) {
    return brandMapper.insertSelective(brand);
}
6.3 前端程式碼
6.3.1 js程式碼
//新增品牌方法
$scope.save = function(){
   //傳送Http請求,執行增加
   $http.post("/brand/add.shtml",$scope.entity).success(function(response){
      //判斷執行狀態
      if(response.success){
         //重新載入新的資料
         $scope.reloadList();
      }else{
         //列印錯誤訊息
         alert(response.message);
      }
   });
}
6.3.2 html程式碼
繫結表單元素,我們用ng-model指令,繫結按鈕的單擊事件我們用ng-click
<!-- 編輯視窗 -->
<div class="modal fade" id="editModal" tabindex="-1" role="dialog" aria-labelledby="myModalLabel" aria-hidden="true">
   <div class="modal-dialog" >
      <div class="modal-content">
         <div class="modal-header">
            <button type="button" class="close" data-dismiss="modal" aria-hidden="true">×</button>
            <h3 id="myModalLabel">品牌編輯</h3>
         </div>
         <div class="modal-body">
            <table class="table table-bordered table-striped"  width="800px">
               <tr>
                  <td>品牌名稱</td>
                  <td><input ng-model="entity.name" class="form-control" placeholder="品牌名稱" >  </td>
               </tr>
               <tr>
                  <td>首字母</td>
                  <td><input ng-model="entity.firstChar"  class="form-control" placeholder="首字母">  </td>
               </tr>
            </table>
         </div>
         <div class="modal-footer">
            <button ng-click="save()" class="btn btn-success" data-dismiss="modal" aria-hidden="true">儲存</button>
            <button class="btn btn-default" data-dismiss="modal" aria-hidden="true">關閉</button>
         </div>
      </div>
   </div>
</div>
6.3.3 效果

6.4 增加快取解決
為了每次開啟視窗沒有遺留上次的資料,我們可以修改新建按鈕,對entity變數進行清空操作
<button ng-click="entity={}" type="button" class="btn btn-default" title="新建" data-toggle="modal" data-target="#editModal" ><i class="fa fa-file-o"></i> 新建</button>效果

6.5 封裝響應訊息體
6.5.1 封裝介紹
響應訊息體我們寫的是一個Map,每次需要用到的時候,都要重複建立這個Map物件,並重復給指定的key賦值,存在大量重複程式碼,而且每次key容易書寫錯,所以我們可以考慮封裝成一個實體Bean,名字叫Result,每次直接new Result()即可。
6.5.2 建立Result
由於Result可能會在很多專案中都會用到,所以我們可以考慮把它放到pinyougou-common專案中,在pinyougou-common中建立Result類
package com.pinyougou.http;
import java.io.Serializable;
public class Result implements Serializable {

    private boolean success;

    private String message;

    public Result(boolean success, String message) {
        this.success = success;
        this.message = message;
    }

    public Result(boolean success) {
        this.success = success;
    }

    public Result(String message) {
        this.message = message;
    }

    public Result() {
    }

    //get.. set.. toString..
}
6.5.3 依賴關係分析
無論是哪個專案都直接或者間接依賴了pinyougou-pojo,所以可以讓pojo依賴pinyougou-common,maven有依賴的傳遞性,則所有專案都會依賴pinyougou-common,而pinyougou-common主要用來寫一些常用的工具包,所以任何專案依賴他都合情合理。
在pinyougou-pojo的pom.xml中加入依賴
<!--依賴pinyougou-common-->
<dependency>
    <artifactId>pinyougou-common</artifactId>
    <groupId>com.pinyougou</groupId>
    <version>1.0-SNAPSHOT</version>
</dependency>
6.5.4 修改Controllerl
修改pinyougou-manager-web中的BrandController的add方法:
/***
 * 增加品牌資料
 * @param brand
 * 響應資料:success
 *                  true:成功  false:失敗
 *           message
 *                  響應的訊息
 *
 */
@RequestMapping(value = "/add",method = RequestMethod.POST)
public Result add(@RequestBody Brand brand){
    try {
        //執行增加
        int acount = brandService.add(brand);

        if(acount>0){
            //增加成功
           return new Result(true,"增加品牌成功");
        }
    } catch (Exception e) {
        e.printStackTrace();
    }
    return new Result(false,"增加品牌失敗");
}
第7章 修改品牌
7.1 需求分析
點選列表的修改按鈕,彈出視窗,修改資料後點“儲存”執行儲存操作,大概分為2個步驟。
第一:根據ID查詢出品牌資料,展示出來。
第二:根據使用者修改儲存資料。
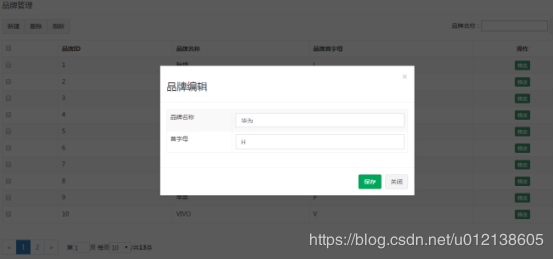
7.2 後端程式碼
7.2.1 控制層
在pinyougou-manager-web的BrandController中分別加入根據id查詢和修改品牌的方法
/***
 * 修改品牌資訊
 * @param brand
 * @return
 */
@RequestMapping(value = "/update",method = RequestMethod.POST)
public Result modify(@RequestBody Brand brand){
    try {
        //根據ID修改品牌資訊
        int mcount = brandService.updateBrandById(brand);
        if(mcount>0){
            return new Result(true,"品牌修改成功");
        }
    } catch (Exception e) {
        e.printStackTrace();
    }
    return new Result(false,"品牌修改失敗");
}

/***
 * 根據ID查詢品牌資訊
 * @param id
 * @return
 */
@RequestMapping(value = "/{id}",method = RequestMethod.GET)
public Brand getById(@PathVariable(value = "id")long id){
    //根據ID查詢品牌資訊
    Brand brand = brandService.getOneById(id);
    return brand;
}
7.2.2 服務介面層
在pinyougou-sellergoods-interface的BrandService.java新增方法定義
/***
 * 根據ID查詢品牌資訊
 * @param id
 * @return
 */
Brand getOneById(long id);

/***
 * 根據ID修改品牌資訊
 * @param brand
 * @return
 */
int updateBrandById(Brand brand);
7.2.3 服務實現層
在pinyougou-sellergoods-service的BrandServiceImpl.java新增方法實現
@Override
public Brand getOneById(long id) {
    return brandMapper.selectByPrimaryKey(id);
}

@Override
public int updateBrandById(Brand brand) {
    return brandMapper.updateByPrimaryKeySelective(brand);
}
7.3 前端程式碼
7.3.1 實現資料查詢
增加JS程式碼;
//根據ID查詢品牌資訊
$scope.getById=function(id){
   $http.get("/brand/"+id+".shtml").success(function(response){
      //將後臺的資料繫結到前臺
      $scope.entity=response;
   });
}
修改列表中的“修改”按鈕,呼叫此方法執行查詢實體的操作
<button ng-click="getById(entity.id)" type="button" class="btn bg-olive btn-xs" data-toggle="modal" data-target="#editModal">修改</button>7.3.2 儲存資料
修改JS的save方法
//新增或者修改品牌方法
$scope.save = function(){
   //傳送Http請求,執行增加
   var url="/brand/add.shtml";
   if($scope.entity.id!=null){
      //執行修改資料
      url="/brand/update.shtml";
   }
   //執行操作
   $http.post(url,$scope.entity).success(function(response){
      //判斷執行狀態
      if(response.success){
         //重新載入新的資料
         $scope.reloadList();
      }else{
         //列印錯誤訊息
         alert(response.message);
      }
   });
}
第8章 刪除品牌
8.1 需求分析
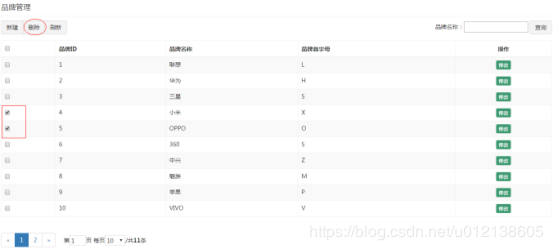
點選列表前的複選框,點選刪除按鈕,刪除選中的品牌。
8.2 後端程式碼
8.2.1 控制層
在BrandController中加入刪除方法
/***
 * 根據ID批量刪除
 * @param ids
 * @return
 */
@RequestMapping(value = "/delete")
public Result delete(@RequestBody List<Long> ids){
    try {
        //根據ID刪除資料
        int dcount = brandService.deleteByIds(ids);

        if(dcount>0){
            return new Result(true,"品牌刪除成功");
        }
    } catch (Exception e) {
        e.printStackTrace();
    }
    return new Result(false,"品牌刪除失敗");
}
8.2.2 服務介面層
在pinyougou-sellergoods-interface的BrandService.java介面定義方法
/***
 * 根據ID批量刪除品牌資訊
 * @param ids
 * @return
 */
int deleteByIds(List<Long> ids);
8.2.3 服務實現層
在pinyougou-sellergoods-service的BrandServiceImpl.java實現該方法
@Override
public int deleteByIds(List<Long> ids) {
    //建立Example,來構建根據ID刪除資料
    Example example = new Example(Brand.class);
    Example.Criteria criteria = example.createCriteria();

    //所需的SQL語句類似 delete from tb_brand where id in(1,2,5,6)
    criteria.andIn("id",ids);
    return brandMapper.deleteByExample(example);
}
8.3 前端程式碼
8.3.1 js
主要思路:我們需要定義一個用於儲存選中ID的陣列,當我們點選複選框後判斷是選擇還是取消選擇,如果是選擇就加到陣列中,如果是取消選擇就從陣列中移除。在點選刪除按鈕時需要用到這個儲存了ID的陣列。
這裡我們補充一下JS的關於陣列操作的知識
陣列的push方法:向陣列中新增元素
陣列的splice方法:從陣列的指定位置移除指定個數的元素 ,引數1為位置 ,引數2位移除的個數
複選框的checked屬性:用於判斷是否被選中:
//定義一個變數,用於儲存要刪除的品牌ID
$scope.selectids=[];

//判斷當前點選是否要刪除對應品牌
$scope.updateSelection=function($event,id){
   //判斷當前操作是否是選中複選框
   if($event.target.checked){
      //如果選中複選框,則將該id增加到陣列中去
      $scope.selectids.push(id);
   }else{
      //取消刪除,則從陣列中移除該id
      var idx = $scope.selectids.indexOf(id);   //獲取id對應的下標
      $scope.selectids.splice(idx, 1);//刪除對應下標的資料,1表示刪除的數量
   }
}


//批量刪除
$scope.delete=function(){
   $http.post("/brand/delete.shtml",$scope.selectids).success(function(response){
      //判斷刪除狀態
      if(response.success){
         $scope.reloadList();
      }else{
         alert(response.message);
      }
   });
}
8.3.2 HTML
修改列表的複選框
<input type="checkbox" ng-click="updateSelection($event,entity.id)" >修改刪除按鈕
<button ng-click="delete()" type="button" class="btn btn-default" title="刪除" ><i class="fa fa-trash-o"></i> 刪除</button>第9章 品牌條件查詢
9.1 需求分析
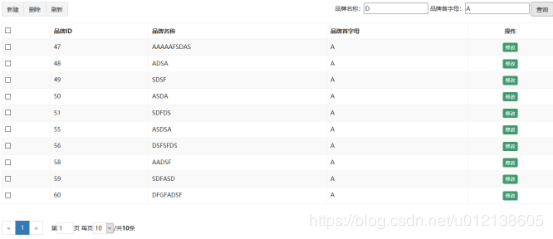
實現品牌條件查詢功能,輸入品牌名稱、首字母后查詢,並分頁。
9.2 後端程式碼
9.2.1 控制層
修改BrandController裡面的list方法
/***
 * 分頁查詢資料
 * 獲取JSON資料
 * @return
 */
@RequestMapping(value = "/list")
public PageInfo<Brand> list(@RequestBody Brand brand,@RequestParam(value = "page", required = false, defaultValue = "1") int page,
                            @RequestParam(value = "size", required = false, defaultValue = "10") int size) {
    return brandService.getAll(brand,page, size);
}
9.2.2 服務介面層
在pinyougou-sellergoods-interface工程的BrandService.java方法增加方法定義
/***
 * 分頁返回列表
 * @param pageNum
 * @param pageSize
 * @return
 */
public PageInfo<Brand> getAll(Brand brand,int pageNum, int pageSize);
9.2.3 服務實現層
在pinyougou-sellergoods-service工程BrandServiceImpl.java實現該方法
public PageInfo<Brand> getAll(Brand brand,int pageNum, int pageSize) {
    //執行分頁
    PageHelper.startPage(pageNum,pageSize);

    //條件查詢
    Example example = new Example(Brand.class);
    Example.Criteria criteria = example.createCriteria();

    if(brand!=null){
        //名字模糊搜尋
        if(StringUtils.isNotBlank(brand.getName())){
            criteria.andLike("name","%"+brand.getName()+"%");
        }

        //首字母搜尋
        if(StringUtils.isNotBlank(brand.getFirstChar())){
            criteria.andEqualTo("firstChar",brand.getFirstChar());
        }
    }
    //執行查詢
    List<Brand> all = brandMapper.selectByExample(example);
    PageInfo<Brand> pageInfo = new PageInfo<Brand>(all);


    //======================================================================
    //List<Brand> all = brandMapper.getAllBrand();
    /*List<Brand> all = brandMapper.selectAll();

    PageInfo<Brand> pageInfo = new PageInfo<Brand>(all);*/
    return pageInfo;
}
9.3 前端程式碼
修改pinyougou-manager-web的brand.html
9.3.1 增加搜尋塊
增加搜尋程式碼塊,並繫結一個搜尋物件。同時增加點選事件,調用搜索方法。
<div class="has-feedback">
   品牌名稱:<input ng-model="searchEntity.name">
   品牌首字母:<input ng-model="searchEntity.firstChar">
   <button ng-click="getPage(1,10)" class="btn btn-default">查詢</button>
</div>
9.3.2 js
定義一個搜尋物件,和搜尋條件那裡保持一致,並修改原來搜尋方法。
//條件查詢物件定義
$scope.searchEntity={};

//獲取所有的品牌資訊
$scope.getPage=function(page,size){
   //傳送請求獲取資料
   $http.post("/brand/list.shtml?page="+page+"&size="+size,$scope.searchEntity).success(function(response){
      //集合資料
      $scope.list = response.list;

      //分頁資料
      $scope.paginationConf.totalItems=response.total;
   });
}
9.3.3 效果
第二天需要的資料文
