
從零開始openGL——五、光線追蹤
前言
前面介紹了基本圖形、模型、曲線的繪製,但是,在好像還沒有感受到那種3D遊戲裡一些能驚豔到自己的效果,即真實感還不是很足。這篇文章中介紹的光線追蹤,是實現真實感必不可少的。拿下面的兩張圖片來對比


對比一下是不是被下面這張圖片的效果驚豔到了?可以很明顯感覺到,下面的這個圖片效果要好的多。這篇部落格將介紹如何實現這樣的效果。
光線求交
這裡暫時只介紹光線與球面和三角面片的求交
光線與球面相交
射線的方程:
\[
R(t) = A+tD
\]
球面的隱式方程:
\[
(X-C)^2=r^2
\]
聯立兩式:
\[
(A+tD-C)^2=r^2
\]
然後通過判別式:\[\Delta=4[(A-C) \cdot D]^2 - 4(A-C)^2+r^2\]來判斷是否相交。
交點法向量:
\[
N=\frac{P-C}{||P-C||}
\]
bool Sphere::intersectLocal( const ray& r, isect& i ) const
{
    // YOUR CODE HERE:
    // 光線與球面相交
    // Add sphere intersection code here.
    Vec3d A = r.getPosition();
    Vec3d D = r.getDirection();
    Vec3d C= Vec3<double>();
    double _r = 1.0;
    double a = D.length2();
    double b = 2 * (A - C) * D;
    double c = (A - C).length2() - _r;
    double delta = b * b - 4 * a * c;
    // it currently ignores all spheres and just return false.
    if (delta >= 0) {
        double t1 = (-b + sqrt(delta)) / (2 * a);
        double t2 = (-b - sqrt(delta)) / (2 * a);
        if (t1 <= RAY_EPSILON)
            return false;
        else {
            double t;
            if (t2 <= RAY_EPSILON) {
                t = t1;
                i.outsideTheObject = false;
            }
            else {
                t = t2;
                i.outsideTheObject = true;
            }
            // 焦點設定
            i.obj = this;
            i.setT(t);
            Vec3d P = r.at(t);
            Vec3d Normal = P;
            if (D*Normal > 0)
                Normal = -Normal;
            Normal.normalize();
            i.setN(Normal);
            return true;
        }
    }
    return false;
}
光線與三角面片相交
射線的方程:
\[
R(t) = A+tD
\]
三角面片點法式方程:
\[
N(p-p_1)=0
\]
聯立兩式得:
\[
t=\frac{N\cdot p_1 - N \cdot A}{n\cdot D}
\]
求出t後,便得到交點座標,然後可通過同向法來判別交點是否在平面內。

// Calculates and returns the normal of the triangle too.
bool TrimeshFace::intersectLocal(const ray& r, isect& i) const
{
    // YOUR CODE HERE:
    // Add triangle intersection code here.
    // it currently ignores all triangles and just return false.
    //
    // Note that you are only intersecting a single triangle, and the vertices
    // of the triangle are supplied to you by the trimesh class.
    //
    // You should retrieve the vertices using code like this:
    //
    // const Vec3d& a = parent->vertices[ids[0]];
    // const Vec3d& b = parent->vertices[ids[1]];
    // const Vec3d& c = parent->vertices[ids[2]];
    const Vec3d& a = parent->vertices[ids[0]];
    const Vec3d& b = parent->vertices[ids[1]];
    const Vec3d& c = parent->vertices[ids[2]];

    Vec3d edge1 = b - a;
    Vec3d edge2 = c - a;
    // 計算平面法向量
    Vec3d nor = edge1 ^ edge2;
    nor.normalize();

    // 判斷是否與平面平行
    float x = nor * r.getDirection();
    if (x == 0)
        return false;
    // Ax + By + Cz = d
    float d = nor * a;
    float t = (d - nor * r.getPosition()) / x;
    if (t <= RAY_EPSILON)
        return false;
    Vec3d intersection_point = r.at(t);
    Vec3d edge3 = intersection_point - a;
    // 同向法判斷是否在平面內
    if (((b - a) ^ (intersection_point - a)) * nor <= 0)
        return false;
    else if (((c - b) ^ (intersection_point - b)) * nor <= 0)
        return false;
    else if (((a - c) ^ (intersection_point - c)) * nor <= 0)
        return false;
    else {
        //交點設定
        i.obj = this;
        i.setT(t);
        i.setN(nor);
        return true;
    }

}
當然,這裡還可以使用重心座標法來實現
光線衰減
在現實場景中,光線也是會衰減的,比如看同一場景,距離遠近不同看到的清晰度也就不同,這是距離衰減。還有陰影衰減,當有物體遮擋住部分光的時候,會形成一定的陰影,這就是陰影衰減產生的效果。
距離衰減
點光源:
\[
A_{j}^{d i s t}=\min \left\{1, \frac{1}{a_{j}+b_{j} r_{j}+c_{j} r_{j}^{2}}\right\}
\]
double PointLight::distanceAttenuation( const Vec3d& P ) const
{
    // You'll need to modify this method to attenuate the intensity
    // of the light based on the distance between the source and the
    // point P.  For now, we assume no attenuation and just return 1.0
    Vec3d d = P - position;
    double r = d.length(); //距離
    return min(1.0, 1.0 / (constantTerm + linearTerm * r + quadraticTerm * r*r));
//  return 1.0;
}
平行光源:
double DirectionalLight::distanceAttenuation( const Vec3d& P ) const
{
    // distance to light is infinite, so f(di) goes to 0.  Return 1.
    return 1.0;
}
陰影衰減
點光源:
首先判斷光線是否被遮擋,然後再判斷是否超出光強所能打到的距離
Vec3d PointLight::shadowAttenuation(const Vec3d& P) const
{
    // YOUR CODE HERE:
    // You should implement shadow-handling code here.
    Vec3d d = getDirection(P);
    isect i;
    ray shadowRay(P, d);
    if (this->getScene()->intersect(shadowRay, i)) {
        double tLight = (P - position).length();
        if (i.t < tLight)
            return Vec3d(0, 0, 0);
        else
            return Vec3d(1, 1, 1);
    }
    return Vec3d(1,1,1);
}
平行光:
只需判斷是否被遮擋即可
Vec3d DirectionalLight::shadowAttenuation( const Vec3d& P ) const
{
    // YOUR CODE HERE:
    Vec3d d = getDirection(P);
    isect i;
    ray shadowRay(P, d);
    if (this->getScene()->intersect(shadowRay, i)) {
        return Vec3d(0, 0, 0);
    }
    // You should implement shadow-handling code here.
    return Vec3d(1,1,1);
}
光線追蹤
先來份虛擬碼

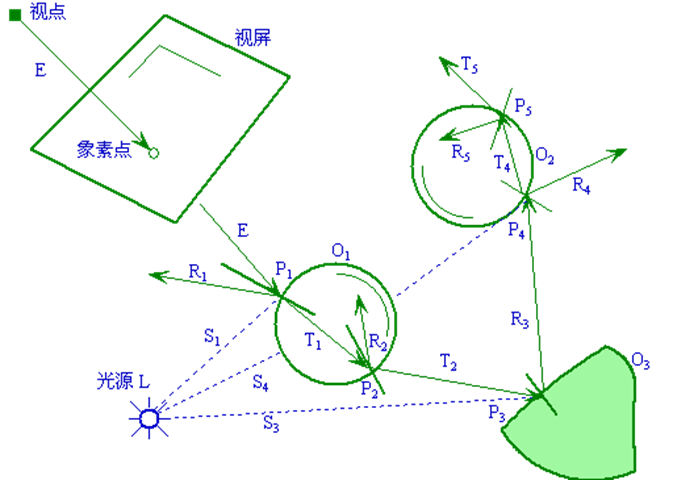
光線跟蹤中的四種射線:
視線:由視點與象素(x,y)發出的射線
陰影測試線:物體表面上點與光源的連線
反射光線
折射光線
光線追蹤的過程
phong光照模型
由物體表面上一點P反射到視點的光強I為環境光的反射光強\(I_e\)、理想漫反射光強\(I_d\)、和鏡面反射光\(I_s\)的總和,即
\[
I=I_ak_a + I_lk_d(L \cdot N)+k_s\sum_{i=1}^{m}[I_{pi}(R \cdot V)^n]
\]
在washington CSE 457的課件中給出的公式為
\[
l_{\text {direct }}=k_{e}+k_{e} I_{L s}+\sum_{f} A_{j}^{\text {shadow}} A_{j}^{\text {dist}} I_{L j} B_{j}\left[k_{d}\left(\mathbf{N} \cdot \mathbf{L}_{j}\right)+k_{s}\left(\mathbf{N} \cdot \mathbf{H}_{j}\right)^{n_{s}}\right]
\]
其中\(k_d\)項表示漫反射,採用Lamber模型,\(k_s\)項表示鏡面反射
\[
I_{d}=I_{p} K_{d} *(L \cdot N)
\]
\[ I_{s}=k_{s} I_{p}(R \cdot V)^{n} \]
即可寫出下列程式碼
// Apply the Phong model to this point on the surface of the object, returning
// the color of that point.
Vec3d Material::shade( Scene *scene, const ray& r, const isect& i ) const
{
    // YOUR CODE HERE

    // For now, this method just returns the diffuse color of the object.
    // This gives a single matte color for every distinct surface in the
    // scene, and that's it.  Simple, but enough to get you started.
    // (It's also inconsistent with the Phong model...)

    // Your mission is to fill in this method with the rest of the phong
    // shading model, including the contributions of all the light sources.
    // You will need to call both distanceAttenuation() and shadowAttenuation()
    // somewhere in your code in order to compute shadows and light falloff.
    if( debugMode )
        std::cout << "Debugging the Phong code (or lack thereof...)" << std::endl;

    Vec3d pos = r.at(i.t);
    Vec3d N = i.N;
    N.normalize();
    Vec3d Ip, L, H, Atten;
    Vec3d shadow = ke(i) + prod(scene->ambient(), ka(i));
    for (vector<Light*>::const_iterator litr = scene->beginLights();
        litr != scene->endLights(); ++litr) {
        Light* pLight = *litr;
        Ip = pLight->getColor(pos);
        L = pLight->getDirection(pos);
        H = -r.getDirection() + L;  H.normalize();
        Atten = pLight->distanceAttenuation(pos)*pLight->shadowAttenuation(pos);
        shadow += prod(Atten, prod(Ip, kd(i)*(L*N) + ks(i)*pow(H*N, 256)));
    }
    return shadow;
}
反射方向
這裡的反射指的是鏡面反射
計算公式:
\[
R=2(V\cdot N)N-V
\]
為什麼是這樣呢?首先來看\(V\cdot N\),這裡N是交點處的法向量,並且是單位向量,那個即視線在法向量上的投影,再乘法向量的兩倍,得到的是平行四邊形的對角線,減去V便是反射後的光線的方向。

折射方向
跟反射方向一樣都是公式推導
\[
\begin{array}{l}{\eta=\frac{\eta_{i}}{\eta_{t}}} \\ \eta_{i} \sin \theta_{i}=\eta_{t} \sin \theta_{t} \\ {\cos \theta_{i}=\mathbf{N} \cdot \mathbf{V}} \\ {\cos \theta_{t}=\sqrt{1-\eta^{2}\left(1-\cos ^{2} \theta_{i}\right)}} \\ {\mathbf{T}=\left(\eta \cos \theta_{i}-\cos \theta_{t}\right) \mathbf{N}-\eta \mathbf{V}}\end{array}
\]

終止條件
經過上述的介紹,很容易可以想到,什麼時候終止光線追蹤
該光線未碰到任何物體
該光線碰到了背景
光線在經過許多次反射和折射以後,就會產生衰減,光線對於視點的光強貢獻很小(小於某個設定值)。
光線反射或折射次數即跟蹤深度大於一定值
因此,光線追蹤的程式碼實現如下
// Do recursive ray tracing!  You'll want to insert a lot of code here
// (or places called from here) to handle reflection, refraction, etc etc.
Vec3d RayTracer::traceRay( const ray& r,
    const Vec3d& thresh, int depth )
{
    isect i;

    if( scene->intersect( r, i ) && depth >= 0) {
        const Material& m = i.getMaterial();

        //計算光源直射
        Vec3d I = m.shade(scene, r, i);

        //計算反射遞迴
        Vec3d Q = r.at(i.t);
        Vec3d R = r.getDirection() - 2 * (r.getDirection()*i.N)*i.N;
        R.normalize();
        I += prod(m.kr(i), traceRay(ray(Q, R), thresh, depth - 1));

        //計算折射遞迴
        double cosThetaI = -i.N*r.getDirection();
        double eta = (i.outsideTheObject) ? 1.0003 / m.index(i) : m.index(i) / 1.0003;
        if (eta*eta*(1 - cosThetaI * cosThetaI) < 1) {
            double cosThetaT = sqrt(1 - eta * eta*(1 - cosThetaI * cosThetaI));
            Vec3d T = (eta*cosThetaI - cosThetaT)*i.N - eta * r.getDirection();
            T.normalize();
            I += prod(m.kt(i), traceRay(ray(Q, -T), thresh, depth - 1));
        }
        return I;
        // An intersection occured!  We've got work to do.  For now,
        // this code gets the material for the surface that was intersected,
        // and asks that material to provide a color for the ray.

        // This is a great place to insert code for recursive ray tracing.
        // Instead of just returning the result of shade(), add some
        // more steps: add in the contributions from reflected and refracted
        // rays.

        //const Material& m = i.getMaterial();
        //return m.shade(scene, r, i);

    } else {
        // No intersection.  This ray travels to infinity, so we color
        // it according to the background color, which in this (simple) case
        // is just black.

        return Vec3d( 0.0, 0.0, 0.0 );
    }
}
小節
到這裡,光線追蹤也就差不多介紹完了,這一系列部落格也算是收尾了。那天在課上聽其他同學展示的的時候,說是我的世界有部分的開源原始碼,裡面有一個可以實現光追的介面,有興趣的小夥伴可以去康康,似乎那個僅僅實現光追還無法達到很好的效果,還要加上路線追蹤,emmmmm。。。。期末考完有空了我再去康康,明早圖形學考試祝我好運